
Categorías populares
¿Buscas un hilo?


Comentarios / Preguntas (113)
![]() Brenda escribió:
Brenda escribió:
Any chance of doing a video tutorial on you-tube. I really like this headband, but am confused with the written pattern.
01.12.2022 - 01:02DROPS Design respondió:
Dear Brenda, you will find videos relative to the techniques used in that pattern at the bottom of the pattern, feel free to ask your question here so that we can help you further in the part of the pattern you don't understand. Happy knitting!
01.12.2022 - 11:46
![]() Kathy escribió:
Kathy escribió:
I am on the first increase row to 24 stitches and following the established rib pattern but there are not enough stitches to complete the rib pattern! What do I do?
11.10.2021 - 01:08DROPS Design respondió:
Hi Kathy, You increase all P1 to P2 (5 stitches increased) which gives you 24 stitches. You now have 1 stitch in garter stitch, 5 x K2, P2 (20 stitches), K2 and 1 stitch in garter stitch = 24 stitches. Happy knitting!
11.10.2021 - 07:04
![]() Iris escribió:
Iris escribió:
Hallo! Ich bin ziemliche Anfängerin und komme mit der Anleitung nicht ganz zurecht. Betrifft das Fertigstellen des Stirnbands mit den Maschen auf einem Hilfsfaden. Habe leider auch kein passendes Videotutorial dazu finden können. Wie lange muß der Hilfsfaden sein? und wird er mithineingenäht? Danke im Voraus für die Hilfe!
01.01.2021 - 22:03DROPS Design respondió:
Liebe Iris, die stillgelegten Maschen werden wie in diesem Video zusammen mit der Anschlagskante - wie in diesem Video zusammen genäht, dh so eine "Mischung" je nach den Maschen. Viel Spaß beim zusammennähen!
04.01.2021 - 14:43
![]() Diana Connolly escribió:
Diana Connolly escribió:
This increase is called a make 1 in English. If you’d written it like this many here wouldn’t have had so many problems, make 1 is a term used when you increase by picking up the loop between stitches. Hope this helps.
27.10.2020 - 21:20
![]() Kirsty escribió:
Kirsty escribió:
Hi, wow many thanks for your helpful video reply. I really appreciate it. Love your site. Well wishes, Kirsty
28.06.2020 - 20:24
![]() Sherie Rodrigues escribió:
Sherie Rodrigues escribió:
To all the knitters who commented and asked questions, and to all the staff who answered the questions, I say THANK YOU. Without your help I may not have worked the pattern out by myself, but I am so glad I did. It is simple, when the light bulb goes off. I would suggest you look at the questions and answers until it makes sense. I do so LOVE this pattern . Thanks again everyone. Regards and happy knitting.
10.06.2020 - 15:30
![]() Karren escribió:
Karren escribió:
Thank you so much for the guidance in my pattern. I am almost finished and think I will love it. Karren
18.04.2020 - 01:05
![]() Karren escribió:
Karren escribió:
I do not understand what I am supposed to do on the wrong side of the pattern in between the increase rows. The increases occur on the right side. Does the ribbing continue through out the whole pattern?
17.04.2020 - 00:53DROPS Design respondió:
Dear Karren, you increase in the P-sections seen from RS (these sts are worked K from WS), when working from WS you will K over K and P over P, and the number of K stitches from WS will increase (then decrease on the 2nd half of piece) as the P stitches from WS increases. Happy knitting!
17.04.2020 - 09:01
![]() Judith escribió:
Judith escribió:
I was sold a yarn that gets 2 st/inch on an 8 needle and is not too stiff. will the pattern work as written? Do I knit first stitch, then do the edge stitch? hat seem strange to me, so I am asking. I thought the edge stitch would be first. Thank you
16.12.2019 - 04:45DROPS Design respondió:
Dear Judith, please check your tension - read more here about tension. Pattern is worked in rib with 1 edge stitch in garter stitch on each side. Happy knitting!
16.12.2019 - 09:10
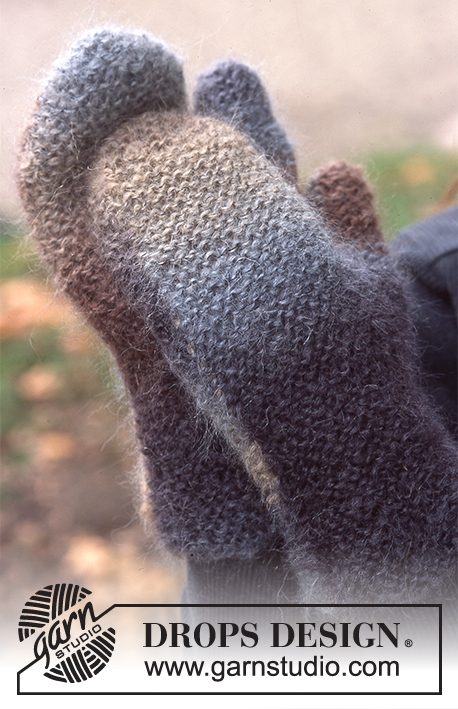
![]() Shannon escribió:
Shannon escribió:
What is the multi colored yarn in the second picture?
14.12.2019 - 04:07DROPS Design respondió:
Dear Shannon, in the second picture, the mittens are made with Vivaldi ( from group C) but this yarn is discontinued. Happy knitting!
15.12.2019 - 18:41
|
|
Saturn Rings |
|
|
|
|
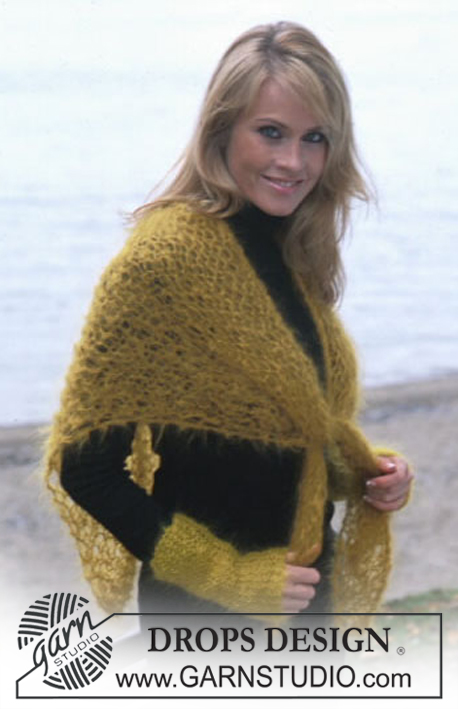
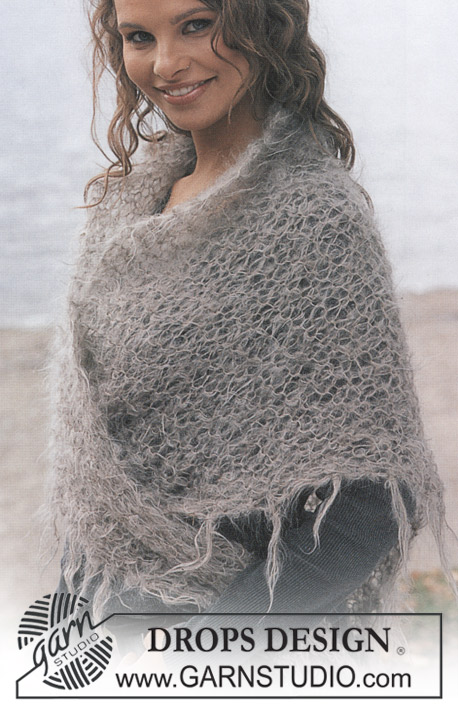
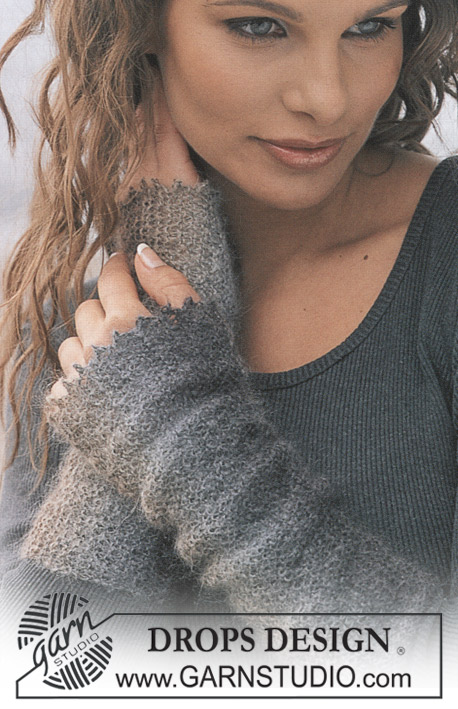
Banda para la cabeza DROPS en “Alaska” y Chal en “Vienna”
DROPS 86-10 |
|
|
Muestra: 18 pts x 23 vtas en puntada jersey = 10 x 10 cm Banda para la cabeza: Empezar por el centro posterior. Mon 19 pts. Tejer resorte como sigue: Vuelta 1 (lado derecho): 1d (pt de orillo tejido en pt musgo), *2d, 1r*, repetir un total de 5 veces – terminar la vta con 2d y 1d (pt de orillo tejido en pt musgo). Vuelta 2 (lado revés): 1d (pt de orillo tejido en pt musgo), *2r, 1d*, repetir un total de 5 veces – terminar la vta con 2r y 1d (pt de orillo tejido en pt musgo). Hacer todos los aum en las vtas del lado derecho. Cuando la pieza mida 8 cm aum todos los 1r a 2r = 24 pts. Cuando la pieza mida 14 cm aum todos los 2r a 3r = 29 pts. Cuando la pieza mida 18 cm aum todos los 3r a 4r = 34 pts. Cuando la pieza mida 21 cm aum todos los 4r a 5r = 39 pts. Cuando la pieza mida 24 cm colocar un marcapuntos (MP) = este es el centro de la banda para la cabeza. A cont corresponde dar forma a la inversa – medir desde el MP. Hacer todas las dism en las vtas del lado derecho. Cuando la pieza mida 3 cm dism todos los 5r a 4r = 34 pts. Cuando la pieza mida 6 cm dism todos los 4r a 3r = 29 pts. Cuando la pieza mida 10 cm dism todos los 3r a 2r = 24 pts. Cuando la pieza mida 16 cm dism todos los 2r a 1r = 19 pts. Cuando la pieza mida 48 cm unir a la orilla de montaje (no rem primero). CHAL: Medidas: Largo: 100 cm Ancho: 205 cm Materiales: DROPS Vienna de Garnstudio 200 g No. 43, café claro Agujas DROPS 15 mm – o tamaño necesario para obtener la muestra correcta. Muestra: 5 pts x 9 vtas en pt musgo = 10 x 10 cm (esto se teje flojo). Chal: Mon 4 pts y tejer pt musgo, aum 1 pt en uno de los lados en vtas alternas. El aum se hace tejiendo 2 pts dentro de 1 pt. Cont aum hasta tener 50 pts, la pieza mide aprox 102 cm. Ahora dism en el mismo lado que los aumentos – dism en vtas alternas tejiendo juntos del derecho los 2 pts más externos. Cont dism hasta que queden 4 pts, la pieza mide aprox 205 cm. Rem pts. Fleco: Colocar mechones de flecos a lo largo de los dos lados aprox 4-5 cm entre uno y otro – empezar en la punta de la orilla inferior. Cortar 6 hebras de 35 cm de largo, doblar a la mitad, pasar la punta doblada a través del pt más externo y pasar los extremos a través del bucle. |
|
¿Terminaste este patrón?Entonces, etiqueta tus fotos con #dropspattern o envíalas a la galería #dropsfan. ¿Necesitas ayuda con este patrón?Encontrarás 16 videos tutoriales, un espacio para comentarios/preguntas y más visitando la página del patrón en garnstudio.com © 1982-2026 DROPS Design A/S. Todos los derechos reservados. Este documento, incluyendo todas sus sub-secciones, está protegido por los derechos de autor (copyright). Lee más acerca de lo que puedes hacer con nuestros patrones en la parte de abajo de cada patrón de nuestro sitio. |


Con más de 40 años en el diseño de modelos de punto y de ganchillo, DROPS Design ofrece una de las más vastas colecciones de patrones gratuitos en el internet - traducidos en 17 idiomas. Al día de hoy, contamos con 324 catálogos y 12290 patrones - de los cuales 11685 están traducidos en español.
Nosotros trabajamos con mucho esmero para brindarte lo mejor que las labores de punto y ganchillo tienen para ofrecer,inspiración y consejos, así como hilos de magnífica calidad a precios increíbles! Te gustaría usar nuestros patrones para otro fin además del uso personal? Puedes leer acerca de lo que estás permitida a hacer en el texto de Copyright en la parte de abajo de todos nuestros patrones. Felices labores!
Escribe un comentario sobre DROPS 86-10
¡Nos encantaría saber qué piensas acerca de este patrón!
Si quieres escribir una pregunta referente al patrón, por favor asegúrate de elegir la categoría correcta en el formulario debajo, para acelerar el proceso de respuesta. Los campos obligatorios están marcados con un *.