
Categorías populares
¿Buscas un hilo?


Comentarios / Preguntas (113)
![]() Lisette escribió:
Lisette escribió:
Wat een leuk patroon! Het is al best oud, dus bedankt dat het nog beschikbaar is. Hier ga ik veel mensen blij mee maken en het is zo prettig om te breien. Super!
18.10.2025 - 01:26
![]() Anneli Kokkola escribió:
Anneli Kokkola escribió:
This is very nice, and there are my daughters and their friends hoping me to make this for them❣️
30.03.2025 - 12:30
![]() Silvia escribió:
Silvia escribió:
Seit Jahren stricke ich dieses Stirnband für mich und Freundinnen in allen möglichen Farben. Gut verständliche Anleitung und das Ergebnis sitzt perfek. Vielen Dank für dieses zeitlose und doch pfiffige Accessoire für kalte Tage.
24.02.2025 - 18:08
![]() Annika escribió:
Annika escribió:
Det fattas ju en del av mönstret på svenska! Inte konstigt att det blir fel är jag försöker sticka. Hade varit tacksam om ni rättade till det!
07.02.2025 - 17:14
![]() Janine Luisier escribió:
Janine Luisier escribió:
Bonjour votre site est excellent belles laines, beaux modèles, et le 86-10 super comme tant d'autres. Les explications à portée de tous. Mille MERCIS ż
05.12.2024 - 15:08
![]() Stéphanie P escribió:
Stéphanie P escribió:
Bonjour, Comment joindre les deux extrémités du tricot sans rabattre les mailles? Je ne trouve aucun tutos ... Merci d'avance Stéphanie
01.11.2024 - 00:33
![]() Lorraine escribió:
Lorraine escribió:
Bonjour, pourquoi ne pas rabattre les mailles avant de coudre le bandeau.
11.09.2024 - 17:20DROPS Design respondió:
Bonjour Lorraine, pour éviter que la couture ne soit trop épaisse, mais vous pouvez tout à fait rabattre avant si vous le préférez. Bon tricot!
12.09.2024 - 09:26
![]() June escribió:
June escribió:
Do I do the first two rows actually like they are written after doing the first increase row?
23.03.2024 - 00:43DROPS Design respondió:
Dear June, in this pattern you have a rib pattern, where you will repeat the rib explained in rows 1 and 2. However, as you increase, the rib will slightly change. For example, in the first increase at 3", you increase from P1 in the rib to P2 from the RS (by purling 2 stitches in 1 purl stitch). Then, on the WS knit over the new purl stitches (so the new rib will look like K2, P2 from the RS and P2, K2 from the WS). As you continue increasing you will add P stitches from the RS, which are knitted from the WS (so K2, P3 from the RS and P2, K3 from the WS; then K2, P4 from the RS and P2, K4 from the WS). Continue increasing like this. Happy knitting!
25.03.2024 - 00:00
![]() June escribió:
June escribió:
When the piece messages 3 ins what do I do now?
23.03.2024 - 00:30DROPS Design respondió:
Dear June, in the first increase at 3", you will work as follows from the RS: K 1 (edge st knit in garter st), * K 2, P 2 (that is, purl 2 stitches in the P1 to increase 1 purl stitch) * repeat a total of 5 times – finish row with K 2 and K 1 (edge st knit in garter st). Due to these increases, in the WS the rib also changes: from P2, K1 to P2, K2 (you don't increase in this row, just work over the increased stitches in the previous row). Happy knitting!
25.03.2024 - 00:00
![]() Carole Saidah escribió:
Carole Saidah escribió:
Bonjour, pour le bandeau, est ce que les diminutions se font sur l'endroit du travail comme pour les augmentations ? Merci pour votre réponse
27.12.2022 - 19:55DROPS Design respondió:
Bonjour Mme Saidah, tout à fait, on doit diminuer le nombre de mailles envers, vu sur l''endroit, on va tricoter ainsi 2 m ens à l'envers sur l'endroit. Bon tricot!
02.01.2023 - 10:33
|
|
Saturn Rings |
|
|
|
|
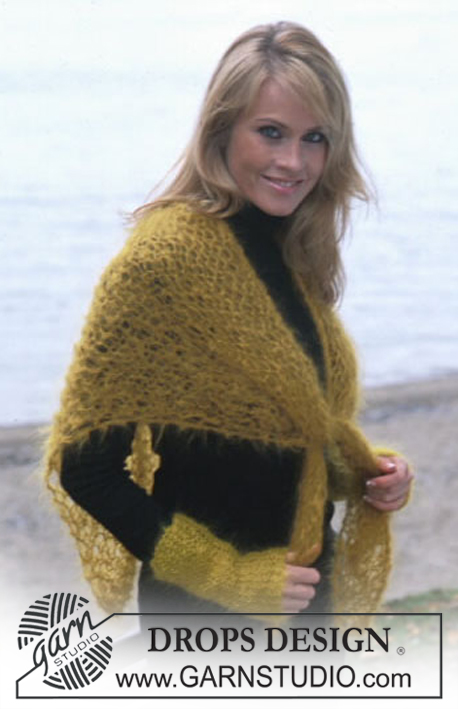
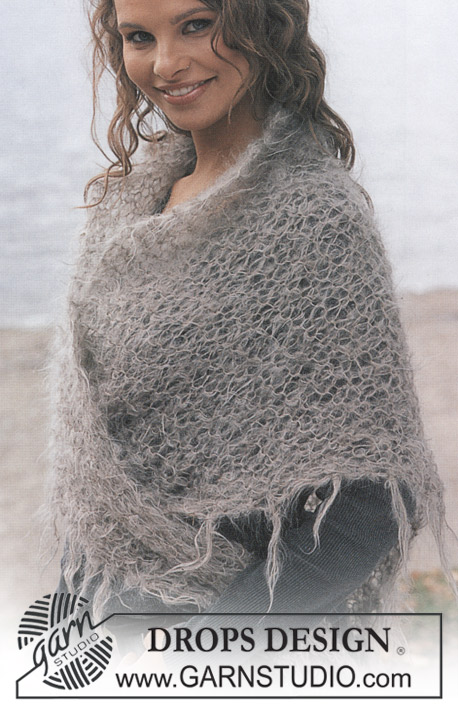
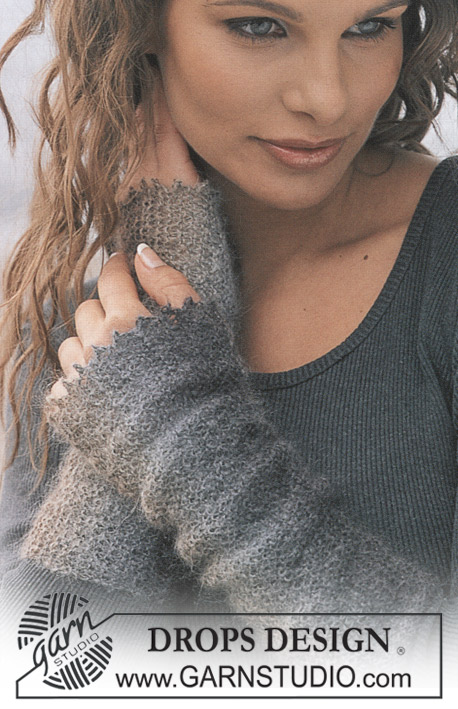
Banda para la cabeza DROPS en “Alaska” y Chal en “Vienna”
DROPS 86-10 |
|
|
Muestra: 18 pts x 23 vtas en puntada jersey = 10 x 10 cm Banda para la cabeza: Empezar por el centro posterior. Mon 19 pts. Tejer resorte como sigue: Vuelta 1 (lado derecho): 1d (pt de orillo tejido en pt musgo), *2d, 1r*, repetir un total de 5 veces – terminar la vta con 2d y 1d (pt de orillo tejido en pt musgo). Vuelta 2 (lado revés): 1d (pt de orillo tejido en pt musgo), *2r, 1d*, repetir un total de 5 veces – terminar la vta con 2r y 1d (pt de orillo tejido en pt musgo). Hacer todos los aum en las vtas del lado derecho. Cuando la pieza mida 8 cm aum todos los 1r a 2r = 24 pts. Cuando la pieza mida 14 cm aum todos los 2r a 3r = 29 pts. Cuando la pieza mida 18 cm aum todos los 3r a 4r = 34 pts. Cuando la pieza mida 21 cm aum todos los 4r a 5r = 39 pts. Cuando la pieza mida 24 cm colocar un marcapuntos (MP) = este es el centro de la banda para la cabeza. A cont corresponde dar forma a la inversa – medir desde el MP. Hacer todas las dism en las vtas del lado derecho. Cuando la pieza mida 3 cm dism todos los 5r a 4r = 34 pts. Cuando la pieza mida 6 cm dism todos los 4r a 3r = 29 pts. Cuando la pieza mida 10 cm dism todos los 3r a 2r = 24 pts. Cuando la pieza mida 16 cm dism todos los 2r a 1r = 19 pts. Cuando la pieza mida 48 cm unir a la orilla de montaje (no rem primero). CHAL: Medidas: Largo: 100 cm Ancho: 205 cm Materiales: DROPS Vienna de Garnstudio 200 g No. 43, café claro Agujas DROPS 15 mm – o tamaño necesario para obtener la muestra correcta. Muestra: 5 pts x 9 vtas en pt musgo = 10 x 10 cm (esto se teje flojo). Chal: Mon 4 pts y tejer pt musgo, aum 1 pt en uno de los lados en vtas alternas. El aum se hace tejiendo 2 pts dentro de 1 pt. Cont aum hasta tener 50 pts, la pieza mide aprox 102 cm. Ahora dism en el mismo lado que los aumentos – dism en vtas alternas tejiendo juntos del derecho los 2 pts más externos. Cont dism hasta que queden 4 pts, la pieza mide aprox 205 cm. Rem pts. Fleco: Colocar mechones de flecos a lo largo de los dos lados aprox 4-5 cm entre uno y otro – empezar en la punta de la orilla inferior. Cortar 6 hebras de 35 cm de largo, doblar a la mitad, pasar la punta doblada a través del pt más externo y pasar los extremos a través del bucle. |
|
¿Terminaste este patrón?Entonces, etiqueta tus fotos con #dropspattern o envíalas a la galería #dropsfan. ¿Necesitas ayuda con este patrón?Encontrarás 16 videos tutoriales, un espacio para comentarios/preguntas y más visitando la página del patrón en garnstudio.com © 1982-2026 DROPS Design A/S. Todos los derechos reservados. Este documento, incluyendo todas sus sub-secciones, está protegido por los derechos de autor (copyright). Lee más acerca de lo que puedes hacer con nuestros patrones en la parte de abajo de cada patrón de nuestro sitio. |


Con más de 40 años en el diseño de modelos de punto y de ganchillo, DROPS Design ofrece una de las más vastas colecciones de patrones gratuitos en el internet - traducidos en 17 idiomas. Al día de hoy, contamos con 324 catálogos y 12290 patrones - de los cuales 11685 están traducidos en español.
Nosotros trabajamos con mucho esmero para brindarte lo mejor que las labores de punto y ganchillo tienen para ofrecer,inspiración y consejos, así como hilos de magnífica calidad a precios increíbles! Te gustaría usar nuestros patrones para otro fin además del uso personal? Puedes leer acerca de lo que estás permitida a hacer en el texto de Copyright en la parte de abajo de todos nuestros patrones. Felices labores!
Escribe un comentario sobre DROPS 86-10
¡Nos encantaría saber qué piensas acerca de este patrón!
Si quieres escribir una pregunta referente al patrón, por favor asegúrate de elegir la categoría correcta en el formulario debajo, para acelerar el proceso de respuesta. Los campos obligatorios están marcados con un *.