
Categorías populares
¿Buscas un hilo?


Comentarios / Preguntas (28)
![]() R N escribió:
R N escribió:
Hei! Teen XL kokoa. Ohjeissa on virhe kun kainaloista lähdetään jatkamaan alaspäin. Kuviot eivät täsmää. Voitteko auttaa?
05.07.2024 - 10:56DROPS Design respondió:
Hei, etu-/takakappaleessa neulotaan mallineuletta piirroksen A.4 mukaisesti ja mallineule jatkuu siitä, mihin se kaarrokkeessa jäi. Mikäli neuletiheys täsmää, kaarroke on valmis, kun olet neulonut ylös piirrokseen kokosi nuolella merkittyyn kerrokseen.
05.07.2024 - 17:08
![]() Mary escribió:
Mary escribió:
But that’s precisely the problem! If I start the third line A4 from the underarm (the first stitch of the new round is basically the third stitch from the underarm) I get the mismatch because the triangle will be stitched earlier: I can’t understand where I am going wrong
09.04.2023 - 14:12DROPS Design respondió:
Dear Mary, you need to adjust the stitches before starting the triangle. In this case, you need to simply knit stitches (not just the amount indicated in the pattern) so that the triangle won't be mismatched. The pattern under the arm may get slightly mismatched initially but that isn't important, since it will later on match correctly. Happy knitting!
10.04.2023 - 13:34
![]() Mary escribió:
Mary escribió:
Yes, I can see that the pattern is the same. But if I follow the instructions from A4 third line, I should start the "triangle" after 3 stitches of the body, while according to the stitches I have after the line with the arrow, A1, I should start the triangle after 5 stitches but this means that it will be "anticipated" hence the mismatch. Does it mean that I have not divided the garment accordingly? Many thanks and Happy Easter!
09.04.2023 - 11:09DROPS Design respondió:
Dear Mary, take into account that you should have adjusted the start of the round in the body; you adjust so that the beginning of the round is in the middle stitch cast on under the sleeve. This should help adjust the pattern so that the triangle in A.4 won't get mismatched with the pattern in the yoke in A.1. Happy knitting!
09.04.2023 - 13:30
![]() Mary escribió:
Mary escribió:
Thanks! But I am still confused: the instructions say that the yoke is finished when I have 168 stitches (S size). If I had not knit the last row (the one with the arrow), I would not have got 168 stitches. In any case, once I have knit the row with the arrow, if I then start A4 from the third line I still get a mismatch in the pattern and I do not know where I get it wrong. Well, I know that I do something wrong while shifting from the yoke to the body but I can't figure out what.
07.04.2023 - 10:25DROPS Design respondió:
Dear Mary, after having worked the row with the arrow, you should have knitted round, where you separated the stitches for each part of the garment. Then, you should start the body with the third row of A.4. There shouldn't be a mismatch there. You can check that the third row of A.4 is exactly like the third row in A.1 after the row with the arrow, so they should be matching. Hope this helps!
08.04.2023 - 20:58
![]() Mary escribió:
Mary escribió:
Thanks! But I am still confused: the instructions say that the yoke is finished when I have 168 stitches (S size). If I had not knit the last row (the one with the arrow), I would not have got 168 stitches. In any case, once I have knit the row with the arrow, if I then start A4 from the third line I still get a mismatch in the pattern and I do not know where I get it wrong. Well, I know that I do something wrong while shifting from the yoke to the body but I can't figure out what.
07.04.2023 - 10:20DROPS Design respondió:
Dear Mary, after having worked the row with the arrow, you should have knitted round, where you separated the stitches for each part of the garment. Then, you should start the body with the third row of A.4. There shouldn't be a mismatch there. You can check that the third row of A.4 is exactly like the third row in A.1 after the row with the arrow, so they should be matching. Hope this helps!
08.04.2023 - 20:59
![]() Mary escribió:
Mary escribió:
Sorry, I am still unclear: I have finished the yoke knitting the A1-A3-A5 line with the arrow. Then I divided the work and I went for a knitted round. Now which line should I knit first and from which diagram?
05.04.2023 - 09:04DROPS Design respondió:
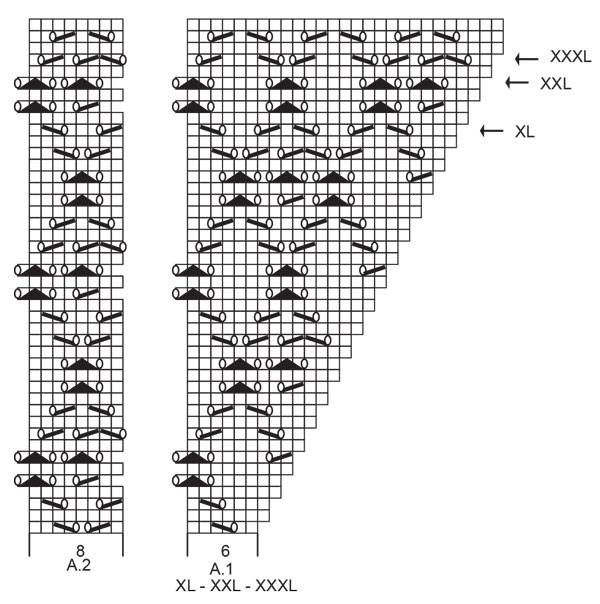
Dear Mary, the arrows in the chart mean that, if the gauge is correct, you should finish the raglan/yoke when you reach the arrow for your size (before working it). If you have worked this row, then you will need to start the new part by working the third row of the new chart (A.4). Happy knitting!
06.04.2023 - 23:29
![]() Mary escribió:
Mary escribió:
Hi! "Continue the pattern from yoke on body – making sure to continue with the correct row in the diagram after the yoke. " Does this mean that if I finish A1 (S size) with the line with the arrow, the next line for the body in A4 is in fact the thirs one of the diagram?
04.04.2023 - 08:59DROPS Design respondió:
Hi Mary, Yes, if you finished the diagram before separating for the body and sleeves, you continue with the first row in the diagram. Happy Easter!
05.04.2023 - 07:01
![]() Mary escribió:
Mary escribió:
"Knit as far as the middle stitch cast on under the sleeve. The round now starts here." Does it mean that the round starts after the second or after the third stitch under the sleeve? Many thanks!
08.03.2023 - 16:03DROPS Design respondió:
Dear Mary, yes correct: work the first 2 of the 5 stitches cast on under 1st sleeve, the rounds will now start here, before the middle of the new stitches. Happy knitting!
08.03.2023 - 16:08
![]() Mary escribió:
Mary escribió:
Following from your last answer: "...you will start the next round 1 stitch eariler. So, you need to not work the last stitch of the previous round". I interpret this as moving the stitch marker one stitch behind and working that stitch as the first one of the next round rather than the last one of the previous round. Is this correct? So it is basically just a matter of moving the stitch marker?
07.03.2023 - 12:16DROPS Design respondió:
Dear Mary, you will now work the dividing round, this means you don't need the markers anymore, you start working the dividing round when the last stitch on previous round remain on left needle, slip the next 39 sts (starting with the last stitch previous round + the first 38 sts next round). Happy knitting!
07.03.2023 - 14:37
![]() Mary escribió:
Mary escribió:
Hi, I have just finished all the increases on the raglan and I have 168 stitches (S size). I'll go now go for a knitted round but what does it mean " adjust so the round now starts 1 stitch earlier"? Plus, the 39 stitches I habe to put aside, correspond to the stiches that are within the first and the second marker?
04.03.2023 - 10:25DROPS Design respondió:
Dear Mary, after finishing the increases and reaching the indicated length (21cm from the marker), you will start the next round 1 stitch eariler. So, you need to not work the last stitch of the previous round. On the other hand, the first marker was inserted in the transition between the back and the sleeve and the second marker between the sleeve and the front. Since you have to put aside the stitches which correspond to the sleeve, these stitches are all in between the first and 2nd marker. Happy knitting!
05.03.2023 - 20:45
|
|||||||||||||||||||
Diamonds in the Sky#diamondsintheskysweater |
|||||||||||||||||||
 |
 |
||||||||||||||||||
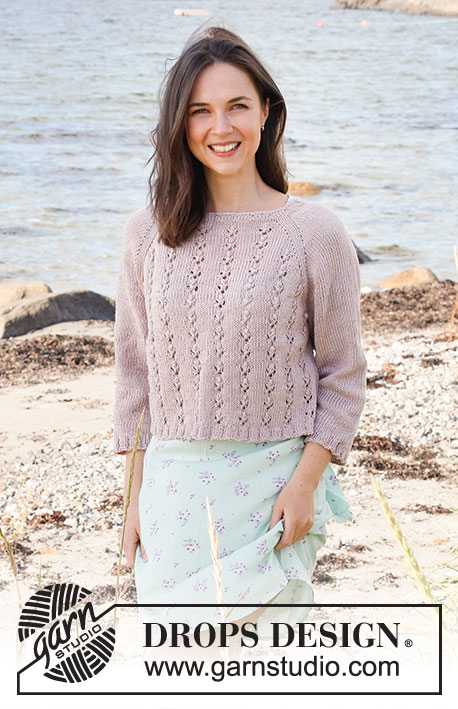
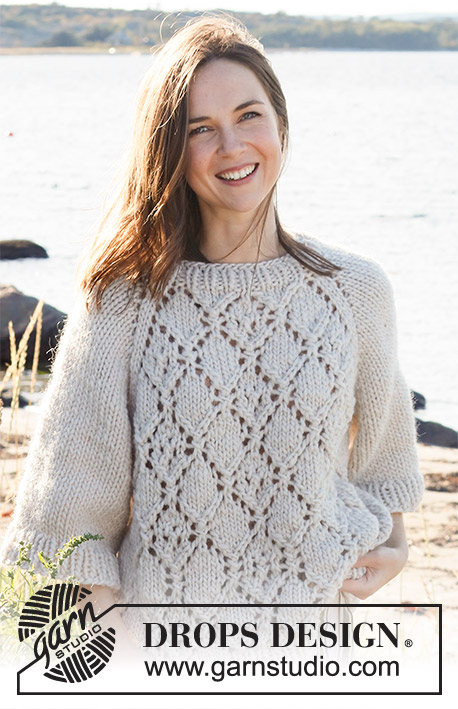
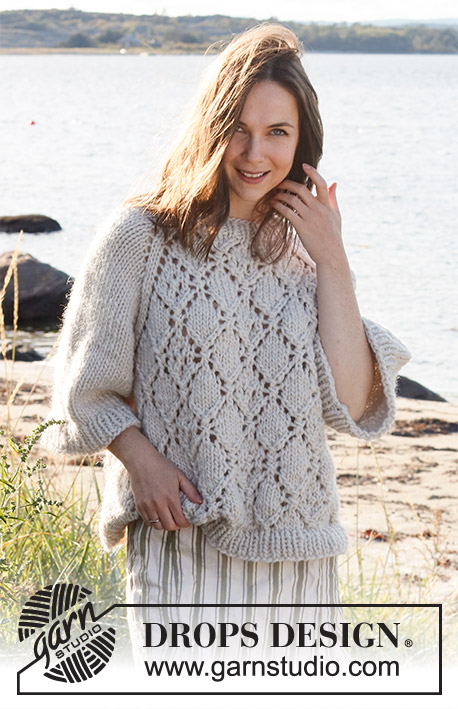
Jersey de punto en DROPS Snow o DROPS Wish. La pieza está tejida de arriba para abajo con raglán, patrón de calados y mangas ¾ anchas. Tallas S – XXXL.
DROPS 221-29 |
|||||||||||||||||||
|
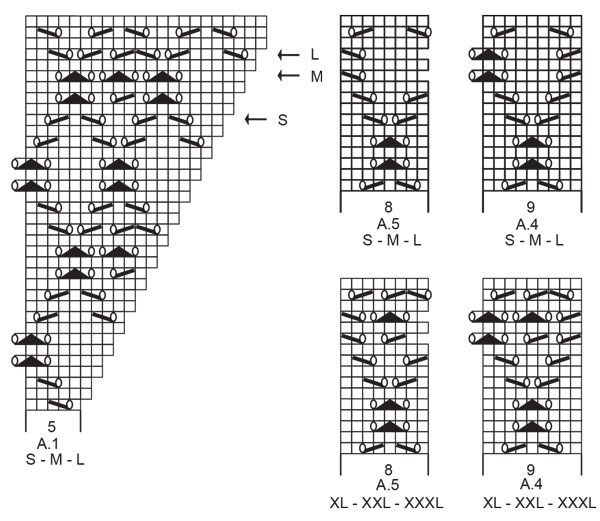
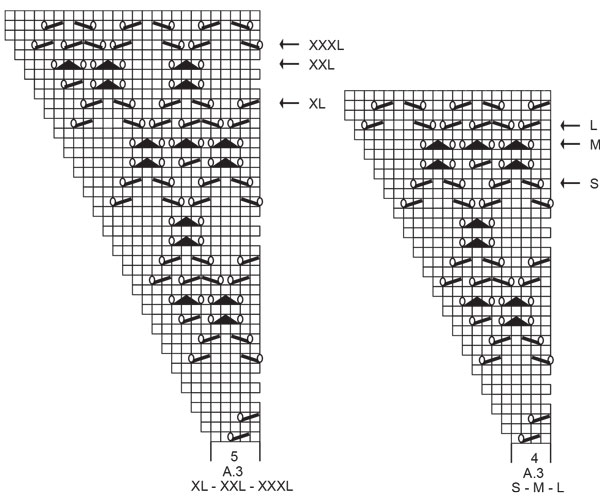
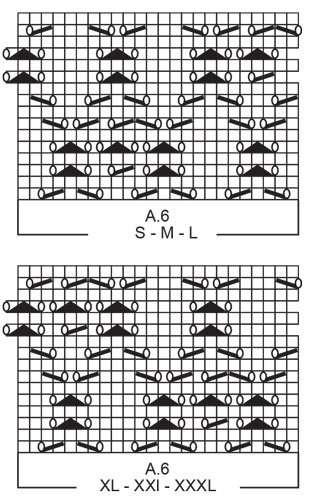
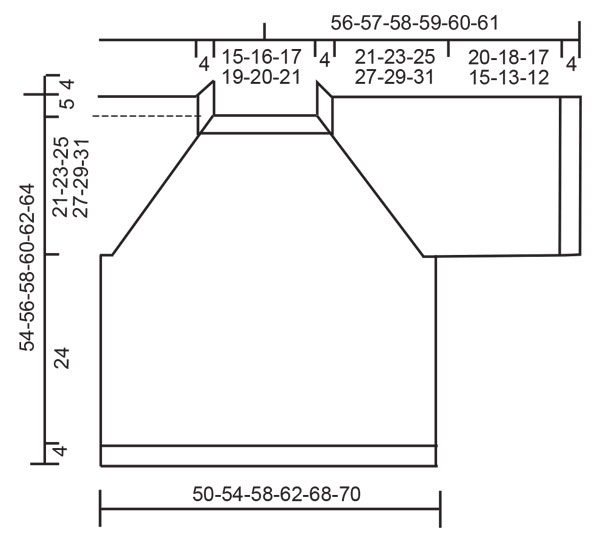
EXPLICACIONES PARA REALIZAR EL PATRÓN: ------------------------------------------------ PATRÓN: Ver diagramas A.1 a A.6. Elegir los diagramas para tu talla. TIP PARA AUMENTAR (distribuidos equitativamente): Para calcular cómo aumentar equitativamente, contar el número total de puntos en la aguja (p. ej. 46 puntos) y dividirlo entre el número de aumentos a hacer (p. ej. 10) = 4.6. En este ejemplo, aumentar haciendo 1 lazada después de cada 4º y 5º punto alternadamente. En la vuelta siguiente, tejer las lazadas retorcidas para evitar que se formen agujeros. RAGLÁN: Aumentar para el raglán haciendo 1 lazada a cada lado de 2 puntos (el marcador está en el centro de estos puntos), en las transiciones entre el cuerpo y las mangas, de la manera siguiente (un total de 8 puntos aumentados). Aumentar 1 punto haciendo 1 lazada. En la vuelta siguiente, tejer las lazadas de derecho para formar agujeros. Después tejer los nuevos puntos dentro del patrón en la pieza del frente y en la pieza de la espalda y en punto jersey en las mangas. TIP PARA REMATAR: Para evitar que la orilla de remate quede apretada, se puede rematar con una aguja de tamaño más grande. Si la orilla aún estuviese apretada, hacer 1 lazada después de aprox. cada 4º punto mientras se rematan los puntos; rematar las lazadas como puntos normales. ------------------------------------------------ COMENZAR LA PIEZA AQUÍ: ------------------------------------------------ JERSEY – RESUMEN DE LA PIEZA: El cuello y el canesú se tejen en redondo con aguja circular, de arriba para abajo. El canesú es dividido y el cuerpo y las mangas son continuados separadamente en redondo con aguja circular, de arriba para abajo. CUELLO: Montar 46-48-50-54-56-58 puntos con aguja circular corta tamaño 8 mm y Snow o Wish. Tejer 1 vuelta de derecho. Después tejer el resorte (1 derecho, 1 revés) en redondo durante 4 cm. Tejer 1 vuelta de derecho aumentando 10-8-6-6-4-2 puntos distribuidos equitativamente – leer TIP PARA AUMENTAR = 56-56-56-60-60-60 puntos. Tejer 1 vuelta de derecho. Cambiar a aguja circular tamaño 9 mm. Insertar 1 marcador después de 20-20-20-21-21-21 puntos (= aprox. centro del frente), ¡el canesú es medido a partir de este marcador! CANESÚ: Ahora tejer el patrón e insertar 4 marcadores de la manera siguiente: Insertar 1 marcador al principio de la vuelta (= la transición entre la pieza de la espalda y la manga derecha), 1 derecho, 1 lazada, 7 derechos, 1 lazada, 1 derecho, insertar 1 marcador aquí (la transición entre la manga derecha y la pieza del frente), 1 derecho, 1 lazada, A.1 sobre los 5-5-5-6-6-6 puntos siguientes, A.2 sobre los 8 puntos siguientes, A.3 sobre los 4-4-4-5-5-5 puntos siguientes, 1 lazada, 1 derecho, insertar 1 marcador aquí (= la transición entre la pieza del frente y la manga izquierda), 1 derecho, 1 lazada, 7 derechos, 1 lazada, 1 derecho, insertar 1 marcador aquí (= la transición entre la manga izquierda y la pieza de la espalda), 1 derecho, 1 lazada, A.1 sobre los 5-5-5-6-6-6 puntos siguientes, A.2 sobre los 8 puntos siguientes, A.3 sobre los 4-4-4-5-5-5 puntos siguientes, 1 lazada, 1 derecho. ¡RECORDAR MANTENER LA MISMA TENSIÓN DE TEJIDO DE LA MUESTRA! El primer aumento para el RAGLÁN – leer descripción arriba, ahora está terminado. Continuar este patrón y aumentos para el raglán a cada 2ª vuelta un total de 14-16-17-18-20-21 veces = 168-184-192-204-220-228 puntos. Después del último aumento, la pieza mide aprox. 20-23-24-26-29-30 cm a partir del marcador en el cuello. Continuar tejiendo sin más aumentos hasta que la pieza mida 21-23-25-27-29-31 cm a partir del marcador, (tejer tantos puntos en el patrón como quepan en dirección del raglán, asegurándose que las lazadas y las disminuciones se correspondan entre ellas de modo que el número de puntos permanezca el mismo – los otros puntos se tejen en punto jersey). En la vuelta siguiente (es decir, una vuelta de derecho) – ajustar de modo que la vuelta ahora comience 1 punto antes, tejer de la manera siguiente: Colocar los primeros 39-43-45-47-51-53 puntos en un hilo para la manga, montar 5-5-7-7-9-9 nuevos puntos en la aguja (= en el lado bajo la manga), tejer los 45-49-51-55-59-61 puntos siguientes como antes (= pieza del frente), colocar los 39-43-45-47-51-53 puntos siguientes en un hilo para la manga, montar 5-5-7-7-9-9 nuevos puntos en la aguja (= en el lado bajo la manga), tejer los últimos 45-49-51-55-59-61 puntos como antes (= pieza de la espalda). Terminar el cuerpo y las mangas separadamente. LA PIEZA ES AHORA MEDIDA A PARTIR DE AQUÍ. CUERPO: = 100-108-116-124-136-140 puntos. Tejer de derecho hasta el punto central montado bajo la manga. La vuelta ahora comienza aquí. Continuar el patrón a partir del canesú en el cuerpo – asegurándose de continuar con la hilera correcta del diagrama después del canesú. Tejer el patrón y punto jersey en los lados de la manera siguiente: * Tejer 1-3-5-3-6-7 puntos derechos, A.4 sobre los 9 puntos siguientes (elegir el diagrama para tu talla), tejer A.6 sobre los 24 puntos siguientes (elegir el diagrama para tu talla), tejer los primeros 8-8-8-16-16-16 puntos de A.6, tejer A.5 sobre los 8 puntos siguientes (elegir el diagrama para tu talla), tejer 0-2-4-2-5-6 puntos derechos *, tejer de *a* 1 vez más en la vuelta. Cuando la pieza mida 24 cm, tejer 1 vuelta de derecho aumentando 10-10-12-12-14-14 puntos distribuidos equitativamente = 110-118-128-136-150-154 puntos. Cambiar a aguja circular tamaño 8 mm y tejer en resorte (1 derecho, 1 revés) durante 4 cm. Rematar con derecho sobre derecho y revés sobre revés. El jersey mide aprox. 54-56-58-60-62-64 cm a partir del hombro para abajo. MANGAS: Colocar los 39-43-45-47-51-53 puntos del hilo en uno de los lados de la pieza en aguja circular corta tamaño 9 mm y levantar 1 punto en cada uno de los 5-5-7-7-9-9 puntos montados bajo la manga = 44-48-52-54-60-62 puntos. Tejer punto jersey en redondo. Cuando la manga mida 20-18-17-15-13-12 cm, aumentar 4-4-4-4-6-6 puntos distribuidos equitativamente = 48-52-56-58-70-68 puntos. Cambiar a aguja circular tamaño 8 mm. Tejer en resorte (1 derecho, 1 revés) durante 4 cm. Rematar con derecho sobre derecho y revés sobre revés. La manga mide aprox. 24-22-21-19-17-16 cm a partir de la división. Tejer la otra manga de la misma manera. |
|||||||||||||||||||
Explicaciones del diagrama |
|||||||||||||||||||
|
|||||||||||||||||||
 |
|||||||||||||||||||
 |
|||||||||||||||||||
 |
|||||||||||||||||||
 |
|||||||||||||||||||
 |
|||||||||||||||||||
¿Terminaste este patrón?Entonces, etiqueta tus fotos con #dropspattern #diamondsintheskysweater o envíalas a la galería #dropsfan. ¿Necesitas ayuda con este patrón?Encontrarás 25 videos tutoriales, un espacio para comentarios/preguntas y más visitando la página del patrón en garnstudio.com © 1982-2026 DROPS Design A/S. Todos los derechos reservados. Este documento, incluyendo todas sus sub-secciones, está protegido por los derechos de autor (copyright). Lee más acerca de lo que puedes hacer con nuestros patrones en la parte de abajo de cada patrón de nuestro sitio. |
|||||||||||||||||||


Con más de 40 años en el diseño de modelos de punto y de ganchillo, DROPS Design ofrece una de las más vastas colecciones de patrones gratuitos en el internet - traducidos en 17 idiomas. Al día de hoy, contamos con 324 catálogos y 12290 patrones - de los cuales 11675 están traducidos en español.
Nosotros trabajamos con mucho esmero para brindarte lo mejor que las labores de punto y ganchillo tienen para ofrecer,inspiración y consejos, así como hilos de magnífica calidad a precios increíbles! Te gustaría usar nuestros patrones para otro fin además del uso personal? Puedes leer acerca de lo que estás permitida a hacer en el texto de Copyright en la parte de abajo de todos nuestros patrones. Felices labores!
Escribe un comentario sobre DROPS 221-29
¡Nos encantaría saber qué piensas acerca de este patrón!
Si quieres escribir una pregunta referente al patrón, por favor asegúrate de elegir la categoría correcta en el formulario debajo, para acelerar el proceso de respuesta. Los campos obligatorios están marcados con un *.