
Popular categories
Looking for a yarn?


Comments / Questions (88)
![]() Anette Schwarz wrote:
Anette Schwarz wrote:
Hallo Drops-Team, Muss ich bei der Passe die Zunahmen gleichzeitig stricken, oder erst 1., 2., 4., und 5. am Markierer und dann am 3. und am 6.? Danke für die Hilfe
08.02.2021 - 09:30DROPS Design answered:
Siehe Antwort unten :)
08.02.2021 - 11:05
![]() Anette Schwarz wrote:
Anette Schwarz wrote:
Bei den Zunahmen an der Passe, nehme ich zuerst 8x an der 1., 2., 4., und 5.Markierung und dann noch 8x an der 3. Und 6. zu, oder gleichzeitig? Danke für die Antwort.
07.02.2021 - 19:47DROPS Design answered:
Liebe Frau Schwarz, je nach der Größe sind die Zunahmen unterschiedlich, in Größe XXXL aber nehmen Sie je 4 Maschen in jeder der 6 Maschen mit einer Markierung (= 24 Zunahmen bei jeder Zunahmenrunde) insgesamt 8 Mal (= 64 M + (24 x 8) = 256 M). Viel Spaß beim stricken!
08.02.2021 - 10:33
![]() Cora wrote:
Cora wrote:
Aan het end van de hals > 1 omslag - 1 av afhalen - 2 av samenbreien. Ik heb dan evenveel steken dan waarmee ik begonnen ben. Of is het de bedoeling dat ik nog een naald brei waar ik de omslag en afgehaalde steek samenbrei alvorens aan de pas te beginnen, waar ik dan de markeerdraden toevoeg? Ik heb alle benodigdheden tezamen besteld maar mis markeerdraden. Kunnen deze nagestuurd worden? (Ivm de lockdown is er helaas geen winkel open).
26.01.2021 - 21:47DROPS Design answered:
Dag Cora,
Aan het eind van de hals brei je eerst de tweede naald van patentsteek patroon, daarna plaats je de markeerdraden (de markeerdraden komen in rechte steken, dus steken die je in boordsteek recht had gebreid. Na het plaatsen van de markeerdraden begin je met met patentsteek.
Voor markeerders kun je je verkooppunt vragen. Je kunt ook (tijdelijk) draden van een andere bol garen in een andere kleur gebruiken.
01.02.2021 - 08:49
![]() Daniela wrote:
Daniela wrote:
Buongiorno, se per il collo ho iniziato 84 maglie perché dopo dovrei averne 60 se non ci sono diminuzioni? Lavorare il giro successivo come segue: * Fare 1 maglia gettata, passare 1 maglia a rovescio, 2 maglie insieme a rovescio *, ripetere da *-* fino alla fine del giro = 52-52-56-60-60-64 maglie. Grazie
25.01.2021 - 12:19DROPS Design answered:
Buonasera Daniela, deve ripetere la sequenza tra gli asterischi fino alla fine del giro: i gettati non si contano, per cui vengono diminuite 28 maglie, e quindi da 84 si passa a 56 maglie. Buon lavoro!
25.01.2021 - 18:24
![]() Heather wrote:
Heather wrote:
I am making size four and I am unable to make the numbers add up for starting the yoke. One starts with 60 sts and the sts are 10, 5, 9. 9, 5. and 13 with a remainder of 3 according to the pattern. This equals 54. While I could add sts to the front/back/sleeves, I want to follow your pattern as written as they are usually fantastic. Please help. Thank you-
24.01.2021 - 03:37DROPS Design answered:
Dear Heather, each marker should be added in a stitch, so that your missing 6 stitches as those with a marker: 10 sts, 1 st with marker, 5 sts, 1 st with marker, 9 sts, 1 st with marker, 9 st, 1 st with marker, 5 sts, 1 st with marker, 13 sts, 1 st with marker, 3 sts. = 60 sts. Happy knitting!
25.01.2021 - 09:28
![]() Simone wrote:
Simone wrote:
Liebes Drops Team, zwischen 1+6 sind 11M ,1+2 5M,2+3 7M,3+4 7M,4+5 5M und zwischen 5+6 11M. Somit habe ich doch hinten zwüschen5+1 8machen mehr als zwüschen2+4.Ist das so richtig?
19.01.2021 - 19:20DROPS Design answered:
Liebe Simone, es ist ja so richtig, es ist keinen echten Raglanpullover. Viel Spaß beim stricken!
20.01.2021 - 07:34
![]() Simone wrote:
Simone wrote:
Liebes Drops Team, zwischen 1+6 sind 11M ,1+2 5M,2+3 7M,3+4 7M,4+5 5M und zwischen 5+6 11M. Somit habe ich doch hinten 8 Maschen mehr.
19.01.2021 - 16:56
![]() Simone wrote:
Simone wrote:
Liebes Drops Team, Ich habe die machen nach dem Halsbünchen aufgeteilt. Ist es richtig das ich zwischen dem 1+5makierer 8 M mehr habe als zwischen Makierer2+4?
19.01.2021 - 12:48DROPS Design answered:
Liebe Simone, ja es ist so richtig - Sie sollen die gleiche Maschenanzahl zwischen Mark. 6 -1 und 1-2 und zwischen Mark 2-3 und 3-4. (es handelt sich hier nicht um einen Raglan-Pullover). Viel Spaß beim stricken!
19.01.2021 - 14:09
![]() Christine Willwoldt wrote:
Christine Willwoldt wrote:
Wieso habe ich bei einem Anschlag von 90 M nach der Halsblende nur noch 60 M ?
13.01.2021 - 11:04DROPS Design answered:
Liebe Frau Willwoldt, die 90 Maschen stricken Sie zuerst 12 cm mit RIPPENMUSTER , dann stricken Sie eine Abnahmerunde (= jede 2. und 3. Maschen rechts zusammen stricken), so bleiben nur 60 M übrig. Für das Patent braucht mann weniger Maschen als mit Rippenmuster für die gleiche Breite. Viel Spaß beim stricken!
13.01.2021 - 12:27
![]() Manuela Scheller wrote:
Manuela Scheller wrote:
Ich muss 7 maschen unter dem Arm aufnehmen lege ich diese 7 maschen mit auf die 37 stillgelegten maschen für den ärmel
27.12.2020 - 12:54DROPS Design answered:
Liebe Manuela. Ja , naturlich. Das ist korrekt. Viele Spass zum Stricken!
03.01.2021 - 16:48
|
|
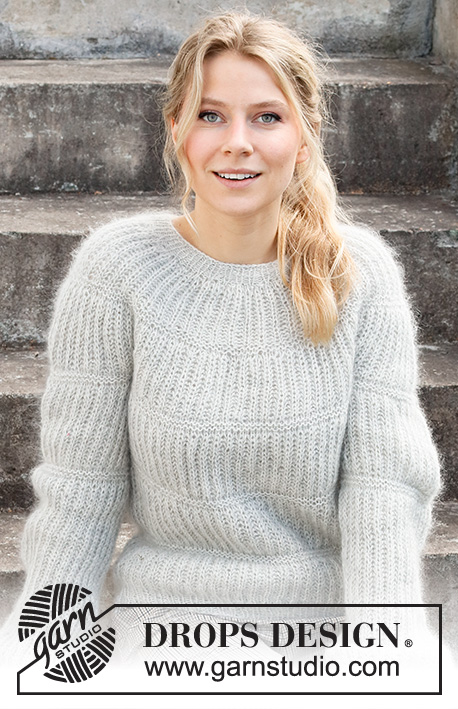
Dublin Winter Sweater#dublinwintersweater |
|
 |
 |
Knitted jumper with round yoke in DROPS Air. The piece is worked top down with English rib and A-shape. Sizes XS - XXL.
DROPS 215-12 |
|
|
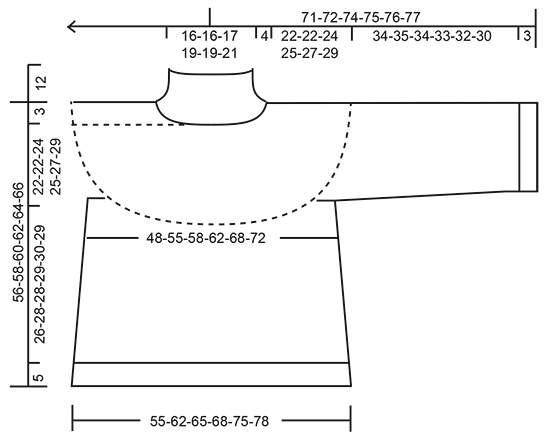
------------------------------------------------------- EXPLANATIONS FOR THE PATTERN: ------------------------------------------------------- RIB (in the round): ROUND 1: * Make 1 yarn over, slip 1 stitch as if to purl, purl 2 *, work from *-* to end of round. ROUND 2: * Knit together the yarn over and slipped stitch, purl 2 *, work from *-* to end of round. Repeat rounds 1 and 2. ENGLISH RIB (in the round): ROUND 1: * Knit together the yarn over and slipped stitch, make 1 yarn over, slip 1 stitch as if to purl, *, repeat from *-* to end of round. ROUND 2: * 1 yarn over, slip 1 stitch as if to purl, purl together the yarn over and slipped stitch *, repeat from *-* to end of round. Repeat rounds 1 and 2. INCREASE TIP (for increases in English rib stitch): All increases are worked on a round where the yarn overs and knitted stitches are knitted together (i.e. Round 1 in English rib). Increase 4 stitches in the English rib stitch as follows: Knit together the yarn over and knitted stitch, but do not slip them from the needle, make 1 yarn over the right needle, knit together the yarn over and knitted stitch again, move the marker to this stitch (= mid-stitch), make 1 yarn over the right needle, knit together the yarn over and knitted stitch again (= 3 stitches and 2 yarn overs), slip the stitches from the left needle. On the next round work the increased stitches as follows: * Make 1 yarn over, slip 1 stitch as if to purl, purl 1 *, work from *-* a total of 2 times, make 1 yarn over, slip 1 stitch as if to purl (= 3 knitted stitches and 2 purled stitches). The marker sits in the middle stitch of the increased stitches (in a knitted stitch). DECREASE TIP (mid under sleeve): All decreases are worked on a round where the yarn overs and knitted stitches are knitted together (i.e. Round 1 in English rib). Start mid under the sleeve (i.e. before the marker-stitch) and decrease 4 stitches on the round as follows: Work the first 2 stitches in English rib as before, slip the next stitch + its yarn over as if to knit, knit together the next 2 stitches + and their yarn overs and pass the slipped stitch + and its yarn-over over the knitted together stitches. Work until there are 4 stitches left before the marker stitch (= mid-stitch under the sleeve), knit together the next 3 stitches + and their yarn overs (= 2 stitches decreased), work the last stitch on the round. CASTING-OFF TIP: To avoid the cast-off edge being tight you can cast off with a larger size needle. If the edge is still tight, make 1 yarn over after approx. each 3rd stitch at the same time as casting off; the yarn overs are cast off as normal stitches. ------------------------------------------------------- START THE PIECE HERE: ------------------------------------------------------- JUMPER – SHORT OVERVIEW OF THE PIECE: The neck and yoke are worked in the round with circular needle, top down. On yoke, increase in 6 stitches marked with markers. The yoke is divided for body and sleeves and the body continued in the round with circular needle. The sleeves are worked in the round with short circular needle, top down. NECK: Cast on 78-78-84-90-90-96 stitches with circular needle size 4 mm and Air. Knit 1 round. Then work RIB – read description above, for 12 cm; finish after round 2. The next round is worked as follows: * Make 1 yarn over, slip 1 stitch as if to purl, purl 2 together *, work from *-* to end of round = 52-52-56-60-60-64 stitches. Change to circular needle size 6 mm. Insert 1 marker thread at the beginning of the round; the yoke is measured from this marker thread. YOKE: Insert 6 markers in the piece as described below (without working the stitches). All markers are in knitted stitches and are used when increasing on the yoke. Count 8-8-8-10-10-10 stitches, insert marker 1 in the next stitch (= back right sleeve), count 5-5-7-5-5-7 stitches, insert marker 2 in the next stitch (= raglan-line in front), count 7-7-7-9-9-9 stitches, insert marker 3 in the next stitch (= mid-front), count 7-7-7-9-9-9 stitches, insert marker 4 in the next stitch (= raglan-line in front), count 5-5-7-5-5-7 stitches, insert marker 5 in the next stitch (= back left sleeve), count 11-11-11-13-13-13 stitches, insert marker 6 in the next stitch (= mid-back), there are 3 stitches left on the round. Work ENGLISH RIB in the round – read description above. REMEMBER THE KNITTING TENSION! When you have worked 2-2-6-2-6-2 rounds of English rib, increase stitches on the next round as follows: Increase 4 stitches in all 6 marker-stitches - read INCREASE TIP (= 24 stitches increased on the round). Increase like this every 12th-10th-10th-10th-8th-10th round (every 6th-5th-5th-5th-4th-5th round of visible English rib stitches) a total of 5-6-6-7-8-8 times at markers 1, 2, 4 and 5 and a total of 4-5-6-6-7-8 times at markers 3 and 6 = 164-188-200-220-244-256 stitches on the needle. If the knitting tension is correct in height, the piece measures approx. 20-20-22-24-24-28 cm from the marker on the neck. Increases at markers 3 and 6 continue two more times on the piece (i.e. a total of 6-7-8-8-9-10 increases mid-front and mid-back); if the piece is shorter than 20-20-22-24-24-28 cm, some of these increases might be on the yoke. The number of stitches when dividing the yoke for body and sleeves will then not be the same as described below. The extra stitches will be on the front and back pieces. (Markers 1 and 5 also have further increases after the division, but these are described under SLEEVE.) Continue working until the piece measures 22-22-24-25-27-29 cm from the marker on the neck. On the next round divide for the body and sleeves as follows: Work the first 14-16-16-18-20-20 stitches as before, place the next 31-35-37-43-47-49 stitches on a thread for the sleeve, cast on 7 stitches under the sleeve, work the next 51-59-63-67-75-79 stitches as before, place the next 31-35-37-43-47-49 stitches on a thread for the sleeve, cast on 7 stitches under the sleeve and work the remaining 37-43-47-49-55-59 stitches as before. BODY: = 116-132-140-148-164-172 stitches – this stitch-count is only applicable if you have increased 4-5-6-6-7-8 times at markers 3 and 6 on the yoke. If you have increased more times on the yoke there will be more stitches on the needle now). Continue in the round with English rib as before and work the last 2 increases at markers 3 and 6 if necessary. The stitches under the sleeve are worked without knitting together stitches and yarn overs on the first round. When all the increases are finished there are 132-148-156-164-180-188 stitches on the body. Work until the piece measures 26-28-28-29-30-29 cm from the division (adjust so the next round is one where stitches and yarn overs are knitted together). There is approx. 5 cm left to finished length; try the jumper on and work to desired length. Change to circular needle size 4 mm and work rib as follows: * Knit the first stitch and yarn over together as before, 1 yarn over (= 1 stitch increased), purl 1 *, work from *-* to end of round = 198-222-234-246-270-282 stitches. Then work the same rib as on the neck for 5 cm (yarn overs worked twisted on the first round). Loosely cast off with knit over knit and purl over purl - read CASTING-OFF TIP! The jumper measures approx. 56-58-60-62-64-66 cm from the shoulder down. SLEEVE: Place the 31-35-37-43-47-49 stitches from the thread on the one side of the piece on short circular needle size 6 mm and knit up 1 stitch in each of the 7 stitches cast on under the sleeve = 38-42-44-50-54-56 stitches. Insert a marker thread in the middle of the 7 stitches under the sleeve (a knitted stitch in the English rib pattern). This stitch will be where you decrease under the sleeve later. Start the round before the mid-stitch and work as follows: Continue in the round with English rib as before; the knitted-up stitches under the sleeve are worked without knitting together stitches and yarn overs on the first round. At the same time increase at marker 1 (or 5 depending on which sleeve you are working) from the yoke and decrease stitches under the sleeve as described below: INCREASES: Continue to increase as before at marker 1/5 (= 4 stitches increased on each increase-round). Increase like this every 12th-10th-10th-10th-8th-10th round a total of 4 times. After the first increase there are 42-46-48-54-58-60 stitches (subsequently the number of stitches stays the same as you decrease at the same time as you increase). DECREASES: When working increase 2, decrease at the same time under the sleeve – read DECREASE TIP (= 4 stitches decreased on each decrease-round). Decrease like this on every round where you also increase (a total of 3 times). In other words, at increase 1, you are left with 42-46-48-54-58-60 stitches. Then the number of stitches remains the same on subsequent increase/decrease rounds. Continue with English rib until the sleeve measures 34-35-34-33-32-30 cm (there are 3 cm left to finished length). Now work the next round in rib in the same way as on the body; i.e. the yarn overs and knitted stitches are knitted together, increase 1 stitch after each knitted stitch and purl the purled stitch = 63-69-72-81-87-90 stitches. Change to circular needle size 4 mm and work rib as on the neck (1 English rib stitch, purl 2) for 3 cm. Loosely cast off with knit over knit and purl over purl - remember CASTING-OFF TIP. The sleeve measures approx. 37-38-37-36-35-33 cm from the division. Work the other sleeve in the same way. |
|
 |
|
Have you finished this pattern?Tag your pictures with #dropspattern #dublinwintersweater or submit them to the #dropsfan gallery. Do you need help with this pattern?You'll find 22 tutorial videos, a Comments/Questions area and more by visiting the pattern on garnstudio.com. © 1982-2026 DROPS Design A/S. We reserve all rights. This document, including all its sub-sections, has copyrights. Read more about what you can do with our patterns at the bottom of each pattern on our site. |
|
With over 40 years in knitting and crochet design, DROPS Design offers one of the most extensive collections of free patterns on the internet - translated to 17 languages. As of today we count 324 catalogues and 12202 patterns translated into English (UK/cm).
We work hard to bring you the best knitting and crochet have to offer, inspiration and advice as well as great quality yarns at incredible prices! Would you like to use our patterns for other than personal use? You can read what you are allowed to do in the Copyright text at the bottom of all our patterns. Happy crafting!
Post a comment to pattern DROPS 215-12
We would love to hear what you have to say about this pattern!
If you want to leave a question, please make sure you select the correct category in the form below, to speed up the answering process. Required fields are marked *.