DROPS Air
DROPS Air
65% Alpaca, 28% Polyamide, 7% Wool
from 4.80 £ /50g
DROPS Big Delight
DROPS Big Delight
100% Wool
Discontinued
find alternatives
DROPS SS24

Metamorphosis

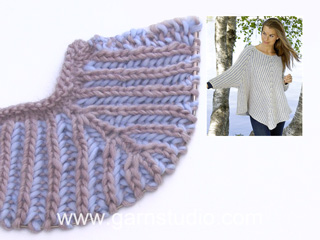
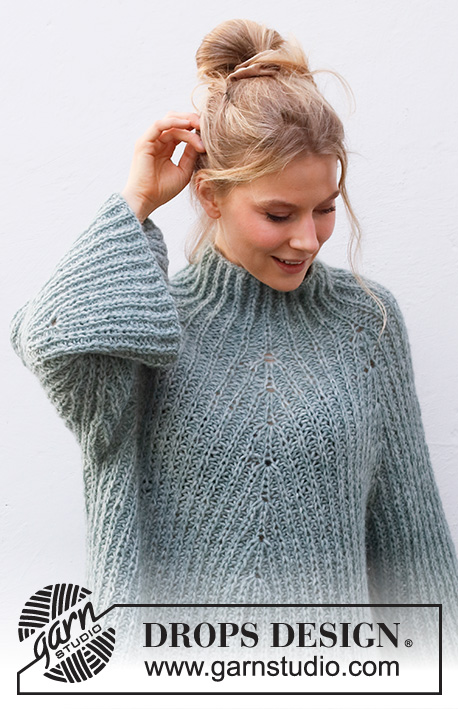
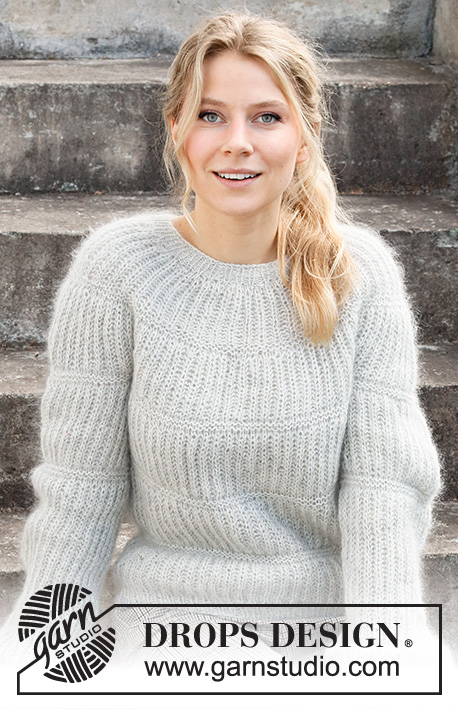
Knitted jumper in DROPS Air and DROPS Big Delight. Piece is knitted top down in two coloured English rib with raglan. Size: S - XXXL

DROPS 215-22
DROPS design: Pattern db-119
Yarn group A + A or C
-------------------------------------------------------

SIZE:
S - M - L - XL – XXL - XXXL

MATERIALS:
DROPS AIR from Garnstudio (belongs to yarn group C)
200-200-200-250-250-300 g colour 02, wheat
And use:
DROPS BIG DELIGHT from Garnstudio (belongs to yarn group C)
300-300-400-400-400-500 g colour 06, autumn forest

KNITTING TENSION:
14 stitches in width and 36 rows vertically with English rib = 10 x 10 cm.
17 stitches in width and 22 rows vertically in stocking stitch = 10 x 10 cm.

NEEDLES:
DROPS DOUBLE POINTED NEEDLES SIZE 5 mm
DROPS CIRCULAR NEEDLE SIZE 5 mm : Length 40 and 60 or 80 cm for English rib.
DROPS DOUBLE POINTED NEEDLES SIZE 4 mm
DROPS CIRCULAR NEEDLE SIZE 4 mm : Length 40 and 80 cm for rib.
Needle size is only a suggestion! If you have too many stitches on 10 cm switch to a larger needle size. If you have too few stitches on 10 cm switch to a smaller needle size.

-------------------------------------------------------

Alternative Yarn – See how to change yarns here
Yarn Groups A to F – Use the same pattern and change the yarn here
Yarn usage using an alternative yarn – Use our yarn converter here

-------------------------------------------------------

DROPS Air
DROPS Air
65% Alpaca, 28% Polyamide, 7% Wool
from 4.80 £ /50g
DROPS Big Delight
DROPS Big Delight
100% Wool
Discontinued
find alternatives

Pattern instructions

NOTE: This pattern is written in British English. All measurements in charts are in cm. For conversion from cm to inches - click here. There are different terms for crocheting in British and American English. If this pattern includes crochet, click for "crochet terms" here. For this pattern in American English, please click here.
-------------------------------------------------------

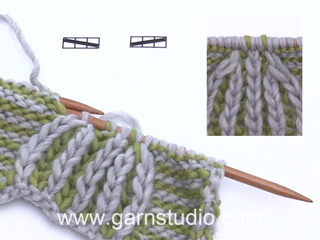
EXPLANATION FOR THE PATTERN:

-------------------------------------------------------

PATTERN:
See diagram A.1. All uneven rounds are worked with Big Delight. All even rounds are worked with Air (see diagram).

INCREASE FOR RAGLAN:
Increase for raglan on each side of purl stitches with marker (= raglan stitches), i.e. Increase in knit stitch and yarn over closes raglan stitch. Increase 2 stitches on each side of raglan stitches (= 16 stitches increased on increase round): All increases are done on a round where yarn over and knit stitch are knitted together (= a round with Air).
Increase 2 stitches in knit stitch and yarn over by working 3 stitches in stitch and yarn over as follows: Knit stitch and yarn over together but wait to pass stitch and yarn over off left needle, make 1 yarn over on right needle, knit same stitch and yarn over together one more time, then slip knit stitch and yarn over worked off left needle (= 2 stitches increased). Then work the new stitches in English rib (A.1) but note that on first round after increases, purl purl stitches in increase without working together with yarn over because yarn over is not made. 

DECREASE TIP (applies to mid under sleeves):
Decrease under sleeves on each side of 3 stitches mid under sleeve (= 1 purl stitch + 1 English rib stitch (= stitch with marker) + 1 purl stitch).
All decreases are done on a round where yarn over and knit stitch are knitted together (= a round worked with Air).
DECREASE 2 STITCHES TOWARDS THE LEFT AS FOLLOWS (i.e. begin right after first purl stitch after stitch with marker): Slip first knit stitch and yarn over on to right needle knitwise, knit the next 2 stitches together (i.e. 1 purl + knit stitch and yarn over), then slip the loose stitch and yarn over over stitches worked together (= 2 stitches decreased).
DECREASE 2 STITCHES TOWARDS THE RIGHT AS FOLLOWS (i.e. begin 4 stitches + 2 yarn overs before stitch with marker): Slip first knit stitch and yarn over loosely on to right needle knitwise, purl 1, pass slipped stitch and yarn over over purl stitch, slip stitch back on left needle, pass slipped stitch and yarn over closest to purl stitch over stitch place back on left needle, slip the remaining stitch over on to right needle (= 2 stitches decreased).

CAST-OFF TIP:
To avoid a tight cast-off edge you may use a larger needle size. If this also is too tight, work a 1 yarn over after approx. every 4th stitch while casting off (cast off yarn overs as regular stitches).

-------------------------------------------------------

START THE PIECE HERE:

-------------------------------------------------------

JUMPER - SHORT OVERVIEW OF THE PIECE:
Neck edge and yoke are worked in the round on circular needle, top down. Now divide yoke for body and sleeves. Body is worked in the round on circular needle, top down. Work sleeves in the round on double pointed needles/short circular needle, top down. Work yoke, body and sleeves in two-coloured English rib with Air visible on right side and Big Delight visible on wrong side. Turn piece inside out when finished (before assembly) so that Big Delight is visible on right side. Work neck edge and rib at the bottom of sleeves and body with Air.
NOTE! All numbers of given when working English rib is without yarn overs because yarn overs are counted as 1 stitch together with slipped stitch.

NECK EDGE:
Cast on 78-82-86-88-96-100 stitches on a short circular needle size 4 mm with 1 strand Air. Rounds begin mid back. Knit 1 round. Then work rib in the round (= knit 1/purl 1) for 8 cm. Knit 1 round while decreasing 2-2-6-4-0-0 stitches evenly = 76-80-80-84-96-100 stitches. Insert 1 marker in middle of round. Then work yoke as explained below. Measure yoke from marker.

YOKE:
Switch to circular needle size 5 mm and knit 1 round. Work next round as follows: * Knit 1, make 1 yarn over, slip 1 stitch purlwise *, work from *-* the entire round. Now insert 4 markers in piece as explained below (this is done without working the stitches). Use markers when increasing for raglan.
Count 13-15-15-15-17-17 stitches (= half back piece), insert 1 marker in next stitch (= raglan stitch), count 9-9-9-9-13-13 stitches (= sleeve), insert 1 marker in next stitch (= raglan stitch), count 27-29-29-31-33-35 stitches (= front piece), insert 1 marker in next stitch (= raglan stitch), count 9-9-9-9-13-13 stitches (= sleeve), insert 1 marker in next stitch (= raglan stitch). 14-14-14-16-16-18 stitches remain on back piece after last marker. Then work A.1 in the round, every other round with Air/Big Delight. AT THE SAME TIME increase for RAGLAN as explained below. REMEMBER THE KNITTING TENSION!

RAGLAN:
When 7 rounds of A.1 have been worked in total (and next round begins with “knit yarn over and slipped stitch together” and worked with Air), increase for RAGLAN – read explanation above (= 16 stitches increased on increase round).
Increase like this every 8th round (i.e. every 4th round with visible English rib stitches vertically) 7-8-9-10-11-12 times in total vertically = 188-208-224-244-272-292 stitches on needle.
Continue A.1 in the round without increases until piece measures 18-20-22-24-26-28 cm from marker by the neck (piece measures approx. 22-24-26-28-30-32 cm from shoulder).
Now divide yoke for body and sleeves. I.e. work next round as follows from mid back:
Work 27-31-33-35-39-43 stitches as before (= half back piece), slip the next 39-43-45-51-57-59 stitches on 1 stitch holder for sleeve, cast on 9 new stitches on row (= in the side under sleeve), work 55-61-67-71-79-87 stitches as before (= front piece), slip the next 39-43-45-51-57-59 stitches on 1 stitch holder for sleeve, cast on 9 new stitches on needle (= in the side under sleeve) and work the 28-30-34-36-40-44 stitches as before (= half back piece). Finish body and sleeves separately. NOW MEASURE PIECE FROM HERE!

BODY:
= 128-140-152-160-176-192 stitches. Continue A.1 in the round as before. Work until piece measures 30 cm from division in all sizes (approx. 4 cm remain until finished measurements, try the jumper on and work to desired length).
Switch to circular needle size 4 mm and work with Air until finished measurements. Work rib in the round (= knit 1/purl 1) - on first round knit yarn overs together with knit stitches. When rib measures 4 cm, loosely cast off with knit over knit and purl over purl - read CAST-OFF TIP! Jumper measures approx. 56-58-60-62-64-66 cm from shoulder and down.

SLEEVE:
Slip the 39-43-45-51-57-59 stitches from stitch holder in one side of piece on double pointed needles or a small circular needle size 5 mm, and cast on 9 new stitches mid under sleeve = 48-52-54-60-66-68 stitches.
Insert 1 marker in the middle of the 9 stitches that were cast on under sleeve. Move the marker upwards when working; it should be used for decrease mid under sleeve. Work A.1 in the round and make sure to begin on correct round in pattern so that round with Air is most visible from right side the same way as on yoke.
AT THE SAME TIME ON 8th round (i.e. on 4th visible round with English rib vertically), decrease 4 stitches mid under sleeve - read DECREASE TIP (decrease 2 stitches towards the left after stitch with marker, and decrease 2 stitches towards the right before stitch with marker).
Decrease like this every 8th-8th-8th-8th-6th-6th round (i.e. every 4th-4th-4th-4th-3rd-3rd round with visible English rib stitches vertically) 3-3-3-4-4-4 times in total vertically = 36-40-42-44-50-52 stitches.
Work until sleeve measures 40-38-36-35-33-32 cm from division (approx. 4 cm remain until finished measurements, try the jumper on and work to desired length).
Switch to double pointed needles size 4 mm and work with Air until finished measurements.
Work rib in the round (= knit 1/purl 1) - on first round knit yarn overs together with knit stitches. When rib measures 4 cm, cast off with knit over knit and purl over purl - remember CAST-OFF TIP! Sleeve measures approx. 44-42-40-39-37-36 cm from division. Work the other sleeve the same way.

ASSEMBLY:
Turn jumper inside out so that Big Delight is most visible on right side. Sew the opening under the sleeves. Fold rib at the top of neck down on the inside of garment. Fasten rib to form a double neck edge. To avoid a tight neck edge and avoiding the edge to tip outwards, it is important to make the seam elastic.

This pattern has been corrected.

Updated online: 22.12.2020
Correction: DECREASE TIP (applies for mid under sleeves) has been updated.

Diagram

symbols = make 1 yarn over, slip 1 stitch purlwise
symbols = purl yarn over and slipped stitch together
symbols = knit yarn over and slipped stitch together
symbols = work with Big Delight
symbols = work with Air
diagram

Each of our patterns has specific tutorial videos to help you.

Do you have a question? See a list of frequently asked questions (FAQ)

Knitting tension is what determines the final measurements of your work, and is usually measured per 10 x 10 cm. It is provided like so: number of stitches in width x number of rows in height - eg: 19 stitches x 26 rows = 10 x 10 cm.

The knitting tension is very individual; some people knit/crochet loosely while others work tightly. You adjust the knitting tension with the needle size, which is why the suggested needle size is only meant as a guide! You need to adjust this (up or down) to ensure that YOUR knitting tension matches the knitting tension provided in the pattern. If you work with a different knitting tension than provided you will have a different yarn consumption, and your work will have different measurements than what the pattern suggests.

The knitting tension also determines which yarns can replace each other. As long as you achieve the same knitting tension you can replace one yarn with another.

See DROPS lesson: How to measure your tension/gauge

See DROPS video: How to make a gauge tension swatch

The required amount of yarn is provided in grams, eg: 450 g. To calculate how many balls you’ll need you first need to know how many grams are in 1 ball (25g, 50g or 100g). This information is available if you click on the individual yarn quality on our pages. Divide the amount required with the amount of each ball. For example, if each ball is 50g (the most common amount), the calculation will be as follows: 450 / 50 = 9 balls.

The important thing when changing from one yarn to another is that the knitting/crochet tension remains the same. This is so that the measurements of the finished piece will be the same as on the sketch provided. It is easier to achieve the same knitting tension using yarns from the same yarn group. It is also possible to work with multiple strands of a thinner yarn to achieve the knitting tension of a thicker one. Please try our yarn converter. We recommend you to always work a test swatch.

Please NOTE: when changing yarn the garment might have a different look and feel to the garment in the photo, due to individual properties and qualities of each yarn.

See DROPS lesson: Can I use a different yarn than the one mentioned in the pattern?

All our yarns are categorised into yarn groups (from A to F) according to thickness and knitting tension – group A contains the thinnest yarns and group F the thickest. This makes it easier for you to find alternative yarns to our patterns, should you wish to switch yarn. All yarns within the same group have a similar knitting tension and can easily replace each other. However, different yarn qualities have different structures and properties which will give the finished work a unique look and feel.

Click here for an overview of the yarns in each yarn group

At the top of all our patterns you’ll find a link to our yarn calculator, which is a helpful tool should you wish to use a different yarn than suggested. By filling in the yarn quality you wish to replace, the amount (in your size) and number of strands, the calculator will present good alternative yarns with the same knitting tension. Additionally it will tell you how much you’ll require in the new qualities and whether you’ll need to work with multiple strands. Most skeins are 50g (some are 25g or 100g).

If the pattern is worked with multiple colours, every colour will have to be calculated separately. Similarly, if the pattern is worked with several strands of different yarns (for example 1 strand Alpaca and 1 strand Kid-Silk) you will have to find alternatives for each, individually.

Click here to see our yarn calculator

Since different yarns have different qualities and textures we have chosen to keep the original yarn in our patterns. However, you can easily find options among our available qualities by using our yarn calculator, or simply pick a yarn from the same yarn group.

It is possible that some retailers still have discontinued yarns in stock, or that someone has a few skeins at home that they would like to find patterns for.

The yarn calculator will provide both alternative yarn as well as required amount in the new quality.

If you think it's hard to decide what size to make, it can be a good idea to measure a garment you own already and like the size of. Then you can pick the size by comparing those measures with the ones available in the pattern's size chart.

You'll find the size chart at the bottom of the pattern.

See DROPS lesson: How to read size chart

The needle size provided in the pattern serves only as a guide, the important thing is to follow the knitting tension. And since knitting tension is very individual, you will have to adjust the needle size to ensure that YOUR tension is the same as in the pattern – maybe you’ll have to adjust 1, or even 2 needle sizes, up or down to achieve the correct tension. For this, we recommend that you work test swatches.

Should you work with a different knitting tension than the one provided, the measurements of the finished garment might deviate from the measurement sketch.

See DROPS lesson: How to measure your tension/gauge

See DROPS video: How to make a tension/gauge swatch

Working a garment top-down provides more flexibility and room for personal adjustment. For example it is easier to try the garment on while working, as well as making adjustments to length of yoke and shoulder caps.

The instructions are carefully explaining every step, in the correct order. Diagrams are adjusted to the knitting direction and are worked as usual.

The diagram depicts all rows/rounds, and every stitch seen from the right side. It is read from bottom to top, from right to left. 1 square = 1 stitch.

When working back and forth, every other row is worked from the right side and every other row is worked from the wrong side. When working from the wrong side, the diagram will have to be worked reversed: from left to right, knit stitches are purled, purl stitches are knit etc.

When working in the round every round is worked from the right side and the diagram are worked from right to left on all rounds.

See DROPS lesson: How to read knitting diagrams

The diagram depicts all rows/rounds, and every stitch seen from the right side. It is worked from bottom to top, from right to left.

When working back and forth every other row is worked from the right side: from right to left and every other row is worked from the wrong side: from left to right.

When working in the round, every row in the diagram are worked from the right side, from right to left.

When working a circular diagram you start in the middle and work your way outwards, counter clockwise, row by row.

The rows usually start with a given number of chain stitches (equivalent to the height of the following stitch), this will either be depicted in the diagram or explained in the pattern.

See DROPS lesson: How to read crochet diagrams

Instructions for working several diagrams after each other on the same row/round, will often be written like so: “work A.1, A.2, A.3 a total of 0-0-2-3-4 times". This means you work A.1 once, then A.2 is worked once, and A.3 is repeated (in width) the number of times provided for your size – in this case like so: S = 0 times, M = 0 times, L=2 times, XL= 3 times and XXL = 4 times.

The diagrams are worked as usual: begin with the first row in A.1, then work the first row in A.2 etc.

See DROPS lesson: How to read knitting diagrams

See DROPS lesson: How to read crochet diagrams

The total width of the garment (from wrist-to-wrist) will be larger in the larger sizes, despite the actual sleeves being shorter. The larger sizes have longer sleeve caps and wider shoulders, so there will be a good fit in all sizes.

The measurement sketch/schematic drawing provides information regarding the full length of the garment. If it’s a jumper or a jacket the length is measured from the highest point on the shoulder closest to the neckline, and straight down to the bottom of the garment. It is NOT measured from the tip of shoulder. Similarly, the length of yoke is measured from the highest point on the shoulder and down to where yoke is split into body and sleeves.

On a jacket measures are never taken along bands, unless specifically stated. Always measure inside band stitches when measuring the length.

See DROPS lesson: How to read a schematic drawing

Diagrams are often repeated on the round or in height. 1 repeat is the diagram the way it appears in the pattern. If it says to work 5 repeats of A.1 in the round, then you work A.1 a total of 5 times after/next to each other in the round. If it says to work 2 repeats of A.1 vertically/in height you work the entire diagram once, then begin again at the start and work the entire diagram one more time.

Chain stitches are slightly narrower than other stitches and to avoid working the cast-on edge too tight, we simply chain more stitches to begin with. The stitch count will be adjusted on the following row to fit the pattern and measurement sketch.

The rib edge is more elastic and will contract slightly compared to, for example, stocking stitch. By increasing before the rib edge, you avoid a visible difference in width between the rib edge and the rest of the body.

It’s very easy to cast off too tightly, and by making yarn overs while casting off (and simultaneously casting these off) you avoid a too tight cast off edge.

See DROPS video: How to bind off with yarn overs (yo)

To achieve an even increase (or decrease) you can increase on, for example: every 3rd and 4th row alternately, like so: work 2 rows and increase on the 3rd row, work 3 rows and increase on the 4th. Repeat this until the increase is complete.

See DROPS lesson: Increase or decrease 1 st on every 3rd and 4th row alternately

Should you prefer to work in the round instead of back and forth, you may of course adjust the pattern. You’ll need to add steeks mid-front (usually 5 stitches), and follow the instructions. When you would normally turn and work from the wrong side, simply work across the steek and continue in the round. At the end you’ll cut the piece open, pick up stitches to work bands, and cover the cut edges.

See DROPS video: How to knit steeks and cut open

Should you prefer to work back and forth instead of in the round, you may of course adjust the pattern so you work the pieces separately and then assemble them at the end. Divide the stitches for the body in 2, add 1 edge stitch in each side (for sewing) and work the front and back pieces separately.

See DROPS lesson: Can I adapt a pattern for circular needles into straight needles?

Pattern repeats can vary slightly in the different sizes, in order to get the correct proportions. If you’re not working the exact same size as the garment in the photo, yours might deviate slightly. This has been carefully developed and adjusted so that the complete impression of the garment is the same in all sizes.

Make sure to follow instructions and diagrams for your size!

If you have found a pattern you like which is available in women’s size it’s not very difficult to convert it to men’s size. The biggest difference will be the length of sleeves and body. Start working on the women size that you think would fit across the chest. The additional length will be worked right before you cast off for the armhole/sleeve cap. If the pattern is worked top-down you can add the length right after the armhole or before the first decrease on sleeve.

Regarding additional yarn amount, this will depend on how much length you add, but it is better with a skein too many than too few.

All yarns will have excess fibres (from production) that might come off as lint or shedding. Brushed yarns (ie hairier yarns) have more of these loose, excess fibres, causing more shedding.

Shedding also depends on what is worn under or over the garment, and whether this pulls at the yarn fibres. It’s therefore not possible to guarantee that there will be no shedding

Below are some tips on how to get the best result when working with hairier yarns:

1. When the garment is finished (before you wash it) shake it vigorously so the looser hairs come off. NOTE: do NOT use a lint roller, brush or any method that pulls at the yarn.

2. Place the garment in a plastic bag and put it in your freezer - the temperature will cause the fibres to become less attached to each other, and excess fibres will come off easier.

3. Leave in the freezer for a few hours before taking it out and shaking it again.

4. Wash the garment according to the instructions on the yarn label.

Pilling is a natural process that happens to even the most exclusive of fibers. It's a natural sign of wear and tear that is hard to avoid, and that is most visible in high friction areas of your garment like a sweater's arms and cuffs.

You can make your garment look as new by removing the pilling, using a fabric comb or a pill/lint remover.

Still can't find the answer you need? Then scroll down and leave your question so one of our experts can try to help you. This will be done normally within 5 to 10 working days.
In the meantime, you can read the questions and answers that others have left to this pattern or join the DROPS Workshop on Facebook to get help from fellow knitters/crocheters!

You might also like...

Post a comment to pattern DROPS 215-22

We would love to hear what you have to say about this pattern!

If you want to leave a question, please make sure you select the correct category in the form below, to speed up the answering process. Required fields are marked *.

Comments / Questions (20)

country flag Cate wrote:

For the yoke I have 80 stitches after my yarn over round. To place the markers that is only adding up to 76 stitches. What am I doing wrong?

27.01.2024 - 00:18

DROPS Design answered:

Hi Cate, The markers are inserted in the next stitch, not before the next stitch, which accounts for your 4 missing stitches. Happy knitting!

29.01.2024 - 06:42

country flag Debra wrote:

I love the Metamorphosis sweater and have started to knit it. But I cannot get further than the second row of A1 on the yoke because i seem to lose the yarnover stitches at the ends of the needle and cannot work out how to correct it. Please can you advise me what I am doing wrong? I have knit flat Fishermans Rib before, but this is quite different. I am so frustrated because I want to get on with it and watch the pattern grow.

07.03.2023 - 20:59

DROPS Design answered:

Dear Debra, this video shows how to work English rib in the round with 2 colours - it might help you to visualize the transition between rounds. Happy knitting!

08.03.2023 - 09:14

country flag Elle wrote:

This looks like Dancing Aurora 218-26 How are they different?

22.11.2022 - 15:48

DROPS Design answered:

Dear Elle, the right side rows are not the same in these both patterns, here you have the knitted stitches of the English rib worked in Big delight in the other pattern, they are worked with Air. Happy knitting!

22.11.2022 - 16:12

country flag Sophie wrote:

Bonjour, le fils big delight n'étant plus disponible, par quoi pouvons nous le remplacer ? Cordialement

20.09.2022 - 09:38

DROPS Design answered:

Bonjour Sophie, vous pouvez utiliser par exemple une autre laine du groupe C ou bien 2 fils du groupe A comme Fabel ou Delight (pour conserver l'effet dégradé) + une autre laine du groupe A, découvrez ici un mélange Delight-Kid-Silk, votre magasin saura vous conseiller les couleurs assorties si besoin, même par mail ou téléphone. Bon tricot!

20.09.2022 - 10:13

country flag Pamela Poulin wrote:

I live in Canada, and I would like to order the wool for the Metamorphosis #119 or Divergence # 274 pattern . I am a size large. Could you shipped to Canada? Thanks for your help. Your patterns are very nice. Best regards, Pam

01.06.2022 - 15:25

DROPS Design answered:

Dear Pam, you will find the list of DROPS Stores in/shipping to Canada here. Happy knitting!

01.06.2022 - 16:51

country flag Camilla Standnes wrote:

Nå er jeg lettere frustrert. Jeg har begynt å strikke på denne genseren, og vært veldig fokusert på oppskrifte/mønsteret. Nå har jeg kommet et stykke, og holdt på i mange dager. Oppdager nå at oppskriften ikke gir meg denne genseren, men det er lik oppskrift som Dancing Aurora - og det jeg har strikket likner mer på den enn Metamorphosis!!!? Og når jeg sammenlikner oppskriftene så er de like? Så utrolig frustrerende! Hva har skjedd?

11.01.2022 - 22:24

DROPS Design answered:

Hej Camilla, det er samme opskift men den ene er med den ene side som retside, og den anden er med den anden side som retside. Vi skriver i opskriften: Arbeidet vrenges når det er strikket ferdig (før montering), slik at Big Delight blir synlig på rettsiden. God fornøjelse!

17.01.2022 - 13:40

country flag Jacqueline Evans wrote:

I can't find the colour 06 Autumn Forest in Big Delight in stores in the UK. Has it been discontinued?

30.09.2021 - 23:35

DROPS Design answered:

Dear Mrs Evzans, correct, you can replace DROPS Big Delight with 1 strand Delight + 1 strand another yarn group A - try out our yarn converter - read morea bout alternatives here your DROPS store will help you choosing the best matching alternative. Happy knitting!

01.10.2021 - 07:45

country flag Lieve Coeck wrote:

Ik brei model 215-22. Ik heb opgemerkt dat het stekenpatroon hetzelfde is als van model 218-26, nochtans zien beide modellen er niet hetzelfde uit. Ik bekom ribben zoals bij model 218-26. Ook wordt mijn breiwerk hierdoor te smal, wat doe ik fout?

11.08.2021 - 12:02

DROPS Design answered:

Dag Lieve,

Het stekenpatroon is inderdaad exact hetzelfde, alleen wordt deze trui aan het einde binnenstebuiten gekeerd, zodat Big Delight meer zichtbaar is. Wat betreft de afmetingen: heb je een proeflapje gemaakt om de stekenverhouding te controleren? Pas eventueel de naalddikte aan voor een juiste stekenverhouding.

17.08.2021 - 12:56

country flag Lieve Coeck wrote:

Ik brei model 215-22, en ik heb gemerkt dat het stekenpatroon hetzelfde is als bij 218-16. Ik bekom het resultaat van 218-16 ipv 215-22 en mijn breiwerk is te smal. Wat doe ik fout?

07.08.2021 - 15:05

country flag Mathilde Klerks-Noordermeer wrote:

Ik vraag me af of het aantal gram wel voldoende is voor deze trui. Het lijkt me zo weinig. Dit mede omdat ik zie dat herfstbos bijna niet meer beschikbaar is.

21.02.2021 - 19:54

DROPS Design answered:

Dag Mathilde,

De hoeveelheden zouden moeten kloppen. DROPS Air is heel licht in gewicht; vandaar dat je minder in grammen nodig hebt. Daarnaast gebruik je 2 verschillende garens.

23.02.2021 - 12:52