
Popular categories
Looking for a yarn?


Comments / Questions (88)
![]() MICHELE wrote:
MICHELE wrote:
1 HILO DE FLORA + 1 HILO DE KID SILK a que grosor de lana corresponde ?
22.03.2021 - 12:55
![]() Maria Venetsanou wrote:
Maria Venetsanou wrote:
Hello team I am in sleeve now I dont understand why i have to make decrease and increase if i have the same stiches.And if i have to do it .in first row i will increase and the next row at the marker stiches i will make the decrease?
13.03.2021 - 13:38DROPS Design answered:
Dear Maria, for the sleeves, in the first row, you pick up stitches in the stitches that were cast off for the armhole. These will hwlp the sleeve sit better on your body, be more comfortable at oyur armpit and give more movement to your arms. Later you derease some stitches only at the the mid-line (under the arm) to have the sleeve flollow the shape of your arm. I hope this helps. Happy Knitting.
13.03.2021 - 19:38
![]() Carina Söderman wrote:
Carina Söderman wrote:
Hej, dax att dela upp arbetet. Har ökat på oket 6ggr (M) ska ha 200 maskor på rundstickan men har bara 198. Kan jag öka nu på något sätt för att rädda arbetet el fördela maskorna på något sätt efter dom jag har? Vad betyder "lägg upp 7 m under ärmen"? Markören som jag satte vid allra första varvet är nu inte längre en "startmarkör" efter alla ökningar. Hur ska jag tänka vid fortsättningen av arbetet? Med vänlig hälsning, Carina
25.02.2021 - 21:54DROPS Design answered:
Hei Carina. Anbefaler deg å ta en sjekk hvor du har glemt å øke, og rekke opp dit slik at maskeantallet stemmer, evnt finne ut hvor (hvilket merke) det ikke har blitt økt og strikke en øke omgang til, slik at maskeantallet stemmer. Men vær obs på at bærestykket da kan bli lengre enn hva det står i oppskriften. Man legger opp 7 nye masker under hver erme. Merket som ble satt i halskanten er til å måle bærestykket. Når du skal måle bolen, måler du fra delingen. mvh DROPS design
10.03.2021 - 10:01
![]() Maria Venetsanou wrote:
Maria Venetsanou wrote:
Hello team again i read your message and thank you that is for M size i fix for L size i will knit like M size? which number i have to follow for increases ?the medium or Large? the 3rd or 4nd number?
19.02.2021 - 16:02DROPS Design answered:
Dear Mrs Venetsanou, correct, there are 56 sts in size M so that the detail below applies to M - size L is the 4th size in this pattern (= worked first over 90 sts then there are 60 sts after decreasing on neck. Happy knitting!
22.02.2021 - 07:07
![]() Merete Westerdahl wrote:
Merete Westerdahl wrote:
Hej Jeg har problemer med at tælle op til ryg, ærmer og forstykke. Er det ikke bare maskerne i mellem udtagningerne? Altså fra midtermaske til midtermaske? Merete :0)
19.02.2021 - 15:36DROPS Design answered:
Hej Merete , mener du når du tæller patentmaskerne? når du tæller patentmasker ser du kun hver 2.omgang som en stor patentmaske. :)
23.02.2021 - 13:34
![]() Maria Venetsanou wrote:
Maria Venetsanou wrote:
Hello team again i am in yoke i have 56 stiches and i have to pout the marker as 1st 10 stiches,2nd 5 stiches,3rd 9 stiches,4th 9 stiches 5th 5 stiches and 6th 13 stiches plus 3 stiches left that count 54 so remain 2 stiches what to do?
19.02.2021 - 14:22DROPS Design answered:
Dear Mrs Venetsanou, you should have: 8 sts, 1 st with 1st marker, 7 sts, 1 st with 2nd marker, 7 sts, 1 st with 3rd marker, 7 sts, 1 st with 4th marker, 7 sts, 1 st with 5th marker, 11 sts, 1 st with 6th marker, 3 sts = 8+1+7+1+7+1+7+1+7+1+11+1+3= 56 sts. Hope this will help. Happy knitting!
19.02.2021 - 15:15
![]() Maria Venetsanou wrote:
Maria Venetsanou wrote:
Hello team again thank you for your answer i fix it for xl size so i put 90 stiches i did the decrease but it is still 90 stiches and i have to have 56 and after i read the yoke that i have to put marker on 10 stiches after 5 stiches after 9 stiches after 9 stiches after 5 stiches and last 13 stiches and remain 3 stiches that count 54 not 56 can you help me?
17.02.2021 - 15:02DROPS Design answered:
Dear Mrs Venetsanou, make sure you really the 2 purl stitches together so that you will decrease 1/3 of the stitches and get 60 sts (without the yarn over made over the stitches that were slipped )., ie work all the round (yarn over, slip 1 as if to purl (= the stitch in English rib as before), Purl the next 2 stitches together into 1 stitch*, and repeat from *-*. Hope that helps. Happy knitting!
17.02.2021 - 15:16
![]() Maria Venetsanou wrote:
Maria Venetsanou wrote:
Hello team i start to knit this pattern drops 215-12 i just finish the neck when i start to Make 1 yarn over, slip 1 stitch as if to purl, purl 2 together *, work from *-* to end of round = 52-52-56-60-60-64 stitches. i see that the lines is not like the photo what to do?
17.02.2021 - 11:30DROPS Design answered:
Dear Mrs Venetsanou, on this round, you should decrease the 2 stitches previously purled by purling them together, the knit stitch will be worked as before, ie make sure you finish rib after round 2 and repeat *yarn over, slip 1 stitch as if to P (= the first st of the previous repeat in rib), purl the 2 sts together*, repeat from *-*, there will be now only 1 purl stitch between the stitch worked in English rib. Happy knitting!
17.02.2021 - 13:58
![]() Carina Söderman wrote:
Carina Söderman wrote:
Hej jag stickar helpatent på rundsticka för första gången och förstår inte vad som menas med följande: "öka så vart 10:e varv (dvs på vart femte synligt varv med helpatent) Med vänlig hälsning, Carina
16.02.2021 - 23:36DROPS Design answered:
Hej Carina, når du tæller patentmasker ser du kun hver 2.omgang som en stor patentmaske. Så du øger på hver 10: varv, men når du tæller ser du kun 5 masker :)
23.02.2021 - 09:49
![]() Valérie Hubot wrote:
Valérie Hubot wrote:
Hello la team Drops, Dans empiècement il est mis: "..., l'ouvrage mesure env 24 cm (taille L) à partir du col. Augmentez ensuite encore 2 x aux marqueurs -3 et -6[...]; si l'ouvrage est plus court que 24 cm (L), certaines [..] Continuer jusqu'à ce que l'ouvrage mesure 25 cm (L) depuis le col." Mes questions: -Augmenter 2 x aux marqueurs 3 et 6: tous les combien de rangs? 10 - Cela fera plus que 25 cm ? On augmente après la division alors? Merci !
11.02.2021 - 18:52DROPS Design answered:
Bonjour Mme Hubot, les augmentations aux marqueurs -3 et -6 se font comme avant (= tous les 10 rangs) - vous divisez l'ouvrage à 25 cm en taille L, si les augmentations ne sont pas toutes terminées, elles le seront après, dans la partie suivante (manches ou dos/devant). Bon tricot!
12.02.2021 - 07:37
|
|
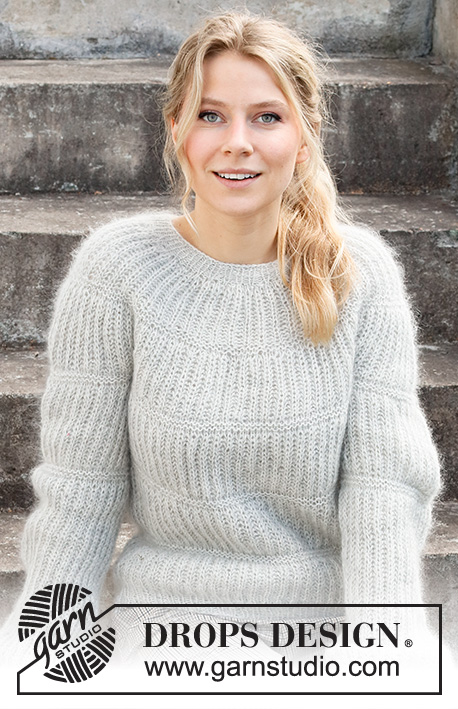
Dublin Winter Sweater#dublinwintersweater |
|
 |
 |
Knitted jumper with round yoke in DROPS Air. The piece is worked top down with English rib and A-shape. Sizes XS - XXL.
DROPS 215-12 |
|
|
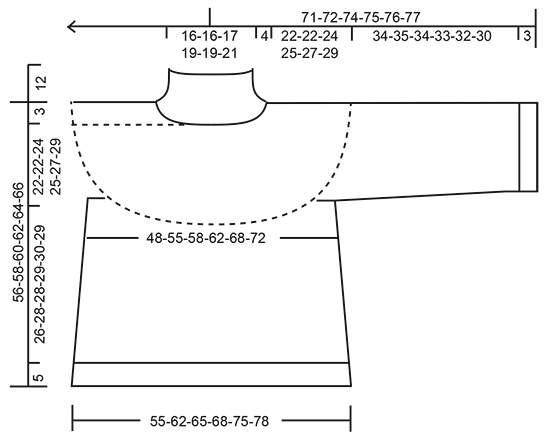
------------------------------------------------------- EXPLANATIONS FOR THE PATTERN: ------------------------------------------------------- RIB (in the round): ROUND 1: * Make 1 yarn over, slip 1 stitch as if to purl, purl 2 *, work from *-* to end of round. ROUND 2: * Knit together the yarn over and slipped stitch, purl 2 *, work from *-* to end of round. Repeat rounds 1 and 2. ENGLISH RIB (in the round): ROUND 1: * Knit together the yarn over and slipped stitch, make 1 yarn over, slip 1 stitch as if to purl, *, repeat from *-* to end of round. ROUND 2: * 1 yarn over, slip 1 stitch as if to purl, purl together the yarn over and slipped stitch *, repeat from *-* to end of round. Repeat rounds 1 and 2. INCREASE TIP (for increases in English rib stitch): All increases are worked on a round where the yarn overs and knitted stitches are knitted together (i.e. Round 1 in English rib). Increase 4 stitches in the English rib stitch as follows: Knit together the yarn over and knitted stitch, but do not slip them from the needle, make 1 yarn over the right needle, knit together the yarn over and knitted stitch again, move the marker to this stitch (= mid-stitch), make 1 yarn over the right needle, knit together the yarn over and knitted stitch again (= 3 stitches and 2 yarn overs), slip the stitches from the left needle. On the next round work the increased stitches as follows: * Make 1 yarn over, slip 1 stitch as if to purl, purl 1 *, work from *-* a total of 2 times, make 1 yarn over, slip 1 stitch as if to purl (= 3 knitted stitches and 2 purled stitches). The marker sits in the middle stitch of the increased stitches (in a knitted stitch). DECREASE TIP (mid under sleeve): All decreases are worked on a round where the yarn overs and knitted stitches are knitted together (i.e. Round 1 in English rib). Start mid under the sleeve (i.e. before the marker-stitch) and decrease 4 stitches on the round as follows: Work the first 2 stitches in English rib as before, slip the next stitch + its yarn over as if to knit, knit together the next 2 stitches + and their yarn overs and pass the slipped stitch + and its yarn-over over the knitted together stitches. Work until there are 4 stitches left before the marker stitch (= mid-stitch under the sleeve), knit together the next 3 stitches + and their yarn overs (= 2 stitches decreased), work the last stitch on the round. CASTING-OFF TIP: To avoid the cast-off edge being tight you can cast off with a larger size needle. If the edge is still tight, make 1 yarn over after approx. each 3rd stitch at the same time as casting off; the yarn overs are cast off as normal stitches. ------------------------------------------------------- START THE PIECE HERE: ------------------------------------------------------- JUMPER – SHORT OVERVIEW OF THE PIECE: The neck and yoke are worked in the round with circular needle, top down. On yoke, increase in 6 stitches marked with markers. The yoke is divided for body and sleeves and the body continued in the round with circular needle. The sleeves are worked in the round with short circular needle, top down. NECK: Cast on 78-78-84-90-90-96 stitches with circular needle size 4 mm and Air. Knit 1 round. Then work RIB – read description above, for 12 cm; finish after round 2. The next round is worked as follows: * Make 1 yarn over, slip 1 stitch as if to purl, purl 2 together *, work from *-* to end of round = 52-52-56-60-60-64 stitches. Change to circular needle size 6 mm. Insert 1 marker thread at the beginning of the round; the yoke is measured from this marker thread. YOKE: Insert 6 markers in the piece as described below (without working the stitches). All markers are in knitted stitches and are used when increasing on the yoke. Count 8-8-8-10-10-10 stitches, insert marker 1 in the next stitch (= back right sleeve), count 5-5-7-5-5-7 stitches, insert marker 2 in the next stitch (= raglan-line in front), count 7-7-7-9-9-9 stitches, insert marker 3 in the next stitch (= mid-front), count 7-7-7-9-9-9 stitches, insert marker 4 in the next stitch (= raglan-line in front), count 5-5-7-5-5-7 stitches, insert marker 5 in the next stitch (= back left sleeve), count 11-11-11-13-13-13 stitches, insert marker 6 in the next stitch (= mid-back), there are 3 stitches left on the round. Work ENGLISH RIB in the round – read description above. REMEMBER THE KNITTING TENSION! When you have worked 2-2-6-2-6-2 rounds of English rib, increase stitches on the next round as follows: Increase 4 stitches in all 6 marker-stitches - read INCREASE TIP (= 24 stitches increased on the round). Increase like this every 12th-10th-10th-10th-8th-10th round (every 6th-5th-5th-5th-4th-5th round of visible English rib stitches) a total of 5-6-6-7-8-8 times at markers 1, 2, 4 and 5 and a total of 4-5-6-6-7-8 times at markers 3 and 6 = 164-188-200-220-244-256 stitches on the needle. If the knitting tension is correct in height, the piece measures approx. 20-20-22-24-24-28 cm from the marker on the neck. Increases at markers 3 and 6 continue two more times on the piece (i.e. a total of 6-7-8-8-9-10 increases mid-front and mid-back); if the piece is shorter than 20-20-22-24-24-28 cm, some of these increases might be on the yoke. The number of stitches when dividing the yoke for body and sleeves will then not be the same as described below. The extra stitches will be on the front and back pieces. (Markers 1 and 5 also have further increases after the division, but these are described under SLEEVE.) Continue working until the piece measures 22-22-24-25-27-29 cm from the marker on the neck. On the next round divide for the body and sleeves as follows: Work the first 14-16-16-18-20-20 stitches as before, place the next 31-35-37-43-47-49 stitches on a thread for the sleeve, cast on 7 stitches under the sleeve, work the next 51-59-63-67-75-79 stitches as before, place the next 31-35-37-43-47-49 stitches on a thread for the sleeve, cast on 7 stitches under the sleeve and work the remaining 37-43-47-49-55-59 stitches as before. BODY: = 116-132-140-148-164-172 stitches – this stitch-count is only applicable if you have increased 4-5-6-6-7-8 times at markers 3 and 6 on the yoke. If you have increased more times on the yoke there will be more stitches on the needle now). Continue in the round with English rib as before and work the last 2 increases at markers 3 and 6 if necessary. The stitches under the sleeve are worked without knitting together stitches and yarn overs on the first round. When all the increases are finished there are 132-148-156-164-180-188 stitches on the body. Work until the piece measures 26-28-28-29-30-29 cm from the division (adjust so the next round is one where stitches and yarn overs are knitted together). There is approx. 5 cm left to finished length; try the jumper on and work to desired length. Change to circular needle size 4 mm and work rib as follows: * Knit the first stitch and yarn over together as before, 1 yarn over (= 1 stitch increased), purl 1 *, work from *-* to end of round = 198-222-234-246-270-282 stitches. Then work the same rib as on the neck for 5 cm (yarn overs worked twisted on the first round). Loosely cast off with knit over knit and purl over purl - read CASTING-OFF TIP! The jumper measures approx. 56-58-60-62-64-66 cm from the shoulder down. SLEEVE: Place the 31-35-37-43-47-49 stitches from the thread on the one side of the piece on short circular needle size 6 mm and knit up 1 stitch in each of the 7 stitches cast on under the sleeve = 38-42-44-50-54-56 stitches. Insert a marker thread in the middle of the 7 stitches under the sleeve (a knitted stitch in the English rib pattern). This stitch will be where you decrease under the sleeve later. Start the round before the mid-stitch and work as follows: Continue in the round with English rib as before; the knitted-up stitches under the sleeve are worked without knitting together stitches and yarn overs on the first round. At the same time increase at marker 1 (or 5 depending on which sleeve you are working) from the yoke and decrease stitches under the sleeve as described below: INCREASES: Continue to increase as before at marker 1/5 (= 4 stitches increased on each increase-round). Increase like this every 12th-10th-10th-10th-8th-10th round a total of 4 times. After the first increase there are 42-46-48-54-58-60 stitches (subsequently the number of stitches stays the same as you decrease at the same time as you increase). DECREASES: When working increase 2, decrease at the same time under the sleeve – read DECREASE TIP (= 4 stitches decreased on each decrease-round). Decrease like this on every round where you also increase (a total of 3 times). In other words, at increase 1, you are left with 42-46-48-54-58-60 stitches. Then the number of stitches remains the same on subsequent increase/decrease rounds. Continue with English rib until the sleeve measures 34-35-34-33-32-30 cm (there are 3 cm left to finished length). Now work the next round in rib in the same way as on the body; i.e. the yarn overs and knitted stitches are knitted together, increase 1 stitch after each knitted stitch and purl the purled stitch = 63-69-72-81-87-90 stitches. Change to circular needle size 4 mm and work rib as on the neck (1 English rib stitch, purl 2) for 3 cm. Loosely cast off with knit over knit and purl over purl - remember CASTING-OFF TIP. The sleeve measures approx. 37-38-37-36-35-33 cm from the division. Work the other sleeve in the same way. |
|
 |
|
Have you finished this pattern?Tag your pictures with #dropspattern #dublinwintersweater or submit them to the #dropsfan gallery. Do you need help with this pattern?You'll find 22 tutorial videos, a Comments/Questions area and more by visiting the pattern on garnstudio.com. © 1982-2026 DROPS Design A/S. We reserve all rights. This document, including all its sub-sections, has copyrights. Read more about what you can do with our patterns at the bottom of each pattern on our site. |
|
With over 40 years in knitting and crochet design, DROPS Design offers one of the most extensive collections of free patterns on the internet - translated to 17 languages. As of today we count 324 catalogues and 12202 patterns translated into English (UK/cm).
We work hard to bring you the best knitting and crochet have to offer, inspiration and advice as well as great quality yarns at incredible prices! Would you like to use our patterns for other than personal use? You can read what you are allowed to do in the Copyright text at the bottom of all our patterns. Happy crafting!
Post a comment to pattern DROPS 215-12
We would love to hear what you have to say about this pattern!
If you want to leave a question, please make sure you select the correct category in the form below, to speed up the answering process. Required fields are marked *.