
Popular categories
Looking for a yarn?


Comments / Questions (26)
![]() Ingela Karlsson wrote:
Ingela Karlsson wrote:
Stickar koftan 217 - 33 i storlek medium. Angående halskant, det skall vara 142 m och fem maskor i var sida som framkant. Därefter stickar man i virden rät och en avig fram till 6 maskor är kvar på varvet, det står att man då ska sticka en vriden rät och sedan framkantens fem maskor. Det stämmer inte för gör man som det står i mönstret blir det två vridna räta maskor efter varandra. Det borde vara ett ojämnt antal maskor på halskanten.
20.09.2020 - 10:18
![]() Sabine Vis wrote:
Sabine Vis wrote:
Volgens mij klopt de beschrijving van naald een en twee van de boord niet.Als je de beschrijving precies volgt gaat het patroon verspringen. De laatste twee steken voor de bies aan de goede kant zijn gedraaid recht. De eerste twee steken na de bies aan de verkeerde kant worden beschreven als gedraaid averecht en recht.
15.09.2020 - 16:18DROPS Design answered:
Dag Sabine,
Inderdaad, ik denk dat er een foutje in zit. Om goed uit te komen zou je een oneven aantal steken op moeten zetten. Ik zal het doorgeven aan de ontwerpafdeling om na te kijken. Om nu verder te kunnen zou je 1 steek minder op kunnen zetten en nadat je de hals klaar hebt meerder je 1 steek in de naald waarin je recht breit vlak na de boordsteek.
18.09.2020 - 12:47
![]() Daniela wrote:
Daniela wrote:
Mi piace il motivo utilizzato
06.07.2020 - 13:57
![]() Sanny wrote:
Sanny wrote:
Mir gefällt die Jacke sehr gut mit dem kleinen Muster
14.06.2020 - 00:55
![]() Gina Lüneberg wrote:
Gina Lüneberg wrote:
Ich finde das Muster toll. Habe schon die Agnes gestrickt und bin von der Raglanjacke begeistert.
06.06.2020 - 19:39
![]() Anne Gullie Falkenberg wrote:
Anne Gullie Falkenberg wrote:
Veldig fin skulle gjerne strikket denne nå så jeg hadde hatten når jeg skal på ferie senere i år.
05.06.2020 - 22:51
|
||||||||||||||||
Mayan Moon Shine#mayanmoonshinecardigan |
||||||||||||||||
 |
 |
|||||||||||||||
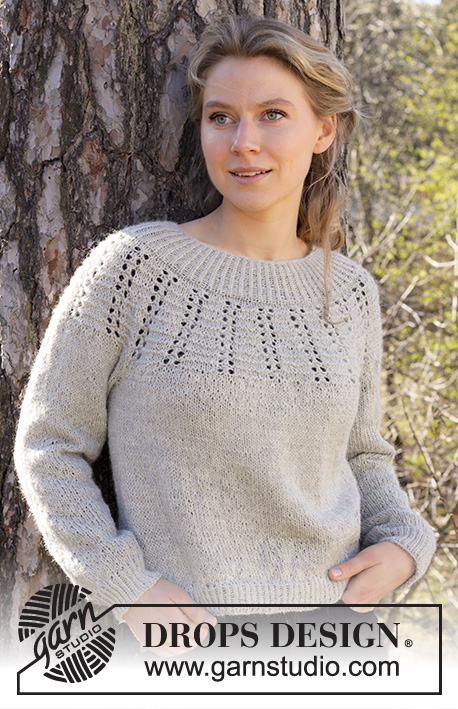
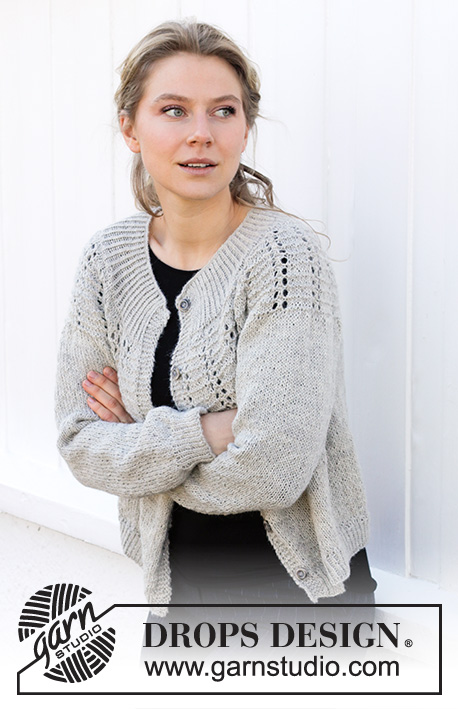
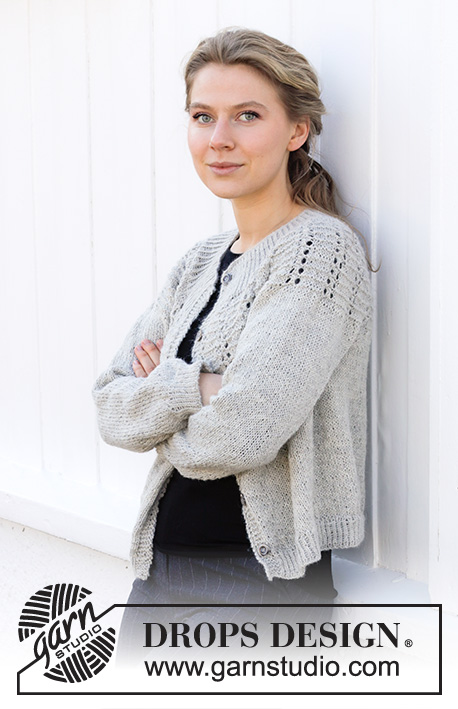
Knitted jacket in DROPS Puna. The piece is worked top down with round yoke, textured pattern and lace pattern. Sizes S - XXXL.
DROPS 217-33 |
||||||||||||||||
|
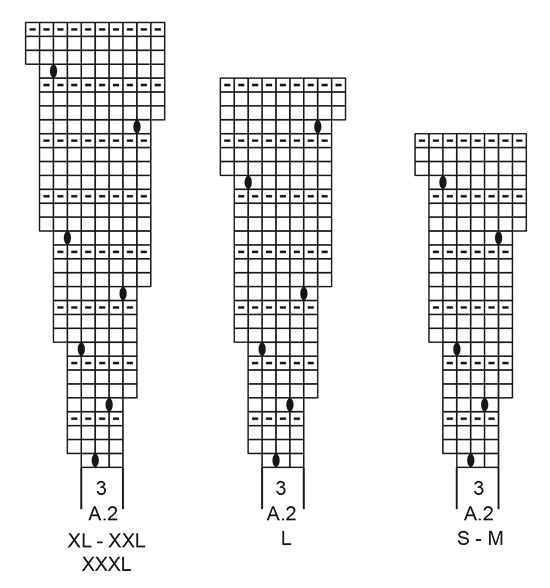
------------------------------------------------------- EXPLANATIONS FOR THE PATTERN: ------------------------------------------------------- RIDGE/GARTER STITCH (worked back and forth): Knit all rows. 1 ridge in height = Knit 2 rows. PATTERN: See diagrams A.1 and A.2 (choose diagram for your size – applies to A.2). The diagrams show all rows in the pattern from the right side. INCREASE TIP (evenly spaced): To work out how to increase evenly, count the total number of stitches on the needle (e.g. 241 stitches) minus bands (e.g. 10 stitches) and divide the remaining stitches by the number of increases to be made (e.g. 24) = 9.6. In this example, increase by making 1 yarn over after alternately each 9th and 10th stitch. Do not increase on bands. On the next row work the yarn overs twisted to avoid holes. DECREASE TIP (for sleeves): Decrease 1 stitch on either side of the marker thread as follows: Work until there are 3 stitches left before the marker thread, knit 2 together, knit 2 (marker thread sits between these 2 stitches), slip 1 stitch as if to knit, knit 1 and pass the slipped stitch over the knitted stitch. BUTTONHOLES: Work buttonholes on the right band (when the garment is worn). Work from the right side when there are 3 stitches left on the row as follows: Make 1 yarn over, knit 2 together and knit 1. On the next row (wrong side), knit the yarn over to leave a hole. The first buttonhole is worked when the rib on the neck measures approx. 1½-2 cm. Then work the other 5-5-6-6-6-6 buttonholes with approx. 8-8½-9-8-8-8½ cm between each one. CASTING-OFF TIP: To avoid the cast-off edge being tight you can cast off with a larger size needle. If the edge is still tight, make 1 yarn over after approx. each 4th stitch at the same time as casting off; the yarn overs are cast off as normal stitches. ------------------------------------------------------- START THE PIECE HERE: ------------------------------------------------------- JACKET – SHORT OVERVIEW OF THE PIECE: The neck and yoke are worked back and forth with circular needle from mid front and top down. The yoke is divided for body and sleeves and the body continued back and forth. The sleeves are worked in the round with short circular needle/double pointed needles, top down. NECK: Cast on 135-141-147-153-159-165 stitches (including 5 band stitches on each side towards mid front) with circular needle size 3 mm and Puna. Purl 1 row (= wrong side). Then work rib as follows: ROW 1 (right side): 5 band stitches in GARTER STITCH – read description above, * knit 1 twisted, purl 1 *, work from *-* until there are 6 stitches left on the row, knit 1 twisted and finish with 5 band stitches in garter stitch. ROW 2 (wrong side): 5 band stitches in garter stitch * purl 1 twisted, knit 1 *, work from *-* until there are 6 stitches left on the row, purl 1 twisted and finish with 5 band stitches in garter stitch. Repeat rows 1 and 2 until the rib measures 8 cm – remember the BUTTONHOLES on the right band – read description above. When the rib is finished, knit 1 row from the right side, AT THE SAME TIME increase 4 stitches evenly – read INCREASE TIP = 139-145-151-157-163-169 stitches. Work 1 row from the wrong side (purl the yarn overs twisted and front band stitches in garter stitch as before). Change to circular needle size 4 mm. YOKE: Work pattern as follows: 5 band stitches in garter stitch, * A.1 over the next 3 stitches, A.2 (= 3 stitches on the first row) *, work from *-* 21-22-23-24-25-26 times in width, work A.1 and finish with 5 band stitches in garter stitch. Continue back and forth like this. REMEMBER THE KNITTING TENSION! When A.2 have been completed in height, there are 244-255-289-325-338-351 stitches on the needle. Continue the pattern (without further increases in A.2) until the yoke measures 17-19-20-22-24-26 cm from the cast-on edge – adjust so you finish on a row like the last row in A.2. Change to circular needle size 4.5 mm. Continue with stocking stitch with 5 band stitches in garter stitch on each side. AT THE SAME TIME on the first row from the right side increase 22-28-23-23-28-38 stitches evenly spaced – read INCREASE TIP = 266-283-312-348-366-389 stitches. When the piece measures 19-21-22-24-26-28 cm increase 24-31-26-26-32-41 stitches = 290-314-338-374-398-430 stitches. Continue working until the yoke measures 20-22-23-25-27-29 cm from the cast-on edge. Now divide the piece for body and sleeves, on the next row from the wrong side, as follows: 5 band stitches in garter stitch, purl 41-45-48-53-58-64 stitches (= right front piece), place the next 58-62-68-76-78-82 stitches on 1 thread for the sleeve and cast on 10-10-12-12-14-14 new stitches on the needle (= in side under sleeve), purl 82-90-96-106-116-128 stitches (= back piece), place the next 58-62-68-76-78-82 stitches on 1 thread for the sleeve and cast on 10-10-12-12-14-14 new stitches on the needle (= in side under sleeve), purl 41-45-48-53-58-64 stitches and work 5 band stitches in garter stitch (= left front piece). Body and sleeves are finished separately. THE PIECE IS NOW MEASURED FROM HERE! BODY: = 194-210-226-246-270-294 stitches. Work stocking stitch with 5 band stitches in garter stitch on each side. When the piece measures 24-24-25-25-25-25 cm from the division, increase 37-41-43-47-53-57 stitches evenly spaced = 231-251-269-293-323-351 stitches. Change to circular needle size 3 mm and work rib as follows: ROW 1 (right side): 5 band stitches in garter stitch, * knit 1 twisted, purl 1 *, work from *-* until there are 6 stitches left on the row, knit 1 twisted and finish with 5 band stitches in garter stitch. ROW 2 (wrong side): 5 band stitches in garter stitch * purl 1 twisted, knit 1 *, work from *-* until there are 6 stitches left on the row, purl 1 twisted and finish with 5 band stitches in garter stitch. Repeat rows 1 and 2 until the rib measures 4 cm. Cast off with knit over knit and purl over purl – read CASTING-OFF TIP. The jacket measures approx. 52-54-56-58-60-62 cm from the shoulder down. SLEEVE: Place the 58-62-68-76-78-82 stitches from the thread on the one side of the piece on double pointed needles/short circular needle size 4.5 mm and knit up 1 stitch in each of the 10-10-12-12-14-14 stitches cast on under the sleeve = 68-72-80-88-92-96 stitches. Insert a marker thread in the middle of the new stitches under the sleeve (= 5-5-6-6-7-7 new stitches on each side of marker thread). Allow the marker thread to follow your work onwards; it will be used when decreasing under the sleeve. Work stocking stitch in the round. When the piece measures 4-4-4-4-4-3 cm from the division, decrease under the sleeve – read DECREASE TIP. Decrease like this every 3-3-2-1½-1½-1 cm a total of 11-12-15-18-19-20 times = 46-48-50-52-54-56 stitches. When the sleeve measures 40-39-38-37-36-34 cm (shorter measurements in larger sizes due to longer yoke), increase 6-6-8-8-10-10 stitches evenly spaced = 52-54-58-60-64-66 stitches. Change to double pointed needles size 3 mm and work rib (= knit 1 twisted, purl 1) for 5 cm. Cast off with knit over knit and purl over purl – remember CASTING-OFF TIP. The sleeve measures approx. 45-44-43-42-41-39 cm. Work the other sleeve in the same way. ASSEMBLY: Sew the buttons onto the left band. |
||||||||||||||||
Diagram explanations |
||||||||||||||||
|
||||||||||||||||
 |
||||||||||||||||
 |
||||||||||||||||
Have you finished this pattern?Tag your pictures with #dropspattern #mayanmoonshinecardigan or submit them to the #dropsfan gallery. Do you need help with this pattern?You'll find 29 tutorial videos, a Comments/Questions area and more by visiting the pattern on garnstudio.com. © 1982-2026 DROPS Design A/S. We reserve all rights. This document, including all its sub-sections, has copyrights. Read more about what you can do with our patterns at the bottom of each pattern on our site. |
||||||||||||||||


With over 40 years in knitting and crochet design, DROPS Design offers one of the most extensive collections of free patterns on the internet - translated to 17 languages. As of today we count 324 catalogues and 12290 patterns translated into English (UK/cm).
We work hard to bring you the best knitting and crochet have to offer, inspiration and advice as well as great quality yarns at incredible prices! Would you like to use our patterns for other than personal use? You can read what you are allowed to do in the Copyright text at the bottom of all our patterns. Happy crafting!
Post a comment to pattern DROPS 217-33
We would love to hear what you have to say about this pattern!
If you want to leave a question, please make sure you select the correct category in the form below, to speed up the answering process. Required fields are marked *.