
Popular categories
Looking for a yarn?


Comments / Questions (26)
![]() Jeg Forstår Ikke A1 Og A2 wrote:
Jeg Forstår Ikke A1 Og A2 wrote:
Jeg forstår ikke A1 og A2? Strikkes det først A1 over 3 også resten A2?
16.05.2021 - 07:29DROPS Design answered:
Hej, Efter de 5 kantmasker, strikker du skiftevis A.1 og A.2 hele vejen rundt og afslutter med 5 kantmasker i den anden side. Allerede på første pind i A.2 tager du 1 masker ud mellem 2. og 3. maske også hele pinden rundt. God fornøjelse!
17.05.2021 - 13:18
![]() Isabelle Lettre wrote:
Isabelle Lettre wrote:
Bonjour, je ne comprend pas cette portion du patron. (A1 au-dessus des 3 mailles suivantes, A.2 (= 3 mailles au 1er rang) Est-ce que je dois tricoter les 5 maille de la boutonnière après tricoter 3 mailles et commencer A.1? Je ne comprend pas le terme au-dessus des 3 maille suivante. Merci de me répondre
06.03.2021 - 23:52DROPS Design answered:
Bonjour Mme Lettre, vous commencez par tricoter les 5 mailles de la bordure du devant, puis répétez les diagrammes ainsi: *A.1 = 3 mailles, puis A.2 = 3 mailles au 1er rang (vous allez augmenter dans A.2 5, 6 ou 7 mailles (cf taille) comme le montre le diagramme*, répétez ainsi ces 5 mailles au 1er rang (= au 1er rang de A.2 vous augmentez ainsi: 2 m end, 1 jeté, 1 m end). Terminez le rang par les 5 m de bordure devant. Bon tricot!
08.03.2021 - 08:27
![]() Lespinasse wrote:
Lespinasse wrote:
Bonjour, j'ai commencé ce gilet, la patte de boutonnage au point mousse resserre le tricot, est-ce qu'à la fin ça ira ? D'habitude je fais les pattes à la fin en relevant les mailles, je n'ai jamais fait la patte au point mousse en même temps que le devant Merci pour vos conseils, très bonne journée
08.02.2021 - 12:16DROPS Design answered:
Bonjour Mme Lespinasse, si vous vous rendez compte que la bordure devant a tendance a resserrer l'ouvrage en hauteur, vous pouvez faire des rangs raccourcis à intervalles réguliers sur les mailles de bordure des devants de chaque côté. Un blocage peut également suffire. N'hésitez pas à essayer sur un échantillon avant de vous décider. Bon tricot!
08.02.2021 - 15:01
![]() Juliette Kühn wrote:
Juliette Kühn wrote:
In der Anleitung steht: Passe,wenn das Muster A2 in der Höhe zu Ende gestrickt wurde..im Muster wie zuvor weiter stricken OHNE ZUNAHMEN IN A2. Wenn ich diese Zunahmen weg lasse,verschiebt sich aber das Lochmuster. Ist das so vorgesehen? Auf den Bildern ist das Lochmuster grade untereinander,wie wird die Passe weiter gestrickt,nachdem A2 einmal in der Höhe gestrickt wurde?
06.02.2021 - 23:49DROPS Design answered:
Liebe Frau Kühn, im Muster wiezuvor weiterstricken meint nur, *3 Reihen glatt rechts, 1 Reihe glatt links* in A.2 wie zuvor stricken, aber dieses Mal stricken Sie keinen Umschlag mehr (= Maschenanzahl bleibt gleich) und A.1 über A.1 wie zuvor weiterstricken. Viel Spaß beim stricken!
08.02.2021 - 08:59
![]() Juliette Kühn wrote:
Juliette Kühn wrote:
Liebes Drops Team,ich würde so gern die Jacke stricken,allerdings erschließt sich mir die Maschenprobe nicht. Bei 3 verschiedenen Nadelstärken die verwenden werden sollen,kann ich ja keine identische Maschenprobe haben.Welche Nadelstärke verwende ich für die Maschenprobe? Und: bei 3 verschiedenen Nadelstärken wird doch die Blende für die Knopflöcher unterschiedlich groß. Oder habe ich da einen Denkfehler? Liebe Grüße
11.01.2021 - 16:37DROPS Design answered:
Liebe Frau Kühn, nachdem Sie Ihre Maschenprobe gestrickt haben, können Sie sie waschen und flach trocknen lassen (wie Sie die Jacke später waschen werden), dann die Maschenprobe messen, sollte sie nicht stimmen, dann entweder mit grösseren oder kleineren Nadeln nochmal versuchen. Viel Spaß beim stricken!
11.01.2021 - 16:51
![]() Virginia wrote:
Virginia wrote:
Hi, I am starting this project and it seems to me to be an awfully large amont of stitches for the neck! Will it close nicely around the neck or make a very deep neck? Thanks
07.12.2020 - 16:21DROPS Design answered:
Dear Virginia, remember to check your tension, if you get 20 sts in width x 26 rows in height in stocking stitch with the larger needles, you should get the correct measurements shown in the chart and the jacket fitting as on the picture. You can read more about tension here. Happy knitting!
08.12.2020 - 08:21
![]() An wrote:
An wrote:
Er favoritt sweater av riktig langer med fine møns!
31.10.2020 - 20:11
![]() Ingela Karlsson wrote:
Ingela Karlsson wrote:
Ni har uppdaterat antal maskor för uppläggning för halskanten från 142 m till 141 för att resåren ska stämma. Men ni har inte ändrat antal maskor på första varvet på oket, där är det fortfarande 142 m. Skall man öka en maska för att det ska stämma med mönsterdiagrammet?
29.09.2020 - 21:55DROPS Design answered:
Hej Ingela. Om du ser på den sista delen under HALSKANT så står det där att du ökar 1 maska. Mvh DROPS Design
30.09.2020 - 07:09
![]() Þóra Margrét Þórsdóttir wrote:
Þóra Margrét Þórsdóttir wrote:
Er munstrið ekki eins beggja megin við listann? Mér sýnist ekki enda á gatamunstri.
27.09.2020 - 23:36DROPS Design answered:
Blessuð Þóra Margrét. Mynstrið er ekki samhverft, við höfum A.1 í annarri hliðinni og A.2 í hinni. Gangi þér vel.
28.09.2020 - 16:09
![]() Suzie Durand wrote:
Suzie Durand wrote:
Bonjour, j'ai monté 148 mailles mais à la fin du rang 1 du col il me manque une maille car il me reste 5 maille au lieu de 6... J'ai ajusté... autre question... empiecement est-ce exact que de chaque côté de la bordure ce n'est pas similaire. ..d'un côté j'ai A.1 et de l'autre j'ai A.2...merci
20.09.2020 - 15:47DROPS Design answered:
Bonjour Mme Durand, merci pour votre retour, le nombre de mailles à monter a été modifié - effectivement le motif n'est pas symétrique on a bien A.1 d'un côté et A.2 de l'autre. Bon tricot!
22.09.2020 - 13:41
|
||||||||||||||||
Mayan Moon Shine#mayanmoonshinecardigan |
||||||||||||||||
 |
 |
|||||||||||||||
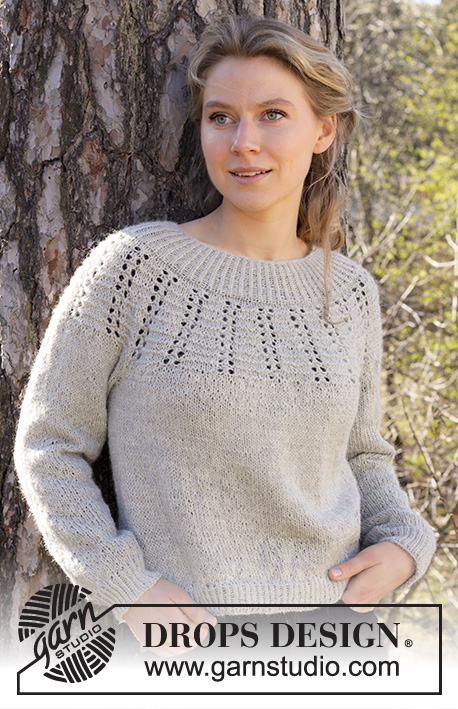
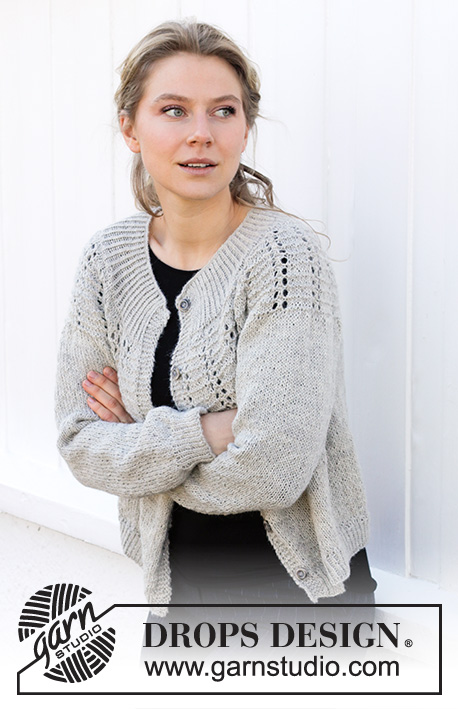
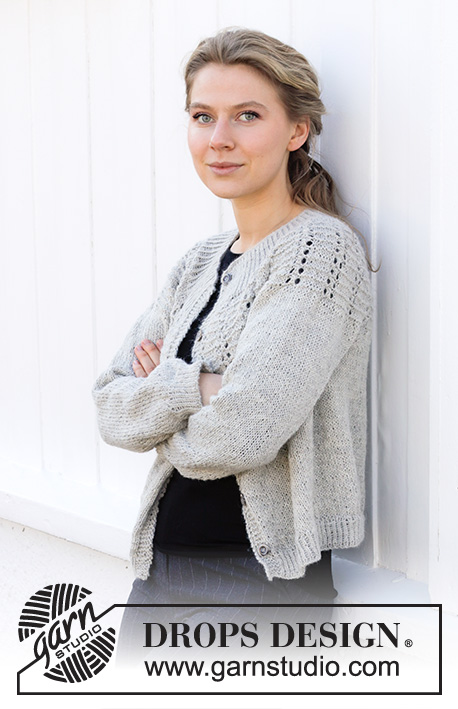
Knitted jacket in DROPS Puna. The piece is worked top down with round yoke, textured pattern and lace pattern. Sizes S - XXXL.
DROPS 217-33 |
||||||||||||||||
|
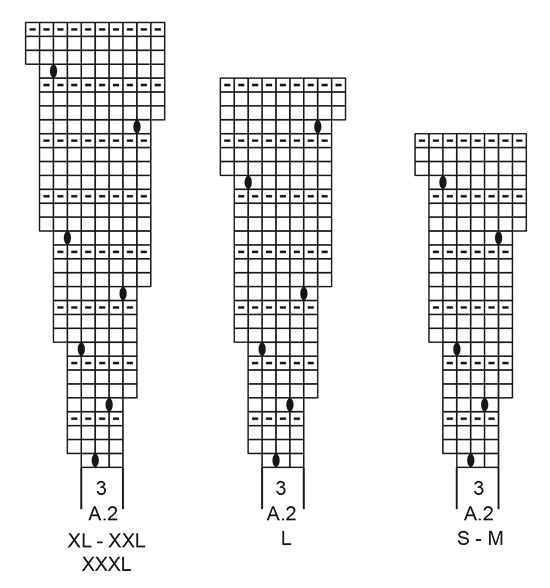
------------------------------------------------------- EXPLANATIONS FOR THE PATTERN: ------------------------------------------------------- RIDGE/GARTER STITCH (worked back and forth): Knit all rows. 1 ridge in height = Knit 2 rows. PATTERN: See diagrams A.1 and A.2 (choose diagram for your size – applies to A.2). The diagrams show all rows in the pattern from the right side. INCREASE TIP (evenly spaced): To work out how to increase evenly, count the total number of stitches on the needle (e.g. 241 stitches) minus bands (e.g. 10 stitches) and divide the remaining stitches by the number of increases to be made (e.g. 24) = 9.6. In this example, increase by making 1 yarn over after alternately each 9th and 10th stitch. Do not increase on bands. On the next row work the yarn overs twisted to avoid holes. DECREASE TIP (for sleeves): Decrease 1 stitch on either side of the marker thread as follows: Work until there are 3 stitches left before the marker thread, knit 2 together, knit 2 (marker thread sits between these 2 stitches), slip 1 stitch as if to knit, knit 1 and pass the slipped stitch over the knitted stitch. BUTTONHOLES: Work buttonholes on the right band (when the garment is worn). Work from the right side when there are 3 stitches left on the row as follows: Make 1 yarn over, knit 2 together and knit 1. On the next row (wrong side), knit the yarn over to leave a hole. The first buttonhole is worked when the rib on the neck measures approx. 1½-2 cm. Then work the other 5-5-6-6-6-6 buttonholes with approx. 8-8½-9-8-8-8½ cm between each one. CASTING-OFF TIP: To avoid the cast-off edge being tight you can cast off with a larger size needle. If the edge is still tight, make 1 yarn over after approx. each 4th stitch at the same time as casting off; the yarn overs are cast off as normal stitches. ------------------------------------------------------- START THE PIECE HERE: ------------------------------------------------------- JACKET – SHORT OVERVIEW OF THE PIECE: The neck and yoke are worked back and forth with circular needle from mid front and top down. The yoke is divided for body and sleeves and the body continued back and forth. The sleeves are worked in the round with short circular needle/double pointed needles, top down. NECK: Cast on 135-141-147-153-159-165 stitches (including 5 band stitches on each side towards mid front) with circular needle size 3 mm and Puna. Purl 1 row (= wrong side). Then work rib as follows: ROW 1 (right side): 5 band stitches in GARTER STITCH – read description above, * knit 1 twisted, purl 1 *, work from *-* until there are 6 stitches left on the row, knit 1 twisted and finish with 5 band stitches in garter stitch. ROW 2 (wrong side): 5 band stitches in garter stitch * purl 1 twisted, knit 1 *, work from *-* until there are 6 stitches left on the row, purl 1 twisted and finish with 5 band stitches in garter stitch. Repeat rows 1 and 2 until the rib measures 8 cm – remember the BUTTONHOLES on the right band – read description above. When the rib is finished, knit 1 row from the right side, AT THE SAME TIME increase 4 stitches evenly – read INCREASE TIP = 139-145-151-157-163-169 stitches. Work 1 row from the wrong side (purl the yarn overs twisted and front band stitches in garter stitch as before). Change to circular needle size 4 mm. YOKE: Work pattern as follows: 5 band stitches in garter stitch, * A.1 over the next 3 stitches, A.2 (= 3 stitches on the first row) *, work from *-* 21-22-23-24-25-26 times in width, work A.1 and finish with 5 band stitches in garter stitch. Continue back and forth like this. REMEMBER THE KNITTING TENSION! When A.2 have been completed in height, there are 244-255-289-325-338-351 stitches on the needle. Continue the pattern (without further increases in A.2) until the yoke measures 17-19-20-22-24-26 cm from the cast-on edge – adjust so you finish on a row like the last row in A.2. Change to circular needle size 4.5 mm. Continue with stocking stitch with 5 band stitches in garter stitch on each side. AT THE SAME TIME on the first row from the right side increase 22-28-23-23-28-38 stitches evenly spaced – read INCREASE TIP = 266-283-312-348-366-389 stitches. When the piece measures 19-21-22-24-26-28 cm increase 24-31-26-26-32-41 stitches = 290-314-338-374-398-430 stitches. Continue working until the yoke measures 20-22-23-25-27-29 cm from the cast-on edge. Now divide the piece for body and sleeves, on the next row from the wrong side, as follows: 5 band stitches in garter stitch, purl 41-45-48-53-58-64 stitches (= right front piece), place the next 58-62-68-76-78-82 stitches on 1 thread for the sleeve and cast on 10-10-12-12-14-14 new stitches on the needle (= in side under sleeve), purl 82-90-96-106-116-128 stitches (= back piece), place the next 58-62-68-76-78-82 stitches on 1 thread for the sleeve and cast on 10-10-12-12-14-14 new stitches on the needle (= in side under sleeve), purl 41-45-48-53-58-64 stitches and work 5 band stitches in garter stitch (= left front piece). Body and sleeves are finished separately. THE PIECE IS NOW MEASURED FROM HERE! BODY: = 194-210-226-246-270-294 stitches. Work stocking stitch with 5 band stitches in garter stitch on each side. When the piece measures 24-24-25-25-25-25 cm from the division, increase 37-41-43-47-53-57 stitches evenly spaced = 231-251-269-293-323-351 stitches. Change to circular needle size 3 mm and work rib as follows: ROW 1 (right side): 5 band stitches in garter stitch, * knit 1 twisted, purl 1 *, work from *-* until there are 6 stitches left on the row, knit 1 twisted and finish with 5 band stitches in garter stitch. ROW 2 (wrong side): 5 band stitches in garter stitch * purl 1 twisted, knit 1 *, work from *-* until there are 6 stitches left on the row, purl 1 twisted and finish with 5 band stitches in garter stitch. Repeat rows 1 and 2 until the rib measures 4 cm. Cast off with knit over knit and purl over purl – read CASTING-OFF TIP. The jacket measures approx. 52-54-56-58-60-62 cm from the shoulder down. SLEEVE: Place the 58-62-68-76-78-82 stitches from the thread on the one side of the piece on double pointed needles/short circular needle size 4.5 mm and knit up 1 stitch in each of the 10-10-12-12-14-14 stitches cast on under the sleeve = 68-72-80-88-92-96 stitches. Insert a marker thread in the middle of the new stitches under the sleeve (= 5-5-6-6-7-7 new stitches on each side of marker thread). Allow the marker thread to follow your work onwards; it will be used when decreasing under the sleeve. Work stocking stitch in the round. When the piece measures 4-4-4-4-4-3 cm from the division, decrease under the sleeve – read DECREASE TIP. Decrease like this every 3-3-2-1½-1½-1 cm a total of 11-12-15-18-19-20 times = 46-48-50-52-54-56 stitches. When the sleeve measures 40-39-38-37-36-34 cm (shorter measurements in larger sizes due to longer yoke), increase 6-6-8-8-10-10 stitches evenly spaced = 52-54-58-60-64-66 stitches. Change to double pointed needles size 3 mm and work rib (= knit 1 twisted, purl 1) for 5 cm. Cast off with knit over knit and purl over purl – remember CASTING-OFF TIP. The sleeve measures approx. 45-44-43-42-41-39 cm. Work the other sleeve in the same way. ASSEMBLY: Sew the buttons onto the left band. |
||||||||||||||||
Diagram explanations |
||||||||||||||||
|
||||||||||||||||
 |
||||||||||||||||
 |
||||||||||||||||
Have you finished this pattern?Tag your pictures with #dropspattern #mayanmoonshinecardigan or submit them to the #dropsfan gallery. Do you need help with this pattern?You'll find 29 tutorial videos, a Comments/Questions area and more by visiting the pattern on garnstudio.com. © 1982-2026 DROPS Design A/S. We reserve all rights. This document, including all its sub-sections, has copyrights. Read more about what you can do with our patterns at the bottom of each pattern on our site. |
||||||||||||||||


With over 40 years in knitting and crochet design, DROPS Design offers one of the most extensive collections of free patterns on the internet - translated to 17 languages. As of today we count 324 catalogues and 12290 patterns translated into English (UK/cm).
We work hard to bring you the best knitting and crochet have to offer, inspiration and advice as well as great quality yarns at incredible prices! Would you like to use our patterns for other than personal use? You can read what you are allowed to do in the Copyright text at the bottom of all our patterns. Happy crafting!
Post a comment to pattern DROPS 217-33
We would love to hear what you have to say about this pattern!
If you want to leave a question, please make sure you select the correct category in the form below, to speed up the answering process. Required fields are marked *.