
Popular categories
Looking for a yarn?


Comments / Questions (19)
![]() Lia De Wind wrote:
Lia De Wind wrote:
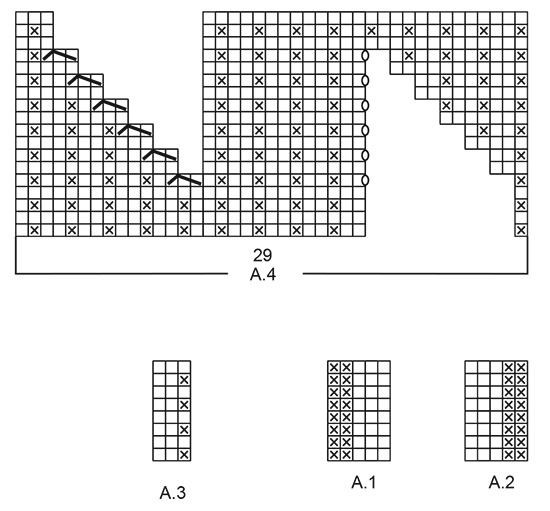
Ik snap de lege velden van A4 en A5 niet. Moet ik de steken van de bovenste rij erbij optellen? Want dan zijn er veel meer dan 29 steken. Wel een prachtig patroon trouwens
19.01.2023 - 22:08DROPS Design answered:
Dag Lia,
Nee, deze tel je er niet bij op. De eerstvolgende steek op je linker naald brei je in de eerstvolgende steek zoals aangegeven in het telpatroon. Het lege stuk sla je dus gewoon over, m.a.w. je zou het er tussen uit kunnen knippen en de hokjes aan elkaar plakken.
22.01.2023 - 19:10
![]() Tina Petersen wrote:
Tina Petersen wrote:
Til diagram forklaring A5. Lav 3 omslag mellem 2 masker. Der står at der kun er taget 2 masker ud - er det ikke 3 masker taget ud? Og hvordan skal det sidste omslag strikkes ? Der er kun anført hvordan de 2 første omslag skal strikkes.
13.05.2021 - 18:07DROPS Design answered:
Hej Tina, det skal være 2 omslag og det er nu blevet rettet. Tak for info :)
14.05.2021 - 09:10
![]() Angèle wrote:
Angèle wrote:
Quelle quantité de pelotes de laine est nécessaire pour la grandeur XL. Ma laine à le même échantillon suggéré. Merci!
02.01.2021 - 18:28DROPS Design answered:
Bonjour Angéle. Il faut 6 pelotes DROPS ALPACA et 6 pelotes DROPS KID-SILK pour la grandeur XL. Bon tricot!
02.01.2021 - 19:45
![]() PG wrote:
PG wrote:
Please demonstrate for the armholes: "knit 2 inside the 1 edge stitch in garter stitch".
16.10.2020 - 16:36DROPS Design answered:
Dear PG, this means you work from RS: 1 edge st in garter st, knit 2, work as before until 3 sts remain, finish with knit 2, 1 edge st in garter st, from WS work: 1 edge st in garter st, purl 2, work as before until 3 sts remain, finish with purl 2, 1 edge st in garter st. Happy knitting!
19.10.2020 - 07:52
![]() Pia Tangen wrote:
Pia Tangen wrote:
Hei, når man skal begynne å strikke de første forkortede pinnene på bolen(strikker XS), midt bak, så står det at man skal strikke 9 masker etter merket for så å snu pinnen og strikke 17 tilbake, når man snur igjen da for å strikke 20 masker med A.3, skal den første masken i A.3(den vrange) strikkes først da? Da havner den over den første av de rette i vrangborden. Eller skal man strikke slik at alle vrange masker(sett fra rett) i A.3 havner over den vrange masken i raden under?
10.10.2020 - 22:49DROPS Design answered:
Hej Pia, ja vrangmaskerne skal havne på en lige linje over hinanden som du kan se i diagrammet. God fornøjelse!
28.10.2020 - 13:38
![]() Kerstin wrote:
Kerstin wrote:
Beskrivningen säger 6 knappar och anger var knapphålen ska komma räknat från uppläggnningskanten: Sjätte knapphålet 39 cm från uppläggningskanten vilket jag har men då har jag ännu inte kommit upp till halskanten. Mina mått i övrigt stämmer med beskrivningen och knapphålet i halskanten kommer alltså att vara det 7:e . Det behövs alltså 7 st knappar.
09.10.2020 - 13:25
![]() PG wrote:
PG wrote:
Thank you for the quick response. The instructions say to knit 20 short rows, but that is not what your response says. I am making size medium. Am I adding new stitches with each short row or creating new stitches in A.3? Please be specific: how many stitches will there be when the short rows are completed? Can you (or any readers) send a photo of the lower back of this sweater?
03.09.2020 - 14:25DROPS Design answered:
Dear PG, sorry my mistake, I missed that part ... you continue working 3 sts more at the end of each row until you have worked a total of 20 short rows, then work next row over all sts on left needle (no more short rows here), turn and work A.3 with front band sts as before over all sts on next row. We do not have any photo from the back piece, but it's jsut a few rows worked over A.3 on mid back. Happy knitting!
03.09.2020 - 15:51
![]() PG wrote:
PG wrote:
I am having trouble with the short rows in the Body, after the ribbing. Am I suppose to add 3 stitches (1 pattern of A.3) with each of the short rows or use the next 3 stitches on the needle? How many stitches are on the needle in total after the short rows? Can you send a photo of the back of the sweater?
03.09.2020 - 03:39DROPS Design answered:
Dear PG, you should work 3 more sts in A.3 at the end of each row, ie you work first 9-12-15-18-24-27 sts in A.3 after marker, then turn now 17-23-29-35-47-53 in A.3, turn and work now these sts + 3 more sts = 20-26-32-38-50-56 sts in A.3, turn and work 3 more sts = 23-29-35-41-53-59 sts in A.3, turn and work 3 more sts in A.3 = 26-32-38-45-56-62 sts and so on until 5 sts remain (=A.2) at the end of the row, then turn and work all sts with A.2, A.3 to the end of row and finish with A.1. Happy knitting!
03.09.2020 - 09:09
![]() Laura wrote:
Laura wrote:
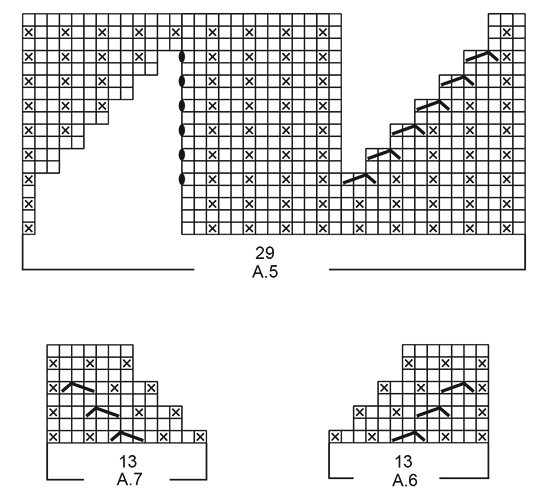
Hello, I have knitted many of your beautiful patterns over the years but with reference to Drops 212-7 pattern, I am having trouble understanding what the blank spaces, the gaps, in A.4 and A.5 mean, I can’t find an explanation, in A.4 for example what do I do after stitch 1 with the next 12 stitches (row 1). I am unfamiliar with the ‘gap’ when working within a specific number of stitches. Kind regards, Laura
29.04.2020 - 04:50DROPS Design answered:
Dear Laura, you will increase (with 2 yarn overs) and decrease (with k3 tog) in A.4 and A.5, let's take A.4: you increase first after the first stitch (on 5th row) and then decrease after the next 13 sts. The new stitches increased on this row do not exist before row 6, that's why they are not drawn before row 6. Same for the decreases but reversed, the 2 sts decreased on row 5 are not there anymore on row 6, reason why they are not there anymore. Just read diagram row after row, if there weren't no space - you should always have 29 sts in diagram and increase/decrease on either side of the same 13 stitches. Hope this helps, happy knitting!
29.04.2020 - 09:14
![]() Mila wrote:
Mila wrote:
Hallo lieber Drops - Team! Wäre es möglich ein Bild vom Rücken zu veröffentlichen? Ich finde, es wäre sehr nützlich! Danke!
20.04.2020 - 10:40DROPS Design answered:
Liebe Mila, wir haben leider kein Foto vom Rücken, wir können Ihnen aber sicher irgendwie helfen, gerne können Sie Ihre Frage hier stellen. Viel Spaß beim stricken!
20.04.2020 - 11:30
|
|||||||||||||||||||
Wake the Wind Jacket#wakethewindjacket |
|||||||||||||||||||
 |
 |
||||||||||||||||||
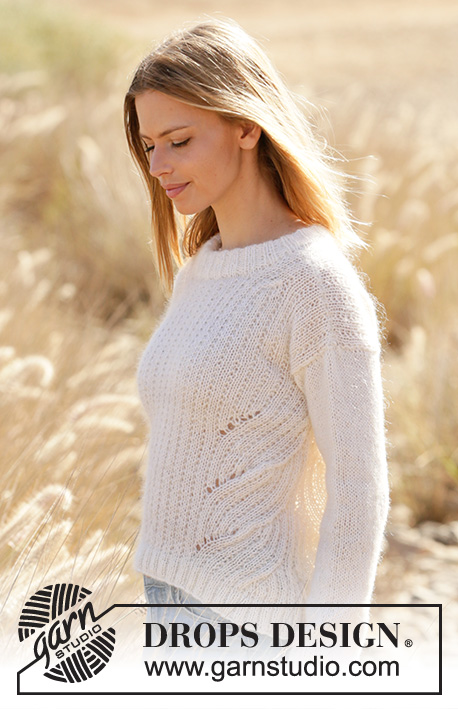
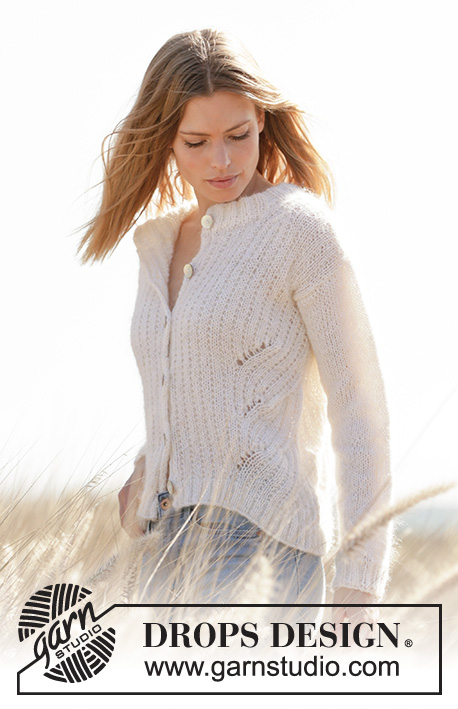
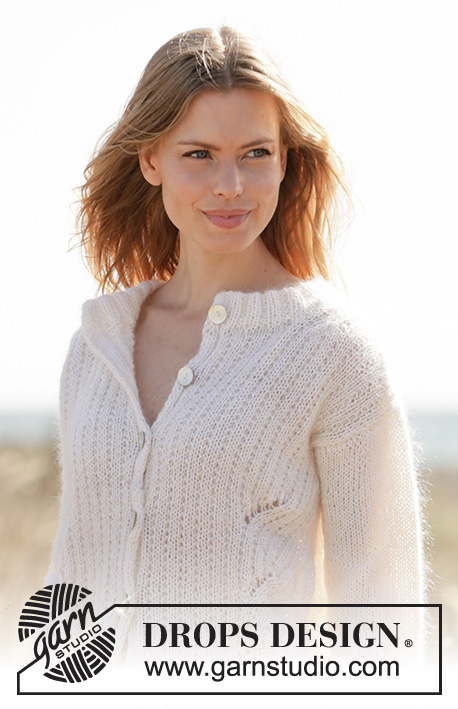
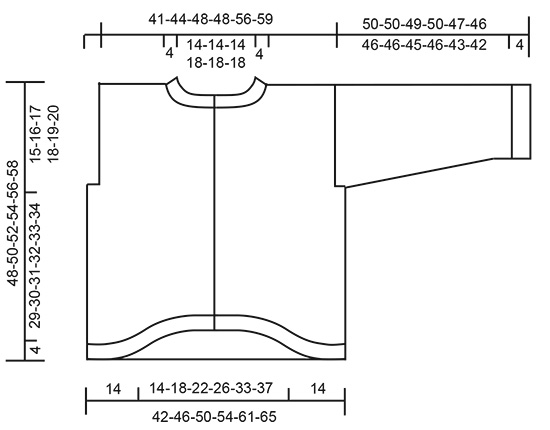
Knitted jacket in DROPS Alpaca and DROPS Kid-Silk. The piece is worked with textured pattern and displacements. Sizes XS - XXL.
DROPS 212-7 |
|||||||||||||||||||
|
------------------------------------------------------- EXPLANATIONS FOR THE PATTERN: ------------------------------------------------------- PATTERN: See diagrams A.1 to A.7. The diagrams show all rows from the right side. DECREASE TIP-1 (for sides of body): All decreases are worked from the right side! Decrease 1 stitch on each side of the marker thread as follows: Work until there are 5 stitches left before the marker thread, knit 2 together, work 6 stitches (marker thread sits in the middle of these 6 stitches), slip 1 stitch as if to knit, knit 1 and pass the slipped stitch over the knitted stitch. DECREASE TIP-2 (evenly spaced): To work out how to decrease evenly, count the total number of stitches on the row (e.g. 44 stitches) and divide by the number of decreases to be made (e.g. 8) = 5.5. In this example decrease by alternately knitting together each 4th and 5th stitch and each 5th and 6th stitch. INCREASE TIP (for sleeves): Work until there are 2 stitches left before the marker thread, 1 yarn over, knit 4 (marker thread sits between these 4 stitches), 1 yarn over. On the next round knit the yarn overs twisted to avoid holes. Then work the new stitches in stocking stitch. BUTTONHOLES (bottom up): Work buttonholes on the right band. 1 BUTTONHOLE = knit together the 3rd and 4th stitch from the edge and make 1 yarn over. On the next row knit the yarn over = hole. Work buttonholes when the piece measures (the last buttonhole is worked on first row of the neck) XS: 3, 9, 15, 21, 27 and 33 cm S: 4, 11, 17, 23, 29 and 35 cm M: 4, 11, 17, 24, 30 and 37 cm L: 3, 10, 17, 24, 31 and 38 cm XL: 3, 10, 18, 25, 33 and 40 cm XXL: 4, 12, 20, 27, 34 and 42 cm ------------------------------------------------------- START THE PIECE HERE: ------------------------------------------------------- JACKET – SHORT OVERVIEW OF THE PIECE: The piece is worked back and forth in sections and sewn together to finish. The body is worked back and forth as far as the armholes, then stitches are cast off for the armholes and the piece is divided for the front and back pieces, which are finished separately. The sleeves are worked in the round with double pointed needles/short circular needle. The neck is worked back and forth to finish. BODY: Cast on 224-240-256-272-304-320 stitches (including 5 band stitches on each side towards mid front) with circular needle size 4.5 mm and 1 strand Alpaca + 1 strand Kid-Silk (= 2 strands). Purl 1 row (= wrong side). The next row is worked as follows from the right side: Work A.1 over the first 5 stitches (= band), * knit 2, purl 2 *, work from *-* until there are 7 stitches left on the needle, knit 2 and finish with A.2 over the last 5 stitches (= band). Continue this rib for 4 cm – remember BUTTONHOLES on the right band – read description above. When the rib is finished, work 1 row from the right side where all purl-2 sections are purled together to purl-1 (do not decrease over the bands) = 171-183-195-207-231-243 stitches. Purl 1 row back from the wrong side (bands worked as before). Change to circular needle size 5.5 mm. You will later work textured pattern with displacements in the sides. The displacements will cause the piece to arch downwards in the sides and upwards mid front and back. To avoid the piece arching upwards mid-back you can now work short rows as follows: Start from the right side and work A.1 (= band), knit 2, A.3 (= 3 stitches – NOTE: The 2 knitted stitches in A.3 should lie over the 2 knitted stitches in the rib) over the next 78-84-90-96-108-114 stitches, insert a marker here (= before the mid-stitch on the row = 1 stitch in garter stitch). Continue working A.3 (= 3 stitches) 9-12-15-18-24-27 stitches past the marker, turn, tighten the strand and work A.3 back over 17-23-29-35-47-53 stitches, turn, tighten the strand and work A.3 over 20-26-32-38-50-56 stitches, turn, tighten the strand and work A.3 over 23-29-35-41-53-59 stitches. Continue back and forth like this, working 3 more stitches each time you turn and until you have worked 20 short rows. The last row is worked from the wrong side. Turn, work A.3 until there are 5 stitches left on the row and finish with A.2 (= band). Turn and work 1 row back from the wrong side with A.3 and A.1/A.2 as before. Now work pattern as follows: A.1 (= band), knit 2, A.3 over the next 9-12-15-18-24-27 stitches (= 3-4-5-6-8-9 repeats of 3 stitches), A.4 over the next 29 stitches, insert a marker thread here (= in the side), A.5 over the next 29 stitches, knit 2, A.3 over the next 21-27-33-39-51-57 stitches (= 7-9-11-13-17-19 repeats of 3 stitches), A.4 over the next 29 stitches, insert a marker thread here (= in the side), A.5 over the next 29 stitches, knit 2, A.3 over the next 9-12-15-18-24-27 stitches (= 3-4-5-6-8-9 repeats), A.2 (= band). Allow the marker threads to follow your work onwards; they will be used later. Continue the pattern back and forth. REMEMBER THE KNITTING TENSION! When A.4 and A.5 have been completed in height, repeat the diagrams in height 2 more times (= a total of 3 times). Then continue with stocking stitch over stocking stitch and garter stitch over garter stitch over the 29 stitches on each side of both marker threads. The other stitches are continued as before. On the next row from the right side begin to decrease on each side of the marker threads – read DECREASE TIP-1. Decrease like this every 2nd row a total of 3 times = 159-171-183-195-219-231 stitches. When the piece measures 33-34-35-36-37-38 cm measured from the cast-on edge and along the marker thread in the side (i.e. longest part), cast off 8-8-8-14-14-14 stitches on each side for the armholes (= 4-4-4-7-7-7 stitches on each side of both marker threads). There are 67-73-79-79-91-97 stitches on the back piece and 38-41-44-44-50-53 stitches on each front piece. Each piece is finished separately. BACK PIECE: = 67-73-79-79-91-97 stitches. Continue back and forth with textured pattern (= A.3) as before. Towards the armholes knit 2 inside the 1 edge stitch in garter stitch. When the piece measures 11-12-13-14-15-16 cm from where stitches were cast off for the armholes, cast off the middle 33-33-33-39-39-39 stitches for the neck and each shoulder is finished separately. On the next row from the neck cast off 1 stitch = 16-19-22-19-25-28 stitches on the shoulder. Continue until the piece measures 15-16-17-18-19-20 cm from where stitches were cast off for the armholes. Cast off with knit. Work the other shoulder in the same way. The jacket measures approx. 48-50-52-54-56-58 cm from the shoulder down (measured at its longest). RIGHT FRONT PIECE: = 38-41-44-44-50-53 stitches. Continue back and forth with 5 band stitches (= A.1) and textured pattern as before. Towards the armhole, knit 2 stitches inside the 1 edge stitch in garter stitch. When the piece measures 8-9-10-10-11-12 cm – adjust so the next row is worked from the right side, work as follows: Work the first 16-16-16-19-19-19 stitches (= 5 band stitches + 11-11-11-14-14-14 stitches in pattern) and place them on a thread for the neck, work A.7 over the next 13 stitches (= towards the neck), work the remaining stitches as before. Continue back and forth like this until A.7 has been completed in height = 16-19-22-19-25-28 stitches. When the piece measures 15-16-17-18-19-20 cm from where stitches were cast off for the armholes, cast off with knit. The jacket measures approx. 48-50-52-54-56-58 cm from the shoulder down (measured where it is longest). LEFT FRONT PIECE: = 38-41-44-44-50-53 stitches. Continue back and forth with textured pattern and 5 band stitches (= A.2) as before. Towards the armhole, knit 2 stitches inside the 1 edge stitch in garter stitch. When the piece measures 8-9-10-10-11-12 cm – adjust so the next row is worked from the wrong side, work as follows: Work the first 16-16-16-19-19-19 stitches (= 5 band stitches + 11-11-11-14-14-14 stitches in pattern) and place them on a thread for the neck, work to end of row as before. Now work pattern from the right side as follows: Work pattern as before until there are 13 stitches left on the row, A.6 over the last 13 stitches (= towards the neck). Continue back and forth like this until A.6 has been completed in height = 16-19-22-19-25-28 stitches. When the piece measures 15-16-17-18-19-20 cm from where stitches were cast off for the armholes, cast off with knit. The jacket measures approx. 48-50-52-54-56-58 cm from the shoulder down (measured where it is longest). SLEEVE: Cast on 44-44-48-48-48-52 stitches with double pointed needles size 4.5 mm and 1 strand Alpaca + 1 strand Kid-Silk (= 2 strands). Knit 1 round, then work rib (= knit 2 / purl 2) in the round for4 cm. Knit 1 round where you decrease 8-8-10-8-6-8 stitches evenly spaced – read DECREASE TIP-2 = 36-36-38-40-42-44 stitches. Change to double pointed needles size 5.5 mm and insert a marker thread at the beginning of the round (= mid under the sleeve). Work stocking stitch in the round. When the sleeve measures 8-8-8-9-8-8 cm, increase 1 stitch on each side of the marker thread – read INCREASE TIP. Increase like this every 7-5-5-4-3½-3½ cm a total of 6-8-8-9-10-10 times = 48-52-54-58-62-64 stitches. When the sleeve measures 47-47-46-46-43-42 cm (shorter sleeves in larger sizes due to longer yoke), finish the sleeve back and forth from the beginning of the round, with 1 edge stitch in garter stitch on each side. This gives you a split which is sewn to the bottom of the armhole. When the sleeve measures 50-50-49-50-47-46 cm, cast off with knit. Work the other sleeve in the same way. ASSEMBLY: Sew the shoulder seams with grafting stitches inside the cast-off edge. Sew the sleeves to the body inside the 1 edge stitch on the body and the cast-off edge on the sleeves. Sew the split to the 4-4-4-7-7-7 stitches cast off for the armhole. Sew the buttons onto the left band (work the last buttonhole on first row of the neck and sew button to the band afterwards). NECK: Start from the right side with 1 strand of each quality (= 2 strands) and circular needle size 4.5 mm. Knit up 92 to 104 stitches around the neck, including the stitches from the threads (number of stitches should be divisible by 4 + 2 + 10 band stitches). Purl 1 row back from the wrong side (bands worked as before). Work rib back and forth (= knit 2 / purl 2), with bands as before and knit 2 inside the bands on both sides. When the neck measures 8 cm, change to circular needle size 5.5 mm and cast off with knit over knit and purl over purl – make sure the cast-off edge is not tight. Fold the neck double to the wrong side and sew down. Make sure the seam is not tight and that the neck is not sewn over the last buttonhole. |
|||||||||||||||||||
Diagram explanations |
|||||||||||||||||||
|
|||||||||||||||||||
 |
|||||||||||||||||||
 |
|||||||||||||||||||
 |
|||||||||||||||||||
Have you finished this pattern?Tag your pictures with #dropspattern #wakethewindjacket or submit them to the #dropsfan gallery. Do you need help with this pattern?You'll find 31 tutorial videos, a Comments/Questions area and more by visiting the pattern on garnstudio.com. © 1982-2026 DROPS Design A/S. We reserve all rights. This document, including all its sub-sections, has copyrights. Read more about what you can do with our patterns at the bottom of each pattern on our site. |
|||||||||||||||||||


With over 40 years in knitting and crochet design, DROPS Design offers one of the most extensive collections of free patterns on the internet - translated to 17 languages. As of today we count 324 catalogues and 12290 patterns translated into English (UK/cm).
We work hard to bring you the best knitting and crochet have to offer, inspiration and advice as well as great quality yarns at incredible prices! Would you like to use our patterns for other than personal use? You can read what you are allowed to do in the Copyright text at the bottom of all our patterns. Happy crafting!
Post a comment to pattern DROPS 212-7
We would love to hear what you have to say about this pattern!
If you want to leave a question, please make sure you select the correct category in the form below, to speed up the answering process. Required fields are marked *.