
Popular categories
Looking for a yarn?


Comments / Questions (26)
![]() Pia wrote:
Pia wrote:
Jeg strikker i str Large. Jeg er med på mønstret, men forstår ikke hvordan jeg kommer videre efter de 8 cm på A1 ( 182 masker) Forstår ganske enkelt ikke 5-1...... og hvor mange cm førend A3 Håber spørgsmålet giver mening
25.03.2021 - 01:58
![]() Lourdes wrote:
Lourdes wrote:
Hola. Es correcta la cantidad de gramos que indicáis para hacer este jersey? 200 gramos me parece poco. Gracias
20.03.2021 - 00:45DROPS Design answered:
Hola Lourdes, las cantidades son en principio correctas, siempre que se mantenga la tensión del tejido y las medidas del patrón. Si tienes dudas, te recomendamos coger un ovillo más. La razón por la que se necesitan menos gramos de esta lana es porque está tiene un alto metraje, con cada ovillo cundiendo 190m, que serían los mismos metros que 2 ovillos de Karisma o de Merino Extra Fine.
21.03.2021 - 19:43
![]() Marianne wrote:
Marianne wrote:
Bonjour, est-il possible de connaître le niveau de difficulté de vos modèles ? Ils sont très beaux, mais je préférerais être sûre de ne pas me lancer dans un projet trop compliqué pour mon niveau et m'améliorer progressivement. Merci !
17.07.2020 - 16:18DROPS Design answered:
Bonjour Marianne, le niveau de difficulté est parfois difficile à déterminer en fonction des connaissances de chacune, lisez attentivement les explications, regardez les vidéos et les leçons listées en bas de page et, vous pouvez poser votre question ici ou bien contacter votre magasin pour toute assistance individuelle complémentaire. Bon tricot!
20.07.2020 - 08:38
![]() Isabelle wrote:
Isabelle wrote:
Très beau dans sa simplicité. Je tente de le tricoter dès maintenant.
03.06.2020 - 23:51
![]() Anett wrote:
Anett wrote:
Bald bin ich fertig. Leider musste ich öfter die Nadel ziehen und ein neues Stück stricken. Vor dem Bündchen (Rumpf) werden lt. Anleitung zu viele Maschen zugenommen. Ich wollte keinen Rock anstricken, doch stand der Bund ab wie ein Volant. Der Ärmel wurde ebenfalls zu weit, weil sich ein Rechenfehler eingeschlichen hat. Schade auch, dass das Modell auf Ihrem Foto Löcher in der Passe vom Zunehmen zeigt, obwohl diese lt. Anleitung vermieden werden sollten. Meiner wird nicht so gut. Anett
19.04.2020 - 20:13
![]() Willeke Groos wrote:
Willeke Groos wrote:
Wat bedoelen jullie met zet 10 steken in de zijkant onder de mouw. En hoe zet je steken op een hulpdraad?
18.04.2020 - 23:03DROPS Design answered:
Dag Willeke,
Onder de mouw (dus eigenlijk onder de oksel) zet je 10 nieuwe steken op. In deze video kun je zien hoe je steken op een hulpdraad zet.
29.04.2020 - 09:50
![]() Benedikte wrote:
Benedikte wrote:
Hej, Jeg forstår ikke anvisningen i diagrammet: "strik 1 maske ret, slå om, 1 maske ret i samme maske" I hvilken 'samme maske'? I omslaget, eller i den retmaske man strikkede før omslaget, eller i retmasken, man strikkede retmasken i? En video ville hjælpe rigtig meget her ;-)
25.03.2020 - 14:58DROPS Design answered:
Hei Benedikte. Du skal strikke 1 maske rett, men ikke løft av masken av pinnen, gjør et kast, strikk 1 maske i samme maske. Vi skal få lage en video ganske snart, takk for ditt innspill. God Fornøyelse!
30.03.2020 - 12:04
![]() Valérie wrote:
Valérie wrote:
Bonjour, puis-je faire les augmentations dans les diagrammes A1, A2 et A3 d'une autre manière ? Si oui, laquelle ? Merci.
19.03.2020 - 19:07DROPS Design answered:
Bonjour Valérie, vous pouvez probablement tricoter 3 fois la même maille (celle correspondant au 2ème symbole de la légende), mais vous n'aurez peut-être pas le même résultat. N'hésitez pas à faire différents essais pour vérifier le rendu. Bon tricot!
20.03.2020 - 09:34
![]() Anett wrote:
Anett wrote:
Hallo Frau Alt, ich stricke gerade White Dove in XXL und habe 254 Maschen mit Rapporten zugenommen. Bis hier war alles rechnerisch nachvollziehbar und korrekt. Nun komme ich auf 355 Maschen. In der Anleitung sollten es nur 338 M sein. Hier stimmt die Berechnung bei allen Größen nicht. Danke für Ihre Antwort. Anett
15.03.2020 - 10:47DROPS Design answered:
Liebe Anett, Sie sollten 367 M haben: Sie beginnen mit 135 M (= 27 x 5 M in jedem A.1) und es sind dann 27 x 7M in jedem A.1 = 189 M. Dann stricken Sie (37 x 5 M in jedem A.1) + 4 M = nach A.1 = (37x7)+4= 263 Maschen. Dann stricken Sie 52 Mal A.1 (= 52x5 M) + 3 Maschen (= 263 M) und es sind dann 52x 7 M in jedem A.1 + die letzen 3 Maschen der Runde = 367 Maschen. Viel Spaß beim stricken!
16.03.2020 - 09:59
![]() Irmgard Alt wrote:
Irmgard Alt wrote:
Ich habe das Model gestrickt in Gr. L . es war sehr klein hat sich beim anziehen zwar gedehnt aber ich mag keine hautengen Pullover. Er sah auf der Abbildung auch nicht so eng aus. Habe den Pullover dann verschenkt an jemanden mit der Größe S. da hat er toll ausgesehen. Was habe ich falsch gemacht? Möchte den Pullover für mich noch einmal stricken.
11.03.2020 - 08:19DROPS Design answered:
Liebe Frau Alt, hatten Sie die richtige Maschenprobe bzw 20 Maschen und 26 Reihen glatt rechts gestrickt = 10 x 10 cm? Diese Angaben (in der Breite sowie in der Höhe) sind wichtig um die korrekte Maßnahmen von der Maßskizze zu bekommen. Hier lesen Sie mehr über Maschenprobe und hier lesen Sie, wie man die Maßsjiuzze liest, ob es auch hilfen kann. Viel Spaß beim stricken!
11.03.2020 - 08:47
|
|||||||
White Dove#whitedovetop |
|||||||
 |
 |
||||||
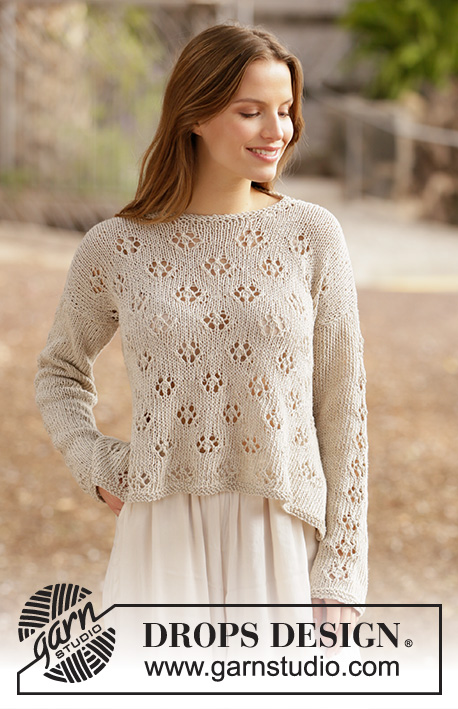
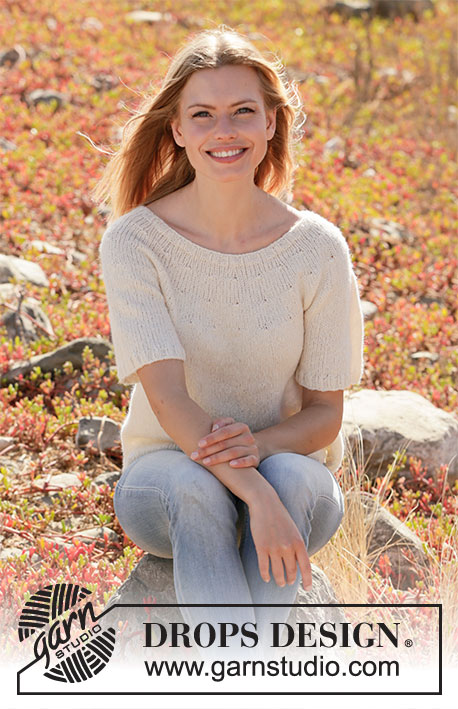
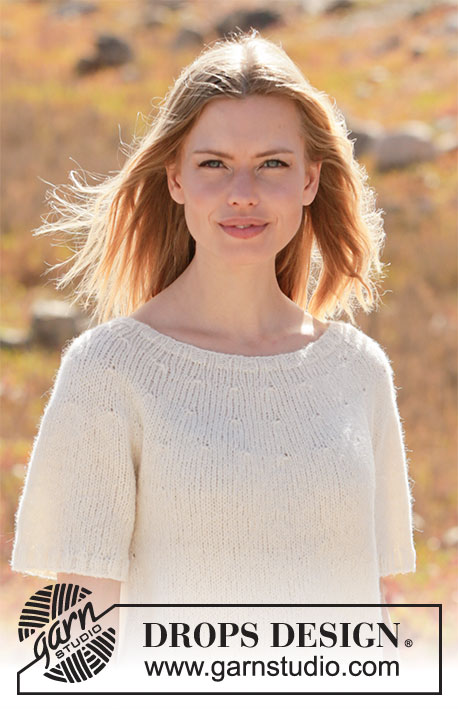
Knitted jumper with short sleeves and round yoke in DROPS Sky. Worked top down. Size: S - XXXL
DROPS 213-3 |
|||||||
|
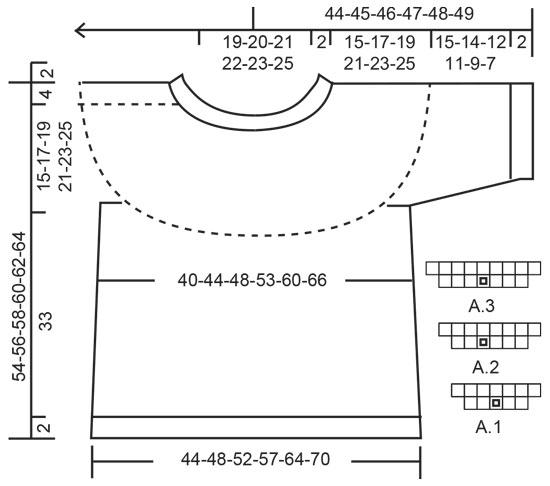
---------------------------------------------------------- EXPLANATION FOR THE PATTERN: ---------------------------------------------------------- PATTERN: See diagrams A.1 to A.3. INCREASE/DECREASE TIP (evenly): To calculate how to increase/decrease evenly, use the total number of stitches on row (e.g. 108 stitches) , and divide stitches by number of increases/decreases to be done (e.g. 2) = 54. In this example increase by making 1 yarn over after every 54th stitch. On next round work yarn overs twisted to avoid holes. To decrease in this example knit every 53th and 54th stitch together. INCREASE TIP-2 (applies to sides of body): Work until 2 stitches remain before marker thread, 1 yarn over, knit 4 (marker thread is in the middle of these stitches), 1 yarn over. On next round knit yarn overs twisted to avoid holes. Then work the new stitches in stocking stitch. DECREASE TIP (applies to sleeves): Decrease 1 stitch on each side of marker thread as follows: Work until 3 stitches remain before marker thread and knit 2 together, knit 2 (marker thread is between these stitches), slip 1 stitch knitwise, knit 1, pass slipped stitch over stitch worked. CAST-OFF TIP: To avoid a tight cast-off edge you may use a larger needle. If this also is too tight, make 1 yarn over after approx. every 4th stitch and cast off these as regular stitches. ---------------------------------------------------------- START THE PIECE HERE: ---------------------------------------------------------- JUMPER - SHORT OVERVIEW OF THE PIECE: Work neck edge and yoke in the round on circular needle from mid back, top down. Now divide yoke for body and sleeves. Body is worked in the round on circular needle, top down. Work sleeves in the round on double pointed needles/short circular needle, top down. NECK EDGE: Cast on 108-112-116-120-124-132 stitches on circular needle size 3.5 mm with Sky. Knit 1 round. Then work rib (= knit 2/purl 2) for 2 cm. When rib is done, knit 1 round while increasing 2-3-9-10-11-13 stitches evenly - read DECREASE/INCREASE TIP = 110-115-125-130-135-145 stitches. Switch to circular needle size 4.5 mm. Insert 1 marker at beginning of round = mid back. Now measure piece from here. YOKE: Work stocking stitch in the round until piece measures 2-2-2-2-3-3 cm. REMEMBER THE KNITTING TENSION! Now work pattern A.1 in the round (= 22-23-25-26-27-29 repetitions of 5 stitches). When A.1 has been worked there are 44-46-50-52-54-58 stitches= 154-161-175-182-189-203 stitches. Continue in stocking stitch until piece measures 6-6-7-8-9-10 cm. Now work pattern in the different sizes as follows: Size S: Work A.3 in the round (= 22 repetitions of 7 stitches). Size M and L: Work A.2 until 5-1 stitch remains (= 26-29 repetitions of 6 stitches), knit 5-1. Size XL, XXL and XXXL: Work A.1 until 2-4-3 stitches remain (= 36-37-40 repetitions of 5 stitches), knit 2-4-3. When entire diagram has been worked, there are 198-213-233-254-263-283 stitches on round. Continue in stocking stitch until piece measures 10-11-12-14-15-17 cm. Now work pattern in the different sizes as follows: Size S: Work A.3 until 2 stitches remain (= 28 repetitions of 7 stitches), knit 2. Size M, L and XL: Work A.2 until 3-5-2 stitches remain (= 35-38-42 repetitions of 6 stitches), knit 3-5-2. Size XXL and XXXL: Work A.1 until 3-3 stitches remain (= 52-56 repetitions of 5 stitches), knit 3-3. When entire diagram has been worked, there are 254-283-309-338-367-395 stitches on round. Knit 1 round while adjusting number of stitches to 256-280-304-338-366-396 (i.e. In size S and XXXL increase 2-1 stitches evenly, in size M, L and XXL decrease 3-5-1 stitch evenly and in size XL do not adjust number of stitches) – remember INCREASE/DECREASE TIP. Continue in stocking stitch until piece measures 15-17-19-21-23-25 cm. Now divide piece for body and sleeves. Work next round as follows: Work the first 36-40-43-48-54-60 stitches (= half back piece), slip the next 56-60-66-73-75-78 stitches on a stitch holder (= sleeve), cast on 8-8-10-10-12-12 stitches in the side under sleeve, work the next 72-80-86-96-108-120 stitches (= front piece), slip the next 56-60-66-73-75-78 stitches on a stitch holder (= sleeve), cast on 8-8-10-10-12-12 stitches in the side under sleeve, work the last 36-40-43-48-54-60 stitches (= half back piece). Then finish body and sleeves separately. NOW MEASURE PIECE FROM HERE. BODY: = 160-176-192-212-240-264 stitches. Insert a marker thread in each side, in the middle of the new 8-8-10-10-12-12 stitches that were cast on in the side under sleeves. There are 80-88-96-106-120-132 stitches between marker threads on front and back piece. Move the marker threads upwards when working; they should be used for increase later in the sides. Work in stocking stitch in the round. When piece measures 4 cm from division, increase 1 stitch on each side of marker thread - READ INCREASE TIP-2. Increase like this approx. every 8 cm 4 times in total = 176-192-208-228-256-280 stitches. When piece measures 33 cm from division, increase 24-28-32-32-40-44 stitches evenly = 200-220-240-260-296-324 stitches. Switch to circular needle size 3.5 mm. Work rib (knit 2/purl 2) in the round for 2 cm. Cast off with knit over knit and purl over purl - read CAST-OFF TIP. Jumper measures approx. 54-56-58-60-62-64 cm from shoulder and down. SLEEVES: Slip the 56-60-66-73-75-78 stitches from stitch holder in one side back on double pointed needles size 4.5 mm and pick up 1 stitch in each of the new 8-8-10-10-12-12 stitches cast on in the side under sleeve = 64-68-76-83-87-90 stitches. Insert a marker thread mid under sleeve (= 4-4-5-5-6-6 new stitches on each side of marker thread). Work in stocking stitch in the round for 4 cm. Now decrease 1 stitch on each side of marker thread – read DECREASE TIP. Decrease like this every 3-3-2-1½-1-½ cm 4-4-4-5-5-5 times in total = 56-60-68-73-77-80 stitches. Continue round in stocking stitch until sleeve measures 15-14-12-11-9-7 cm. Knit 1 round while increasing 4-4-4-3-3-4 stitches evenly = 60-64-72-76-80-84 stitches. Switch to double pointed needles size 3.5 mm. Work rib (knit 2/purl 2) in the round for 2 cm. Cast off with knit over knit and purl over purl - read CAST-OFF TIP. Work another sleeve the same way. |
|||||||
Diagram explanations |
|||||||
|
|||||||
 |
|||||||
Have you finished this pattern?Tag your pictures with #dropspattern #whitedovetop or submit them to the #dropsfan gallery. Do you need help with this pattern?You'll find 21 tutorial videos, a Comments/Questions area and more by visiting the pattern on garnstudio.com. © 1982-2026 DROPS Design A/S. We reserve all rights. This document, including all its sub-sections, has copyrights. Read more about what you can do with our patterns at the bottom of each pattern on our site. |
|||||||


With over 40 years in knitting and crochet design, DROPS Design offers one of the most extensive collections of free patterns on the internet - translated to 17 languages. As of today we count 325 catalogues and 12298 patterns translated into English (UK/cm).
We work hard to bring you the best knitting and crochet have to offer, inspiration and advice as well as great quality yarns at incredible prices! Would you like to use our patterns for other than personal use? You can read what you are allowed to do in the Copyright text at the bottom of all our patterns. Happy crafting!
Post a comment to pattern DROPS 213-3
We would love to hear what you have to say about this pattern!
If you want to leave a question, please make sure you select the correct category in the form below, to speed up the answering process. Required fields are marked *.