
Popular categories
Looking for a yarn?


Comments / Questions (72)
![]() Jannie Helleman wrote:
Jannie Helleman wrote:
Beste mevrouw, Ik kom niet uit in de eerste naald (maat L) met het telpatroon onder 1a. Hier wordt vermeld dat je aan het einde van de naald de laatste 28 steken het telpatroon 1a moet breien (3 herhalingen) .Maar bij 3 herhalingen houdt ik 4 steken over! Is wel juist, dat je maar 3 herhalingen heb over de laatste 28 steken? Heb je in het telpatroon 2 of 1 omslag? Nu onder de juiste categorie de vraag gesteld. Zie graag uw reactie. Mvg Jannie Helleman
23.06.2025 - 18:50DROPS Design answered:
Dag Jannie,
Een patroonherhaling is 7 steken. Je breit over 28 steken. Dan heb je toch 4 herhalingen? Want 4x7=28. Je maakt 1 omslag, dan haal je 1 steek recht af, brei je 3 steken recht samen en je haalt de afgehaalde steek over de samengebreide steken. Per herhaling van het patroon in de breedte minder je 1 steek, waardoor je 6 steken per herhaling overhoudt
29.06.2025 - 18:59
![]() Jannie Helleman wrote:
Jannie Helleman wrote:
Beste mevrouw, Ik kom niet uit in de eerste naald (maat L) met het telpatroon onder 1a. Hier wordt vermeld dat je aan het einde van de naald de laatste 28 steken het telpatroon 1a moet breien (3 herhalingen) .Maar bij 3 herhalingen houdt ik 4 steken over! Is wel juist, dat je maar 3 herhalingen heb over de laatste 28 steken? Heb je in het telpatroon 2 of 1 omslag?
23.06.2025 - 18:42
![]() Marianne wrote:
Marianne wrote:
Jag vill sticka med ett ullgarn. Vilket garn passar mönstret?
15.06.2025 - 17:57DROPS Design answered:
Hei Marianne, Du kan bruke alle garn fra samme garngruppe som Drops Bomull-Lin (gruppe C), eller 2 tråder fra et garn fra garngruppe A. Klikk på Garn og Pinner på toppen av siden, deretter på Garngrupper. For eksempel, Alaska i garngruppe C er 100% ull. Hilsen Drops Team.
16.06.2025 - 06:32
![]() Tove Reklev Stene wrote:
Tove Reklev Stene wrote:
Jeg får ikke mønster til å stemme med antall masker etter felling av A.1a. Har dere noen korrigeringer på oppskriften? Ser det har vært en del spørsmål fra fransk etc i 2020.
27.07.2024 - 22:12DROPS Design answered:
Hej Tove, opskriften på nettet er korrigeret. Hvilken størrelse? Hvor mange masker har du og hvad får du ikke til at stemme :)
01.08.2024 - 11:30
![]() Anna wrote:
Anna wrote:
Hallo liebes Drops-Team. Ich verstehe Ihre Antwort nicht. A1a und A1b sind doch die Muster für die Blende. Was muss ich denn da anpassen? Die Blende möchte ich ja im Muster stricken. (wie geschrieben) Handelt es sich um ein Missverständnis oder habe ich etwas übersehen?
24.06.2024 - 10:45DROPS Design answered:
Liebe Anna, oh ja stimmt, sorry :)
24.06.2024 - 14:07
![]() Anna wrote:
Anna wrote:
Hallo, ich möchte außer Ärmel und vordere Blende alles glatt rechts stricken. Also wollte ich Muster A2 und A3 einfach weglassen. Muss ich noch etwas anderes beachten? Gibt das Lochmuster z.B. mehr nach als glatt rechts?
23.06.2024 - 12:59DROPS Design answered:
Liebe Anna, beachten Sie auch, daß 1 Maschen in jedem A.1 abgenommen wird - so A.1 sollen Sie auch anpassen. Viel Spaß beim Stricken!
24.06.2024 - 09:48
![]() Annemiek wrote:
Annemiek wrote:
Hallo, ik kom niet uit met het stekenaantal: in A.1a wordt er in de 1e naald in totaal 8 steken (maat XL) geminderd. Telkens herhaald na 20 naalden. Maar waar komen die er weer bij? De markeringsdraad komt nu niet recht te lopen en ik ben bang dat het model er niet goed in komt op deze manier.
20.06.2024 - 10:10DROPS Design answered:
Dag Annemiek,
Telpatroon A.1a brei je slechts eenmaal in de hoogte. Daarna brei je steeds A.1b boven A.1a. Dus je mindert eenmalig 8 steken.
25.06.2024 - 19:31
![]() Hexe wrote:
Hexe wrote:
Hey, „ UWAGA! W 5-tym rzędzie schematu A.2 przerobić …..” schemat ten jest powtarzanych w blokach po 2razy, 6razy i 2razy czy dobrze rozumiem, że w tym 5-tym rzędzie zawsze przed rozpoczęciem takiego bloku za pierwszym razem przesunąć o jedno prawe oczko schemat?
03.06.2024 - 20:30DROPS Design answered:
Witaj, przesuwasz to oczko tylko na początku rzędu, za pierwszym razem, gdy przerabiamy schemat za oczkami obszycia prawego przodu i za nitką markerem na bokach. Pozdrawiamy!
04.06.2024 - 18:36
![]() Ursula Hohmann wrote:
Ursula Hohmann wrote:
Ich verstehe nicht, wo genau der Markierungsfaden angebracht wird. Vor oder wenn die Maschen rechts gestrickt wurden ?An der Seite des Rumpfteils? damit kann ich nichts anfangen. Das Rumpfteil ist doch die gesamte Arbeit bis zu den Armen. Vielen Dank für ihre Hilfe.
14.04.2024 - 19:47DROPS Design answered:
Liebe Frau Hohmann, die Markierungsfäden beim Rumpfteil sind für die Seiten der Jacke und werden bei der Verteilung der Arbeit benutzt, dh es sind 2 Maschen für die Armlöcher abgkettet = 1 Masche vor + 1 Masche nach jedem Markierungsfaden. Viel Spaß beim Stricken!
15.04.2024 - 08:24
![]() Sylvia wrote:
Sylvia wrote:
Bij patroon 1 a begin ik met 7 steken en hou er 6 over. Dan kom ik er toch steeds 1 tekort? Mvg sylvia
25.03.2024 - 12:59DROPS Design answered:
Dag Sylvia,
Je mindert inderdaad in de eerste naald 1 steek per herhaling en dat is juist de bedoeling. Dit staat ook in de paragraaf onder 'Alle maten'.
27.03.2024 - 13:25
|
|||||||||||||||||||
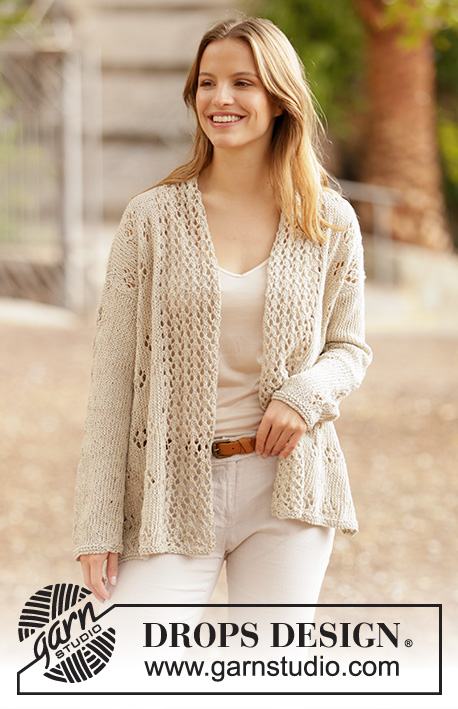
Free Flow#freeflowcardigan |
|||||||||||||||||||
 |
 |
||||||||||||||||||
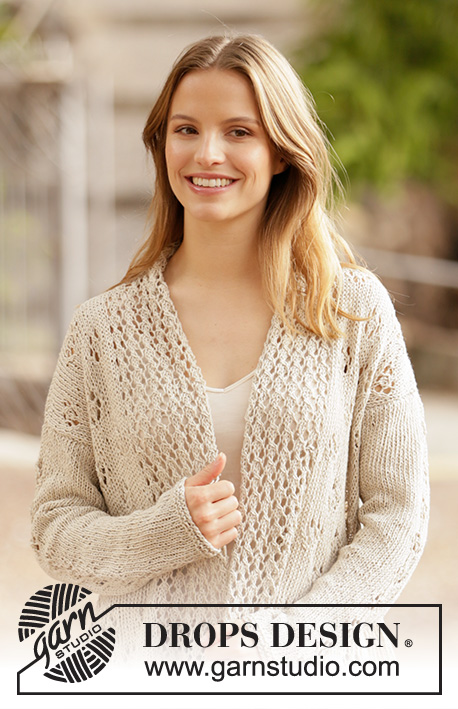
Knitted long jacket with shawl collar in DROPS Bomull-Lin or DROPS Paris. Piece is knitted with lace pattern. Size XS–XXL.
DROPS 213-18 |
|||||||||||||||||||
|
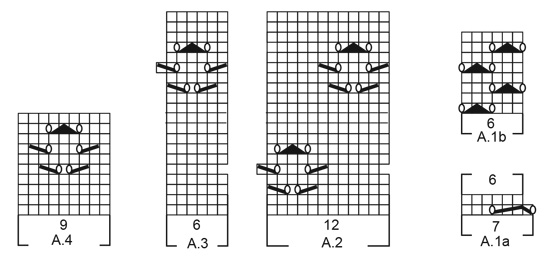
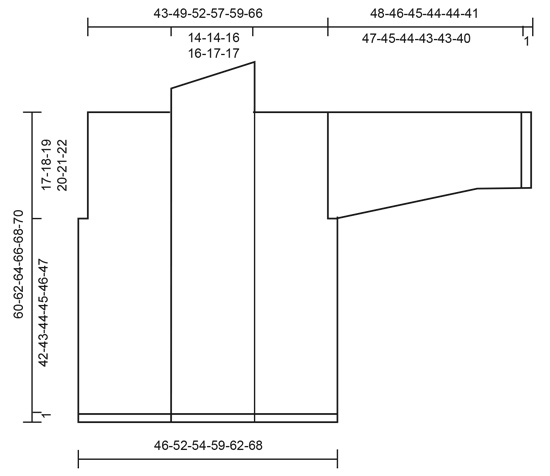
---------------------------------------------------------- EXPLANATION FOR THE PATTERN: ---------------------------------------------------------- GARTER STITCH (worked in the round): 1 ridge vertically = 2 rounds, i.e. knit 1 round and purl 1 round. GARTER STITCH (back and forth): Knit all rows. 1 ridge vertically = knit 2 rows. PATTERN: See diagram A.1 to A.4 (diagram A.4 applies to sleeves). Diagrams show all rows in pattern seen from the right side. INCREASE TIP (applies to sleeves): Work until 2 stitches remain before marker thread, 1 yarn over, knit 4 (marker thread is in the middle of these stitches), 1 yarn over. On next round knit yarn overs twisted to avoid holes. Then work the new stitches in stocking stitch. ---------------------------------------------------------- START THE PIECE HERE: ---------------------------------------------------------- JACKET - SHORT OVERVIEW OF THE PIECE: Work body back and forth on circular needle up to armhole. Then cast off stitches for armholes in each side, and work front pieces and back piece back and forth separately. Work sleeves in the round on double pointed needles/a short circular needle. BODY: Cast on 169-189-195-225-231-251 stitches (including 1 edge stitch in each side towards mid front) on circular needle size 5 mm with Bomull-Lin or Paris. Work 2 ridges in GARTER STITCH - read explanation above. Switch to circular needle size 5.5 mm. Work next row in the different sizes as follows: Size XS, L, XL: Work 1 edge stitch in garter stitch, A.1a over the next 21-28-28 stitches (= 3-4-4 repetitions of 7 stitches), knit 4-3-2, A.2 over the next 12-24-24 stitches (= 1-2-2 repetitions of 12 stitches), A.3 over the next 6-6-6 stitches (= 1 repetition of 6 stitches), knit 4-3-5, insert a marker thread here (= in the side), knit 3-2-4, A.2 over the next 60-84-84 stitches (= 5-7-7 repetitions), A.3 over the next 6-6-6 stitches (= 1 repetition), knit 4-3-5, insert a marker thread here (= in the side), knit 3-2-4, A.2 over the next 12-24-24 stitches (= 1-2-2 repetitions), A.3 over the next 6-6-6 stitches (= 1 repetition of 6 stitches), knit 5-4-3, A.1a over the next 21-28-28 stitches (= 3-4-4 repetitions), 1 edge stitch in garter stitch. Size S, M, XXL: Work 1 edge stitch in garter stitch, A.1a over the next 21-21-28 stitches (= 3-3-4 repetitions of 7 stitches), knit 4-3-2, A.2 over the next 24-24-36 stitches (= 2-2-3 repetitions of 12 stitches), knit 3-5-4, insert a marker thread here (= the side), knit 2-4-3, A.2 over the next 72-72-96 stitches (= 6-6-8 repetitions), A.3 over the next 6-6-6 stitches (= 1 repetition of 6 stitches), knit 3-5-4, insert a marker thread here (= in the side), knit 2-4-3, A.2 over the next 24-24-36 stitches (= 2-2-3 repetitions), knit 5-4-3, A.1a over the next 21-21-28 stitches (= 3-3-4 repetitions), 1 edge stitch in garter stitch. All sizes: When first row has been worked, 1 stitch has been decreased in every repetition A.1a on row (= 6-6-6-8-8-8 stitches decreased in total) = 163-183-189-217-223-243 stitches. Work 1 row from wrong side. Now work A.1b over every repetition A.1a and work pattern as before over the remaining stitches on row. NOTE! On 5th row in A.2 work 1 more knit stitch before the first stitch in diagram (applies first time diagram is worked after band stitches on right front piece and after marker thread in the sides). On 15th row in A.3 work 1 knit stitch less after the last stitch in diagram (applies before marker thread in the sides and before band stitches on left front piece. REMEMBER THE KNITTING TENSION! When piece measures 43-44-45-46-47-48 cm - adjust so that next row is worked from wrong side, cast off 2 stitch in each side, i.e. 1 stitch on each side of marker thread in each side. Then finish front pieces and back piece separately. BACK PIECE: = 71-81-85-93-97-107 stitches. Work first row as follows from right side: 1 edge stitch in garter stitch, knit 2-1-3-1-3-2, work pattern as before over the next 66-78-78-90-90-102 stitches, knit 1-0-2-0-2-1, 1 edge stitch in garter stitch. Continue back and forth like this. When piece measures 55-57-59-61-63-65 cm, do not begin any more lace patterns vertically (this way the neck isn’t cast off in the middle of working a lace pattern).When last lace pattern has been worked, continue with stocking stitch and 1 edge stitch in garter stitch in each side. When piece measures 58-60-62-64-66-68 cm, cast off the middle 21-21-23-23-25-25 stitches for neck, and finish each shoulder separately. On next row from the neck, cast off 1 stitch = 24-29-30-34-35-41 stitches. When piece measures 60-62-64-66-68-70 cm, cast off all stitches. Work the other shoulder the same way. RIGHT FRONT PIECE: = 44-49-50-60-61-66 stitches. Work first row from right side as follows: 1 edge stitch in garter stitch, work A.1b over the next 18-18-18-24-24-24 stitches, knit 4-4-3-3-2-2, work pattern as before over the next 18-24-24-30-30-36 stitches, knit 2-1-3-1-3-2, 1 edge stitch in garter stitch. Continue back and forth like this. When piece measures 60-62-64-66-68-70 cm – adjust so that next row is worked from wrong side, cast off the first 24-29-30-34-35-40 stitches for shoulder, then work over the last 20-20-20-26-26-26 stitches as before. Continue with lace pattern and 1 edge stitch in garter stitch in each side until band measures 7-7-7-7-8-8 cm from shoulder. At the beginning of the next 3-3-3-4-4-4 rows from wrong side, cast off the first 5 stitches = 5-5-5-6-6-6 stitches remain. Loosely cast off the last stitches on next row from wrong side LEFT FRONT PIECE: = 44-49-50-60-61-66 stitches. Work first row from right side as follows: 1 edge stitch in garter stitch, knit 1-0-2-0-2-1, pattern as before over the next 18-24-24-30-30-36 stitches, knit 5-5-4-4-3-3, A.1b over the next 18-18-18-24-24-24 stitches, 1 edge stitch in garter stitch. Continue back and forth like this. When piece measures 60-62-64-66-68-70 cm – adjust so that next row is worked from right side, cast off the first 24-29-30-34-35-40 stitches for shoulder, then work over the last 20-20-20-26-26-26 stitches as before. Continue with lace pattern and 1 edge stitch in garter stitch in each side until band measures 7-7-7-7-8-8 cm from shoulder. At the beginning of the next 3-3-3-4-4-4 rows from right side, cast off the first 5 stitches = 5-5-5-6-6-6 stitches remain. Loosely cast off the last stitches on next row from right side SLEEVES: Cast on 35-35-37-39-41-41 stitches on double pointed needles size 5 mm with Bomull-Lin or Paris. Work 2 ridges. Switch to double pointed needles size 5.5 mm. Insert a marker thread at beginning of round (= mid under sleeve). Work pattern as follows: Knit 13-13-14-15-16-16, A.4 (= 9 stitches) knit 13-13-14-15-16-16. Work pattern in the round as follows. When piece measures 8-8-8-9-9-9 cm, increase 2 stitches under sleeve - read INCREASE TIP! Increase like this approx. every 4-3½-3-2½-2½-2 cm 10-11-12-13-13-15 times in total = 55-57-61-65-67-71 stitches. When sleeve measures 43-41-40-39-39-36 cm, do not begin any more lace patterns vertically (this way the sleeve isn’t cast off in the middle of working a lace pattern). Continue in the round in stocking stitch. When sleeve measures 48-46-45-44-44-41 cm, cast off all stitches. Work the other sleeve the same way. ASSEMBLY: Sew shoulder seams with grafting/kitchener stitches inside cast-off edge. Sew sleeves in body inside 1 edge stitch in garter stitch on body and inside cast-off edge on sleeve. Sew the collar together mid back and sew it to the neck. Fasten off. Bomull-Lin will be more even and look better after it has been washed. When the garment is finished, soak it, stretch it to correct measurements - see chart, and leave it to dry flat. |
|||||||||||||||||||
Diagram explanations |
|||||||||||||||||||
|
|||||||||||||||||||
|
|||||||||||||||||||
|
|||||||||||||||||||
Have you finished this pattern?Tag your pictures with #dropspattern #freeflowcardigan or submit them to the #dropsfan gallery. Do you need help with this pattern?You'll find 23 tutorial videos, a Comments/Questions area and more by visiting the pattern on garnstudio.com. © 1982-2025 DROPS Design A/S. We reserve all rights. This document, including all its sub-sections, has copyrights. Read more about what you can do with our patterns at the bottom of each pattern on our site. |
|||||||||||||||||||


With over 40 years in knitting and crochet design, DROPS Design offers one of the most extensive collections of free patterns on the internet - translated to 17 languages. As of today we count 314 catalogues and 11821 patterns translated into English (UK/cm).
We work hard to bring you the best knitting and crochet have to offer, inspiration and advice as well as great quality yarns at incredible prices! Would you like to use our patterns for other than personal use? You can read what you are allowed to do in the Copyright text at the bottom of all our patterns. Happy crafting!
Post a comment to pattern DROPS 213-18
We would love to hear what you have to say about this pattern!
If you want to leave a question, please make sure you select the correct category in the form below, to speed up the answering process. Required fields are marked *.