
Popular categories
Looking for a yarn?


Comments / Questions (55)
![]() Jenny Tituaña wrote:
Jenny Tituaña wrote:
Con cuántos puntos debo empezar el cuello?
27.03.2021 - 23:20DROPS Design answered:
Hola Jenny, el número de puntos depende de la talla. Para la talla S y M: 111 puntos, para la talla L: 117 puntos para la talla XL y XXL: 129 puntos; y para la talla XXXL: 135 puntos.
28.03.2021 - 20:33
![]() Anne Gallacher wrote:
Anne Gallacher wrote:
When readng his pattrn, the word incease is not stated, printing 1xgarter stitch, ?is that the increase, very off putting, am aiming to knit this lovely to nature patter, cardiganstyle, having to try and calculate numbers, having a trial beginning, making my mistakes befor using my lovely wool. Confused with garterstitches in front purl at the back, when there's more stocking stitch in the leaf design
28.11.2020 - 21:57DROPS Design answered:
Dear Mrs Gallacher, not sure to understand properly your question, sorry in advance - when working the leaf pattern = the diagrams, the increases are shown in the diagrams: you are making yarn overs and these yarn overs will be worked twisted on next row you avoid holes. Hope this will help, happy knitting!
30.11.2020 - 10:37
![]() Annamaria wrote:
Annamaria wrote:
Niente da fare ho provato e riprovato ma niente nn ci riesco, arrivo al 2 ferro del diagramma e mi fermo perché mi viene sbagliato. C'e per caso un video che lo fa vedere o qualcosa del genere? Grazie....
15.11.2020 - 20:54DROPS Design answered:
Buonasera Annamaria, i diagrammi si leggono dal basso verso l'alto, da destra verso sinistra per i ferri di andata e da sinistra verso destra per quelli di ritorno. Se ci spiega esattamente il punto in cui trova difficoltà possiamo aiutarla in modo più preciso. Buon lavoro!
17.11.2020 - 22:26
![]() Annamaria wrote:
Annamaria wrote:
Salve volevo sapere per lo sprone si lavorano 7 maglie per il bordo poi 6 maglie di a.1 e 6 maglie di a.2 che si ripetono fino a 14 maglie finali del ferro poi 7 maglie di a.3 e 7 maglie del bordo. Dopo questo primo ferro dello sprone gli altri sono tutti così o poi si eseguono i ferri del diagramma in giusta sequenza: a.1 poi a.2 e poi a.3 fino che nn finiscono tutte le maglie del ferro ? ( lasciando le 7 maglie finali x il bordo)
14.11.2020 - 21:29DROPS Design answered:
Buonasera Annamaria, dopo il 1° ferro deve continuare a lavorare le 7 maglie più esterne a ogni lato per il bordo e le altre maglie con i diagramma A.1, A.2 e A.3. Buon lavoro!
14.11.2020 - 23:02
![]() Annamaria wrote:
Annamaria wrote:
Salve ho provato a farlo ma nn ci sono riuscita. Potete gentilmente scrivermi come vanno fatti i primi 8 ferri?(i tre cm di lavoro cioe') In questo modo: 1ferro a diritto = 1dir,2rov,3dir. 2ferro a rovescio= 1dir,1gett,3rov ecc ecc ho fatto un esempio. Scrivete x favore come vanno fatte le maglie del bordo pure sia nei ferri a diritto che in quelli a rovescio. Vi ringrazio se la risposta sarà così dettagliata come ho chiesto in modo da riuscire a farlo. Grazie....
12.11.2020 - 09:52DROPS Design answered:
Buongiorno Annamaria, le istruzioni sono già dettagliate. Deve avviare le maglie e lavorare 1 ferro a rovescio. Poi lavora 1 maglia a maglia legaccio, 1 maglia diritto, e ripete (2 maglie rovescio, 1 maglia diritto) fino a quando rimangono 4 maglie, e lavorare 2 maglie rovescio, 1 maglia diritto e 1 maglia a maglia legaccio. Sui ferri a rovescio lavora le maglie come si presentano. Si ricordi di lavorare le ASOLE come indicato. Buon lavoro!
13.11.2020 - 15:43
![]() Annamaria wrote:
Annamaria wrote:
Salve sono confusa sul pattern di questo cardigan (listen to nature) La spiegazione dice di montare 111 maglie poi un ferro a rovescio e poi un ferro a diritto in cui fare: 1 maglia a legaccio, 1 diritto, * 2rovesci,1diritto* fino a 4 maglie dalla fine con: 2 rovesci, 1 diritto,1 maglia a legaccio. Nel ferro successivo cioè nella parte a rovescio nn capisco come devo fare potete aiutarmi? Grazie...
09.11.2020 - 17:37DROPS Design answered:
Buongiorno Annamaria, deve lavorare le maglie come si presentano. Buon lavoro!
10.11.2020 - 10:18
![]() Marianne Kenny wrote:
Marianne Kenny wrote:
Hi when I work 3 stitches in the one stitch do I work the yarn over twisted in the following row?
07.11.2020 - 02:54DROPS Design answered:
Dear Mrs Kenny, you can work the yarn over in the front loop of stitch on next row, but if you find this hole is too large for you, you can work it into back of loop. Happy knitting!
09.11.2020 - 09:23
![]() Sue Giles wrote:
Sue Giles wrote:
I have cast on, purl one row and the second row in purl 2 knit 1 rib. I understand that I now start the buttonhole but do I also continue the rib by knit purl 1? Thanks.
15.07.2020 - 17:45DROPS Design answered:
Dear Mrs Giles, the first buttonhole will be worked at the end of a RS row when rib edge measures approx. 1,5/2cm - see BUTTONHOLES - this means you first work some rows and when piece measures 1.5/2 cm work the first buttonhole at the end of next RS row. Happy knitting!
16.07.2020 - 09:36
![]() Gudrun wrote:
Gudrun wrote:
Kan jag köpa detta mönster eftersom jag EJ kan skriva ut det?
06.07.2020 - 09:48DROPS Design answered:
Hej Gudrun. Det ska gå att skriva ut det om du trycker på knappen "skriv ut" och väljer mönster. Om det inte fungerar kan de se på dina inställningar på skrivaren om felet kan ligga där. Får du det inte att fungera kan säkert återförsäljaren där du köper garnet hjälpa dig! Mvh DROPS Design
06.07.2020 - 11:36
![]() Martha Bentzen wrote:
Martha Bentzen wrote:
Listen to Nature jacket Diagram forklaring Er det ikke vrang fra retsiden og ret fra vrangen? Tak for hjælpen Martha
03.07.2020 - 10:32DROPS Design answered:
Hej Martha. Du har rätt, det var fel i den danska översättningen. Tack för info, detta är nu rättat. Mvh DROPS Design
03.07.2020 - 10:50
|
|||||||||||||||||||||||||||||||
Listen to Nature Jacket#listentonaturejacket |
|||||||||||||||||||||||||||||||
 |
 |
||||||||||||||||||||||||||||||
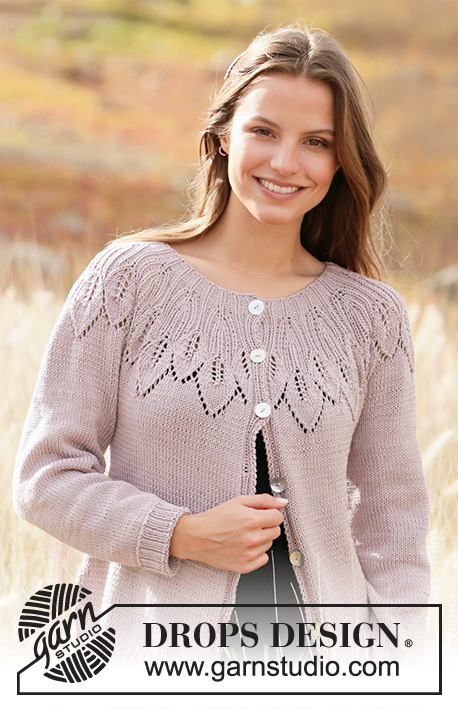
Knitted jacket with round yoke in DROPS Muskat. Piece is knitted top down with leaf pattern and lace pattern. Size: S - XXXL
DROPS 213-2 |
|||||||||||||||||||||||||||||||
|
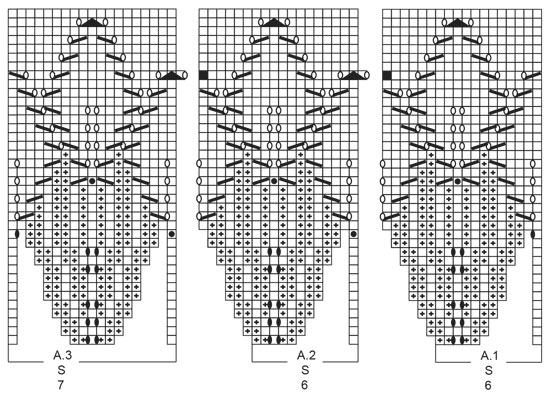
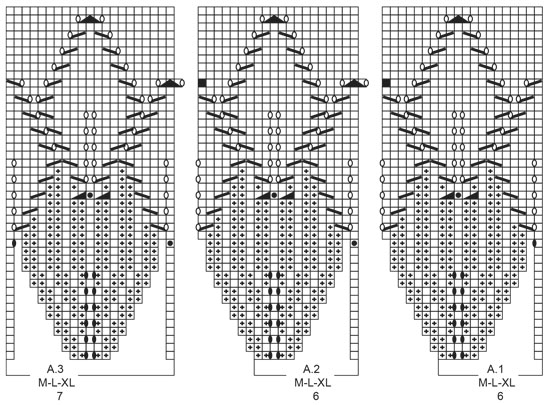
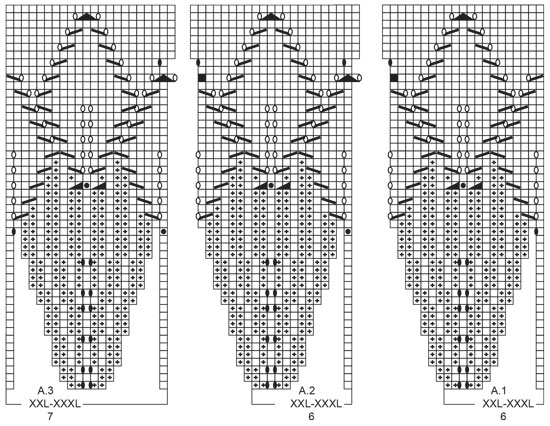
---------------------------------------------------------- EXPLANATION FOR THE PATTERN: ---------------------------------------------------------- GARTER STITCH (back and forth): Knit all rows. 1 ridge vertically = knit 2 rows. PATTERN: See diagrams A.1 to A.3. Choose diagram for your size. Diagrams show all rows in pattern seen from the right side. INCREASE TIP (applies to sides of body): All increases are done from right side. Work until 2 stitches remain before marker thread, 1 yarn over, knit 4 (marker thread is in the middle of these stitches), 1 yarn over. On next row purl yarn overs twisted to avoid holes. Then work the new stitches in stocking stitch. DECREASE TIP (applies to sleeves): Decrease 1 stitch on each side of marker thread as follows: Work until 3 stitches remain before marker thread and knit 2 together, knit 2 (marker thread is between these stitches), slip 1 stitch knitwise, knit 1, pass slipped stitch over stitch worked. CAST-OFF TIP: To avoid a tight cast-off edge you may use a larger needle. If this also is too tight, make 1 yarn over after approx. every 4th stitch and cast off these as regular stitches. BUTTONHOLES: Decrease for buttonholes on right band (when garment is worn). Decrease from right side when 6 stitches remain on row as follows: Make 1 yarn over, knit the next 2 stitches together and work the last 4 stitches as before. On next row purl yarn over to make holes. Decrease first buttonhole when rib in neck measures approx. 1½-2 cm. Then decrease the next 6-6-6-6-7-7 buttonholes, approx. 7½-7½-8-8½-7½-7½ cm between each. ---------------------------------------------------------- START THE PIECE HERE: ---------------------------------------------------------- JACKET - SHORT OVERVIEW OF THE PIECE: Work neck edge and yoke back and forth on circular needle from mid front, top down. Now divide yoke for body and sleeves. Work body back and forth on circular needle, top down. Work sleeves in the round on double pointed needles, top down. NECK EDGE: Cast on 111-111-117-129-129-135 stitches (including 7 band stitches in each side towards mid front) on circular needle size 3 mm with Muskat. Purl 1 row (= wrong side). Work next row as follows from right side: Work 1 stitch in GARTER STITCH – see explanation above, knit 1, * purl 2, knit 1 *, work from *-* until 4 stitches remain, purl 2, knit 1 and 1 stitch in garter stitch. Decrease for BUTTONHOLES - read explanation above. When piece measures 3 cm, switch to circular needle size 4 mm. Insert 1 marker after band at the beginning of row mid front, measure yoke from this marker! YOKE: Work as follows from right side: Work 1 stitch in garter stitch, knit 1, purl 2, knit 1, purl 2 (= band), A.1 (= 6 stitches), A.2 (= 6 stitches) until 14 stitches remain (= 14-14-15-17-17-18 times in width), A.3 (= 7 stitches), and over band purl 2, knit 1, purl 2, knit 1 and 1 stitch in garter stitch. REMEMBER THE KNITTING TENSION! When A.1 to A.3 have been worked 1 time vertically, there are 303-335-355-395-431-453 stitches on needle. Piece now measures 14-16-16-16-18-18 cm from marker. Work band stitches as before and in stocking stitch over the remaining stitches. When piece measures 19-21-22-24-26-28 cm from marker, divide piece for body and sleeves as follows: Work the 7 band stitches as before, stocking stitch over the next 41-45-49-53-60-64 stitches (= front piece), slip the next 63-69-72-84-89-90 stitches on a stitch holder for sleeve and cast on 6-6-6-6-8-10 new stitches under sleeve, work in stocking stitch over the next 81-93-99-107-119-131 stitches (= back piece), slip the next 63-69-72-84-89-90 stitches on a stitch holder for sleeve and cast on 6-6-6-6-8-10 new stitches under sleeve, work 41-45-49-53-60-64 stitches in stocking stitch, and work 7 band stitches as before (= front piece). BODY: = 189-209-223-239-269-293 stitches. Insert 1 marker thread after 51-55-59-63-71-76 stitches in from each side (= in the side of body). There are 87-99-105-113-127-141 stitches between marker threads on back piece. Move the marker threads upwards when working; they should be used for increase later in the sides. Then work in stocking stitch and the 7 band stitches in each side of piece as before. When piece measures 4 cm from division, increase 1 stitch on each side of every marker thread - read INCREASE TIP (= 4 stitches increased). Increase like this every 4 cm 5-4-4-5-5-5 times in total = 209-225-239-259-289-313 stitches. When piece measures 28-28-29-29-29-29 cm from division, increase 13-12-13-14-14-14 stitches evenly = 222-237-252-273-303-327 stitches. Switch to circular needle size 3 mm and work from right side as follows: Work 1 stitch in garter stitch, work rib (= knit 1/purl 2) until 2 stitches remain, and finish with knit 1 and 1 stitch in garter stitch. Cast off by knitting from right side when rib measures 4 cm - read CAST-OFF TIP. Piece measures 32-32-33-33-33-33 cm from where it was divided. SLEEVES: Slip the 63-69-72-84-89-90 stitches from stitch holder in one side of piece on double pointed needles size 4 mm and pick in addition up 1 stitch in each of the 6-6-6-6-8-10 new stitches cast on under sleeve = 69-75-78-90-97-100 stitches. Insert 1 marker thread in the middle of the 6-6-6-6-8-10 stitches under sleeve. Move the marker upwards when working. Decrease on each side of this marker thread later. Work in stocking stitch in the round. When piece measures 2 cm, decrease 1 stitch on each side of marker thread- read DECREASE TIP (= 2 stitches decreased). Decrease like this every 3-2-2-1½-1-1 cm 11-13-14-19-21-22 times in total = 47-49-50-52-55-56 stitches. When piece measures 38-37-36-34-33-31 cm, increase 1-2-1-2-2-1 stitches evenly on next round= 48-51-51-54-57-57 stitches. Switch to double pointed needles size 3 mm and work rib in the round (= knit 1/purl 2). When rib measures 4 cm, cast off knit over knit and purl over purl. Sleeve measures 42-41-40-38-37-35 cm from division. Work the other sleeve the same way. ASSEMBLY: Sew the buttons on to the left band. |
|||||||||||||||||||||||||||||||
Diagram explanations |
|||||||||||||||||||||||||||||||
|
|||||||||||||||||||||||||||||||
 |
|||||||||||||||||||||||||||||||
 |
|||||||||||||||||||||||||||||||
 |
|||||||||||||||||||||||||||||||
 |
|||||||||||||||||||||||||||||||
Have you finished this pattern?Tag your pictures with #dropspattern #listentonaturejacket or submit them to the #dropsfan gallery. Do you need help with this pattern?You'll find 25 tutorial videos, a Comments/Questions area and more by visiting the pattern on garnstudio.com. © 1982-2026 DROPS Design A/S. We reserve all rights. This document, including all its sub-sections, has copyrights. Read more about what you can do with our patterns at the bottom of each pattern on our site. |
|||||||||||||||||||||||||||||||


With over 40 years in knitting and crochet design, DROPS Design offers one of the most extensive collections of free patterns on the internet - translated to 17 languages. As of today we count 324 catalogues and 12290 patterns translated into English (UK/cm).
We work hard to bring you the best knitting and crochet have to offer, inspiration and advice as well as great quality yarns at incredible prices! Would you like to use our patterns for other than personal use? You can read what you are allowed to do in the Copyright text at the bottom of all our patterns. Happy crafting!
Post a comment to pattern DROPS 213-2
We would love to hear what you have to say about this pattern!
If you want to leave a question, please make sure you select the correct category in the form below, to speed up the answering process. Required fields are marked *.