
Popular categories
Looking for a yarn?


Comments / Questions (12)
![]() Venstre Vott, øke Til Tommel Etter 8 Cm wrote:
Venstre Vott, øke Til Tommel Etter 8 Cm wrote:
Hei, det står i oppskriften at det skal økes til tommel etter 8 cm. Betyr det 8 cm hele arbeidet, eller 8 cm fra vrang bord?
03.02.2025 - 09:11DROPS Design answered:
Hei. Hele arbeidet :) mvh DROPS Design
10.02.2025 - 14:40
![]() Larouche wrote:
Larouche wrote:
Arrêter au 1er ou 3ème tour du diagramme, Est-ce avant ou après le tour? Merci
02.09.2024 - 21:39DROPS Design answered:
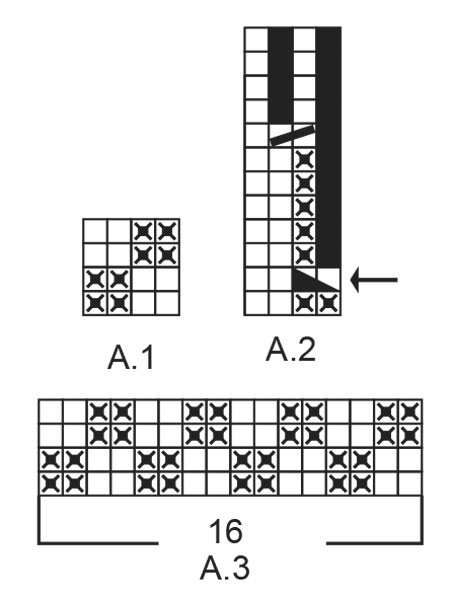
Bonjour Mme Larouche, tricotez jusqu'à la fin d'un tour 1 ou d'un tour 3 du diagramme, le tour doit être tricoté jusqu'à la fin, mais pour que le diagramme A.2 s'ajuste au-dessus de A.1, vous devez arrêter le point fantaisie soit après un tour 1 soit après un tour 3. Bon tricot!
03.09.2024 - 09:46
![]() Ana Ramirez wrote:
Ana Ramirez wrote:
Jeg vil prøve å lage luen. Det står at man strikker fra vrangbord 88 masker. Men luen skal være 54/56 i størrelse. Bør jeg legge til mer masker?
18.12.2023 - 16:04DROPS Design answered:
Hej Ana, nej du skal tage ind som der står - du skal have 19 masker i mønster på 10 cm, hvis du har det, vil hue sidde lidt stramt som på billedet. Vil du have den større, så skal du evt strikke efter den større størrelse :)
19.12.2023 - 14:49
![]() BrittMari wrote:
BrittMari wrote:
Stickar mössan var snäll förklara intagningarna tack
20.11.2023 - 22:01DROPS Design answered:
Hej BrittMari Se svar nedan. Mvh DROPS Design
22.11.2023 - 14:09
![]() Britt-Mari wrote:
Britt-Mari wrote:
Hej,! Stickar mössan och ska börja intagningarna. Har jag förstått rätt : Börjar vid pilen med att sticka ihop två aviga sen två räta varvet ut, ska sen följande varv stickas utan intagningar och nästa två räta stickas samman ? Men sen då ? Tacksam för svar
20.11.2023 - 21:58DROPS Design answered:
Hej. Du stickar varvet med pil i diagram A.2 såhär: "2 maskor aviga tillsammans, 2 räta maskor" - detta upprepas varvet ut. De nästa 5 varv stickas enligt diagrammet (1 avig, 2 räta) och där är det inga minskningar. Nästa varv efter det stickar du "2 räta maskor tillsammans, 1 rätmaska" - detta upprepas varvet ut. De sista 2 varv i diagrammet stickas alla maskor räta utan minskningar. Fortsätt sedan enligt beskrivningen. Mvh DROPS Design
22.11.2023 - 14:09
![]() Gabriella Gazzola wrote:
Gabriella Gazzola wrote:
Vorrei lavorare il cappello e lo scaldacollo Modello n° z-87350. Vorrei acquistare 50 g di filatoDROPS KID-SILK di Garnstudio colore n° 06 foschia blu da lavorare insieme a 150 g di filato Alpaca. Quale colore mi consigliate di abbinare in sostituzione del grigio perla non disponibile? Vorrei che risultasse un insieme dal colore delicato ma non banale, è per una ragazzina. Le quantità vanno bene? Grazie
23.09.2023 - 17:33DROPS Design answered:
Buonasera Gabriella, lo potrebbe abbinare al 2917 o 2918 di Alpaca: chieda al suo rivenditore DROPS di fiducia di scattarle delle foto dei diversi abbinamenti, così potrà scegliere meglio. Buon lavoro!
25.09.2023 - 23:13
![]() Lucile Lefloch wrote:
Lucile Lefloch wrote:
Bonjour, Concernant le tour de cou, arrivé à la hauteur souhaitée ne faut-il pas prendre l'aiguille circulaire 3,5 plutôt que 4,5 ? Merci pour votre réponse
23.10.2022 - 17:35DROPS Design answered:
Bonjour Mme Lefloch, pour le tour de cou, on utilise une aiguille circulaire 5,5 + une aiguille circulaire 4,5 - ainsi, on va tricoter les côtes du début et de la fin avec les aiguilles 4,5 (elles seraient beaucoup trop serrées avec des 3,5). Bon tricot!
24.10.2022 - 08:44
![]() Montserrat wrote:
Montserrat wrote:
He hecho el conjunto con 3 ovillos Drops Baby Merino color 22 y 2 ovillos Drops Kid-Silk color 01. Resultado mut agradable i elegante.
26.12.2021 - 12:15
![]() Montserrat wrote:
Montserrat wrote:
Buenas , estoy haciendo la muestra para hacer el gorro con las agujas del 3'5, me salen 10 centímetros, 28 puntos. Estoy hecha un lio no se con que agujas trabajar para que me salga el trabajo bien para la talla M.
16.11.2021 - 11:32DROPS Design answered:
Hola Montserrat, tienes que hacer tu muestra con las agujas 4,5 (2 hilos= 1 Alpaca + 1 Kid-Silk). Saludos!
17.11.2021 - 08:33
![]() Aubrey wrote:
Aubrey wrote:
I am interested in making this hat, but can't tell the purpose of using two types of yarn simultaneously. Is it for color variation or thickness? Can this project be made with just one strand of yarn? Or are two essential?
03.10.2021 - 07:07DROPS Design answered:
Dear Aubrey, we are using two different yarn in this piece to combine the qualities of the two yarns (softnes, silkiness, durability, halo effect, etc). You can use different yarns or even one yarn, but the result will be different, and you will have to make sure to do a gauge swatch and check your stitch/row count. Happy Stitching!
03.10.2021 - 12:27
|
|||||||||||||||||||
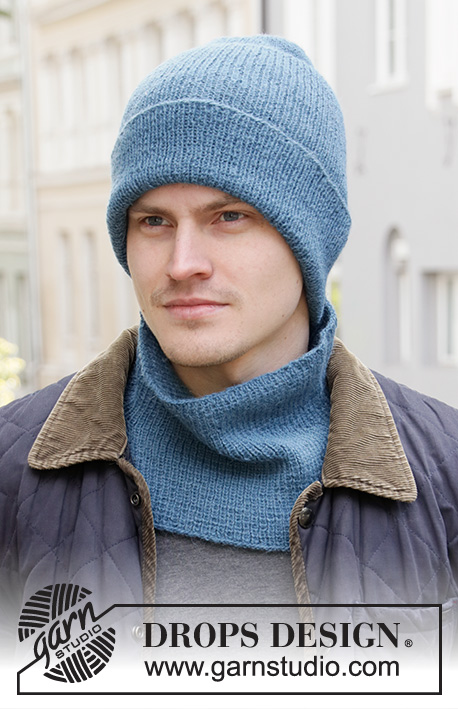
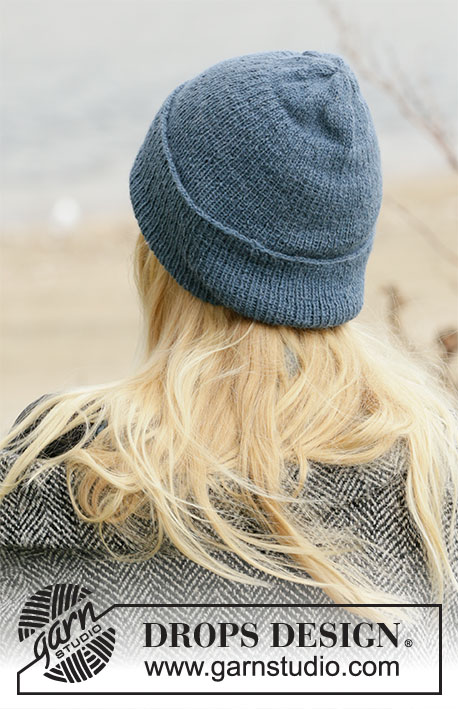
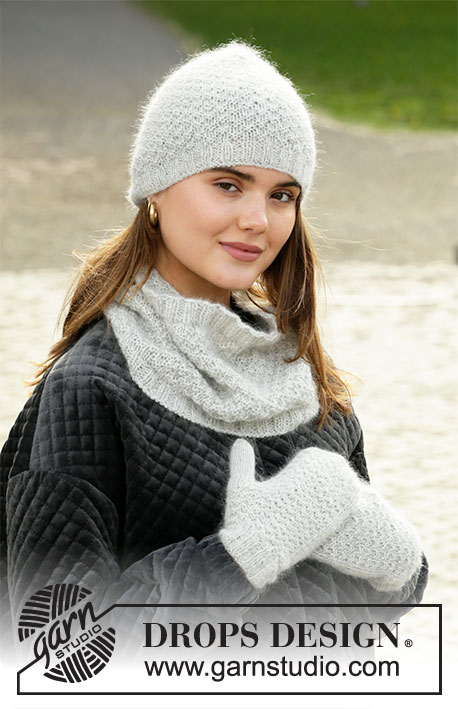
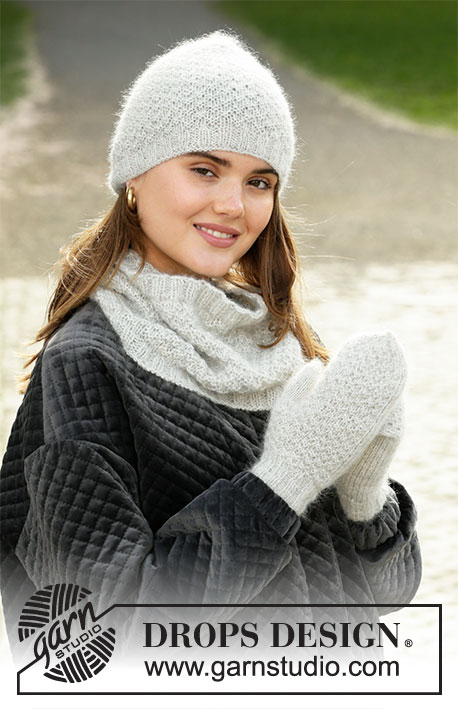
Weekend Wander#weekendwanderset |
|||||||||||||||||||
 |
 |
||||||||||||||||||
Knitted hat, neck warmer and mittens in DROPS Alpaca and DROPS Kid-Silk with textured pattern.
DROPS 204-34 |
|||||||||||||||||||
|
---------------------------------------------------------- EXPLANATION FOR THE PATTERN: ---------------------------------------------------------- PATTERN: Hat: See diagrams A.1 and A.2. Neck warmer: See diagram A.1. Mittens: See diagram A.3. INCREASE TIP (evenly): To calculate how to increase evenly, use the total number of stitches on round (e.g. 128 stitches) and divide stitches by number of increases to be done (e.g. 20) = 6.4. In this example increase by making 1 yarn over after approx. every 6th stitch. On next round work yarn overs twisted to avoid holes. DECREASE TIP-1 (evenly): To calculate how to decrease evenly, use the total number of stitches on round (e.g. 96 stitches) and divide stitches by number of decreases to be done (e.g. 8) = 12. In this example decrease by knitting every 11th and 12th stitch together. DECREASE TIP-2 (applies to mittens): Decrease as follows (begin 3 stitches before marker): Knit 2 together, knit 2 (marker is in the middle of these 2 stitches), slip 1 stitch knitwise, knit 1, pass slipped stitch over. Repeat in the other side. NOTE! Work as many stitches of pattern A.1 that fit on the front of mitten between decreases in each side. Work in stocking stitch on the inside of mitten as before. ---------------------------------------------------------- START THE PIECE HERE: ---------------------------------------------------------- HAT - SHORT OVERVIEW OF THE PIECE: Worked in the round on circular needle. Switch to double pointed needles when needed. HAT: Cast on 96-104 stitches on circular needle size 3.5 mm with 1 strand Alpaca and 1 strand Kid-Silk (= 2 strands). Knit 1 round. Then work rib = knit 2/purl 2 until piece measures 3 cm. Switch to circular needle size 4.5 mm. Knit 1 round while decreasing 8-12 stitches evenly - read DECREASE TIP-1 = 88-92 stitches. Work A.1 (= 4 stitches) the entire round. REMEMBER THE KNITTING TENSION! When piece measures 17-19 cm - adjust to finish on 1st or 3rd round in diagram, begin decrease. Knit until first purl stitch. Insert a marker thread here. This is now the beginning of round. Begin round with arrow in A.2 and work diagram in the round on round. When A.2 has been worked vertically, there are 44-46 stitches on round. Now knit stitches together 2 by 2 = 22-23 stitches. Knit 2 rounds. Knit 2 and 2 stitches together until 11-12 stitches remain on round. Hat measures approx. 24-26 cm. Cut the yarn and pull it through the remaining stitches, tighten together and fasten. ---------------------------------------------------------- NECK WARMER - SHORT SUMMARY OF PIECE: Worked in the round on circular needle. NECK WARMER: Cast on 148-156 stitches on circular needle size 4.5 mm with 1 strand Alpaca and 1 strand Kid-Silk (= 2 strands). Knit 1 round. Then work rib (= knit 2/purl 2) for 3 cm. Switch to circular needle size 5.5 mm. Knit 1 row while decreasing 20 stitches evenly - read DECREASE TIP = 128-136 stitches. Then work pattern A.1 in the round on round. REMEMBER THE KNITTING TENSION! When piece measures 19-21 cm - adjust to finish after 2nd or 4th round in diagram, knit 1 round while increasing 20-20 stitches evenly - READ INCREASE TIP = 148-156 stitches on needle. Switch to circular needle size 4.5 mm. Work rib (knit 2/purl 2) for 3 cm. Cast off stitches with knit over knit and purl over purl. Neck warmer measures approx. 22-24 cm. Cut and fasten the yarn. ---------------------------------------------------------- MITTENS - SHORT OVERVIEW OF THE PIECE: Worked in the round on double pointed needles. LEFT MITTEN: Cast on 40-44 stitches on double pointed needles size 3 mm with 1 strand Alpaca and 1 strand Kid-Silk (= 2 strands). Then work rib (= knit 2/purl 2) for 4 cm. Switch to double pointed needles size 4 mm. Knit 1 round while decreasing 4 stitches evenly = 36-40 stitches. Insert a marker thread at beginning of piece. Move the marker thread upwards when working. Work pattern as follows: Knit 2-3, A.1 (= 16 stitches), knit the remaining stitches on round. REMEMBER THE KNITTING TENSION! When A.1 has been worked vertically, repeat diagram vertically. When piece measures 8 cm, increase 1 stitch on each side of first stitch on round for thumb (= 2 stitches increased) - read INCREASE TIP! Repeat increase on each side of the increased stitches every other round 5 times in total = 46-50 stitches. Now slip the 11 thumb stiches on 1 stitch holder. Work in stocking stitch and A.1 in the round AT THE SAME TIME cast on 1 new stitch behind thumb on next round = 36-40 stitches. When mitten measures approx. 22 cm (try the mitten on if needed, approx. 4-5 cm remain until finished measurements), insert 2 marker threads in piece as follows: Move the marker thread at the beginning of round 1 stitch, i.e. 1 stitch from right to left. Insert a new marker thread after another 18-20 stitches. 18-20 stitches remain on round after last marker thread. Now continue with as many stitches of A.1 that fit on the front of mitten and work in stocking stitch over the remaining stitches, AT THE SAME TIME on first row decrease 1 stitch on each side of both marker threads (= 4 stitches decreased) - read DECREASE TIP-2. Decrease like this on every other round 2-3 more times and then every round 4 times in total = 8-8 stitches. On next round knit all stitches together 2 by 2 = 4-4 stitches. Cut the yarn and pull it through the remaining stitches, tighten together and fasten. THUMB: Slip the 11 thumb stiches from stitch holder back on double pointed needle size 4 mm. Pick in addition up 4-5 stitches behind thumb = 15-16 stitches. Work in stocking stitch until the thumb itself measures approx. 5½-6 cm (try on the mitten, approx. ½ cm remains until finished measurements). Knit 2 rounds AT THE SAME TIME knit all stitches together 2 by 2 on both rounds. Cut the yarn and pull it through the remaining stitches, tighten together and fasten. RIGHT MITTEN: Cast on 40-44 stitches on double pointed needles size 3 mm with 1 strand Alpaca and 1 strand Kid-Silk (= 2 strands). Then work rib (= knit 2/purl 2) for 4 cm. Switch to double pointed needles size 4 mm. Knit 1 round while decreasing 4 stitches evenly = 36-40 stitches. Insert a marker thread at beginning of piece. Move the marker thread upwards when working. Work pattern as follows: Knit 18-21, A.1 (= 16 stitches), knit 2-3. When A.1 has been worked vertically, repeat diagram vertically. When piece measures 8 cm, increase 1 stitch on each side of last stitch on round for thumb (= 2 stitches increased) - remember INCREASE TIP! Repeat increase on each side of the increased stitches every other round 5 times in total = 46-50 stitches. Now slip the 11 thumb stiches on 1 stitch holder. Work in stocking stitch and A.1 in the round AT THE SAME TIME cast on 1 new stitch behind thumb on next round = 36-40 stitches. When mitten measures approx. 22 cm (try the mitten on if needed, approx. 4-5 cm remain until finished measurements), insert 2 marker threads in piece as follows: Move the marker thread at the beginning of round 1 stitch, i.e. 1 stitch from left to right. Insert a new marker thread after another 18-20 stitches. 18-20 stitches remain on round after last marker thread. Now continue with as many stitches of A.1 that fit on the front of mitten and work in stocking stitch over the remaining stitches, AT THE SAME TIME on first row decrease 1 stitch on each side of both marker threads (= 4 stitches decreased) - remember DECREASE TIP. Decrease like this on every other round 2-3 more times and then every round total 4 times in total = 8-8 stitches. On next round knit all stitches together 2 by 2 = 4-4 stitches. Cut the yarn and pull it through the remaining stitches, tighten together and fasten. THUMB: Slip the 11 thumb stiches from stitch holder back on double pointed needle size 4 mm. Pick in addition up 4-5 stitches behind thumb = 15-16 stitches. Work in stocking stitch until the thumb itself measures approx. 5½-6 cm (try on the mitten, approx. ½ cm remains until finished measurements). Knit 2 rounds AT THE SAME TIME knit all stitches together 2 by 2 on both rounds. Cut the yarn and pull it through the remaining stitches, tighten together and fasten. |
|||||||||||||||||||
Diagram explanations |
|||||||||||||||||||
|
|||||||||||||||||||
 |
|||||||||||||||||||
Have you finished this pattern?Tag your pictures with #dropspattern #weekendwanderset or submit them to the #dropsfan gallery. Do you need help with this pattern?You'll find 25 tutorial videos, a Comments/Questions area and more by visiting the pattern on garnstudio.com. © 1982-2026 DROPS Design A/S. We reserve all rights. This document, including all its sub-sections, has copyrights. Read more about what you can do with our patterns at the bottom of each pattern on our site. |
|||||||||||||||||||


With over 40 years in knitting and crochet design, DROPS Design offers one of the most extensive collections of free patterns on the internet - translated to 17 languages. As of today we count 325 catalogues and 12298 patterns translated into English (UK/cm).
We work hard to bring you the best knitting and crochet have to offer, inspiration and advice as well as great quality yarns at incredible prices! Would you like to use our patterns for other than personal use? You can read what you are allowed to do in the Copyright text at the bottom of all our patterns. Happy crafting!
Post a comment to pattern DROPS 204-34
We would love to hear what you have to say about this pattern!
If you want to leave a question, please make sure you select the correct category in the form below, to speed up the answering process. Required fields are marked *.