
Popular categories
Looking for a yarn?


Comments / Questions (60)
![]() Giusy wrote:
Giusy wrote:
Buon pomeriggio, se sostituisco il filatomelody che ha una metratura di 140m con il filato air che ha una metratura di 150m, potrebbe cambiare lo svolgimento del lavoro del maglione? Spero al più presto di una vostra risposta
12.03.2026 - 17:18DROPS Design answered:
Buongiorno Giusy, i due filati appartengono a gruppi diversi: provi a lavorare un campione e vedere se corrisponde a quello indicato. Buon lavoro!
14.03.2026 - 10:57
![]() Giusy wrote:
Giusy wrote:
Buongiorno, ho bisogno di un vostro aiuto. Dal momento che il filato melody n.19 è 20 non c'è, li posso sostituire con il filato alpaca e aggiungere un filo del filato kidsilk nel lavoro? Aspetto una vostra risposta per fare l'ordine. Grazie
11.03.2026 - 08:09DROPS Design answered:
Buonasera Giusy, potrebbe usare 2 fili di un filato del gruppo filati B o 3 fili di un filato del gruppo filati A. Buon lavoro!
11.03.2026 - 23:40
![]() Giusy wrote:
Giusy wrote:
Buongiorno, desidero sapere se i colori del filato melody 19 mattone e 20 uva vi arriveranno. Altrimenti con quali altri colori dello stesso filato potrei sostituirli . Grazie in anticipo per una vostra risposta.
09.03.2026 - 07:38DROPS Design answered:
Buongiorno Giusy, i colori disponibili sono quelli nella cartella colori. Può rivolgersi al suo rivenditore DROPS di fiducia per un'assistenza così personalizzata. Buon lavoro!
14.03.2026 - 11:12
![]() Giusy wrote:
Giusy wrote:
Buongiorno con quale altro filato potrei sostituire il filato Melody? Grazie
29.01.2026 - 14:13DROPS Design answered:
Buonasera Giusy, purtroppo Melody è l'unico componente del gruppo filati D. Buon lavoro!
29.01.2026 - 23:14
![]() Louise wrote:
Louise wrote:
Hi just to let knitters know that having knit this jumper in size M to the guage I found that only 200g of the main colour was required, not 250g. It’s a great pattern and I have knit it for both my daughter and son in law.
24.01.2026 - 13:07
![]() Alexandra Marshall wrote:
Alexandra Marshall wrote:
I would love to see the Rust colour come back so I can make this! More rich autumn colours for Melody would be nice.
18.09.2025 - 23:09
![]() Sonja wrote:
Sonja wrote:
Jag testade sticka pch tycker det blir väldigt glappt. Bytte till mindre sticka vilket gör det lite mer tätare men då får jag ca 18 maskor på 10cm. Jag hade tänkt göra så en S (istället för m) men kanske tröjan blir för stor ändå. Hur skulle det se ut om jag stickade med 2 melody trådar?
23.09.2024 - 20:02DROPS Design answered:
Hej Sonja. Jag tror inte att du får den stickfasthet som står i mönstret om du använder 2 trådar Melody dessvärre, men du kan alltid testa att göra en provlapp i dubbel tråd för att se. Mvh DROPS Design
01.10.2024 - 09:17
![]() Sonja wrote:
Sonja wrote:
Hej! Jag ska testa sticka denna tröja. Men när jag fick garnet blev jag chockad att det är ju väldigt tunnt men att det ska skickas med så tjocka stickor! Blir det inte jätte stora hål i tröjan? Är det verkligen stickor 7mm och 8mm man ska använda?
20.09.2024 - 09:01DROPS Design answered:
Jo tröjan ska stickas med stickor nr 7 och 8. Garnet är ju ganska luddigt, så det ska inte bli hål. Det är viktigt att du kontrollerar din stickfasthet så att du får den stickfasthet som anges i beskrivningen.
23.09.2024 - 19:36
![]() Anouk wrote:
Anouk wrote:
Bonjour, Je ne comprends pas pourquoi monter les mailles avec deux fils avant d'en retirer un au début de l'ouvrage. Est-ce pour que le premier rang soit plus lâche ? Cela fait-il une grande différence si l'on monte les mailles avec un seul fil ? Comment retirer un des fil une fois que les deux sont montés ensemble ? Merci beaucoup.
19.02.2024 - 00:30DROPS Design answered:
Bonjour Anouk, on monte avec 2 fils pour avoir un bord un peu plus ferme et en même temps plus élastique car plus épais, dans vidéo, nous montrons comment monter mais aussi comment rabattre les mailles avec 2 fils, tout en tricotant avec 1 seul fil entre le montage et avant de rabattre. Bon tricot!
19.02.2024 - 09:38
![]() Monica wrote:
Monica wrote:
Buongiorno, se uso dei ferri circolari n3 , con quante maglie devo cominciare, e gli aumenti sono uguali? Grazie
24.09.2023 - 12:05DROPS Design answered:
Buonasera Monica, questo modello è pensato e progettato per essere lavorato con la tensione indicata. Se la tensione cambia molto, il risultato sarà completamente diverso da quello riportato. Buon lavoro!
25.09.2023 - 23:05
|
||||||||||||||||
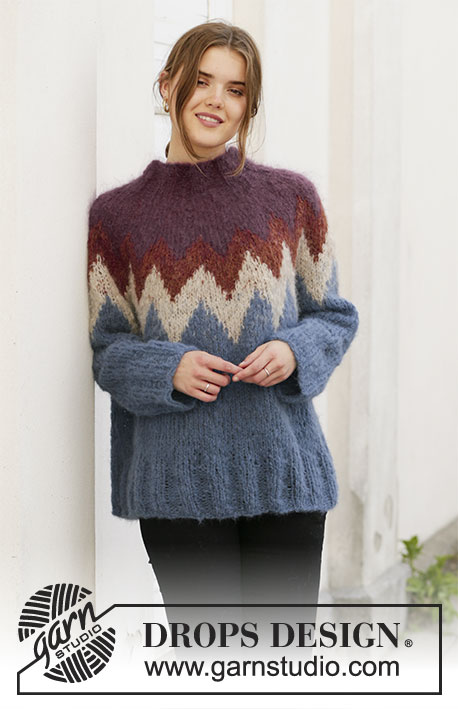
Morocco Love#moroccolovesweater |
||||||||||||||||
 |
 |
|||||||||||||||
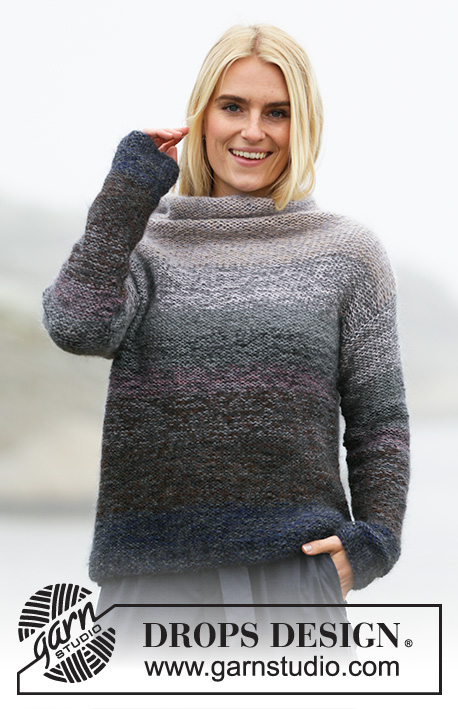
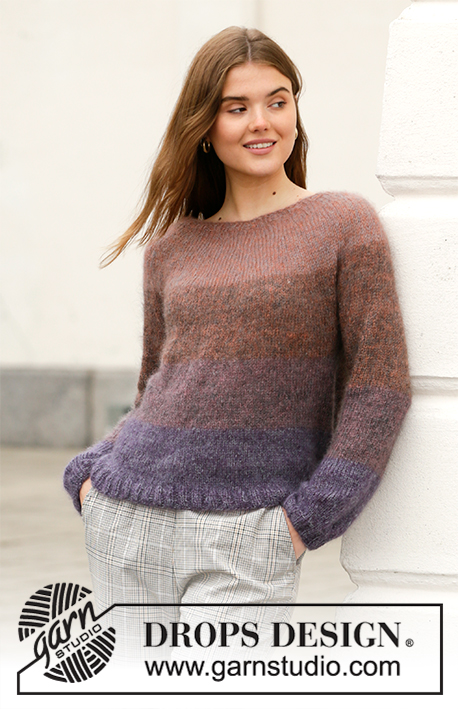
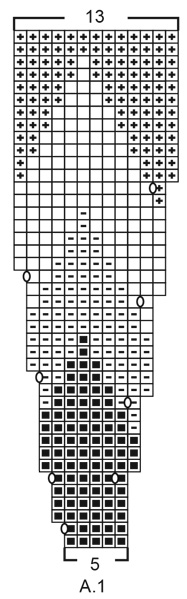
Knitted jumper in DROPS Melody. The piece is worked top down with round yoke and Nordic pattern on the yoke. Sizes S - XXXL.
DROPS 206-5 |
||||||||||||||||
|
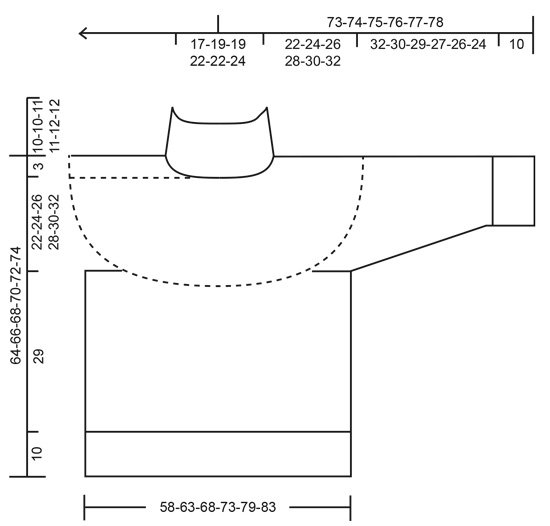
------------------------------------------------------- EXPLANATIONS FOR THE PATTERN: ------------------------------------------------------- INCREASE/DECREASE TIP (evenly spaced): To work out how to increase/decrease evenly, count the total number of stitches on needle (e.g. 54 stitches) and divide by the number of increases/decreases to be made (e.g. 26) = 2.1. In this example, increase by making 1 yarn over after approx. each 2nd stitch. On the next round knit the yarn overs twisted to avoid holes. When decreasing, knit together every and every-other stitch. PATTERN: See diagram A.1. The whole pattern is worked in stocking stitch. DECREASE TIP (for mid under sleeve): Work until there are 3 stitches left before the marker thread, knit 2 together, knit 2 (marker thread sits between these 2 stitches), slip 1 stitch as if to knit, knit 1 and pass the slipped stitch over the knitted stitch (= 2 stitches decreased). CASTING OFF TIP: To avoid the cast-off edge being tight you can cast off with a double strand, or a larger size needle. ------------------------------------------------------- START THE PIECE HERE: ------------------------------------------------------- JUMPER – SHORT OVERVIEW OF THE PIECE: The high neck and yoke are worked in the round with circular needle, top down. The yoke is divided for body and sleeves. The body is continued in the round with circular needle. The sleeves are worked in the round with short circular needle/double pointed needles, top down. HIGH NECK: Cast on 54-60-60-66-66-72 stitches with short circular needle size 7 mm and 2 strands grape. Remove one strand and continue with just 1 strand grape. Work rib in the round (= knit 3 / purl 3) for 10-10-11-11-12-12 cm (or to desired length of neck). Knit 1 round where you increase 26-20-30-24-44-38 stitches evenly spaced – read INCREASE/DECREASE TIP = 80-80-90-90-110-110 stitches. Insert 1 marker thread in the middle of the round (= mid front) – the yoke is measured from here. YOKE: Change to circular needle size 8 mm. Work 0-1-3-3-3-4 rounds with stocking stitch and grape. Then work A.1 in the round (= 16-16-18-18-22-22 repeats of 5 stitches). Increase as shown in the diagram. REMEMBER THE KNITTING TENSION! Continue A.1 until the piece measures 22-24-26-28-30-32 cm from the marker on the neck. The last increase is now finished and there are 208-208-234-234-286-286 stitches on the needle. Now divide the yoke for body and sleeves as described below – NOTE: A.1 is not finished in all sizes, so the pattern then continues on the body and sleeves (if A.1 is finished work stocking stitch with dark denim blue over all stitches). Work A.1 over the first 39-39-39-39-52-52 stitches (= 3-3-3-3-4-4 repeats of 13 stitches on approx. half the back piece), place the next 39-39-39-39-52-52 stitches on 1 thread for the sleeve (= 3-3-3-3-4-4 repeats of 13 stitches), cast on 4-10-4-10-4-8 new stitches on the needle (= in side under sleeve), continue A.1 over the next 65-65-78-78-91-91 stitches (= 5-5-6-6-7-7 repeats of 13 stitches on the front piece), place the next 39-39-39-39-52-52 stitches on 1 thread for the sleeve (= 3-3-3-3-4-4 repeats of 13 stitches), cast on 4-10-4-10-4-8 new stitches on the needle (= in side under sleeve) and work A.1 over the remaining 26-26-39-39-39-39 stitches on the back piece (= 2-2-3-3-3-3 repeats of 13 stitches). Cut the strand. Body and sleeves are finished separately. BODY: = 138-150-164-176-190-198 stitches. Start the round in the middle of the 4-10-4-10-4-8 stitches under the sleeve on the one side of the piece. Continue A.1 in the round, but the new stitches under each sleeve are worked with dark denim blue (if A.1 is finished on the yoke work stocking stitch with dark denim blue over all stitches). When A.1 is finished, work stocking stitch with dark denim blue over all stitches. Work until the piece measures 29 cm from the division (there is approx. 10 cm left to finished length; you can try the jumper on and work to desired length). Knit 1 round where you decrease 6-6-2-2-4-6 stitches evenly spaced = 132-144-162-174-186-192 stitches. Change to circular needle size 7 mm and work rib (= knit 3 / purl 3) for 10 cm. Cast off with knit over knit and purl over purl – read CASTING OFF TIP. The jumper measures approx. 64-66-68-70-72-74 cm from the shoulder down. SLEEVE: Place the 39-39-39-39-52-52 stitches from the thread on the one side of the piece on short circular needle size 8 mm and knit up 1 stitch in each of the 4-10-4-10-4-8 new stitches cast on under the sleeve = 43-49-43-49-56-60 stitches. Insert 1 marker thread in the middle of the 4-10-4-10-4-8 new stitches under the sleeve; allow it to follow your work onwards, it will be used when decreasing mid under sleeves. Start the round at the marker thread and continue A.1 in the round, but the new stitches under the sleeve are worked with dark denim blue (if A.1 is finished on the yoke work stocking stitch with dark denim blue over all stitches). When A.1 is finished, work stocking stitch with dark denim blue over all stitches. AT THE SAME TIME when the piece measures 3-3-4-4-4-4 cm from the division, decrease 2 stitches mid under sleeve – read DECREASE TIP. Decrease like this every 6-4-10-4-2½-2 cm a total of 5-7-3-6-9-10 times = 33-35-37-37-38-40 stitches. Continue working until the sleeve measures 32-30-29-27-26-24 cm from the division (there is approx. 10 cm left to finished length; you can try the jumper on and work to desired length). NOTE: Shorter measurements in larger sizes due to wider neck and longer yoke. Knit 1 round where you adjust the number of stitches to 30-36-36-36-36-42 stitches (S: Decrease 3 stitches, M: Increase 1 stitch, L and XL: Decrease 1 stitch, XXL: Decrease 2 stitches, XXXL: Increase 2 stitches). Change to double pointed needles size 7 mm and work rib (= knit 3 / purl 3) for 10 cm. Cast off with knit over knit and purl over purl – remember CASTING OFF TIP! The sleeve measures approx. 42-40-39-37-36-34 cm from the division. Work the other sleeve in the same way. |
||||||||||||||||
Diagram explanations |
||||||||||||||||
|
||||||||||||||||
 |
||||||||||||||||
 |
||||||||||||||||
Have you finished this pattern?Tag your pictures with #dropspattern #moroccolovesweater or submit them to the #dropsfan gallery. Do you need help with this pattern?You'll find 26 tutorial videos, a Comments/Questions area and more by visiting the pattern on garnstudio.com. © 1982-2026 DROPS Design A/S. We reserve all rights. This document, including all its sub-sections, has copyrights. Read more about what you can do with our patterns at the bottom of each pattern on our site. |
||||||||||||||||


With over 40 years in knitting and crochet design, DROPS Design offers one of the most extensive collections of free patterns on the internet - translated to 17 languages. As of today we count 324 catalogues and 12290 patterns translated into English (UK/cm).
We work hard to bring you the best knitting and crochet have to offer, inspiration and advice as well as great quality yarns at incredible prices! Would you like to use our patterns for other than personal use? You can read what you are allowed to do in the Copyright text at the bottom of all our patterns. Happy crafting!
Post a comment to pattern DROPS 206-5
We would love to hear what you have to say about this pattern!
If you want to leave a question, please make sure you select the correct category in the form below, to speed up the answering process. Required fields are marked *.