DROPS Alpaca
DROPS Alpaca
100% Alpaca
from 3.40 £ /50g
DROPS Kid-Silk
DROPS Kid-Silk
75% Mohair, 25% Silk
from 4.60 £ /25g
Get the yarn to make this pattern from 65.20£.

The yarn cost is calculated from the pattern’s smallest size and the yarn’s cheapest product type. Looking for an even better price? You might find it on the DROPS Deals!

DROPS SS24

Cloudscape

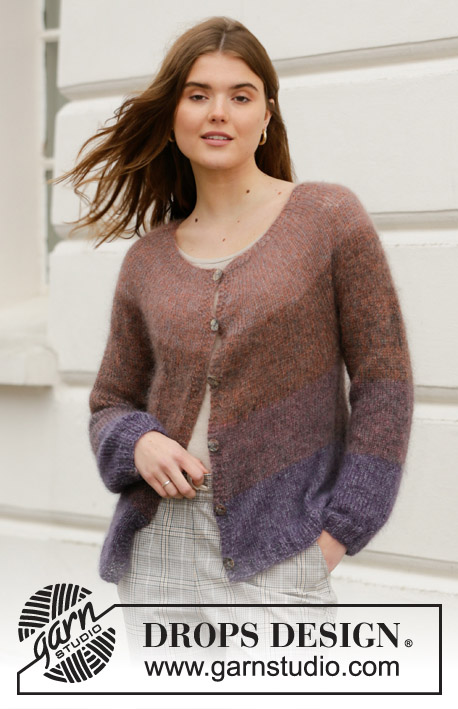
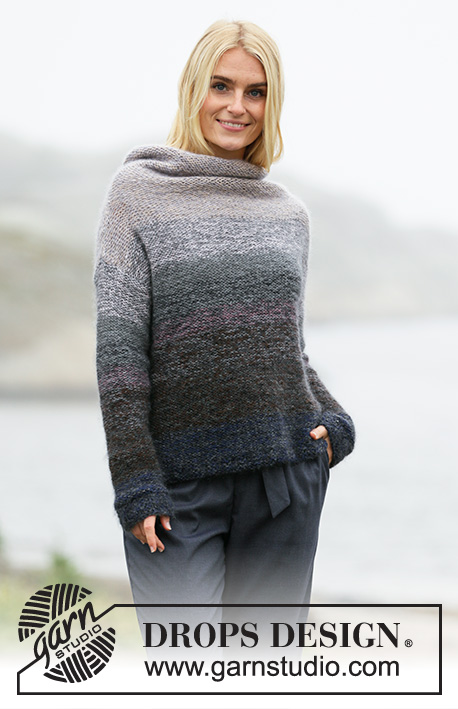
Knitted jumper in DROPS Alpaca and DROPS Kid-Silk. The piece is worked in stocking stitch with the wrong side out and with speckled stripes. Sizes S - XXXL.

DROPS 206-20
DROPS Design: Pattern no z-871
Yarn group A + A + A or D
-------------------------------------------------------

SIZES:
S - M - L - XL - XXL - XXXL

MATERIALS:
DROPS ALPACA from Garnstudio (belongs to yarn group A)
100-100-100-100-100-150 g colour 0601, dark brown
50-100-100-100-100-100 g colour 2020, light camel
50-50-50-50-50-100 g colour 517, medium grey
50-50-50-50-50-100 g colour 4010, light lavender
50-50-50-50-50-100 g colour 5575, navy blue
50-50-50-50-50-50 g colour 3800, old pink

And use:
DROPS KID-SILK from Garnstudio (belongs to yarn group A)
75-75-75-100-100-100 g colour 02, black
75-75-75-75-100-100 g colour 10, grey
50-75-75-75-75-100 g colour 22, ash grey
25-25-25-25-50-50 g colour 09, light lavender

KNITTING TENSION:
13 stitches in width and 15 rows in height with stocking stitch and 1 strand Alpaca + 2 strands Kid-Silk (3 strands) = 10 x 10 cm.

NEEDLES:
DROPS CIRCULAR NEEDLE SIZE 7 MM: Length 40 cm and 80 cm for stocking stitch
DROPS CIRCULAR NEEDLE SIZE 6 MM: Length 80 cm for rib.
Needle size is only a guide. If you get too many stitches on 10 cm, change to a larger needle size. If you get too few stitches on 10 cm, change to a smaller needle size.

-------------------------------------------------------

Alternative Yarn – See how to change yarns here
Yarn Groups A to F – Use the same pattern and change the yarn here
Yarn usage using an alternative yarn – Use our yarn converter here

-------------------------------------------------------

DROPS Alpaca
DROPS Alpaca
100% Alpaca
from 3.40 £ /50g
DROPS Kid-Silk
DROPS Kid-Silk
75% Mohair, 25% Silk
from 4.60 £ /25g
Get the yarn to make this pattern from 65.20£.

The yarn cost is calculated from the pattern’s smallest size and the yarn’s cheapest product type. Looking for an even better price? You might find it on the DROPS Deals!

Pattern instructions

NOTE: This pattern is written in British English. All measurements in charts are in cm. For conversion from cm to inches - click here. There are different terms for crocheting in British and American English. If this pattern includes crochet, click for "crochet terms" here. For this pattern in American English, please click here.
-------------------------------------------------------

EXPLANATIONS FOR THE PATTERN:

-------------------------------------------------------

RIDGE/GARTER STITCH (worked back and forth):
Knit all rows.
1 ridge in height = Knit 2 rows.

INCREASE/DECREASE TIP (evenly spaced):
To work out how to increase/decrease evenly, count the total number of stitches on needle (e.g. 70 stitches), minus edge stitches (e.g. 2 stitches) and divide the remaining 68 stitches with number of increases/decreases to be made (e.g. 6) = 11.3.
In this example, decrease by knitting together approx. each 10th and 11th stitch (do not decrease over the edge stitches).
When increasing, make 1 yarn over after approx. each 11th stitch. On the next row work the yarn overs twisted to avoid holes.

DECREASE TIP (for sides of sleeves):
All decreases are made from the right side!
Decrease as follows after the 1 edge stitch in garter stitch: Knit 2 twisted together.
Decrease as follows before the 1 edge stitch in garter stitch: Work until there are 3 stitches left on the row, knit 2 together and finish with 1 edge stitch in garter stitch.

SPECKLED STRIPES BODY (the piece is worked bottom up):
The stripes are worked in stocking stitch with the wrong side out (purl from the right side and knit from the wrong side) and with 1 strand Alpaca and 2 strands Kid-Silk as described below (= 3 strands). A = Alpaca. KS = Kid-Silk.
5-6-7-7-7-7 cm with 1 strand navy blue A + 1 strand black KS + 1 strand ash grey KS.
10-11-11-12-12-12 cm with 1 strand dark brown A + 1 strand black KS + 1 strand ash grey KS.
8-8-8-9-9-9 cm with 1 strand dark brown A + 1 strand black KS + 1 strand grey KS.
4-4-4-4-4-5 cm with 1 strand old pink A + 1 strand black KS + 1 strand grey KS.
5-5-5-5-6-6 cm with 1 strand medium grey A + 1 strand black KS + 1 strand grey KS.
4-4-4-4-4-5 cm with 1 strand medium grey A + 1 strand ash grey KS + 1 strand grey KS.
9-9-9-9-9-9 cm with 1 strand light lavender A + 1 strand ash grey KS + 1 strand grey KS.
Then work with 1 strand light camel A + 1 strand grey KS + 1 strand light lavender KS to finished length.

SPECKLED STRIPES SLEEVES (the piece is worked top down):
The stripes are worked in stocking stitch with the wrong side out (purl from the right side and knit from the wrong side) and with 1 strand Alpaca and 2 strands Kid-Silk as described below (= 3 strands). A = Alpaca. KS = Kid-Silk.
9-9-8-8-7-7 cm with 1 strand light lavender A + 1 strand ash grey KS + 1 strand grey KS (= top of sleeve).
4-4-4-4-4-3 cm with 1 strand medium grey A + 1 strand ash grey KS + 1 strand grey KS.
5-5-5-5-4-4 cm with 1 strand medium grey A + 1 strand black KS + 1 strand grey KS.
4-4-4-4-4-3 cm with 1 strand old pink A + 1 strand black KS + 1 strand grey KS.
8-7-7-7-7-7 cm with 1 strand dark brown A + 1 strand black KS + 1 strand grey KS.
9-9-9-8-8-8 cm with 1 strand dark brown A + 1 strand black KS + 1 strand ash grey KS.
Then work with 1 strand navy blue A + 1 strand black KS + 1 strand ash grey KS to finished length.

-------------------------------------------------------

START THE PIECE HERE:

-------------------------------------------------------

JUMPER – SHORT OVERVIEW OF THE PIECE:
The piece is worked back and forth with circular needle in different parts which are sewn together to finish.

FRONT PIECE:
Cast on 70-78-82-90-98-106 stitches (including 1 edge stitch on each side) with circular needle size 6 mm and1 strand navy blue Alpaca + 1 strand black Kid-Silk + 1 strand ash grey Kid-Silk (= 3 strands). Purl 1 row (= wrong side). Then work rib as follows:
Row 1 (= right side): Knit.
Row 2 (= wrong side): Knit 1 edge stitch, * purl 2, knit 2 *, work from *-* until there is 1 stitch left on the row and finish with knit 1 edge stitch.
Repeat rows 1 and 2 until the rib measures 4 cm.
Knit 1 row from the right side where you decrease 6-8-6-8-8-8 stitches evenly spaced – read INCREASE/DECREASE TIP = 64-70-76-82-90-98 stitches.
Change to circular needle size 7 mm and work SPECKLED STRIPES BODY with 1 edge stitch in GARTER STITCH on each side – read description above. REMEMBER THE KNITTING TENSION and note that the first stripe will be 9-10-11-11-11-11 cm including the rib.
When the piece measures 37-38-39-40-41-42 cm, insert 1 marker in each side. These mark where the armholes start. Continue the stripes as before with 1 edge stitch in garter stitch on each side.
When the piece measures 56-58-60-62-64-66 cm cast off for the shoulders; i.e. the next row is worked as follows from the right side: Cast off 14-17-18-21-24-28 stitches for shoulder (make sure the cast-off edge is not tight), work stocking stitch with the wrong side out over the next 36-36-40-40-42-42 stitches and then place these 36-36-40-40-42-42 stitches on 1 thread and cast off the remaining 14-17-18-21-24-28 stitches for the shoulder. Lay the piece to one side and work the back piece as described below.

BACK PIECE:
Cast on the same number of stitches as for the front piece and work in the same way; i.e. front and back piece are the same.

SLEEVE:
The sleeves are worked back and forth with circular needle, top down.
Cast on 52-54-56-60-62-64 stitches (including 1 edge stitch on each side) with circular needle size 7 mm and 1 strand light lavender Alpaca + 1 strand ash grey Kid-Silk + 1 strand grey Kid-Silk (= 3 strands). Work SPECKLED STRIPES SLEEVE with 1 edge stitch in garter stitch on each side – read description above.
When the sleeve measures 2 cm, decrease 1 stitch on each side – read DECREASE TIP. Decrease like this every 4-3½-3½-3-2½-2½ cm a total of 11-12-12-13-14-14 times on each side = 30-30-32-34-34-36 stitches. Continue working until the sleeve measures 45-44-43-41-39-37 cm (or to desired length; there is approx. 4 cm to finished length – NOTE: There are shorter measurements in larger sizes due to wider shoulders).
Knit 1 row from the right side where you increase 4-4-2-4-4-2 stitches evenly spaced = 34-34-34-38-38-38 stitches.
Change to circular needle size 6 mm and continue with the last stripe-colour, working rib as follows starting from the wrong side:
Row 1 (= wrong side): Knit 1 edge stitch, * purl 2, knit 2 *, work from *-* until there is 1 stitch left on the row and finish with knit 1 edge stitch.
Row 2 (= right side): Knit.
Repeat rows 1 and 2 until the rib measures 4 cm, but finish after a row from the wrong side. Then loosely cast off with knit from the right side. The sleeve measures approx. 49-48-47-45-43-41 cm from the top down. Work the other sleeve in the same way.

ASSEMBLY:
Sew the shoulder seams inside the cast-off edges.
Sew the sleeves onto the body between the markers for the armholes – sew inside the 1 edge stitch on both front and back pieces.
Sew sleeve and side seams in one go – sew inside the 1 edge stitch.

NECK:
Place both the 36-36-40-40-42-42 stitches from the thread on the front piece and the 36-36-40-40-42-42 stitches from the thread on the back piece on a short circular needle size 7 mm = 72-72-80-80-84-84 stitches on needle.
Work stocking stitch in the round with wrong side out and 1 strand light camel A + 1 strand grey KS + 1 strand light lavender KS. When the neck measures approx. 17-17-19-19-21-21 cm, knit 1 round, purl 1 round, knit 1 round and purl 1 round. Then LOOSELY cast off with knit.

Diagram

diagram measurements

Each of our patterns has specific tutorial videos to help you.

Do you have a question? See a list of frequently asked questions (FAQ)

Knitting tension is what determines the final measurements of your work, and is usually measured per 10 x 10 cm. It is provided like so: number of stitches in width x number of rows in height - eg: 19 stitches x 26 rows = 10 x 10 cm.

The knitting tension is very individual; some people knit/crochet loosely while others work tightly. You adjust the knitting tension with the needle size, which is why the suggested needle size is only meant as a guide! You need to adjust this (up or down) to ensure that YOUR knitting tension matches the knitting tension provided in the pattern. If you work with a different knitting tension than provided you will have a different yarn consumption, and your work will have different measurements than what the pattern suggests.

The knitting tension also determines which yarns can replace each other. As long as you achieve the same knitting tension you can replace one yarn with another.

See DROPS lesson: How to measure your tension/gauge

See DROPS video: How to make a gauge tension swatch

The required amount of yarn is provided in grams, eg: 450 g. To calculate how many balls you’ll need you first need to know how many grams are in 1 ball (25g, 50g or 100g). This information is available if you click on the individual yarn quality on our pages. Divide the amount required with the amount of each ball. For example, if each ball is 50g (the most common amount), the calculation will be as follows: 450 / 50 = 9 balls.

The important thing when changing from one yarn to another is that the knitting/crochet tension remains the same. This is so that the measurements of the finished piece will be the same as on the sketch provided. It is easier to achieve the same knitting tension using yarns from the same yarn group. It is also possible to work with multiple strands of a thinner yarn to achieve the knitting tension of a thicker one. Please try our yarn converter. We recommend you to always work a test swatch.

Please NOTE: when changing yarn the garment might have a different look and feel to the garment in the photo, due to individual properties and qualities of each yarn.

See DROPS lesson: Can I use a different yarn than the one mentioned in the pattern?

All our yarns are categorised into yarn groups (from A to F) according to thickness and knitting tension – group A contains the thinnest yarns and group F the thickest. This makes it easier for you to find alternative yarns to our patterns, should you wish to switch yarn. All yarns within the same group have a similar knitting tension and can easily replace each other. However, different yarn qualities have different structures and properties which will give the finished work a unique look and feel.

Click here for an overview of the yarns in each yarn group

At the top of all our patterns you’ll find a link to our yarn calculator, which is a helpful tool should you wish to use a different yarn than suggested. By filling in the yarn quality you wish to replace, the amount (in your size) and number of strands, the calculator will present good alternative yarns with the same knitting tension. Additionally it will tell you how much you’ll require in the new qualities and whether you’ll need to work with multiple strands. Most skeins are 50g (some are 25g or 100g).

If the pattern is worked with multiple colours, every colour will have to be calculated separately. Similarly, if the pattern is worked with several strands of different yarns (for example 1 strand Alpaca and 1 strand Kid-Silk) you will have to find alternatives for each, individually.

Click here to see our yarn calculator

Since different yarns have different qualities and textures we have chosen to keep the original yarn in our patterns. However, you can easily find options among our available qualities by using our yarn calculator, or simply pick a yarn from the same yarn group.

It is possible that some retailers still have discontinued yarns in stock, or that someone has a few skeins at home that they would like to find patterns for.

The yarn calculator will provide both alternative yarn as well as required amount in the new quality.

If you think it's hard to decide what size to make, it can be a good idea to measure a garment you own already and like the size of. Then you can pick the size by comparing those measures with the ones available in the pattern's size chart.

You'll find the size chart at the bottom of the pattern.

See DROPS lesson: How to read size chart

The needle size provided in the pattern serves only as a guide, the important thing is to follow the knitting tension. And since knitting tension is very individual, you will have to adjust the needle size to ensure that YOUR tension is the same as in the pattern – maybe you’ll have to adjust 1, or even 2 needle sizes, up or down to achieve the correct tension. For this, we recommend that you work test swatches.

Should you work with a different knitting tension than the one provided, the measurements of the finished garment might deviate from the measurement sketch.

See DROPS lesson: How to measure your tension/gauge

See DROPS video: How to make a tension/gauge swatch

Working a garment top-down provides more flexibility and room for personal adjustment. For example it is easier to try the garment on while working, as well as making adjustments to length of yoke and shoulder caps.

The instructions are carefully explaining every step, in the correct order. Diagrams are adjusted to the knitting direction and are worked as usual.

The diagram depicts all rows/rounds, and every stitch seen from the right side. It is read from bottom to top, from right to left. 1 square = 1 stitch.

When working back and forth, every other row is worked from the right side and every other row is worked from the wrong side. When working from the wrong side, the diagram will have to be worked reversed: from left to right, knit stitches are purled, purl stitches are knit etc.

When working in the round every round is worked from the right side and the diagram are worked from right to left on all rounds.

See DROPS lesson: How to read knitting diagrams

The diagram depicts all rows/rounds, and every stitch seen from the right side. It is worked from bottom to top, from right to left.

When working back and forth every other row is worked from the right side: from right to left and every other row is worked from the wrong side: from left to right.

When working in the round, every row in the diagram are worked from the right side, from right to left.

When working a circular diagram you start in the middle and work your way outwards, counter clockwise, row by row.

The rows usually start with a given number of chain stitches (equivalent to the height of the following stitch), this will either be depicted in the diagram or explained in the pattern.

See DROPS lesson: How to read crochet diagrams

Instructions for working several diagrams after each other on the same row/round, will often be written like so: “work A.1, A.2, A.3 a total of 0-0-2-3-4 times". This means you work A.1 once, then A.2 is worked once, and A.3 is repeated (in width) the number of times provided for your size – in this case like so: S = 0 times, M = 0 times, L=2 times, XL= 3 times and XXL = 4 times.

The diagrams are worked as usual: begin with the first row in A.1, then work the first row in A.2 etc.

See DROPS lesson: How to read knitting diagrams

See DROPS lesson: How to read crochet diagrams

The total width of the garment (from wrist-to-wrist) will be larger in the larger sizes, despite the actual sleeves being shorter. The larger sizes have longer sleeve caps and wider shoulders, so there will be a good fit in all sizes.

The measurement sketch/schematic drawing provides information regarding the full length of the garment. If it’s a jumper or a jacket the length is measured from the highest point on the shoulder closest to the neckline, and straight down to the bottom of the garment. It is NOT measured from the tip of shoulder. Similarly, the length of yoke is measured from the highest point on the shoulder and down to where yoke is split into body and sleeves.

On a jacket measures are never taken along bands, unless specifically stated. Always measure inside band stitches when measuring the length.

See DROPS lesson: How to read a schematic drawing

Diagrams are often repeated on the round or in height. 1 repeat is the diagram the way it appears in the pattern. If it says to work 5 repeats of A.1 in the round, then you work A.1 a total of 5 times after/next to each other in the round. If it says to work 2 repeats of A.1 vertically/in height you work the entire diagram once, then begin again at the start and work the entire diagram one more time.

Chain stitches are slightly narrower than other stitches and to avoid working the cast-on edge too tight, we simply chain more stitches to begin with. The stitch count will be adjusted on the following row to fit the pattern and measurement sketch.

The rib edge is more elastic and will contract slightly compared to, for example, stocking stitch. By increasing before the rib edge, you avoid a visible difference in width between the rib edge and the rest of the body.

It’s very easy to cast off too tightly, and by making yarn overs while casting off (and simultaneously casting these off) you avoid a too tight cast off edge.

See DROPS video: How to bind off with yarn overs (yo)

To achieve an even increase (or decrease) you can increase on, for example: every 3rd and 4th row alternately, like so: work 2 rows and increase on the 3rd row, work 3 rows and increase on the 4th. Repeat this until the increase is complete.

See DROPS lesson: Increase or decrease 1 st on every 3rd and 4th row alternately

Should you prefer to work in the round instead of back and forth, you may of course adjust the pattern. You’ll need to add steeks mid-front (usually 5 stitches), and follow the instructions. When you would normally turn and work from the wrong side, simply work across the steek and continue in the round. At the end you’ll cut the piece open, pick up stitches to work bands, and cover the cut edges.

See DROPS video: How to knit steeks and cut open

Should you prefer to work back and forth instead of in the round, you may of course adjust the pattern so you work the pieces separately and then assemble them at the end. Divide the stitches for the body in 2, add 1 edge stitch in each side (for sewing) and work the front and back pieces separately.

See DROPS lesson: Can I adapt a pattern for circular needles into straight needles?

Pattern repeats can vary slightly in the different sizes, in order to get the correct proportions. If you’re not working the exact same size as the garment in the photo, yours might deviate slightly. This has been carefully developed and adjusted so that the complete impression of the garment is the same in all sizes.

Make sure to follow instructions and diagrams for your size!

If you have found a pattern you like which is available in women’s size it’s not very difficult to convert it to men’s size. The biggest difference will be the length of sleeves and body. Start working on the women size that you think would fit across the chest. The additional length will be worked right before you cast off for the armhole/sleeve cap. If the pattern is worked top-down you can add the length right after the armhole or before the first decrease on sleeve.

Regarding additional yarn amount, this will depend on how much length you add, but it is better with a skein too many than too few.

All yarns will have excess fibres (from production) that might come off as lint or shedding. Brushed yarns (ie hairier yarns) have more of these loose, excess fibres, causing more shedding.

Shedding also depends on what is worn under or over the garment, and whether this pulls at the yarn fibres. It’s therefore not possible to guarantee that there will be no shedding

Below are some tips on how to get the best result when working with hairier yarns:

1. When the garment is finished (before you wash it) shake it vigorously so the looser hairs come off. NOTE: do NOT use a lint roller, brush or any method that pulls at the yarn.

2. Place the garment in a plastic bag and put it in your freezer - the temperature will cause the fibres to become less attached to each other, and excess fibres will come off easier.

3. Leave in the freezer for a few hours before taking it out and shaking it again.

4. Wash the garment according to the instructions on the yarn label.

Pilling is a natural process that happens to even the most exclusive of fibers. It's a natural sign of wear and tear that is hard to avoid, and that is most visible in high friction areas of your garment like a sweater's arms and cuffs.

You can make your garment look as new by removing the pilling, using a fabric comb or a pill/lint remover.

Still can't find the answer you need? Then scroll down and leave your question so one of our experts can try to help you. This will be done normally within 5 to 10 working days.
In the meantime, you can read the questions and answers that others have left to this pattern or join the DROPS Workshop on Facebook to get help from fellow knitters/crocheters!

You might also like...

Post a comment to pattern DROPS 206-20

We would love to hear what you have to say about this pattern!

If you want to leave a question, please make sure you select the correct category in the form below, to speed up the answering process. Required fields are marked *.

Comments / Questions (28)

country flag Mariángeles wrote:

Hola, he trabajado la talla L bien pero al usar el modelo, pesa y se abre, hay algún truco para mantener las medidas?

02.12.2023 - 17:49

DROPS Design answered:

Hola Mariángeles, parece ser un problema de la tensión del tejido. Puedes poner una cinta bies por las partes de las costuras (en los hombros, sisas, lados y la unión del cuello con el cuerpo).

03.12.2023 - 20:02

country flag Dorota wrote:

Hola, tengo una duda, comencé a tejer el suéter Cloudscape, ¡ya tengo 20 cm! Sin embargo, me di cuenta de que debería haber elegido la talla L, no M. ¿Está permitido hacer una de las partes (delantera o trasera) más ancha, 2 cm? ¿Quizás haya otra solución? Gracias de antemano por su consejo.

29.09.2023 - 11:19

DROPS Design answered:

Hola Dorota, en principio no, ya que se moverían las costuras laterales y podrían quedar más visibles.

01.10.2023 - 00:00

country flag Dorota wrote:

Witam, mam pytanie, zaczęłam robić sweter Cloudscape, mam już 20 cm! Zdałam sobie jednak sprawę, że powinnam była wybrać rozmiar L, a nie M. Czy jest dopuszczalne jeśli jedną część (przód lub tył) zrobię trochę szersza o 2 cm? Może istnieje inne rozwiązanie? Dziękuje z góry za poradę.

29.09.2023 - 11:17

DROPS Design answered:

Witaj Doroto, 2 cm to nie dużo. Są 2 opcje: 1. pruć, 2. nie pruć, tylko dobrać oczka na bokach (do rozmiaru L) i później zrobić pęknięcia na dole swetra. Co o tym myślisz?

30.09.2023 - 15:15

country flag Ruth wrote:

Ich stricke nicht nach der Anleitung, sondern nur nach Diagramm. Dieses ist sehr gut dargestellt, aber bei Drops fehlt immer die Armweite unten am Handgelenk Warum? . Wieviel cm hat sie bei Modell "Cloudscape"?

12.08.2023 - 20:07

DROPS Design answered:

Liebe Ruth, wahrscheinlich eine Gewohneit, ,diese Maßnahmen können Sie immer von der Anleitung mit der Hilfe von der Maschenprobe kalkulieren, z..B. in die 1. Größe sind 34 Maschen nach Abnahmen übrig- 2 Randmaschen (für die Naht) = 32 M / 1,3 (= 13 Maschen für 10 cm) = ca 25 cm. Vie Spaß beim stricken!

14.08.2023 - 09:43

country flag Suzanne Sirjacobs wrote:

Hallo! Waar is de tekening van het patroon naartoe? Voor de afmetingen

20.03.2022 - 16:22

country flag Sabine Marse wrote:

Kan het garen kid silk ook door iets anders vervangen worden? Ik ben nml allergisch voor mohair.

12.07.2021 - 11:57

DROPS Design answered:

Dag Sabine,

Ja, deze zou door een ander garen uit groep A vervangen kunnen worden. Bijvoorbeeld nog een draad Alpaca of BabyAlpaca Silk. Het heeft dan natuurlijk wel wat een ander effect; minder pluizig/harig.

13.07.2021 - 18:43

country flag Annelieke Limahelu wrote:

Volgens mij staat er een fout in het patroon. Onder de beschrijving van het voorpand staat ‘ribbelsteek’ maar dat moet mijns inzien zijn: ‘tricotsteek met de averechte kant aan de goede kant’, Dank voor de leuke patronen!

24.01.2021 - 09:24

country flag Vibeke Christoffersen wrote:

Farve 601 er udgået - hvilken farve vil være et godt alternativ?

05.01.2021 - 13:11

DROPS Design answered:

Hej Vibeke, jeg ville have valgt burgunder 6736 DROPS Alpaca men det er jo en smagssag. Du kan også bruge DROPS Fabel 300 brun :)

08.01.2021 - 11:10

country flag Elisabeth Fernandez wrote:

Bonjour, le colorie 601 en alpaca est supprimé, les gris 10 et 22 de kid_silk ne sont ni en stochk ni commandés que puis_je aire pour conservé l'harmonie des couleurs et des textures ? Merci de me répondre

24.11.2020 - 23:44

DROPS Design answered:

Bonjour Mme Fernandez, n'hésitez pas à contacter - même par mail ou téléphone - votre magasin qui pourra vous conseiller les meilleures couleurs correspondantes. Bon tricot!

25.11.2020 - 07:53

country flag Věra wrote:

Zdravím.....tak mi to tady nikdo ani po roce nepřeložil.....jen hlídací pes se nabízí,ale to bych musela být génius abych to pochopila.....

15.10.2020 - 12:17