
Popular categories
Looking for a yarn?


Comments / Questions (25)
![]() Sonja Vandeven wrote:
Sonja Vandeven wrote:
Bedank voor het mooie model . Ik vind de trui prachtig. Heb hem met 2 draden gebreid waarvan 1 effe kleur (groen) en 1 in een draad(bordo , groen ,blauw ,okergeel) die gevlamd is ,zeer mooi!
14.11.2019 - 19:09
![]() Siv Gullaksen wrote:
Siv Gullaksen wrote:
Jeg kommer til at merkemasken må flyttes 8 masker på ermene- ikke fire som det står for å få viftene mellom de forrige
09.07.2019 - 15:47
![]() Ilka wrote:
Ilka wrote:
Hallo, ich brauche Hilfe. Nach vielen Versuchen bin ich immer noch am scheitern. Kann mir bitte jemand zeigen, wie ich diese Fächerkombination stricken soll? Ein Video wäre super. (Und ja.... Ich weiß wie ich Diagramme lesen und stricken soll). = Fächer in die markierte Masche: * die Nadel in die markierte Masche einstechen, 1 Umschlag und den Umschlag zur Vorderseite ca. 2,5 cm lang durchholen, 1 Masche rechts *, von *-* insgesamt 5 x arbeiten (= 5 Umschläge auf der Nadel)??? Danke
12.05.2019 - 16:51DROPS Design answered:
Liebe Ilka, wir haben Ihre Anfrage unser Team weitergeleitet, das Video wird sicher auf unser "Todolist" sein, aber gerne können Sie individuelle Hilfen von Ihrem DROPS Laden (auch telefonisch oder per E-Mail) bekommen. Viel Spaß beim stricken!
13.05.2019 - 09:55
![]() Mary wrote:
Mary wrote:
*****How did you like this yarn? Please let me know! I want to make an embellished cardigan and want to use this for the linen. I like working with all cotton for my afghans, it has a nice weight to it, But kind of sags a lot for sweaters.
25.04.2019 - 13:50DROPS Design answered:
Dear Mary, what about contacting your DROPS Store - even per mail or telephone, they will assist you choosing the best matching yarn for your next project. Happy knitting!
25.04.2019 - 15:52
![]() Cornelia wrote:
Cornelia wrote:
Ich würde auch gerne wissen wie man den Fächer strickt. Danke :-)
29.03.2019 - 13:12DROPS Design answered:
Liebe Cornelia, hier lesen Sie, wie man Diagram strickt. Viel Spaß beim stricken!
01.04.2019 - 10:34
![]() Elke wrote:
Elke wrote:
Liebes Drops-Team, können Sie mir bitte erläutern, wie ich die Fächer stricke, vielen Dank!
28.03.2019 - 08:27DROPS Design answered:
Liebe Elke, hier lesen Sie, wie man Diagram strickt. Viel Spaß beim stricken!
01.04.2019 - 09:32
![]() Nyllie wrote:
Nyllie wrote:
Is there a video on how to knit chart A.1 in this pattern?
28.03.2019 - 01:47DROPS Design answered:
Dear Nyllie, your request for a video has been forwarded, you will find how to read diagrams here. Happy knitting!
01.04.2019 - 09:28
![]() Andrea wrote:
Andrea wrote:
I love this pattern but I'm confused with the part where it says slip stitch above the last yarn over in the fan.What stitch above?
26.03.2019 - 10:34DROPS Design answered:
Dear Andrea, when you worked the fan 2 rounds below, you worked a total of 5 yarn overs, then you knit all these YO on next round. Then you will decrease by slipping the stitch worked from the last YO on previous fan, then K1, psso. Happy knitting!
26.03.2019 - 12:14
![]() Martijntje wrote:
Martijntje wrote:
Leuke mouwen.
22.02.2019 - 22:20
![]() Heike Buschhardt wrote:
Heike Buschhardt wrote:
Hübsch! Wo bekommt man die Anleitung?
16.02.2019 - 21:35
|
||||||||||||||||||||||||||||
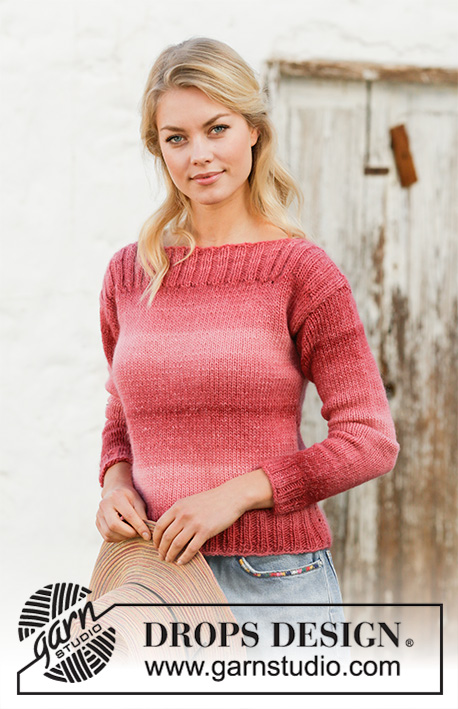
Spring Song#springsongsweater |
||||||||||||||||||||||||||||
 |
 |
|||||||||||||||||||||||||||
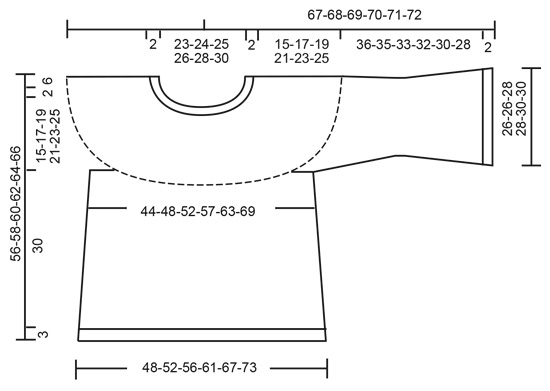
Knitted jumper with round yoke in DROPS Belle. The piece is worked top down with fan pattern and trumpet sleeves. Sizes S - XXXL.
DROPS 202-23 |
||||||||||||||||||||||||||||
|
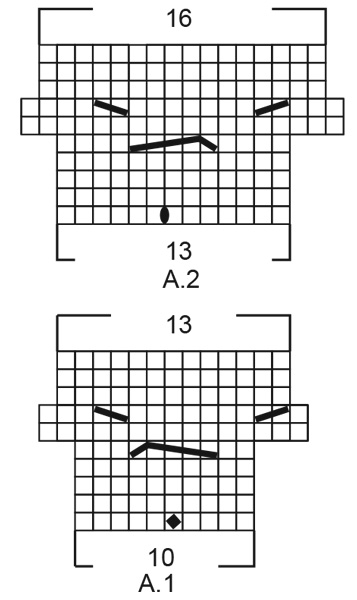
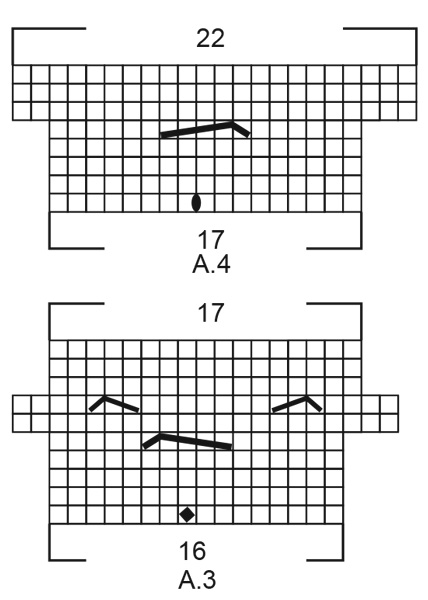
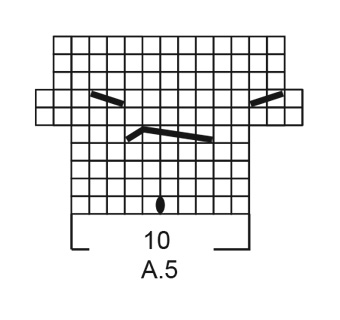
------------------------------------------------------- EXPLANATIONS FOR THE PATTERN: ------------------------------------------------------- PATTERN: See diagrams A.1 to A.5. INCREASE TIP-1 (evenly spaced): To work out how to increase evenly, count the total number of stitches on the needle (e.g. 123 stitches) and divide by the number of increases to be made (e.g. 7) = 17.6. In this example, increase by making 1 yarn over after alternately each 17th and 18th stitch. On the next round knit the yarn overs twisted to avoid holes. INCREASE TIP-2 (for sides of body): Work until there are 2 stitches left before marker thread, 1 yarn over, knit 4 (marker thread sits in middle of these 4 stitches), 1 yarn over (= 2 stitches increased). On the next round knit the yarn overs twisted to avoid holes. Then work the new stitches in stocking stitch. DECREASE TIP (for sleeves): Decrease 1 stitch on each side of the marker thread as follows: Work until there are 3 stitches left before the marker thread, knit 2 together, knit 2 (marker thread sits between these 2 stitches), slip 1 stitch as if to knit, knit 1 and pass the slipped stitch over the knitted stitch. ------------------------------------------------------- START THE PIECE HERE: ------------------------------------------------------- JUMPER – SHORT OVERVIEW OF THE PIECE: The piece is worked in the round, top down. The sleeves are worked in the round with double pointed needles/short circular needle. NECK: Cast on 123-126-129-135-144-150 stitches with circular needle size 3 mm and Belle. Knit 1 round, then work rib (= knit 1/ purl 2) for 4 rounds. Knit 1 round. Knit 1 more round where you increase 7-14-11-15-16-20 stitches evenly spaced – read INCREASE TIP-1 = 130-140-140-150-160-170 stitches. YOKE: Change to circular needle size 4 mm. Insert a marker thread at the beginning of the round and allow it to follow your work onwards. Now work pattern A.1 (= 10 stitches) a total of 13-14-14-15-16-17 times in width on the round. When A.1 has been completed in height there are 169-182-182-195-208-221 stitches on the round (and a marker thread in each repeat of A.1). Knit 5 stitches, remove the marker thread from the beginning of the round and insert it here (i.e. the beginning of the round has now been moved 5 stitches to the left). Remove the other marker threads from the piece. Now work pattern A.2 (= 13 stitches) a total of 13-14-14-15-16-17 times on the round. NOTE: the fans should be in between the fans from the previous round. When A.2 has been completed in height there are 208-224-224-240-256-272 stitches on the round (and 1 marker thread in each repeat of A.2). Knit 7 stitches, remove the marker thread from the beginning of the round and insert it here (i.e. the beginning of the round has now been moved 7 stitches to the left). Remove the other marker threads from the piece. REMEMBER THE KNITTING TENSION! Now work pattern A.3 (= 16 stitches) a total of 13-14-14-15-16-17 times on the round. NOTE: the fans should be in between the fans from the previous round. When A.3 has been completed in height there are 221-238-238-255-272-289 stitches on the round (and 1 marker thread in each repeat of A.3). Knit 8 stitches, remove the marker thread from the beginning of the round and insert it here (i.e. the beginning of the round has now been moved 8 stitches to the left). Remove the other marker threads from the piece. Now work pattern A.4 (= 17 stitches) a total of 13-14-14-15-16-17 times on the round. NOTE: the fans should be in between the fans from the previous round. When A.4 has been completed in height there are 286-308-308-330-352-374 stitches on the round (and 1 marker thread in each repeat of A.4). The piece measures approx. 16 cm from the cast-on edge down. Now continue with stocking stitch in the round for 1-3-5-7-9-11 cm and at the same time increase 2-14-19-23-24-26 stitches evenly spaced on the first round – remember INCREASE TIP-1. Increase like this every 1-2-2-3-4-5 cm a total of 1-1-2-2-2-2 times = 288-322-346-376-400-426 stitches. When the piece measures 17-19-21-23-25-27 cm, work the next round as follows: Work the first 42-46-49-55-60-65 stitches (= half back piece), place the next 60-68-74-78-80-82 stitches on a thread for sleeve, cast on 8-8-10-10-12-14 new stitches on the needle (= in side under sleeve), work the next 84-93-99-110-120-131 stitches (= front piece), place the next 60-68-74-78-80-82 stitches on a thread for sleeve, cast on 8-8-10-10-12-14 new stitches on the needle (= in side under sleeve) and work the remaining 42-47-50-55-60-66 stitches (= half back piece). THE PIECE IS NOW MEASURED FROM HERE! BODY: = 184-202-218-240-264-290 stitches. Insert a marker thread in each side, in the middle of the 8-8-10-10-12-14 stitches cast on under each sleeve (= 4-4-5-5-6-7 new stitches on each side of marker threads). Work stocking stitch in the round. When the piece measures 4 cm from the division, increase 1 stitch on each side of both marker threads – read INCREASE TIP-2. Increase like this every 7 cm a total of 4 times = 200-218-234-256-280-306 stitches. When the piece measures 30 cm from the division, increase 31-31-36-38-41-45 stitches evenly spaced = 231-249-270-294-321-351 stitches. Change to circular needle size 3 mm and work rib (= knit 1/ purl 2) for 3 cm. Cast off. Make sure the cast-off edge is not tight; you can increase a needle size when casting off if necessary. The jumper measures approx. 56-58-60-62-64-66 cm from the shoulder down. SLEEVE: Place the 60-68-74-78-80-82 stitches from the thread on the one side of the piece on double pointed needles/short circular needle size 4 mm and knit up 1 stitch in each of the 8-8-10-10-12-14 stitches cast on under the sleeve = 68-76-84-88-92-96 stitches. Insert 1 marker thread in the middle of the 8-8-10-10-12-14 stitches under the sleeve. The thread marks the beginning of the round and it follows your work onwards. Work stocking stitch in the round. When the sleeve measures 4 cm, decrease 1 stitch on each side of the marker thread – read DECREASE TIP! Decrease in the different sizes as follows: Size S: Decrease every 4 cm a total of 5 times. Size M: Decrease every 2 cm a total of 8 times. Size L: Decrease every cm, 5 times and every 2 cm 4 times. Size XL: Decrease every cm, 5 times and every 2 cm 4 times. Size XXL: Decrease every cm, 6 times and every 2 cm 3 times. Size XXXL: Decrease every cm a total of 9 times. When all the decreases are finished there are 58-60-66-70-74-78 stitches on the needles. Continue with stocking stitch until the sleeve measures 22-21-19-18-16-14 cm. Knit 1 round where the number of stitches is adjusted to 60-60-68-68-76-76 stitches. Now work pattern as follows: * Knit 5-5-7-7-9-9 stitches, work A.1 *, work from *-* a total of 4 times on the round. When A.1 has been completed in height there are 72-72-80-80-88-88 stitches on the round (and a marker thread in each repeat of A.1). Knit 4 stitches, remove the marker thread from the beginning of the round and insert it here (i.e. the beginning of the round has now been moved 4 stitches to the left). Remove the other marker threads. Now work pattern as follows: * Knit 8-8-10-10-12-12 stitches, work A.5 (= 10 stitches) *, work from *-* a total of 4 times on the round. NOTE: the fans should be in between the fans from the previous round. When A.5 has been completed in height there are 84-84-92-92-100-100 stitches on the round (and a marker thread in each repeat of A.5). Knit 5 stitches, remove the marker thread from the beginning of the round and insert it here (i.e. the beginning of the round has now been moved 5 stitches to the left). Remove the other marker threads. Now work pattern as follows: * Knit 11-11-13-13-15-15 stitches, work A.1 *, work from *-* a total of 4 times on the round. NOTE: the fans should be in between the fans from the previous round. When A.1 has been completed in height there are 96-96-104-104-112-112 stitches on the round (and a marker thread in each repeat of A.1). Knit 4 stitches, remove the marker thread from the beginning of the round and insert it here (i.e. the beginning of the round has now been moved 4 stitches to the left). Remove the other marker threads. Now work pattern as follows: * Knit 14-14-16-16-18-18 stitches, work A.5 *, work from *-* a total of 4 times on the round. NOTE: the fans should be in between the fans from the previous round. When A.5 has been completed in height there are 108-108-116-116-124-124 stitches on the round (and a marker thread in each repeat of A.5). Knit 1 round where you increase 6-6-7-7-8-8 stitches evenly spaced = 114-114-123-123-132-132 stitches. Change to circular needle size 3 mm. Work rib (= knit 1/ purl 2) for 2 cm. Cast off with knit over knit and purl over purl. The sleeve measures approx. 38-37-35-34-32-30 cm. Cut and fasten the strand. Work the other sleeve in the same way. |
||||||||||||||||||||||||||||
Diagram explanations |
||||||||||||||||||||||||||||
|
||||||||||||||||||||||||||||
 |
||||||||||||||||||||||||||||
 |
||||||||||||||||||||||||||||
 |
||||||||||||||||||||||||||||
 |
||||||||||||||||||||||||||||
Have you finished this pattern?Tag your pictures with #dropspattern #springsongsweater or submit them to the #dropsfan gallery. Do you need help with this pattern?You'll find 26 tutorial videos, a Comments/Questions area and more by visiting the pattern on garnstudio.com. © 1982-2026 DROPS Design A/S. We reserve all rights. This document, including all its sub-sections, has copyrights. Read more about what you can do with our patterns at the bottom of each pattern on our site. |
||||||||||||||||||||||||||||


With over 40 years in knitting and crochet design, DROPS Design offers one of the most extensive collections of free patterns on the internet - translated to 17 languages. As of today we count 324 catalogues and 12290 patterns translated into English (UK/cm).
We work hard to bring you the best knitting and crochet have to offer, inspiration and advice as well as great quality yarns at incredible prices! Would you like to use our patterns for other than personal use? You can read what you are allowed to do in the Copyright text at the bottom of all our patterns. Happy crafting!
Post a comment to pattern DROPS 202-23
We would love to hear what you have to say about this pattern!
If you want to leave a question, please make sure you select the correct category in the form below, to speed up the answering process. Required fields are marked *.