
Popular categories
Looking for a yarn?


Comments / Questions (41)
![]() Susanne Winckler wrote:
Susanne Winckler wrote:
Opskriften kan ikke printes ud! Er det noget I kan fixe?
26.02.2021 - 09:59DROPS Design answered:
Hej Susanne, jo vi kan..., du klikker på "skriv ud"-knappen inde på selve opskriften til højre for billederne, vælg opskrift og hvilke side :)
26.02.2021 - 12:08
![]() Edit wrote:
Edit wrote:
A leírásban hiba van. A vállrészben A1.A és A1.C szerepel, az A1.B teljesen kimaradt, így félre érthető. Kötés közben rájöttem a hibára, visszabontottam. Megnéztem az angol leírást, ott szerepel az A1.B is...
19.01.2021 - 11:42
![]() Helen wrote:
Helen wrote:
Hei! Skal bord A.3 strikkes over 16 masker både på erme og bol? Strikekr størrelse S.
30.06.2020 - 20:46
![]() Karine Maheut wrote:
Karine Maheut wrote:
Re bonjour Je suis bloquée au diagramme A. 1A; A. 1B et A. 1C au rang 14. je devrais avoir 7 mailles centrales de la feuilles juste au dessus des jetés. j'en ai 9
06.05.2020 - 15:10DROPS Design answered:
Bonjour Mme Maheut, avez-vous bien vérifié que vous avez le bon nombre de mailles à chacun des rangs précédents dans chaque diagramme? Avez-vous bien le bon nombre de mailles envers avant et après chaque feuille dans chaque diagramme? Essayez la technique des marqueurs entre les motifs à répéter, ça aide beaucoup à bien se repérer. Bon tricot!
06.05.2020 - 16:15
![]() Maheut Karine wrote:
Maheut Karine wrote:
Bonjour je suis au rang 14 du motif de l'encolure. au milieu de la feuille qui se dessine je devrais avoir 7 mailles après avoir tricoté les jetés du rang précédent. quand je les tricote cela m'en fait 9 ! pourriez vous m'aider. J'y suit depuis plusieurs jours à faire et à défaire, je ne comprends pas où j'ai pu me tromper malgrès mes marqueurs. merci de votre aide. bonne journée
06.05.2020 - 14:49DROPS Design answered:
Bonjour Mme Maheut, je suis navrée je ne situe pas à quel niveau des diagrammes vous en êtes, pouvez-vous indiquer quel rang de A.1A à A.3A vous tricotez exactement? Pour bien vous repérer, n'hésitez pas à mettre des marqueurs entre chacun des diagrammes à tricoter, il est ainsi souvent plus simple de vérifier le nombre de mailles. Bon tricot!
06.05.2020 - 14:58
![]() Ane Bro wrote:
Ane Bro wrote:
Når man har strikket a.1 og kommer til række 10. Herfra er der jævnligt flere masker pr. linie, men det angives ikke om man blot skal lave omslag, og derved lave de ekstra masker. Er det sådan man skal gøre? MvH Ane
28.03.2020 - 12:37DROPS Design answered:
Hej Ane, jo de 2 omslag du laver i midten på hver side af en retmaske (ifølge diagrammet), bliver til 2 masker mere på næste pind. Sæt gerne et mærke imellem hver rapport, så er det lettere for dig at se hvor du skal starte med diagrmmerne. God fornøjelse!
31.03.2020 - 11:40
![]() Tone Lill wrote:
Tone Lill wrote:
Hei. Er fremdeles på 200-11. Er det sånn at på diagrammet strikkes vrangen fra venstre mor høyre? Mvh Tone Lill
21.03.2020 - 12:37DROPS Design answered:
Hej Tone, ja det stemmer, hver 2. pind i diagrammet strikkes fra vrangen fra venstre mod højre. Længere nede i opskriften finder du en lektion: Hvordan læses strikkediagrammer :) God fornøjelse!
24.03.2020 - 08:37
![]() Tone Lill Hayden wrote:
Tone Lill Hayden wrote:
Strikker drops 200-11, ovenfra og nedover. Er på diagram A. 1A, rad 9. Hittil fint , men så begynner diagrammet med færre masker på venstre side , rad 9, og så fra 10 og oppover går det utover på hver side. Er det meningen at det da skal økes på sidene? Og hva med rad 9 som plutselig får to masker mindre , altså 11 masker. Håper du forstår meg. Hjelp
20.03.2020 - 11:44DROPS Design answered:
Hej Tone, Du strikker A.1A 1 gang, efter de 4 vrangmasker på pind nr 9 strikker du det første omslag på samme pind i A.1B, således fortsætter du A.1B hele pinden rundt osv. God fornøjelse!
25.03.2020 - 09:46
![]() Tove wrote:
Tove wrote:
Lurer på hvor lenge under armen i diagram A3 skal følges, forstår jeg rett at det er 6 omganger fra retten, så vanlig strikking fra rett og rang ?
13.03.2020 - 11:46DROPS Design answered:
Hej Tove, Vi har strikket A.3 under hele ærmet, du ser det på billede nr 3. Men du gør som du synes er finest. God fornøjelse! ;)
18.03.2020 - 15:41
![]() Tove Hansen wrote:
Tove Hansen wrote:
Har ennå ikke fått rettelsen på diagram A.1A Skulle gjerne fått strikket ferdig 😊☺
08.11.2019 - 13:05DROPS Design answered:
Hej Tove, nu har design haft tid til at se på diagrammerne, og de stemmer. Se vores svar under dit tidligere spørgsmål. God fornøjelse!
12.11.2019 - 11:10
|
||||||||||||||||||||||||||||||||||
Summer Twinkle#summertwinklecardigan |
||||||||||||||||||||||||||||||||||
 |
 |
|||||||||||||||||||||||||||||||||
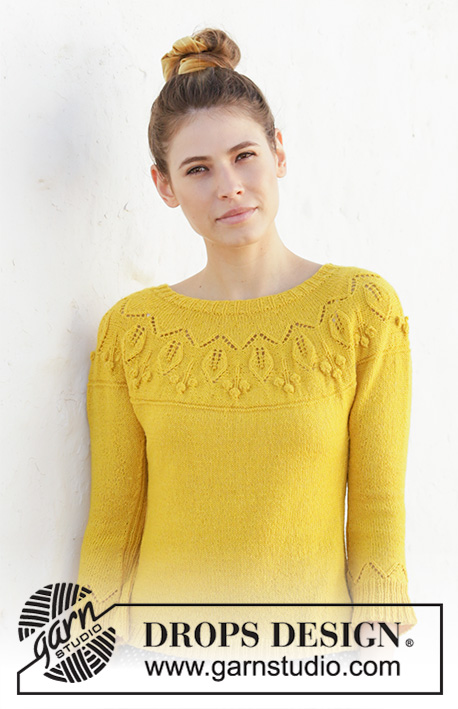
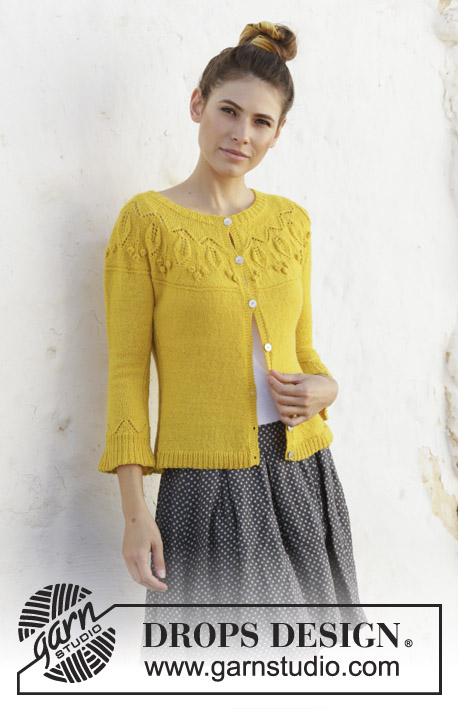
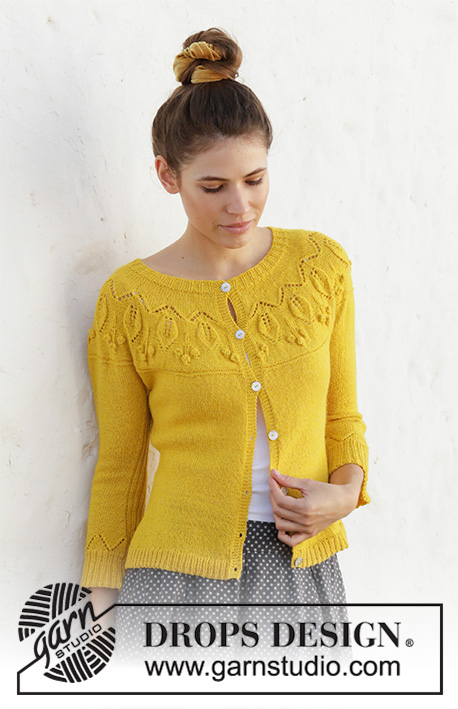
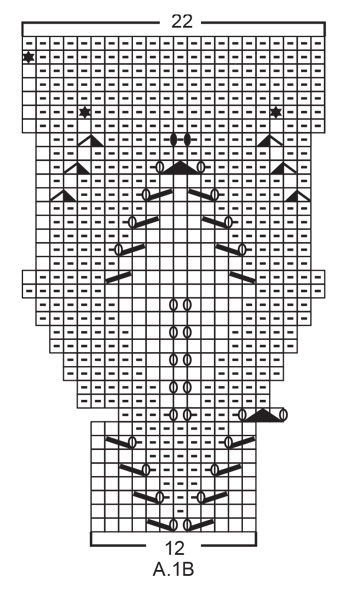
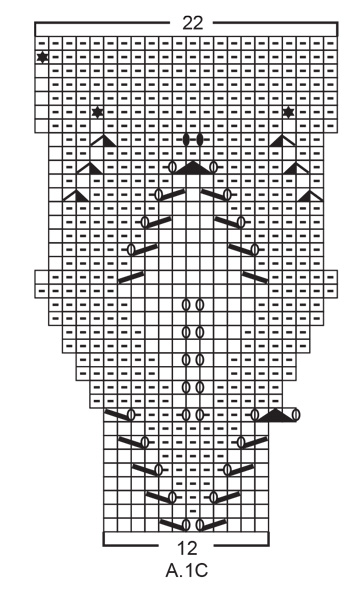
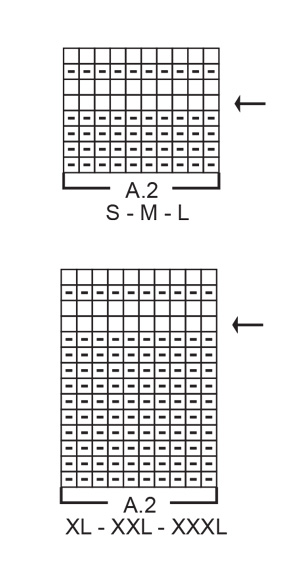
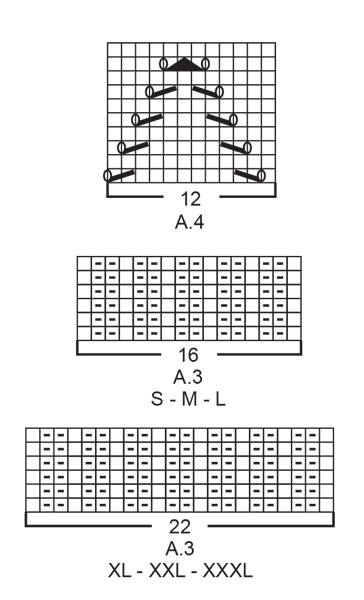
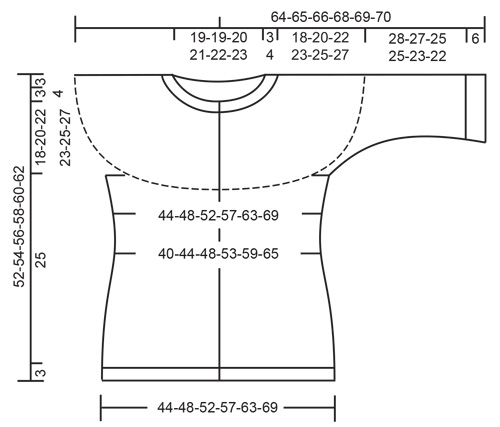
Knitted jacket with leaf pattern, bobbles, round yoke and ¾-length sleeves. The piece is worked in DROPS Flora, top down. Sizes S - XXXL.
DROPS 200-11 |
||||||||||||||||||||||||||||||||||
|
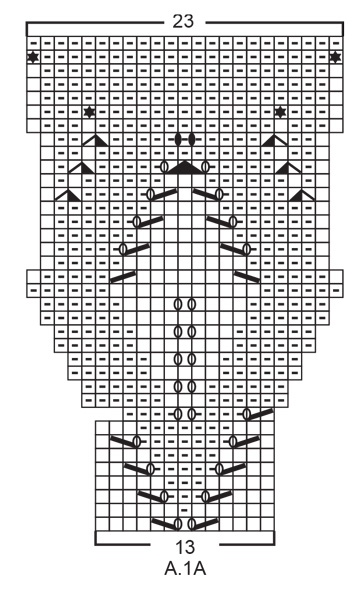
------------------------------------------------------- EXPLANATIONS FOR THE PATTERN: ------------------------------------------------------- RIDGE/GARTER STITCH (worked back and forth): Knit all rows. 1 ridge in height = Knit 2 rows. PATTERN: See diagrams A.1 to A.4. Choose diagram for your size (applies to A.2 and A.3) The diagrams show all rows in pattern seen from the right side. INCREASE TIP-1 (evenly spaced): All increases are worked from the right side! To work out how to increase evenly, count the total number of stitches on the needle (e.g. 128 stitches) minus bands (e.g. 10 stitches) and divide the remaining stitches by the number of increases to be made (e.g. 38) = 3.1. In this example, increase by making 1 yarn over after approx. every 3rd stitch. Do not increase on bands. On the next row (wrong side) purl the yarn overs twisted to avoid holes. INCREASE TIP-2 (for sides of body and mid under sleeves): All increases are worked from the right side and increase on each side of the rib as described below: Work as far as A.3, make 1 yarn over, work A.3 (= 16-16-16-22-22-22 stitches - marker thread sits in middle of these 16-16-16-22-22-22 stitches), make 1 yarn over (= 2 stitches increased). On the next row/round work the yarn overs twisted to avoid holes. Then work the new stitches in stocking stitch. DECREASE TIP (for sides of body and mid under sleeves): All decreases are worked from the right side and decrease on each side of the rib as described below: Work until there are 2 stitches left before A.3, knit 2 together, work A.3 (= 16-16-16-22-22-22 stitches - marker thread sits in middle of these 16-16-16-22-22-22 stitches), slip 1 stitch as if to knit, knit 1 and pass the slipped stitch over the knitted stitch (= 2 stitches decreased). BUTTONHOLES: Work buttonholes on right band (when garment is worn). Work from the right side when there are 3 stitches left on row as follows: Make 1 yarn over, knit 2 together and knit the last stitch. On the next row (wrong side) knit the yarn over to leave a hole. The first buttonhole is worked when the neck measures 1½-2 cm. Then work the other 6 buttonholes with approx. 7½-8-8½-8½-9-9½ cm between each one. ------------------------------------------------------- START THE PIECE HERE: ------------------------------------------------------- JACKET - SHORT OVERVIEW OF THE PIECE: Neck and yoke are worked back and forth with circular needle from mid front and top down. The yoke is divided for body and sleeves. The body is continued back and forth with circular needle from mid front and top down. The sleeves are worked in the round with short circular needle/double pointed needles, top down. NECK: Cast on 128-131-134-140-143-149 stitches (including 5 band stitches on each side towards mid front) with circular needle size 2.5 mm and Flora. Purl 1 row (= wrong side). The next row is worked as follows from the right side: 5 band stitches in GARTER STITCH – read description above, * knit 1, purl 2 *, work from *-* until there are 6 stitches left on row, knit 1 and finish with 5 band stitches in garter stitch. Continue this rib for approx. 3-3-3-4-4-4 cm – remember BUTTONHOLE on right band – read description above. When the rib is finished, knit 1 row from the right side where you increase 38-40-42-44-48-52 stitches evenly spaced – read INCREASE TIP-1 = 166-171-176-184-191-201 stitches. Purl 1 row from the wrong side (bands worked in garter stitch and yarn overs purled twisted). Then work yoke as described below. YOKE: Change to circular needle size 3 mm and work stocking stitch back and forth with 5 band stitches in garter stitch on each side towards mid front. REMEMBER THE KNITTING TENSION! When the piece measures 4-5-6-6-7-7 cm from the cast-on edge increase 13-32-39-43-48-50 stitches evenly spaced = 179-203-215-227-239-251 stitches. When the piece measures 5-6-7-8-9-9 cm from the cast-on edge start the leaf pattern and the first row is worked as follows from the right side: 5 band stitches in garter stitch, work A.1A (= 13 stitches), A.1B until there are 17 stitches left on row (= 12-14-15-16-17-18 repeats of 12 stitches), work A.1C (= 12 stitches) and finish with 5 band stitches in garter stitch. Continue this pattern. When A.1 has been completed there are 319-363-385-407-429-451 stitches on the needle. The next row is worked as follows from the right side: 5 band stitches in garter stitch, work A.2 until there are 5 stitches left on row and finish with 5 band stitches in garter stitch. Continue this pattern AT THE SAME TIME on the row marked with an arrow in A.2, increase 16-8-10-28-34-40 stitches evenly spaced = 335-371-395-435-463-491 stitches. When A.2 has been completed continue with stocking stitch and 5 band stitches in garter stitch on each side towards mid front. When the piece measures 21-23-25-27-29-31 cm from the cast-on edge divide the yoke for body and sleeves. Work as follows from the wrong side: Work 54-59-62-68-74-80 stitches as before (= front piece), place the next 65-73-79-87-89-91 stitches on 1 thread for sleeve, cast on 8-8-12-12-14-16 new stitches on needle (= in side under sleeve), purl 97-107-113-125-137-149 stitches (= back piece), place the next 65-73-79-87-89-91 stitches on 1 thread for sleeve, cast on 8-8-12-12-14-16 new stitches on needle (= in side under sleeve) and work the remaining 54-59-62-68-74-80 stitches as before (= front piece). Body and sleeves are finished separately. THE PIECE IS NOW MEASURED FROM HERE! BODY: = 221-241-261-285-313-341 stitches. Insert 1 marker thread 58-63-68-74-81-88 stitches in from each side (= 105-115-125-137-151-165 stitches between marker threads on back piece). The threads mark the side of the body. Work stocking stitch back and forth with 5 band stitches in garter stitch on each side towards mid front and A.3 over the middle 16-16-16-22-22-22 stitches under each sleeve (marker threads sit in middle of A.3). Continue this pattern. When the piece measures 2 cm from the division, decrease 1 stitch on each side of A.3 on each side – READ DECREASE TIP (= 4 stitches decreased). Decrease like this every 1½ cm a total of 5 times on each side = 201-221-241-265-293-321 stitches. When the piece measures 13 cm from the division increase 1 stitch on each side of A.3 on each side – read INCREASE TIP-2 (= 4 stitches increased). Increase like this every 2½ cm a total of 5 times on each side = 221-241-261-285-313-341 stitches. Continue working until the piece measures 25 cm from the division in all sizes (or to desired length; there is 3 cm left to finished length). On the next row from the right side increase as follows: Work 5 band stitches in garter stitch, 45-50-55-58-65-72 stitches in stocking stitch and increase 12-16-17-20-19-21 stitches evenly spaced over these 45-50-55-58-65-72 stitches, continue A.3 over the next 16-16-16-22-22-22 stitches as before, work 89-99-109-115-129-143 stitches in stocking stitch and increase 27-26-31-34-35-39 stitches evenly spaced over these 89-99-109-115-129-143 stitches, continue A.3 over the next 16-16-16-22-22-22 stitches as before, work 45-50-55-58-65-72 stitches in stocking stitch and increase 12-16-17-20-19-21 stitches evenly spaced over these 45-50-55-58-65-72 stitches and finish with 5 band stitches in garter stitch = 272-299-326-359-386-422 stitches. These increases are worked to prevent the rib being tight. Change to circular needle size 2.5 mm and work rib as follows from the wrong side: 5 band stitches in garter stitch, * purl 1, knit 2 *, work from *-* until there are 6 stitches left on row, purl 1 and finish with 5 band stitches in garter stitch (the rib fits neatly over A.3 on each side). Continue this rib for 3 cm. Change to circular needle size 3 mm and loosely cast off with garter stitch over garter stitch, knit over knit and purl over purl. The jacket measures approx. 52-54-56-58-60-62 cm from the shoulder down. SLEEVE: Place the 65-73-79-87-89-91 stitches from the thread on the one side of the piece on double pointed needles size 3 mm and knit up 1 stitch in each of the 8-8-12-12-14-16 stitches cast on under the sleeve = 73-81-91-99-103-107 stitches. Insert 1 marker thread in the middle of the 8-8-12-12-14-16 new stitches. The marker thread marks mid under sleeve and the start of the round. Work A.3 mid under sleeve (marker thread sits in middle of A.3) and the remaining stitches in stocking stitch. When the piece measures 2-2-1-1-1-1 cm from the division decrease 1 stitch on each side of A.3 – read DECREASE TIP (= 2 stitches decreased). Decrease like this every 1½-1-1-1-1-1 cm a total of 6-9-13-12-12-13 times = 61-63-65-75-79-81 stitches. When the piece measures 13-13-15-14-14-15 cm from the division increase 1 stitch on each side of A.3 – read INCREASE TIP-2 (= 2 stitches increased). Increase like this every 1½-1½-1-1-1-1 cm a total of 8-7-6-7-5-4 times = 77-77-77-89-89-89 stitches. Continue working until the sleeve measures 25-24-22-22-20-19 cm from the division (shorter measurements in larger sizes due to wider neck and longer yoke). The increases are now finished and the lace pattern at bottom of sleeves starts here. Work the next round as follows: Continue with A.3 as before over the first 8-8-8-11-11-11 stitches, work 0-0-0-3-3-3 stitches in stocking stitch, A.4 over the next 60 stitches (= 5 repeats of 12 stitches in all sizes), work 1-1-1-4-4-4 stitches in stocking stitch and finish with A.3 over the remaining 8-8-8-11-11-11 stitches as before. When A.4 has been completed in height, work 1 round with stocking stitch and A.3 as before where you increase 19-19-19-25-25-25 stitches evenly spaced over the 61-61-61-67-67-67 stitches which are not rib = 96-96-96-114-114-114 stitches. Change to short circular needle/double pointed needles size 2.5 mm and work rib in the round (= knit 1, purl 2 – the rib fits neatly over A.3 mid under sleeve). When the rib measures 2 cm increase every other purl 2 to purl 3 = 112-112-112-133-133-133 stitches. When the rib measures 4 cm increase the remaining purl 2 to purl 3 = 128-128-128-152-152-152 stitches. Continue working until the sleeve measures approx. 34-33-31-31-29-28 cm from the division (rib measures approx. 6 cm). Change to short circular needle size 3 mm and loosely cast off with knit over knit and purl over purl. Work the other sleeve in the same way. ASSEMBLY: Sew buttons onto left band. |
||||||||||||||||||||||||||||||||||
Diagram explanations |
||||||||||||||||||||||||||||||||||
|
||||||||||||||||||||||||||||||||||
 |
||||||||||||||||||||||||||||||||||
 |
||||||||||||||||||||||||||||||||||
 |
||||||||||||||||||||||||||||||||||
 |
||||||||||||||||||||||||||||||||||
 |
||||||||||||||||||||||||||||||||||
 |
||||||||||||||||||||||||||||||||||
Have you finished this pattern?Tag your pictures with #dropspattern #summertwinklecardigan or submit them to the #dropsfan gallery. Do you need help with this pattern?You'll find 28 tutorial videos, a Comments/Questions area and more by visiting the pattern on garnstudio.com. © 1982-2026 DROPS Design A/S. We reserve all rights. This document, including all its sub-sections, has copyrights. Read more about what you can do with our patterns at the bottom of each pattern on our site. |
||||||||||||||||||||||||||||||||||


With over 40 years in knitting and crochet design, DROPS Design offers one of the most extensive collections of free patterns on the internet - translated to 17 languages. As of today we count 325 catalogues and 12298 patterns translated into English (UK/cm).
We work hard to bring you the best knitting and crochet have to offer, inspiration and advice as well as great quality yarns at incredible prices! Would you like to use our patterns for other than personal use? You can read what you are allowed to do in the Copyright text at the bottom of all our patterns. Happy crafting!
Post a comment to pattern DROPS 200-11
We would love to hear what you have to say about this pattern!
If you want to leave a question, please make sure you select the correct category in the form below, to speed up the answering process. Required fields are marked *.