
Popular categories
Looking for a yarn?


Comments / Questions (15)
![]() Lisa wrote:
Lisa wrote:
Jag får en jättekonstig ärm när jag ökar med 1 cm mellanrum. Ser ut som att ökningarna sitter för tätt. Ska det verkligen vara så? 🤔
20.06.2020 - 13:55
![]() Vinnie Larsen wrote:
Vinnie Larsen wrote:
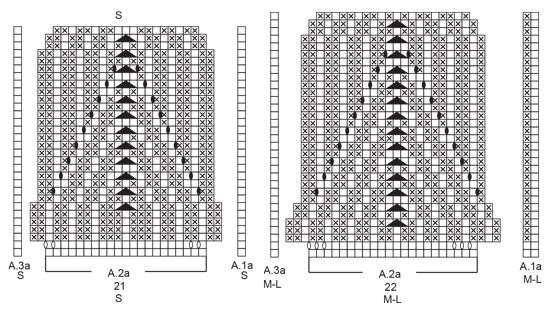
Når jeg starter på bærestykket, er der et OBS " på 2. Pind i diagram A.2a tages der ud fra vangen" ? Hvordan og hvor meget? Og, hvordan mindskes antal masker når diagram A.1a til A.3a er strikket fra 437 masker til 411 Håber i kan hjælpe mig Venlig hilsen Vinnie
06.06.2020 - 13:41DROPS Design answered:
Hei Vinnie. Økninger: Se i det diagrammet du strikker, da ser du et oval ikon. Det betyr at mellom 2 masker lages det 1 kast fra vrangen, kastet strikkes vridd på neste pinne, det skal IKKE bli hull. Antallet ser du i diagrammet x med hvor mange ganger diagrammet strikkes. Fellinger: Se i det diagrammet du strikker, så ser du at i de siste radene av diagrammene så er det et ikon (sort trekantet ikon over 3 masker) som forklarer hvordan du minsker masker. Slik felles det: Ta 2 masker løs over på høyre pinne som om de skulle strikkes rett sammen, 1 rett, løft de 2 løse maskene over masken som ble strikket = 2 masker felt pr gang diagrammet strikkes. God Fornøyelse!
09.06.2020 - 09:50
![]() Andrea wrote:
Andrea wrote:
Please!! Do you have written directions instead of those maddening charts for the lovely yoke pattern? I have seen many of these and they are impossible to follow---too small, too hard even when I try to enlarge them to not waste a lot of time trying to recall which box means what stitch!!!! These charts are really awful!! It wouldn't be hard to use the old, tried and true method of giving written pattern directions so I can just follow the numbered rows!!! I've been knitting over 50 years !!!
06.01.2020 - 16:44DROPS Design answered:
Dear Andrea, The DROPS patterns are knitted and crocheted by thousands and thousands of people around the world. We understand however that in certain countries, with different knitting/crochet traditions than Scandinavia, our patterns might be written in a way that differs from what some are used to. But of course we want everyone to understand our patterns, so that’s why we have created an extensive library of tutorial videos as well as step by step lessons that explain how to follow the techniques we use and how to read the diagrams in our patterns. Give them a try!
07.01.2020 - 09:16
![]() Inge wrote:
Inge wrote:
Om de pas te beginnen (grootste maat) staat er (bies) dan A1a (=2 st), dan 21x A2a, dan A3a (=1st). A1a kan ik in het patroon vinden, maar bestaat uit 24 steken, I.p.v. 2st. A2a en A3a geheel niet. Even als A2b en A3b kan ik niet vinden. Mist er wat? Hoop snel wat te horen, anders kan ik niet verder.
19.11.2018 - 17:35DROPS Design answered:
Dag Inge,
Het lijkt er inderdaad op dat de telpatronen niet op de juiste manier toegevoegd zijn. Heb het doorgegeven aan de ontwerp afdeling ter correctie en ik hoop op een spoedige reactie.
22.11.2018 - 11:53
![]() Monique wrote:
Monique wrote:
Dieses Modell hätte ich gerne! Weiter Ausschnitt und leichte A-Linie, die auch in größerer Größe toll ist. Dazu diese schöne Farbe! Bitte veröffentlichen!
13.07.2018 - 09:04
|
|||||||||||||||||||||||||
Green Echo Jacket#greenechojacket |
|||||||||||||||||||||||||
 |
 |
||||||||||||||||||||||||
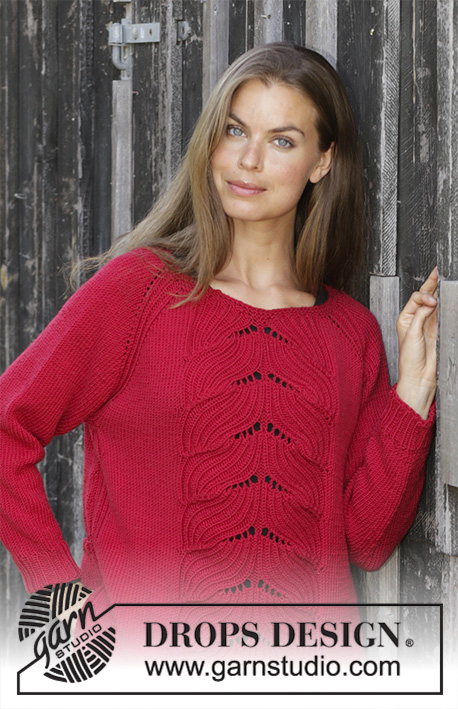
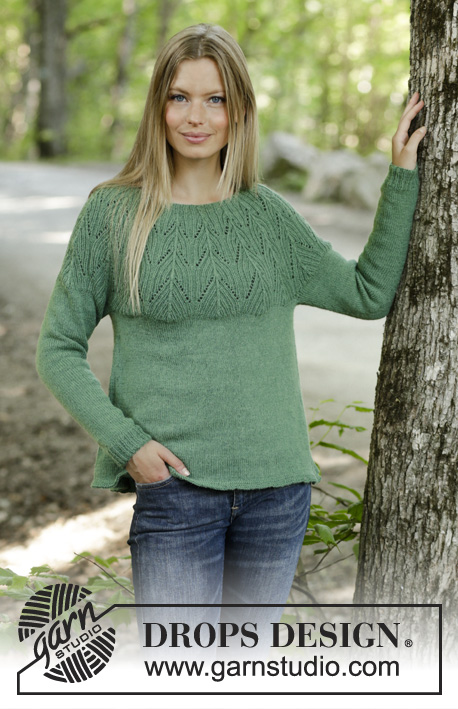
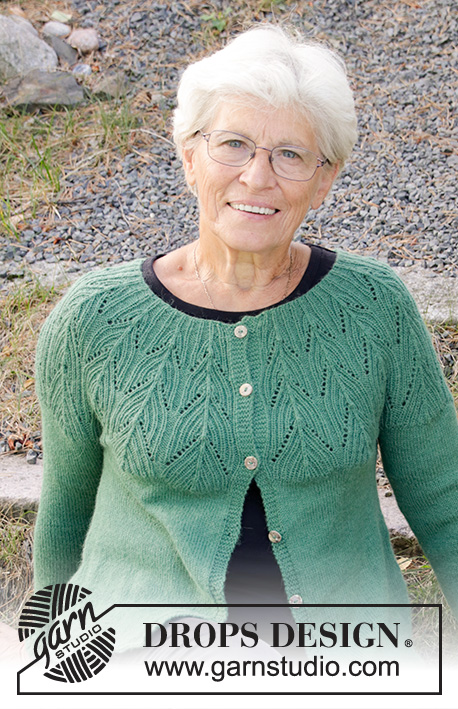
Knitted jacket with round yoke in DROPS Nord. The piece is worked with lace pattern and textured pattern. Sizes S – XXXL.
DROPS 196-27 |
|||||||||||||||||||||||||
|
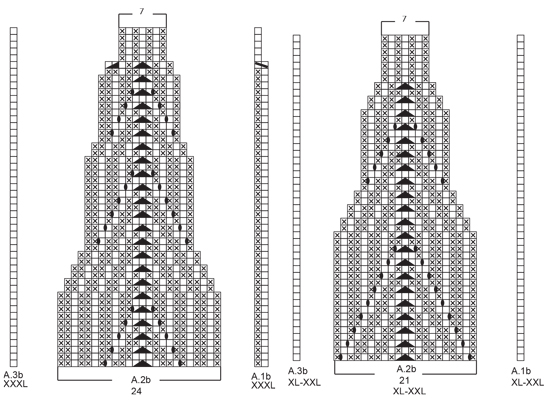
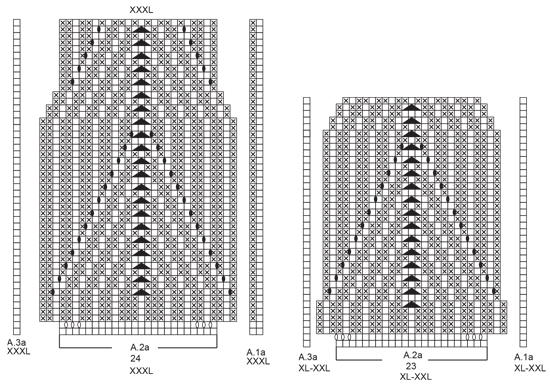
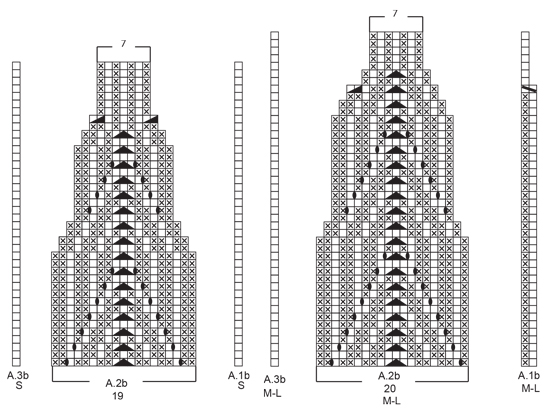
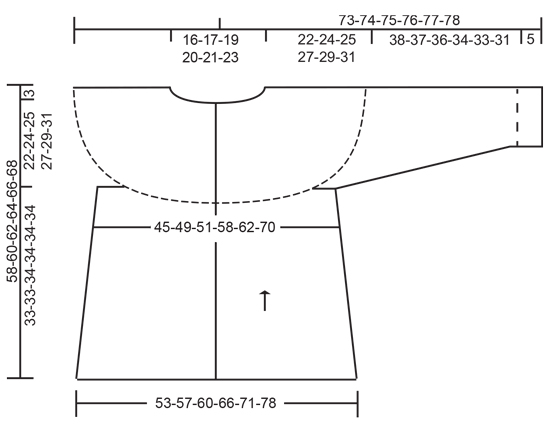
EXPLANATIONS FOR THE PATTERN: ------------------------------------------------------- RIDGE/GARTER STITCH (worked back and forth): 1 ridge = Knit 2 rows. PATTERN: See diagrams A.1 to A.3. Choose diagram for your size. The diagrams show all the rows in the pattern seen from the right side. DECREASE TIP (for body): All decreases are made from the right side! Decrease 1 stitch on each side of each marker thread as follows: Work until there are 3 stitches left before the marker thread, knit 2 together, knit 2 (the marker thread sits in the middle of these 2 stitches), slip 1 stitch as if to knit, knit 1 and pass the slipped stitch over the knitted stitch (= 2 stitches decreased by each marker thread = a total of 4 stitches decreased on the row). INCREASE TIP (for sleeves): Work until there are 2 stitches left before the marker, 1 yarn over (= 1 stitch increased), knit 4 (the marker thread sits in the middle of these 4 stitches), 1 yarn over (= 1 stitch increased). The yarn overs are knitted twisted on the next round to avoid holes. BUTTONHOLES (bottom up): Work buttonholes on the right band. 1 BUTTONHOLE = Knit 3rd and 4th stitch from the edge together and make 1 yarn over. On the next row knit the yarn over = hole. Work buttonholes when the piece measures: S: 10, 19, 28, 37, 45 and 53 cm M: 11, 20, 29, 38, 47 and 55 cm L: 9, 17, 25, 33, 41, 49 and 57 cm XL: 10, 19, 27, 35, 43, 51 and 59 cm XXL: 9, 17, 25, 33, 40, 47, 54 and 61 cm XXXL: 10, 18, 26, 34, 42, 49, 56 and 63 cm ------------------------------------------------------- START THE PIECE HERE: ------------------------------------------------------- JACKET - SHORT OVERVIEW OF THE PIECE: The piece is worked bottom up. First the body is worked back and forth with circular needle. Then the sleeves are worked in the round with double pointed needles. The sleeves and body are then placed on the same circular needle and the yoke is worked back and forth with textured pattern. BODY: Cast on 266-285-297-327-348-385 stitches (including 5 band stitches on each side of the piece) with circular needle size 2.5 mm and Nord. Work 3 RIDGES – read description above. Change to circular needle size 3 mm and continue with stocking stitch and 5 band stitches in garter stitch on each side of the piece. Insert 1 marker thread 69-74-77-84-89-99 stitches in from each side (mark the sides). REMEMBER THE KNITTING TENSION! Work BUTTONHOLES on the right band – read description above! When the piece measures 8 cm decrease 1 stitch on each side of each marker thread – read DECREASE TIP! Decrease like this every 2½ cm a total of 10 times = 226-245-257-287-308-345 stitches. When the piece measures 33-33-34-34-34-34 cm cast off for the armholes on the next row from the right side as follows: Work 5 band stitches in garter stitch, knit 50-55-57-64-68-78 stitches, cast off the next 8-8-10-10-12-12 stitches, knit 100-110-114-129-138-156, cast off the next 8-8-10-10-12-12 stitches, knit 50-54-56-64-68-77 and finish with 5 band stitches in garter stitch = 210-229-237-267-284-321 stitches. Lay the piece to one side and work the sleeves. SLEEVE: Cast on 57-60-63-66-66-69 stitches with double pointed needles size 2.5 mm and work rib in the round (= knit 1 / purl 2) over all stitches. When the piece measures 5 cm, change to double pointed needles size 3 mm and continue with stocking stitch. On the first round decrease 12-11-13-13-10-11 stitches evenly on round = 45-49-50-53-56-58 stitches. Insert 1 marker at the beginning of the round. When the sleeve measures 8-10-6-12-12-9 cm, increase 1 stitch on each side of the marker – read INCREASE TIP! Increase like this every 2-1½-1½-1-1-1 cm a total of 16-19-23-24-25-26 times = 77-87-96-101-106-110 stitches. When the piece measures 43-42-41-39-38-36 cm, cast off the first 4-4-5-5-6-6 stitches and the last 4-4-5-5-6-6 stitches for the armhole = 69-79-86-91-94-98 stitches. Lay the piece to one side and work the other sleeve in the same way. YOKE: Place the sleeves on the same circular needle size 3 mm as the body, where the stitches were cast off for the armholes = 348-387-409-449-472-517 stitches. Work stocking stitch with 5 band stitches in garter stitch on each side of the piece for 0-0-1-0-2-0 cm. Change to circular needle size 2.5 mm and work as follows from the right side: Work 5 band stitches in garter stitch, A.1a (= 1-2-2-1-1-2 stitches), repeat A.2a (= 21-22-22-23-23-24 stitches) over the next 336-374-396-437-460-504 stitches (= 16-17-18-19-20-21 times in width), A.3a (= 1 stitch) and finish with 5 band stitches in garter stitch. Note! On the 2nd row in diagram A.2a you increase stitches from the wrong side. Continue this pattern. When A.1a to A.3a have been worked 1 time in height there are 316-353-373-411-432-517 stitches on the needle. Now work A.1b to A.3b over A.1a to A.3a. When A.1b to A.3b have been worked 1 time in height there are 124-132-139-145-152-160 stitches on the needle. Cast off with knit over knit and purl over purl. The yoke measures approx. 22-24-25-27-29-31 cm. ASSEMBLY: Sew buttons onto left band. Sew underarm seam edge to edge in the outermost loop of the outermost stitch. |
|||||||||||||||||||||||||
Diagram explanations |
|||||||||||||||||||||||||
|
|||||||||||||||||||||||||
 |
|||||||||||||||||||||||||
 |
|||||||||||||||||||||||||
 |
|||||||||||||||||||||||||
 |
|||||||||||||||||||||||||
 |
|||||||||||||||||||||||||
Have you finished this pattern?Tag your pictures with #dropspattern #greenechojacket or submit them to the #dropsfan gallery. Do you need help with this pattern?You'll find 29 tutorial videos, a Comments/Questions area and more by visiting the pattern on garnstudio.com. © 1982-2026 DROPS Design A/S. We reserve all rights. This document, including all its sub-sections, has copyrights. Read more about what you can do with our patterns at the bottom of each pattern on our site. |
|||||||||||||||||||||||||


With over 40 years in knitting and crochet design, DROPS Design offers one of the most extensive collections of free patterns on the internet - translated to 17 languages. As of today we count 324 catalogues and 12290 patterns translated into English (UK/cm).
We work hard to bring you the best knitting and crochet have to offer, inspiration and advice as well as great quality yarns at incredible prices! Would you like to use our patterns for other than personal use? You can read what you are allowed to do in the Copyright text at the bottom of all our patterns. Happy crafting!
Post a comment to pattern DROPS 196-27
We would love to hear what you have to say about this pattern!
If you want to leave a question, please make sure you select the correct category in the form below, to speed up the answering process. Required fields are marked *.