
Popular categories
Looking for a yarn?


Comments / Questions (44)
![]() Kerry wrote:
Kerry wrote:
Is it possible to knit this on straight needles? If so, can you email me the pattern please
03.04.2020 - 00:37DROPS Design answered:
Dear Kerry, you will find informations about adapting a pattern into straight needles here. Happy knitting!
03.04.2020 - 07:57
![]() Aleksandra wrote:
Aleksandra wrote:
Czy nie ma błędu w opisie? Napisane jest, ze przy największym rozmiarze powtarzamy w sumie dodawanie 5 oczek 13 razy, a to dałoby polowe krótsza robotke... czy to nie wyjdzie 27 razy? 27x5cm wysokości dałoby 135cm plus ścieg francuski na zakończenie?
11.02.2020 - 22:39DROPS Design answered:
Witaj Olu, nie ma błędu, ponieważ oczka nie są dodawane do samej góry. Zakończą się po jakieś 30 cm od początku przerabiania w tę i z powrotem. Na górze koc nie będzie się już rozszerzał. Przepraszam za tak późną odpowiedź. Jak będziesz w przyszłości miała pytania, proszę zaznacz w formularzu PYTANIE, a nie KOMENTARZ, wtedy szybciej odpowiemy. A propos, czy już zagłosowałaś na nową kolekcję DROPS Jesień/Zima, zapraszamy serdecznie!
07.06.2020 - 14:19
![]() Rosaleen Smith wrote:
Rosaleen Smith wrote:
Question do you have a pattern for a double knit version my choice of wool is too small for the pattern iwas using so before i pull it out and hopefully can start will enquire thankyou
11.02.2020 - 22:05DROPS Design answered:
Dear Mrs Smith, our both Mermaid blankets are worked with DROPS Eskimo. Happy knitting!
12.02.2020 - 08:06
![]() Elisabeth wrote:
Elisabeth wrote:
Jeg strikker dette teppet nå, men savner forklaring på hvordan man lager splitten. Kan dere forklare det?
06.02.2020 - 17:56DROPS Design answered:
Hej Elisabeth, du deler arbejdet og strikker frem og tilbage når arbeidet måler 25-27-29-31-33-35 cm. God fornøjelse!
10.02.2020 - 08:52
![]() Beata wrote:
Beata wrote:
Witam. Płetwa ogonowa przerabiana jest na okrągło ?
24.01.2020 - 23:01DROPS Design answered:
Witaj Beato, tak płetwa ogonowa jest przerabiana na okrągło. Miłej pracy nad robótką!
25.01.2020 - 10:31
![]() Anja wrote:
Anja wrote:
Tack för fina mönster! Det har dock smugit sig in en miss. Det saknas antal maskor efter minskning på stjärtfenan för näst största stl 146/152. 68 maskor bör finnas med.
03.12.2019 - 15:43
![]() Agnieszka wrote:
Agnieszka wrote:
Czy całość robimy dwiema nitkami czy tylko płetwę? Nie bardzo to wynika z opisu.
09.11.2019 - 09:30DROPS Design answered:
Witaj Agnieszko! Nabieramy oczka na płetwę 2 nitkami, ale przerabiamy ją tylko jedną nitką, podobnie jak pozostałą część koca. Pozdrawiamy!
10.11.2019 - 11:32
![]() Kathrin wrote:
Kathrin wrote:
Hallo, muss ich nach dem Teilen der Arbeit am Rundenanfang dann 5 neue Maschen für die Zunahmen markieren? Bei mir sitzt eine Markierung genau am Rundenanfang...
24.10.2019 - 20:53DROPS Design answered:
Liebe Kathrin, nach allen Zunahmen stricken Sie in Reihen und nicht in Runden mehr, dh stricken Sie die letzte Runde bis Rundenanfant, dann, anstatt die nächste Masche wie zuvor stricken, wenden Sie die Arbeit und stricken Sie die Rückreihen auf der Rückseite, mit 5 Maschen Krausrechts beidseitig. Und so in Hin- und Rück-Reihen weiterstricken. Viel Spaß beim stricken!
25.10.2019 - 09:33
![]() Barbara Karli wrote:
Barbara Karli wrote:
Guten Tag Es steht, dass man Zunahmen *vor* und *nach* dem Markierungsfaden: = 2*5 pro Zunahmerunde, dies 11 x. also total 110 Maschen. Wenn ich nur 1 Masche pro Faden zunehme stimmt die Maschenzahl. Ist hier ein Fehler? Danke für eine Antwort.
20.10.2019 - 19:18DROPS Design answered:
Liebe Frau Karli, es wird nur 5 Maschen jeweils zugenommen, bei der 1. Zunahmenrunde nehmen Sie vor jeder Markierung, bei der 2. Zunahmenrunde nehmen Sie nach jeder Markierung, so wird "abwechselnd vor und nach allen Markierungsfäden" gemeint. Viel Spaß beim stricken!
21.10.2019 - 11:14
![]() Inger Lise Drage wrote:
Inger Lise Drage wrote:
Får ikkje fram rettelsen på dette teppet når eg trykker på linken ovafor. Står berre at det er rettelser på halefinnen og ingenting meir.
11.10.2019 - 11:56DROPS Design answered:
Hej. Själva oppskriften är rättad/uppdaterad, så följ bara den så blir det riktigt! Lycka till!
11.10.2019 - 13:49
|
|
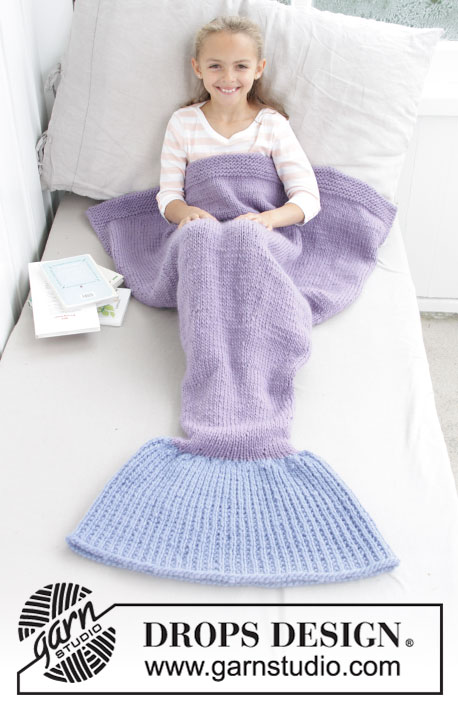
Cute Mermaid Blanket#cutemermaidblanket |
|
 |
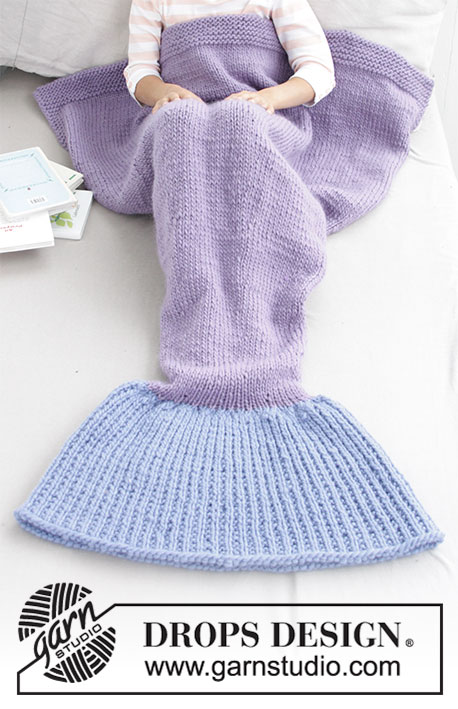 |
Knitted mermaid blanket for kids. Size 3-14 years Piece is knitted bottom up in DROPS Snow.
DROPS Children 28-12 |
|
|
INFORMATION FOR PATTERN: GARTER STITCH (back and forth): 1 ridge = knit 2 rows. PATTERN: ROUND 1: Knit all stitches. ROUND 2: Knit 1, purl 1 the entire round. ---------------------------------------------------------- BLANKET: Blanket it worked from tail fin and upwards. First worked in the round on circular needle, divide the piece on the tail and work back and forth onwards. TAIL FIN: Cast on 110-116-124-130-136-142 stitches on circular needle size 8 mm with 2 strands light blue. Cut one strand and continue working with only 1 strand. Work in PATTERN - see explanation above. REMEMBER THE KNITTING TENSION! When piece measures 25-26-28-29-30-31 cm, knit all stitches together 2 by 2 = 55-58-62-65-68-71 stitches. Tail fin is now done. Cut the yarn. TAIL: Switch to medium purple. Now continue working in stocking stitch and on first round decrease 21-20-20-19-18-15 stitches evenly on round = 34-38-42-46-50-56 stitches. Insert a marker and measure from here. Work 2 cm in stocking stitch. On next round increase 1-2-3-4-5-4 stitches evenly on round = 35-40-45-50-55-60 stitches. Work in stocking stitch until piece measures 4 cm. Insert 5 marker threads evenly on round. Switch to a long circular needle when needed. READ THE REST OF THE PATTERN BEFORE CONTINUING! Now increase alternately before and after each of the marker threads by making 1 yarn over (= 5 stitches increased each time) on every 3rd-4th-4th-5th-5th-5th cm, increase 10-11-11-12-12-13 times in total, work the yarn overs twisted on next row/round to avoid holes. After last increase there are 85-95-100-110-115-125 stitches on needle. AT THE SAME TIME when piece measures 25-27-29-31-33-35 cm divide the pieces for a slit on the start of the round = mid back. Work the first and last 5 stitches in GARTER STITCH - see explanation above, and rest of the stitches are worked in stocking stitch as before. When piece measures 64-78-92-106-122-136 cm work 6 cm with garter stitch over all stitches until piece measures 70-84-98-112-128-142 cm. Cast off and fasten the yarn. ASSEMBLY: Fasten the strands. Sew the vent at the bottom of tail together along the bottom 5 cm or as long up the tail as you want. Place tail double with vent in the middle of piece. Sew tail fin together along cast-on edge. Enjoy your new blanket. |
|
Have you finished this pattern?Tag your pictures with #dropspattern #cutemermaidblanket or submit them to the #dropsfan gallery. Do you need help with this pattern?You'll find 19 tutorial videos, a Comments/Questions area and more by visiting the pattern on garnstudio.com. © 1982-2026 DROPS Design A/S. We reserve all rights. This document, including all its sub-sections, has copyrights. Read more about what you can do with our patterns at the bottom of each pattern on our site. |
|


With over 40 years in knitting and crochet design, DROPS Design offers one of the most extensive collections of free patterns on the internet - translated to 17 languages. As of today we count 324 catalogues and 12290 patterns translated into English (UK/cm).
We work hard to bring you the best knitting and crochet have to offer, inspiration and advice as well as great quality yarns at incredible prices! Would you like to use our patterns for other than personal use? You can read what you are allowed to do in the Copyright text at the bottom of all our patterns. Happy crafting!
Post a comment to pattern DROPS Children 28-12
We would love to hear what you have to say about this pattern!
If you want to leave a question, please make sure you select the correct category in the form below, to speed up the answering process. Required fields are marked *.