
Popular categories
Looking for a yarn?


Comments / Questions (28)
![]() Anne wrote:
Anne wrote:
Hej! Stickar Telemarkströjan. Om ärmen från delningen ska vara endast 29 cm så räcker den inte till handleden. Något måste vara fel
27.04.2026 - 09:34
![]() Ingeborg wrote:
Ingeborg wrote:
Stemmer det at i forhøyning øverst bak så skal det økes en gang mer fra rettsiden enn fra vrangsiden. På siste gangen fra vrangsiden skal det snus 28 masker fra midten, mens fra rettsiden er det 42 masker fra midten det snus siste gangen. Synes bare det virker litt rart
30.12.2025 - 21:32DROPS Design answered:
Hei Ingeborg. Det burde ha vært likt på hver side. Oppskriften er oversendt til design avd for en dobbeltsjekk, men du kan evnt etter å ha strikke 70 masker rett. snu og strikk 84 masker vrang, snu og så strikk tilbake til starten på omgangen. mvh DROPS Design
12.01.2026 - 11:03
![]() Gitte wrote:
Gitte wrote:
Hej. Jeg er igang med af tage ind under ærmet. Jeg synes indtagningerne blive grime da det giver en nærmest bule/tyk rille. Er det rigtigt. Ligger det sig bedre når den er vasket. Mvh Gitte
26.04.2024 - 16:12DROPS Design answered:
Hei Gitte. Om du følger FELLETIPS-1 og de antall gangene hvor ofte i den str. du strikker, så skal det bli bra. Når du er ferdig kan du prøve å dampe lett og se du fremdeles syns at det buler. mvh DROPS Design
29.04.2024 - 08:50
![]() Rosita wrote:
Rosita wrote:
Buonasera, non mi è chiaro il passaggio sulla manica, Quando il lavoro misura 14-12-12-10-10-9 cm, lavorare il diagramma A.3 (= 6 maglie), ALLO STESSO TEMPO, sul giro indicato dalla freccia nel diagramma, 9cm eseguire lo schema a3, ma non è troppo presto a 9 cm? E poi le frecce x le diminuzioni sono quasi a metà del diagramma, giusto? Grazie 👋
28.02.2024 - 20:47DROPS Design answered:
Buongiorno Rosita, le misure per l'inizio del diagramma A.3 sono corrette: le diminuzioni iniziano sui primi giri del diagramma. Buon lavoro!
02.03.2024 - 11:45
![]() Azza wrote:
Azza wrote:
Dans le modèle drops 179-9 Mon me demande de monté COL: Monter 88-96-100-104-108-112 mailles avec la petite aiguille circulaire 3,5 en gris moyen. Tricoter 1 tour endroit puis en côtes ainsi: *1 maille endroit, 3 mailles POINT DE RIZ – voir ci-dessus *, tricoter de *-* jusqu’à la fin du tour. Continuer en côtes ainsi pendant 4 cm. Mais je ne comprends pas je monte en côte ou au point de riz ?
12.02.2024 - 09:15DROPS Design answered:
Bonjour Aza, les côtes sont formées par le point (1 maille endroit, 3 mailles point de riz), tricotez ainsi, de (à) pendant 4 cm. Bon tricot!
13.02.2024 - 08:00
![]() Azza wrote:
Azza wrote:
Dans le modèle drops 179-9 Mon me demande de monté COL: Monter 88-96-100-104-108-112 mailles avec la petite aiguille circulaire 3,5 en gris moyen. Tricoter 1 tour endroit puis en côtes ainsi: *1 maille endroit, 3 mailles POINT DE RIZ – voir ci-dessus *, tricoter de *-* jusqu’à la fin du tour. Continuer en côtes ainsi pendant 4 cm. Mais je ne comprends pas je monte en côte ou au point de riz ?
11.02.2024 - 23:28DROPS Design answered:
Bonjour Mme Azza, ce point fantaisie (1 m endroit, 3 mailles point de riz) va former des côtes, autrement dit, continuez ainsi. Bon tricot!
12.02.2024 - 09:31
![]() Kristel Rõõm wrote:
Kristel Rõõm wrote:
Juhendis: Kui töö kõrgus on 23-23-24-24-25-26 cm silmusemärkijast, kahanda 32-34-38-40-40-42 silmust ühtlaste vahedega ringil = 232-260-276-296-320-348 silmust. Koo 1 ring parempidi (koo kõik õhksilmused keerdsilmustena, et ei jääks auke). Kas siin peab kahandama või kasvatama? Silmade arvu järgi kasvatama, aga tegelikult?
25.11.2022 - 09:59DROPS Design answered:
Tere Kristel! Viga parandatud. Tänan teatamast!
15.12.2022 - 23:00
![]() Mette wrote:
Mette wrote:
Hej, jag har ytterligare en fråga angående mönstret. Jag stickar storlek L och funderar över fram och bakdelen där det står att man ska öka med 38 maskor då arbetet mäter 24cm. Varifrån ska det mätas 24cm? Hela mitt arbete är ju betydligt längre (för tillfället nästan 50cm). Är det från mönstrets slut, från ärmens hål eller var? Och är det alltså hela arbetet som i slutet ska vara 60cm eller 60cm från ärmen (och hela arbetet då längre)?
29.09.2022 - 08:58DROPS Design answered:
Hej Mette, när du har delt till fram & bakstycke skriver vi härifrån mäts arbetet :)
29.09.2022 - 09:38
![]() Mette wrote:
Mette wrote:
Hej, Jag stickar storlek L och funderar om jag verkligen ska sticka tills arbetet är 30cm innan jag tar av maskor för ärmarna. Om jag räknat rätt har jag nästan stickat hela mönstret då arbetet är så långt, och på bilden ser det ut som att ärmen börjar ungefär mitt i mönstret. Är orolig över att jag gör fel och kommer dricka för långt och inte få mönster på ärmarna…
09.09.2022 - 20:13DROPS Design answered:
Hei Mette. Så lenge strikkefastheten din stemmer i høyden, så er du nesten ferdig med diagram A.1 når du skal dele til bol og ermer. Bildet viser en modell i str S (den skal måle 27 cm) og da blir det mer av diagram A.1 igjen etter delingen. mvh DROPS Design
12.09.2022 - 09:19
![]() Rosaria Pittano wrote:
Rosaria Pittano wrote:
Non capisco come devo iniziare e cosa è un alzata? Grazie.
02.12.2020 - 07:25DROPS Design answered:
Buongiorno Rosaria, deve iniziare come indicato dal collo. L'alzata consiste semplicemente di lavorare qualche ferro a ferri accorciati sul collo, in modo che sia un po' più alto rispetto al davanti, per una vestibilità migliore. Buon lavoro!
02.12.2020 - 08:43
|
|||||||||||||||||||
Telemark#telemarksweater |
|||||||||||||||||||
 |
 |
||||||||||||||||||
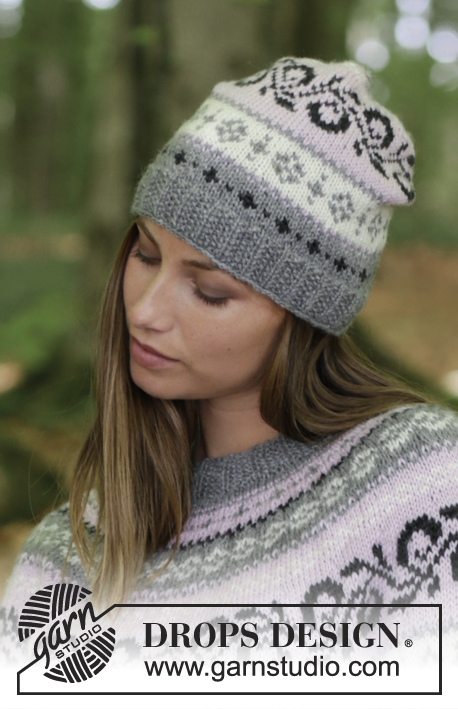
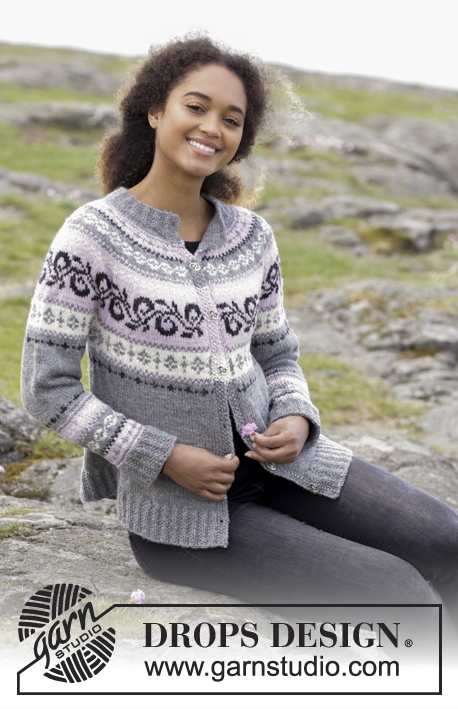
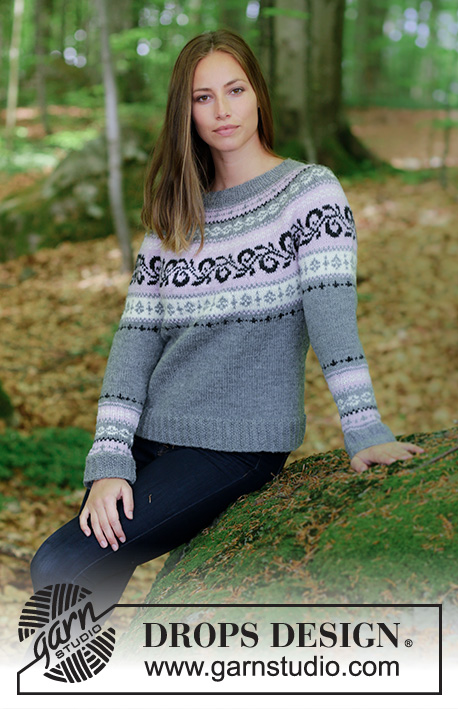
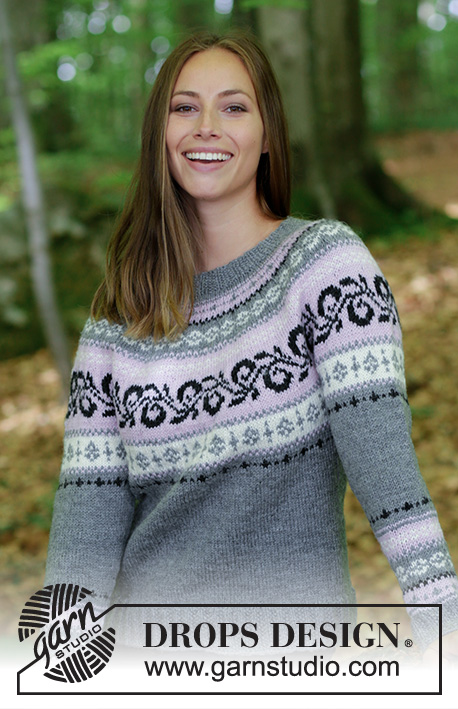
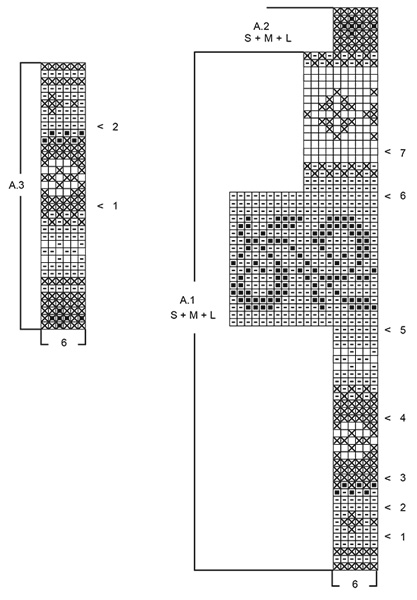
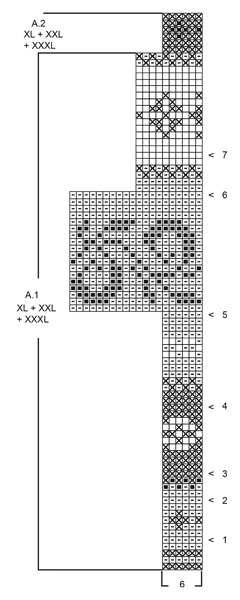
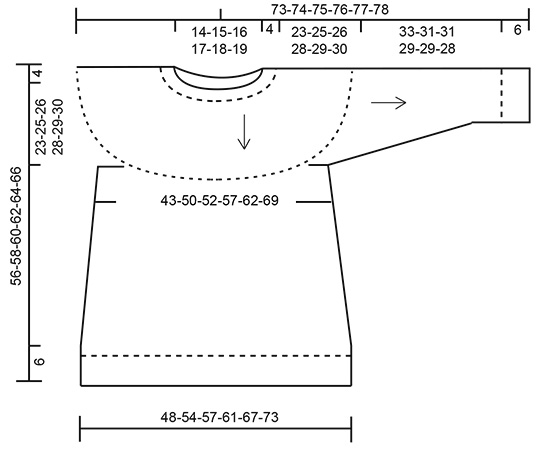
Knitted jumper with round yoke and multi-coloured Norwegian pattern, worked top down. Sizes S - XXXL. The piece is worked in DROPS Merino Extra Fine.
DROPS 179-9 |
|||||||||||||||||||
|
INFORMATION FOR THE PATTERN: MOSS STITCH: ROUND 1: * Knit 1, purl 1 *, work from *-*. ROUND 2: Knit over purl and purl over knit. Repeat round 2. INCREASE TIP-1 (evenly spaced): To work out how to increase evenly on round, count the total number of stitches on the needle (e.g. 88 stitches), and divide by the number of increases to be made (e.g. 8) = 11. In this example, increase after approx. every 11th stitch. Increase 1 stitch by making 1 yarn over. On the next round, knit the yarn overs twisted to prevent holes. INCREASE TIP-2 (for sides on body): Start 4 stitches before the marker thread, make 1 yarn over, knit 8 (the marker thread sits in the middle of these 8 stitches), make 1 yarn over (= 2 stitches increased). On the next round, knit the yarn overs twisted to prevent holes. ELEVATION: Work an elevation from mid back (= the start of the round). Start from the right side and knit 12-13-14-14-15-15 stitches, turn, tighten the strand and purl 24-26-28-28-30-30 stitches. Turn, tighten the strand and knit 36-39-42-42-45-45 stitches, turn, tighten the strand and purl 48-52-56-56-60-60 stitches. Turn, tighten the strand and knit 60-65-70-70-75-75 stitches, turn, tighten the strand and purl 72-78-84-84-90-90 stitches. Turn, tighten the strand and knit back to beginning of round. PATTERN: See diagrams A.1 to A.3. (Choose diagram for your size – applies to A.1 and A.2). The whole pattern is worked in stocking stitch. All the rows in the diagram show the pattern seen from the right side. KNITTING TIP: To prevent the knitting tension becoming tighter when working pattern, it is important that the strands at the back of the piece are not tight. You can increase a needle size when working pattern if this is a problem. DECREASE TIP-1 (for mid under sleeve): Start 3 stitches before the marker thread, knit 2 together, knit 2 (the marker thread sits in the middle of these 2 stitches), slip 1 stitch as if to knit, knit 1, pass the slipped stitch over the knitted stitch (= 2 stitches decreased). DECREASE TIP-2 (evenly spaced): To work out how to decrease evenly, count the total number of stitches on the needle (e.g. 60 stitches) and divide by the number of decreases to be made (e.g. 6) = 10. In this example knit every 9th and 10th stitch together. ---------------------------------------------------------- JUMPER: The piece is worked with circular needle, top down. The round begins mid back. The sleeves are worked in the round with double pointed needles. NECKLINE: Cast on 88-96-100-104-108-112 stitches with short circular needle size 3.5 mm and medium grey. Knit 1 round. Now work rib as follows: * Knit 1, 3 stitches MOSS STITCH – see description above *, work from *-* to end of round. Continue the rib in this way for 4 cm. After the rib, knit 1 round where you increase 8-6-8-10-12-14 stitches evenly on round – read INCREASE TIP-1 (evenly spaced) = 96-102-108-114-120-126 stitches. Knit 1 round. For a better fit, work a small ELEVATION in the back of the neck – see description above. YOKE: Change to circular needle size 4 mm. Continue with 2-2-4-4-6-6 rounds stocking stitch. Now work PATTERN and increase stitches – read KNITTING TIP! The first round is worked as follows: work A.1 (= 16-17-18-19-20-21 repeats of 6 stitches on the first round in diagram). Continue pattern in this way. REMEMBER THE KNITTING TENSION! AT THE SAME TIME on each round marked with an arrow in the diagram increase evenly on round as follows – remember INCREASE TIP-1 (evenly spaced): Arrow-1: Increase 30-36-42-42-48-48 stitches evenly on round = 126-138-150-156-168-174 stitches. Arrow-2: Increase 30-36-42-42-48-48 stitches evenly on round = 156-174-192-198-216-222 stitches. Arrow-3: Increase 30-36-36-42-42-48 stitches evenly on round = 186-210-228-240-258-270 stitches. Arrow-4: Increase 30-36-36-42-42-48 stitches evenly on round = 216-246-264-282-300-318 stitches. Arrow-5: Increase 24-34-36-38-40-42 stitches evenly on round = 240-280-300-320-340-360 stitches. Arrow-6: Increase 30 evenly on round in all sizes = 270-310-330-350-370-390 stitches. Arrow-7: Increase 20-20-20-30-30-40 stitches evenly on round = 290-330-350-380-400-430 stitches. When the piece measures 27-29-30-32-33-34 cm from the cast-on edge, divide the stitches for body and sleeves as follows (A.1 has not been finished and is continued as before): Work 41-48-50-55-59-65 stitches as before (= half the back piece), place the next 63-68-75-80-82-84 stitches on a thread (= sleeve), cast on 8-8-10-10-12-14 new stitches (= in side under sleeve), work 82-97-100-110-118-131 stitches as before (= front piece), place the next 63-68-75-80-82-84 stitches on a thread (= sleeve), cast on 8-8-10-10-12-14 new stitches (= in side under sleeve) and work the remaining 41-49-50-55-59-66 stitches as before (= half the back piece). Body and sleeves are now finished separately. THE PIECE IS NOW MEASURED FROM HERE! BODY: = 180-210-220-240-260-290 stitches. Continue with A.1 as before. When A.1 has been completed in height, continue with A.2 over A.1, BUT on the first round in A.2 increase 0-0-2-0-4-4 stitches evenly on round = 180-210-222-240-264-294 stitches. When A.2 has been completed in height, insert 1 marker thread in each side. Insert first marker thread after 45-52-55-60-66-73 stitches and second marker thread after 90-106-112-120-132-148 new stitches. There is now 45-52-55-60-66-73 stitches left on round after last marker thread. Continue working with medium grey and stocking stitch to finished length. On the next round increase 2 stitches in each side – read INCREASE TIP-2 (for sides on body)! Increase in this way every 4-5-5-5-5-5 cm a total of 5-4-4-4-4-3 times = 200-226-238-256-280-306 stitches. When the piece measures 23-23-24-24-25-26 cm increase 32-34-38-40-40-42 stitches evenly on next round = 232-260-276-296-320-348 stitches. Knit 1 round (all yarn overs are knitted twisted to prevent holes). Change to circular needle size 3.5 mm. Work rib * knit 1, 3 stitches moss stitch *, work from *-* to end of round. Continue in this way until the rib measures 6 cm. Cast off with knit over knit and purl over purl. To avoid the cast-off edge being tight, you can cast off with a larger needle size. The jumper measures approx. 56-58-60-62-64-66 cm from the shoulder down. SLEEVE: Place the 63-68-75-80-82-84 stitches from the thread in the one side of the piece on double pointed needles size 4 mm and, in addition, knit up 1 stitch in each of the 8-8-10-10-12-14 new stitches cast on under the sleeve (knit up stitches with background colour in the next round in the pattern) = 71-76-85-90-94-98 stitches. Continue A.1A in the round on the sleeve (pattern on the sleeve should match pattern on the yoke) – NOTE: In sizes S, M, L, XXL and XXXL the pattern will not fit the number of stitches mid under the sleeve, but to avoid too large a gap, it is recommended that you work as many stitches of A.1A as possible on the round. When A.1A has been completed in height, work A.2A over A.1A in the round, AT THE SAME TIME on the first round adjust the number of stitches to 72-78-84-90-96-96 stitches (so that pattern A.2A will fit the number of stitches). When A.2A has been completed in height, insert a marker thread in the middle of the 8-8-10-10-12-14 new stitches cast on under the sleeve (= 4-4-5-5-6-7 new stitches on each side of the marker thread). THE PIECE IS NOW MEASURED FROM HERE! Continue working with medium grey. On the next round decrease 2 stitches mid under the sleeve – read DECREASE TIP-1! Decrease in this way approx. every 6th-3rd-3rd-2nd-2nd-2nd round a total of 6-9-9-12-12-12 times = 60-60-66-66-72-72 stitches. When the piece measures 14-12-12-10-10-9 cm work pattern A.3 (= 6 stitches) in the round, AT THE SAME TIME on the rounds marked with an arrow in the diagram decrease evenly as follows – read DECREASE TIP-2 (evenly spaced): Arrow-1: Decrease 6 stitches evenly on round = 54-54-60-60-66-66 stitches. Arrow-2: Decrease 6-6-12-12-12-12 stitches evenly on round = 48-48-48-48-54-54 stitches. When A.3 has been completed in height, the piece measures 33-31-31-29-29-28 cm from the separation. Continue with medium grey. Work 1 round where you increase 4-4-8-8-8-8 stitches evenly on round = 52-52-56-56-62-62 stitches. Change to double pointed needles size 3.5 mm. Work rib in the round (= knit 1 /3 stitches moss stitch) for 6 cm. Cast off with knit over knit and purl over purl. The sleeve measures approx. 39-37-37-35-35-34 cm from the separation. Work the other sleeve in the same way. |
|||||||||||||||||||
Diagram explanations |
|||||||||||||||||||
|
|||||||||||||||||||
 |
|||||||||||||||||||
 |
|||||||||||||||||||
 |
|||||||||||||||||||
Have you finished this pattern?Tag your pictures with #dropspattern #telemarksweater or submit them to the #dropsfan gallery. Do you need help with this pattern?You'll find 30 tutorial videos, a Comments/Questions area and more by visiting the pattern on garnstudio.com. © 1982-2026 DROPS Design A/S. We reserve all rights. This document, including all its sub-sections, has copyrights. Read more about what you can do with our patterns at the bottom of each pattern on our site. |
|||||||||||||||||||


With over 40 years in knitting and crochet design, DROPS Design offers one of the most extensive collections of free patterns on the internet - translated to 17 languages. As of today we count 324 catalogues and 12290 patterns translated into English (UK/cm).
We work hard to bring you the best knitting and crochet have to offer, inspiration and advice as well as great quality yarns at incredible prices! Would you like to use our patterns for other than personal use? You can read what you are allowed to do in the Copyright text at the bottom of all our patterns. Happy crafting!
Post a comment to pattern DROPS 179-9
We would love to hear what you have to say about this pattern!
If you want to leave a question, please make sure you select the correct category in the form below, to speed up the answering process. Required fields are marked *.