
Popular categories
Looking for a yarn?


Comments / Questions (11)
![]() Virginie Miani wrote:
Virginie Miani wrote:
Bonjour, je souhaiterais faire ce modèle mais dans une laine plus fine. Comment l'adapter ? Comment compter la quantité de laine ? Je vous remercie de votre réponse. Cordialement. Virginie
24.01.2024 - 11:05DROPS Design answered:
BonjourMme Miani, vous devez vous baser sur votre propre tension, le point ajouré et le schéma des mesures pour tout recalculer. Pour la quantité de laine, elle va dépendre de votre échantillon, de votre taille, de l'aisance souhaitée, etc... Vous pouvez vous inspirer d'un modèle analogue correspondant à votre propre tension. Bon tricot!
25.01.2024 - 08:08
![]() Wilma Strijbosch wrote:
Wilma Strijbosch wrote:
Vermoedelijk is dit patroon vertaald. Het woord 'rechter' als in rechter schouder, wordt vertaald als 'goed'. Dit is zo verwarrend: Brei over de linker schouder zoals hiervoor, zet 15 nieuwe steken op voor de hals, brei de 34-34-38-38-42-42 steken aan de goede kant tot aan de naald op de verkeerde kant = 83-83-91-91-99-99 steken. Ik moest het vaak lezen voordat ik snapte wat er moest gebeuren.
19.06.2023 - 16:35
![]() Aurélie wrote:
Aurélie wrote:
Bonjour, je commence le tricot par l'épaule droite et je ne comprends pas les augmentations a effectuer, pouvez vous m'éclairer? La 3 ème maille montée est en fait la 3 ème augmentation ? Merci
03.05.2021 - 13:45DROPS Design answered:
Bonjour Aurélie, quand on tricote les épaules, on monte les mailles de l'encolure (ces mailles doivent être montées pas augmentées) mais effectivement ce sera bien la 3ème montée à la fin du 3ème rang sur l'endroit. Bon tricot!
03.05.2021 - 13:50
![]() Helle Petersen wrote:
Helle Petersen wrote:
Jeg er meget i tvivl, om hvor mærke trådene skal sættes når de4 skal tages. Jeg opfatter det som om at der skal tages ud i hulmønstetet. Passer det?
10.06.2019 - 15:53DROPS Design answered:
Hei Helle. Merketrådene settes i vrangpartiene mellom A.1. Du strikker 8-12-12-18-20-26 masker vrang, A,1, 1 maske vrang, sett merketråd her. Så strikker du igjen 8-12-12-18-20-26 masker vrang, A,1, 1 maske vrang, sett merketråd her osv. Det settes altså 3 merketråder på forstykket, og 3 merketråder på bakstykket. Videre øker du vekselsvis på slutten og starten av vrangpartiene med merketråd (les ØKETIPS). God fornøyelse
11.06.2019 - 07:38
![]() Inge wrote:
Inge wrote:
Liebes Drops- Team, leider verstehe ich nicht (Schulter rechts), was " die 3. Masche die angeschlagen wird" ist. Ist damit die 3. letzte Masche gemeint? Danke für ihre Hilfe.
22.11.2018 - 10:17DROPS Design answered:
Liebe Inge, für den Hals werden 1 M 3 x und dann 2 M 1 x angeschlagen. Diese Maschen werden so gestrick; die 2 neuen Maschen glatt rechts, die 3. Masche glatt links und die 2 letzten Maschen glatt rechts. Viel Spaß beim stricken!
22.11.2018 - 11:08Eliana Sullivan wrote:
The instructions forthe right shoulder say Purl 2, A1, P1 etc, then "continue this pattern." Should I purl the Purl 2 and Purl 1 on the wrong side as well? Also, are the yarn overs meant to be knitted on the wrong side? I would normally purl them in a UK pattern. Thanks!
03.10.2018 - 10:41DROPS Design answered:
Dear Eliana, the first row tells you how to set the pattern, from then you should follow the diagrams. Between the patterned columns the P stitches are reversed stockinett, that are purled on the RS and knitted on the WS. Happy Knitting!
03.10.2018 - 11:38
![]() Maria Van Gils wrote:
Maria Van Gils wrote:
Hej, när jag satt ihop axlarna och börjat sticka framstycket så står det att jag ska öka under 6 varv, totalt 10 maskor, när arbetet mäter 16 cm. Det går inte ihop med att jag då ska ha ökat från 91-111 maskor (20 maskors ökning) eller att arbetet då ska vara ca 20 cm, efter endast 6 varvs ökning. Hur ska jag göra? Mvh Maria
10.03.2018 - 11:25DROPS Design answered:
Hej, du ska öka i båda sidorna, då ökas det alltså totalt 20 maskor under 12 varv.
15.03.2018 - 14:33
![]() Maria Van Gils wrote:
Maria Van Gils wrote:
Hej, när jag satt ihop axlarna och börjat sticka framstycket så står det att jag ska öka under 6 varv, totalt 10 maskor, när arbetet mäter 16 cm. Det går inte ihop med att jag då ska ha ökat från 91-111 maskor (20 maskors ökning) eller att arbetet då ska vara ca 20 cm, efter endast 6 varvs ökning. Hur ska jag göra? Mvh Maria
10.03.2018 - 08:14Deirdre wrote:
Hello, I'd love to knit this pattern, but it appears to be missing sizing information. Can you point me to the measurements for the sizes listed, please?
04.01.2018 - 20:22DROPS Design answered:
Dear Deirdre, you will find at the bottom of the pattern a measurement chart with all measurements for each size taken flat from side to side. Compare these to a similar garment you have and like the shape to find out the matching size. Read more about sizeing here. Happy knitting!
05.01.2018 - 08:42
![]() Gabriela wrote:
Gabriela wrote:
Schlicht und edel - weniger ist mehr! Ein echter Eye-catcher
01.07.2017 - 05:45
|
||||||||||||||||
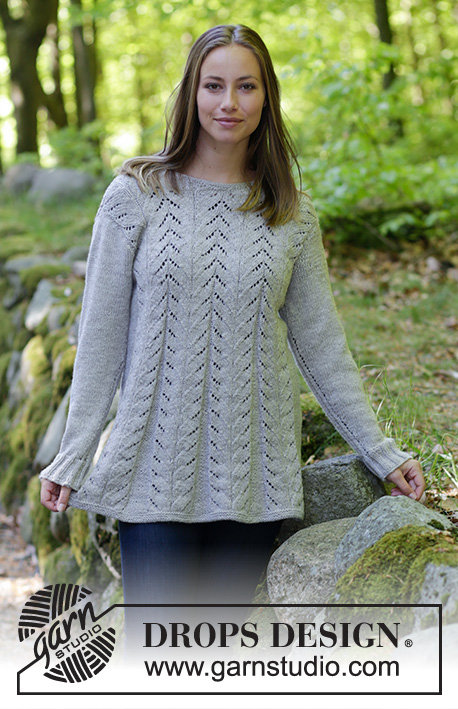
Timeless Elegance#timelesselegancesweater |
||||||||||||||||
 |
 |
|||||||||||||||
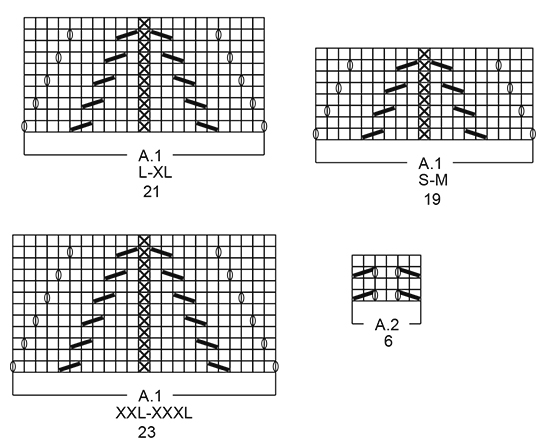
Jumper with lace pattern, worked top down in A-shape. Size: S - XXXL Piece is knitted in DROPS Karisma.
DROPS 181-34 |
||||||||||||||||
|
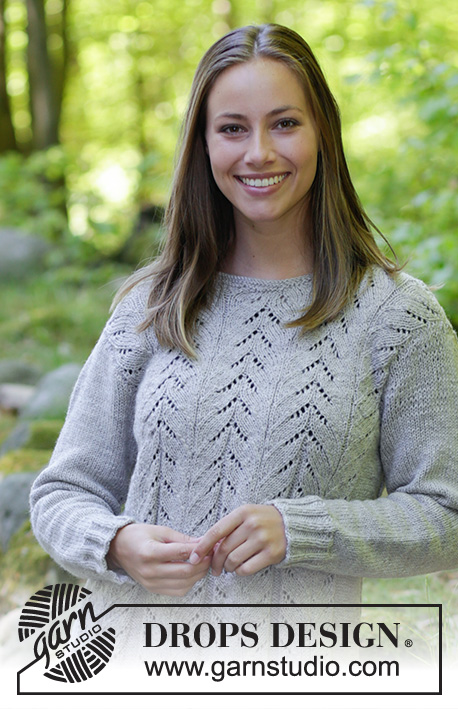
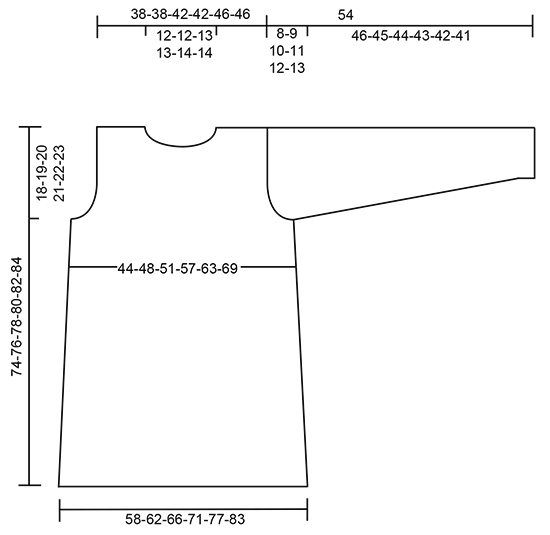
INFORMATION FOR PATTERN: GARTER STITCH (worked in the round): 1 ridge = 2 rounds. Knit 1 round and purl 1 round. INCREASE TIP (applies to body): Increase 1 stitch in each purl section with marker thread as follows: Work all purl stitches, make 1 yarn over. On next increase, increase with 1 yarn over before all purl stitches. Purl yarn over twisted on next round to avoid hole. Purl the increased stitches. Increase alternately on left and right side of every purl section with marker thread. PURL (applies to body): To avoid the purl sections from contracting too much knit 1 round over all purl stitches approx. every 6th round. PATTERN: See diagrams A.1 and A.2. Diagrams show all rows in pattern seen from the right side. Choose diagram for your size. ---------------------------------------------------------- JUMPER: Worked top down. First work each part separately, back and forth down to armhole, then slip parts together on circular needle and work in the round. Finish by working the sleeves. FRONT PIECE: Work each shoulder separately, increase and cast on for neck and put piece together. RIGHT SHOULDER: Cast on 29-29-32-32-35-35 stitches on circular needle size 4 mm with Karisma. Work as follows from right side: Purl 2, A.1 (= 19-19-21-21-23-23 stitches), purl 1, 7-7-8-8-9-9 stitches in stocking stitch. REMEMBER THE KNITTING TENSION! Continue this pattern for 5-5-6-6-7-7 cm, then begin increase for neck: Cast on new stitch at the end of every row from right side as follows (the 3rd stitch that are cast on should be purled from right side, and knit from wrong side, work the remaining stitches in stocking stitch): 1 stitch 3-3-4-4-5-5 times and 2 stitches 1 time = 34-34-38-38-42-42 stitches. Work 1 row from wrong side and 1 row from right side, put piece aside. LEFT SHOULDER: Cast on 29-29-32-32-35-35 stitches on circular needle size 4 mm with Karisma. Work as follows from right side: 7-7-8-8-9-9 stitches in stocking stitch, purl 1, A.1, purl 2. Continue this pattern for 5-5-6-6-7-7 cm, then begin increase for neck: Cast on new stitch at the end of every row from wrong side as follows (the 3rd stitch that are cast on should be purled from right side, and knit from wrong side,, work the remaining stitches in stocking stitch): 1 stitch 3-3-4-4-5-5 times and 2 stitches 1 time = 34-34-38-38-42-42 stitches. Work 1 row from right side. FRONT PIECE: Now work left shoulder together with right shoulder from wrong side as follows: Work over left shoulder as before, cast on 15 new stitches for neck, work the 34-34-38-38-42-42 stitches from right side on to needle from wrong side = 83-83-91-91-99-99 stitches. Then work as follows from right side: Purl 2, *A.1, purl 1 *, work from *-* 3 times in total, A.1, purl 2. Continue this pattern. When piece measures 15-15-16-15-15-14 cm, cast on stitches for armholes at the end of every row as follows: 1 stitches 3-3-3-4-4-5 times, 2 stitches 0-2-2-3-4-5 times and 3 stitches 1-1-1-2-2-3 times = 95-103-111-123-135-147 stitches. Purl the increased stitches. Piece now measures approx. 18-19-20-21-22-23 cm. Put piece aside and work the back piece. BACK PIECE: Work each shoulder separately, increase and cast on for neck and put piece together. LEFT SHOULDER: Cast on and work as right shoulder on front piece until piece measures 3 cm. Then cast on 1 new stitch at the end of next row from right side = 30-30-33-33-36-36 stitches. Work 1 row from wrong side and 1 row from right side. Put piece aside. RIGHT SHOULDER: Cast on and work as left shoulder on front piece until piece measures 3 cm. Then cast on 1 new stitch at the end of next row from wrong side = 30-30-33-33-36-36 stitches. Work 1 row from right side. BACK PIECE: Now work right shoulder together with left shoulder from wrong side as follows: Work over right shoulder as before, cast on 23-23-25-25-27-27 new stitches for neck, work the 30-30-33-33-36-36 stitches from left side on to needle from wrong side = 83-83-91-91-99-99 stitches. Work pattern and cast on stitches for armholes as on front piece = 95-103-111-123-135-147 stitches. BODY: Slip all stitches on to same circular needle (without working them) = 190-206-222-246-270-294 stitches. Insert 1 marker in piece, NOW MEASURE PIECE FROM HERE. Round now begins mid under one sleeve. Insert 6 marker threads in the piece as follows: ** PURL 8-12-12-18-20-26 – see explanation above, * A.1, purl 1, insert 1 marker thread *, work from *-* 3 times in total, A.1, PURL 8-12-12-18-20-26 **, work from **-** 2 times in total. When piece measures 4 cm, increase 1 stitch at each marker thread (= 6 stitches increased) - READ INCREASE TIP! Increase like this every 5-5-5½-5½-6-6 cm 9 times in total = 244-260-276-300-324-348 stitches. Continue pattern until piece measures 54-55-56-57-58-59 cm from marker (piece measures 72-74-76-78-80-82 cm in total). Work 3 ridges in GARTER STITCH - see explanation above. Cast off. SLEEVE: Work sleeve in the round on double pointed needles/circular needle. Cast on 55-55-60-60-65-65 stitches on double pointed needles size 3.5 mm with Karisma. Knit 1 round, then work rib = knit 2/purl 3. Work rib for 6 cm. Switch to double pointed needles size 4 mm. Work all 3 purl together to 2 purl = 44-44-48-48-52-52 stitches. Work A.2 (= 6 stitches) and 38-38-42-42-46-46 stitches in stocking stitch (the middle of A.2 is mid under sleeve). When piece measures 8-8-8-10-10-8 cm, increase 2 stitches mid under sleeve by skipping the decreases in A.2. Increase like this every 2½-2-2-1½-1½-1½cm 15-17-18-20-20-22 times in total = 74-78-84-88-92-96 stitches. When piece measures 46-45-44-43-42-41 cm (shorter measurements in the larger sizes because of longer sleeve cap and wider shoulders), cast off 6-6-6-8-8-8 stitches mid under sleeve. Now work the sleeve cap back and forth on needle while casting off at beginning of every row in each side as follows: Cast off 3-3-3-4-4-4 stitches 1 time, 2 stitches 3 times and 1 stitch 6 times. Cast off 2 stitches in each side until piece measures 53 cm. Cast off 3 stitches 1 time in each side and cast off the remaining stitches, the piece measures 54 cm. Work another sleeve. ASSEMBLY: Sew shoulder seem and sew in sleeves. NECK EDGE: Pick up approx. 66-84 stitches along neck edge on circular needle size 3.5 mm with Karisma. Work 2 ridges. Cast off. |
||||||||||||||||
Diagram explanations |
||||||||||||||||
|
||||||||||||||||
 |
||||||||||||||||
 |
||||||||||||||||
Have you finished this pattern?Tag your pictures with #dropspattern #timelesselegancesweater or submit them to the #dropsfan gallery. Do you need help with this pattern?You'll find 31 tutorial videos, a Comments/Questions area and more by visiting the pattern on garnstudio.com. © 1982-2026 DROPS Design A/S. We reserve all rights. This document, including all its sub-sections, has copyrights. Read more about what you can do with our patterns at the bottom of each pattern on our site. |
||||||||||||||||


With over 40 years in knitting and crochet design, DROPS Design offers one of the most extensive collections of free patterns on the internet - translated to 17 languages. As of today we count 325 catalogues and 12298 patterns translated into English (UK/cm).
We work hard to bring you the best knitting and crochet have to offer, inspiration and advice as well as great quality yarns at incredible prices! Would you like to use our patterns for other than personal use? You can read what you are allowed to do in the Copyright text at the bottom of all our patterns. Happy crafting!
Post a comment to pattern DROPS 181-34
We would love to hear what you have to say about this pattern!
If you want to leave a question, please make sure you select the correct category in the form below, to speed up the answering process. Required fields are marked *.