
Popular categories
Looking for a yarn?


Comments / Questions (24)
![]() Louise Désilets wrote:
Louise Désilets wrote:
Merci beaucoup! Je suis quasiment gênée; je cherchais tellement ce qu'était cette sorte de maille que j'ai oublié que c'était la couleur de mon fil. lol
15.01.2020 - 15:12
![]() Louise Desilets wrote:
Louise Desilets wrote:
Bonjour! Pouvez-vous m'expliquer ce qui est une maille en littoral? Merci à l'avance!
15.01.2020 - 05:01
![]() Louise Désilets wrote:
Louise Désilets wrote:
Bonjour! Je ne comprends pas qu'est-ce qu'une maille en littoral.
15.01.2020 - 05:00DROPS Design answered:
Bonjour Mme Désilets, il s'agit d'une maille tricotée avec la couleur littoral de DROPS Fabel. Bon tricot!
15.01.2020 - 09:39
![]() Coraline wrote:
Coraline wrote:
Un grand merci pour la réponse rapide !!!!
13.06.2019 - 17:01
![]() Coraline wrote:
Coraline wrote:
Merci . Mais comment savoir si on fait le raglan tous les 4 rangs ou tous les 2 rangs ? On fait un rang avec diminution raglan et un rang sans diminution et on alterne ces deux rangs jusqu’au bout c’est ça ?
13.06.2019 - 16:32DROPS Design answered:
Bonjour Coraline, on diminue 4 mailles pour le raglan d'abord 5-5-5-7-7-8 fois au total tous les 4 tours, puis 18-22-26-26-30-32 fois tous les 2 tours. Bon tricot!
13.06.2019 - 16:35
![]() Coraline wrote:
Coraline wrote:
Bonjour Il n’y aura pas de différence entre le dos et le devant au niveau du raglan ? Merci
03.06.2019 - 18:29DROPS Design answered:
Bonjour Coraline, le dos et le devant sont identiques au niveau du raglan. Bon tricot!
03.06.2019 - 19:24
![]() Coraline wrote:
Coraline wrote:
Bonjour je ne comprends pas « Diminuer de cette façon 5-5-5-7-7-8 fois au total tous les 4 tours, et 18-22-26-26-30-32 fois tous les 2 tours = 144-152-152-168-168-172 mailles. » Tous les 2 tours on fait l’étape Raglan de 8 diminutions Mais tous les 4 tours ? On fait 2 fois l’étape du raglan ? 16 diminutions donc tous les 4 rangs ? Merci
03.06.2019 - 18:22DROPS Design answered:
Bonjour Coraline! Si tu diminues tous les 4 tours, tu diminues toujours 8 mailles par tour (on fait l’étape Raglan, le meme que tous les 2 tours). Bon tricot!
03.06.2019 - 19:45
![]() Anne wrote:
Anne wrote:
Hva er kyst?
26.02.2019 - 09:30DROPS Design answered:
hei Anne. Det er fargenavnet på mønsterfargen, så det forteller deg hvilken farge du skal bruke. God fornøyelse
26.02.2019 - 14:52
![]() Dagmar Thiel wrote:
Dagmar Thiel wrote:
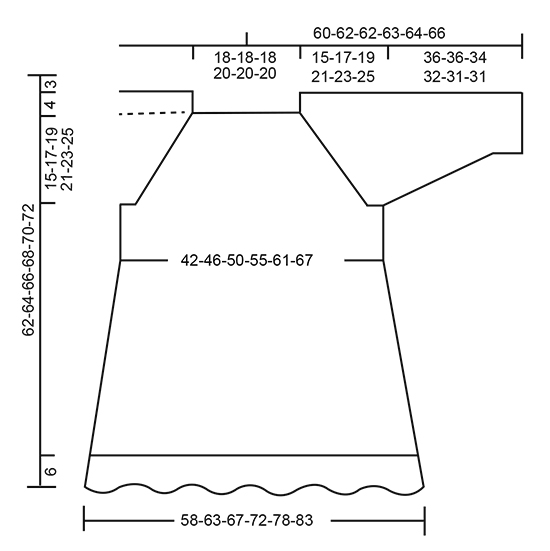
Liebes Drops- Team, ich verstehe nicht, das man beim Rumpfteil nach 40 cm Höhe für alle Größen die Arbeit schon teilen soll. Laut Diagramm sind es 62 cm? Über eine kurze Information würde ich ich freuen! Viele Grüße! Dagmar Thiel
25.01.2019 - 17:53DROPS Design answered:
Liebe Frau Thiel, in jede Grösse mist das Rumpfteil 40 cm, dann stricken Sie eine unterschiedliche Höhe für die Passe, z.B. in der 1. Grösse: 40 cm Rumpfteil + 22 cm Passe vom Schulter = 62 cm Gesamthöhe vom Schulter bis unteren Rand. Viel Spaß beim stricken!
28.01.2019 - 08:47
![]() DENIS wrote:
DENIS wrote:
Bonjour, J'ai un problème avec l'échantillon. Comme je tricote serré j'ai utilisé les aiguilles n° 4 pour le faire. J'obtiens le bon nombre de rangs mais j'ai 2 mailles en trop. Si je prends du 4,5, j'aurai trop de rangs. Avez vous une astuce ? Merci de votre réponse. Cordialement Laurence
26.09.2017 - 13:29DROPS Design answered:
Bonjour Laurence, vous pouvez dans un premier temps laver et faire sécher votre échantillon pour vérifier les mesures après lavage, puis ajuster la taille des aiguilles en conséquence. Si vous obtenez la bonne largeur mais pas la bonne hauteur, vous pouvez ajuster la hauteur du raglan en conséquence (par exemple s'il c'est toujours trop serré, tricotez des rangs supplémentaires à intervalles réguliers entre les rangs de diminutions du raglan), vous pourrez ainsi recalculer le nombre de rangs supplémentaire à faire pour vous permettre d'avoir les bonnes mesures. Bon tricot!
26.09.2017 - 14:59
|
|||||||||||||||||||
Spring Rain#springrainsweater |
|||||||||||||||||||
|
|
|||||||||||||||||||
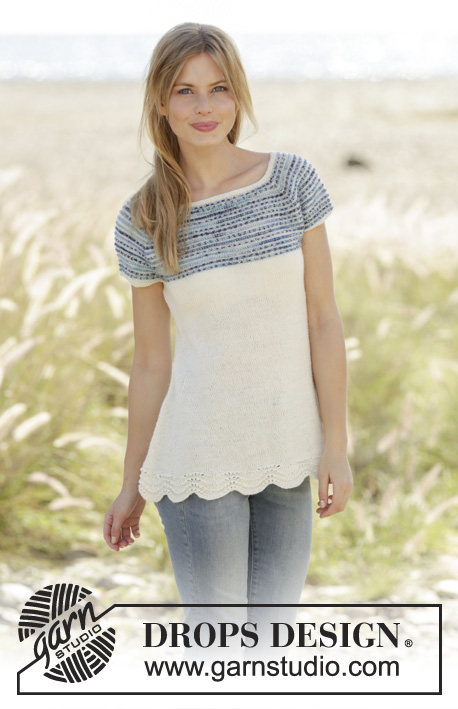
Knitted jumper with edge in wave pattern, ¾-length sleeves, raglan and stripes on yoke in DROPS Fabel. Sizes S - XXXL.
DROPS 177-25 |
|||||||||||||||||||
|
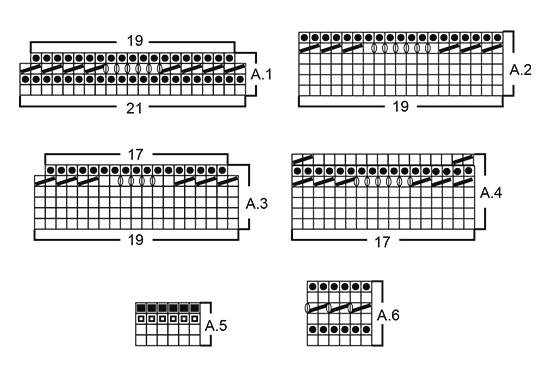
PATTERN: See diagrams A.1 to A.6. DECREASE TIP-1 (for sides of body): Start 12 stitches before the marker thread, knit 2 together, knit 20 (the marker thread sits in the middle of these 20 stitches), slip 1 stitch as if to knit, knit 1, pass the slipped stitch over the knitted stitch (= 2 stitches decreased). DECREASE TIP-2: To work out how to decrease evenly, count the total number of stitches on needle (e.g. 144 stitches) and divide by the number of decreases to be made (e.g. 18) = 8. In this example, knit every 7th and 8th stitch together. INCREASE TIP (for mid under the sleeves): Start 1 stitch before the marker thread, make 1 yarn over, knit 2 (the marker thread sits between these 2 stitches), make 1 yarn over (= 2 stitches increased). On the next round, work the yarn overs twisted knit to prevent holes. RAGLAN: Decrease to raglan every transition between body and sleeves. Start 2 stitches before the marker thread, knit 2 together, marker thread, slip 1 stitch as if to knit, knit 1, pass the slipped stitch over the knitted stitch (= 2 stitches decreased). --------------------------------------------------------- JUMPER: The body is worked in the round with circular needle from the bottom up. The sleeves are worked in the round with double pointed needles. BODY: Loosely cast on 399-420-462-483-525-567 stitches with circular needle size 3 mm and off white. Work A.1 around (= 19-20-22-23-25-27 repeats of 21 stitches). When A.1 has been completed 1 time in height there are 361-380-418-437-475-513 stitches on the needle. Work A.2 around (= 19-20-22-23-25-27 repeats of 19 stitches). When A.2 has been completed 1 time in height work A.3 around (= 19-20-22-23-25-27 repeats of 19 stitches). When A.3 has been completed 1 time in height there are 323-340-374-391-425-459 stitches on the needle. Now work A.4 around, but on the last round of A.4 decrease 5-0-10-1-3-5 stitches evenly along the round in addition to the decreases in the diagram. After A.4, there are 280-300-320-344-372-400 stitches on the needle. Insert 1 marker thread at the beginning of the round and 1 marker thread after 140-150-160-172-186-200 stitches (= in the sides). Continue to work stocking stitch. REMEMBER THE KNITTING TENSION. When the piece measures 8 cm decrease 1 stitch on each side of both marker threads – READ DECREASE TIP-1 (= 4 stitches decreased). Decrease in this way every 1 cm in total 20 times in each side = 200-220-240-264-292-320 stitches. Continue working until the piece measures 40 cm in all sizes. The next round is worked as follows: Cast off 3-3-4-4-5-6 stitches for the armhole, work 94-104-112-124-136-148 stitches stocking stitch (= front piece), cast off 6-6-8-8-10-12 stitches for the armhole, work 94-104-112-124-136-148 stitches stocking stitch (= back piece) and cast off the remaining 3-3-4-4-5-6 stitches for the armhole. Lay the piece to one side and work the sleeves. SLEEVE: Cast on 60-62-64-68-70-72 stitches with double pointed needles size 2.5 mm and off white. Work A.6 around. Change to double pointed needles size 3 mm. Insert 1 marker thread at the beginning of the round (= mid under sleeve) and work stocking stitch. When the piece measures 6 cm in all sizes increase 2 stitches mid under the sleeve – READ INCREASE TIP. Increase in this way every 12th-8th-5th-5th-4th-4th round in total 8-12-16-16-18-19 times = 76-86-96-100-106-110 stitches. When the piece measures 36-36-34-32-31-31 cm (shorter measurements in the larger sizes due to longer yoke) cast off the middle 6-6-8-8-10-12 stitches mid under sleeve (3-3-4-4-5-6 stitches on each side of the marker thread) = 70-80-88-92-96-98 stitches on the needle. Lay the piece to one side and work another sleeve in the same way. YOKE: Place the sleeves on the same circular needle size 3 mm as the body where there are cast-off stitches for the armholes (do this without working the stitches) = 328-368-400-432-464-492 stitches on the needle. Insert 1 marker thread in each transition between body and sleeves = 4 marker threads. Work stripes around as shown in A.5. AT THE SAME TIME on the fifth round of A.5 (i.e. a round of knit) decrease to RAGLAN – see description above (= 8 stitches decreased). Decrease in this way every 4th round in total 5-5-5-7-7-8 times, then every 2nd round in total 18-22-26-26-30-32 times = 144-152-152-168-168-172 stitches on the needle. After the last decrease to raglan, work 1 round knit. Change to short circular needle size 2.5 mm and off white and knit 1 round where you decrease 18-26-26-32-32-36 stitches evenly along the round – READ DECREASE TIP-2 = 126-126-126-136-136-136 stitches. Purl 1 round, knit 1 round and purl 1 round. Then loosely cast off in knit. ASSEMBLY: Sew the openings under the sleeves. |
|||||||||||||||||||
Diagram explanations |
|||||||||||||||||||
|
|||||||||||||||||||
 |
|||||||||||||||||||
 |
|||||||||||||||||||
Have you finished this pattern?Tag your pictures with #dropspattern #springrainsweater or submit them to the #dropsfan gallery. Do you need help with this pattern?You'll find 29 tutorial videos, a Comments/Questions area and more by visiting the pattern on garnstudio.com. © 1982-2026 DROPS Design A/S. We reserve all rights. This document, including all its sub-sections, has copyrights. Read more about what you can do with our patterns at the bottom of each pattern on our site. |
|||||||||||||||||||


With over 40 years in knitting and crochet design, DROPS Design offers one of the most extensive collections of free patterns on the internet - translated to 17 languages. As of today we count 324 catalogues and 12290 patterns translated into English (UK/cm).
We work hard to bring you the best knitting and crochet have to offer, inspiration and advice as well as great quality yarns at incredible prices! Would you like to use our patterns for other than personal use? You can read what you are allowed to do in the Copyright text at the bottom of all our patterns. Happy crafting!
Post a comment to pattern DROPS 177-25
We would love to hear what you have to say about this pattern!
If you want to leave a question, please make sure you select the correct category in the form below, to speed up the answering process. Required fields are marked *.