
Popular categories
Looking for a yarn?


Comments / Questions (27)
![]() Gunilla wrote:
Gunilla wrote:
Jag vill sticka tröjan i slätstickning. Vad bör jag tänka på? Det står under "raglan" att omslagsmaskan stickas avig på "nästa varv". Stickar jag då bara denna rät???
30.03.2026 - 08:59DROPS Design answered:
Hej Gunilla, ja da strikker du bare den i ret :)
09.04.2026 - 11:13
![]() Charlotte wrote:
Charlotte wrote:
Wie Teresa schon vor einigen Jahren, stolpere auch ich über die Angabe"Die Arbeit hat eine Gesamt länge von ca 22-24-... ab der Schulter (19-21-... ab dem Anschlagrand)." Wie kann die Länge ab Anschlagrand kürzer sein?
17.05.2020 - 23:06DROPS Design answered:
Liebe Charlotte, wegen Schulter wird die Arbeit länger wenn sie flach liegt als wenn sie von der Anschlagskante gemessen wird - siehe auch Maßskizze. Viel Spaß beim stricken!
18.05.2020 - 08:43
![]() Birgitta Lööf wrote:
Birgitta Lööf wrote:
Hej! I rubriken står det att oket är med avigsidan ut. På bilden ser det också ut som att ok och ”kropp” är olika struktur. Men det står att allt ska var rätstickning - det ser inte randigt ur på det sätt som rätstickning brukar se ut. Förstår inte riktigt...? Är möjligen bild och mönster inte överensstämmande vad gäller detta? Ser ut som avigstickat (eller rätstickat) ok och slätstickad kropp. Tacksam för svar :-)
28.04.2020 - 00:46DROPS Design answered:
Hej Birgitta, Jo du börjar oket med 6 v rätstickning, sedan stickas det med avigsidan ut. Lycka till :)
28.04.2020 - 15:20
![]() Laura Kruus wrote:
Laura Kruus wrote:
Voisiko tähän malliin tehdä niskaan korotuksen?
13.01.2019 - 06:15
![]() Francien wrote:
Francien wrote:
Beste Drops, Hartelijk dank voor het snelle antwoord! Klopt het dat dan deze zin in het patroon moet worden aangepast: ‘Ga verder met lichtgrijs en rondbreinld 4,5 mm en brei 1 nld av en meerder 20-20-24-22-22-24 st gelijkmatig‘ ipv av moet daar dan recht staan toch?
01.01.2019 - 19:29DROPS Design answered:
Dag Francien,
Dat klopt inderdaad, ik zal het doorgeven aan de ontwerpafdeling, maar het kan zijn dat dit effect bij het ontwerp hoort.
01.01.2019 - 19:40
![]() Fran wrote:
Fran wrote:
Beste Drops, Bedankt voor het antwoord, ik begrijp het. Ik snap in het eerste stukje nog niet hoe de ribbels in grijs netjes overlopen in lichtgrijs. Als ik namelijk de eerste pen na de ribbels in av doe, krijg je een lelijke kleurwisseling omdat de helft van de ribbel grijs is en de andere helft lichtgrijs. Dat zie ik niet op de afbeelding. Is het de bedoeling eerst nog een naald recht te doen om dit te voorkomen? Zo ja, in welke naald moet dan gemeerderd worden? Alvast dank.
30.12.2018 - 13:06DROPS Design answered:
Dag Fran,
De eerste pen na de ribbels en dus de eerste pen in medium grijs, brei je recht, op die manier krijg je een mooie overgang.
01.01.2019 - 19:07Evelyn wrote:
Thank you for your reply. I can understand that part but after the first round (body) increase of sleeve and body, I get 128+12 stitches for size M, is that correct?
21.12.2018 - 09:39DROPS Design answered:
Dear Evelyn, the increase for raglan are then different on body and on sleeves, on body you increase 1 stitch at the beg of front/back piece + 1 st at the end of front/back piece 12 times every 2nd round + 6 times every 4th round while on sleeve you will increase 2 sts at the beg of sleeve + 2 sts at the end of sleeve 4 times every 2nd round then only 1 st at the beg + end of sleeve 16 times every 2nd round then 2 times every 4th round. ie when inc on body (2 sts) and sleeves (4 sts) you should have 12 more sts after 1st inc round. Happy knitting!
21.12.2018 - 13:26Evelyn wrote:
Hi, for the first round of increase for the body and sleeves, how many stitches in total have been added? I am a bit confused as I am a new knitter. Many thanks
21.12.2018 - 05:39DROPS Design answered:
Dear Evelyn, jumper is worked top down from neck. Choose your size and follow the indications to this size (ex. 1st size = 1st number, 2nd size = 2nd number and so on). So that after the ridges on yoke you will inc 20 sts in size S and M, 24 sts in size L and XXXL and 22 sts in size XL and XXL. Happy knitting!
21.12.2018 - 08:10
![]() Francien wrote:
Francien wrote:
Beste Drops, In de benodigdheden staat rondbreinaald én gewone naald zonder knop, zijn deze beide nodig of is het ook mogelijk alles op de rondbreinaald te doen? Ik zie in het patroon nog niet zo duidelijk waarvoor de gewone naald gebruikt wordt. Alvast hartelijk dank.
16.12.2018 - 19:47DROPS Design answered:
Dag Francien,
De naalden zonder knop worden gebruikt voor de mouw, maar als daar handig in bent kun je ook de magic loop gebruiken, zodat je alleen rondbreinaalden nodig hebt. Zie deze video
17.12.2018 - 22:43
![]() Martine Lavoie wrote:
Martine Lavoie wrote:
Bonjour, Je suis bloqué quand on augmente tous les 4 rangs et que nous continuons à faire des jours tous les 2 tours sans augmenter. Je ne sais pas comment le faire .. Pouvez-vous me donner plus d\'explication car j\'ai encore des tours au 2 tours pour les manches. Merci de me répondre.
04.07.2018 - 19:21DROPS Design answered:
Bonjour Mme Lavoie, les augmentations du raglan se font à un rythme différent sur le dos/le devant et sur les manches, ainsi vous allez augmenter soit 8 mailles (= 2 m sur chaque manche, 2 sur le devant et 2 sur le dos) ou seulement 4 mailles (2 m par manche ou 2 m sur le dos + 2 m sur le devant). Pour les tours sans augmentations, augmentez comme indiqué sous "RAGLAN": Quand on augmente tous les 4 rangs... Bon tricot!
05.07.2018 - 07:33
|
||||
Stonehenge#stonehengesweater |
||||
|
|
||||
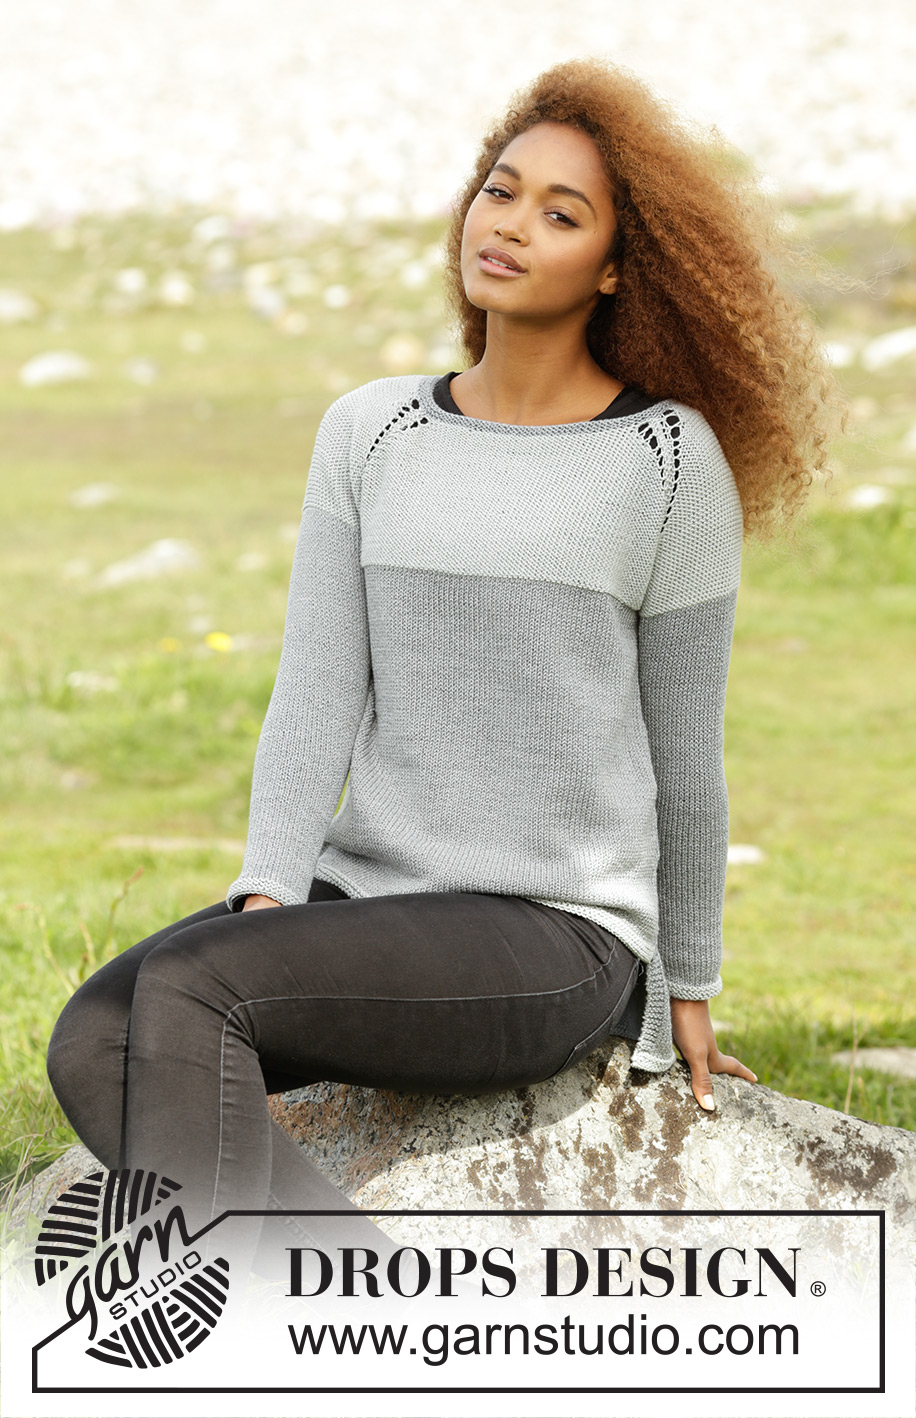
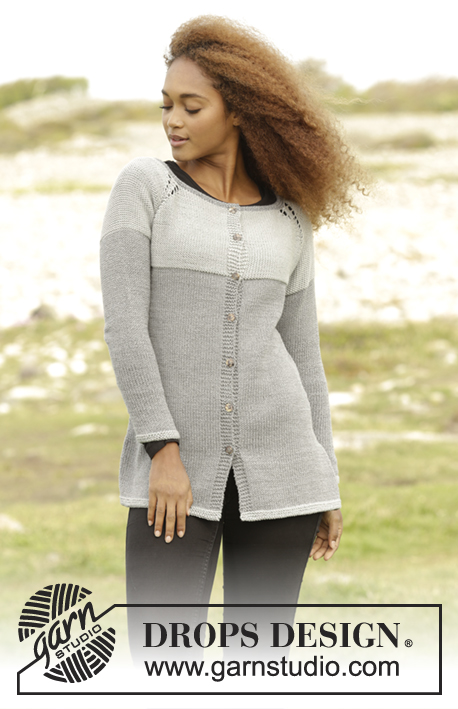
Knitted DROPS jumper with vents, raglan and yoke with wrong side out, worked top down in ”Cotton Merino”. Size: S - XXXL.
DROPS 172-40 |
||||
|
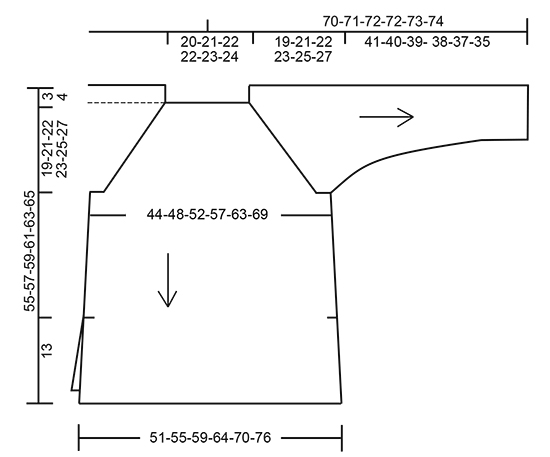
GARTER ST (worked in the round): 1 ridge = 2 rounds. * K 1 round and P 1 round *, repeat from *-*. GARTER ST (back and forth): K all rows. 1 ridge = 2 rows K. RAGLAN: NOTE: P all YOs on next round to make holes. Inc 1 st after/before marker as follows: After marker: P 1, 1 YO (= 1 st inc). Before marker: Beg 1 st before marker, 1 YO (= 1 st inc), P 1. Inc 2 st after/before marker as follows: After marker: P 1, 1 YO (= 1 st inc), P 2 in next st (= 1 st inc) Before marker: Beg 2 st before marker, P 2 in next st (= 1 st inc), 1 YO, (= 1 st inc), P 1. When inc every 4th row, still work holes on every other round but work holes without inc, i.e. work as follows: After marker: P 1, 1 YO, slip 1 st as if to P, P 1, psso Before marker: Beg 3 st before marker, P 2 tog, 1 YO, P 1. INCREASE TIP (applies to inc in the sides of body): Beg 1 sts before marker, 1 YO, K 2 (marker is in the middle of these 2 sts), 1 YO (= 2 sts inc). On next round K YOs twisted to avoid holes. DECREASE TIP: Dec mid under sleeve as follows: Beg 3 sts before marker and K 2 tog, K 2 (marker is between these 2 sts), slip 1 st as if to K, K 1, psso (= 2 sts dec). ---------------------------------------------------------- JUMPER: Worked in the round, top down. First work P, then work in stocking st. YOKE: Cast on 104-108-112-118-122-128 sts on circular needle size 3.5 mm with medium grey. Work 3 ridges in GARTER ST - see explanation above. Switch to light grey and circular needle size 4.5 mm and P 1 round while inc 20-20-24-22-22-24 sts evenly = 124-128-136-140-144-152 sts. On next round P and insert 4 markers in the piece as follows: Insert 1 marker at beg of round, work 50-52-56-54-56-60 sts (= back piece), insert next marker, work the next 12-12-12-16-16-16 sts, insert next marker (= sleeve), work the next 50-52-56-54-56-60 sts (= front piece), insert last marker, work the remaining 12-12-12-16-16-16 sts (= sleeve). Continue with P. READ ALL OF THE FOLLOWING SECTION BEFORE CONTINUING! On next round beg inc for raglan. NOTE: Inc differently on sleeves and body - READ RAGLAN. Inc as follows: BODY: Inc 1 st after/before marker every other round 8-12-12-23-28-32 times in total, then inc 1 st after/before marker every 4th round 7-6-7-2-1-0 times in total. SLEEVES: Inc 2 sts after/before marker every other round 2-4-5-4-2-1 times in total. Then inc 1 st after/before marker every other round 16-16-17-19-24-27 times in total and 1 st after/before marker every 4th round 2 times in total in all sizes. AT THE SAME TIME when piece measures 19-21-21-22-23-23 cm (from cast-on edge), switch to medium grey and continue in stocking st - NOTE: The 2 sts in the raglan (1 st on each side of each marker) continues i P, K the rest of sts (and YO). REMEMBER THE KNITTING TENSION After all inc are done there are 272-304-328-356-380-404 sts on needle. Piece measures approx. 22-24-25-27-29-31 cm from shoulder (19-21-22-23-25-27 cm from cast-on edge). Now work as follows: Work the first 80-88-94-104-114-124 sts (= back piece), slip the next 56-64-70-74-76-78 sts on a stitch holder (= sleeve), cast on 8-8-10-10-12-14 sts under sleeve (insert a marker in the middle of these new sts), work the next 80-88-94-104-114-124 sts (= front piece), slip the next 56-64-70-74-76-78 sts on a stitch holder (= sleeve), cast on 8-8-10-10-12-14 sts under sleeve (insert a marker in the middle of these new sts). NOW MEASURE PIECE FROM HERE! BODY: = 176-192-208-228-252-276 sts. Work in stocking st in the round. When piece measures 2 cm in all sizes, inc in each side - READ INCREASE TIP (= 4 sts inc). Repeat inc every 2½-2½-3-3-3-3½ cm a total of 7 times in all sizes = 204-220-236-256-280-304 sts. When piece measures 20-20-21-21-21-21 cm, work as follows: Work the first 102-110-118-128-140-152 sts (= back piece) and slip them on a stitch holder, work the remaining 102-110-118-128-140-152 sts (= front piece). FRONT PIECE: = 102-110-118-128-140-152 sts. Now work back and forth on circular needle. Work next row as follows from WS: 5 sts in GARTER ST - see explanation above, stocking st until 5 sts remain, work 5 sts in garter st. Continue to work like this until piece measures 31-31-32-32-32-32 cm. Switch to light grey and circular needle size 3.5 mm, work 3 ridges, cast off. Piece measures 55-57-59-61-63-65 cm in total from shoulder. BACK PIECE: = 102-110-118-128-140-152 sts. Work as front piece. SLEEVE: Worked in the round. Slip sts from stitch holder back on circular needle/ double pointed needles size 4.5 mm and cast in addition on 8-8-10-10-12-14 new sts under sleeve = 64-72-80-84-88-92 sts. Insert 1 marker in the middle of the new sts under sleeve – NOW MEASURE PIECE FROM HERE. Worked in stocking st in the round on circular needle/double pointed needles. When piece measures 2 cm, dec 1 st on each side of marker - READ DECREASE TIP. Repeat dec every 2½-2-1½-1½-1½-1 cm 13-16-19-20-21-22 times in total = 38-40-42-44-46-48 sts. When piece measures 39-38-37-36-35-33 cm (NOTE: Short measurements in the larger sizes because of longer yoke), switch to light grey and double pointed needle size 3.5 mm, work 3 ridges and cast off. Work the other sleeve the same way. ASSEMBLY: Sew the openings under the sleeves. |
||||
Diagram explanations |
||||
|
||||
 |
||||
Have you finished this pattern?Tag your pictures with #dropspattern #stonehengesweater or submit them to the #dropsfan gallery. Do you need help with this pattern?You'll find 26 tutorial videos, a Comments/Questions area and more by visiting the pattern on garnstudio.com. © 1982-2026 DROPS Design A/S. We reserve all rights. This document, including all its sub-sections, has copyrights. Read more about what you can do with our patterns at the bottom of each pattern on our site. |
||||


With over 40 years in knitting and crochet design, DROPS Design offers one of the most extensive collections of free patterns on the internet - translated to 17 languages. As of today we count 324 catalogues and 12290 patterns translated into English (UK/cm).
We work hard to bring you the best knitting and crochet have to offer, inspiration and advice as well as great quality yarns at incredible prices! Would you like to use our patterns for other than personal use? You can read what you are allowed to do in the Copyright text at the bottom of all our patterns. Happy crafting!
Post a comment to pattern DROPS 172-40
We would love to hear what you have to say about this pattern!
If you want to leave a question, please make sure you select the correct category in the form below, to speed up the answering process. Required fields are marked *.