
Popular categories
Looking for a yarn?


Comments / Questions (30)
![]() Lorena wrote:
Lorena wrote:
Ho un dubbio quando dice che si deve aumentare per il raglan ad ogni giro cosa faccio un giro faccio la gettata e il giro dopo lavoro la maglia gettata oppure devo lavorare la maglia gettata e fare contemporaneamente un’altra gettata ? E quando è ogni 2 giri? Grazie
12.07.2021 - 00:30DROPS Design answered:
Buonasera Lorena, quando si aumenta su tutti i giri deve lavorare come indicato su tutti i giri. Ogni 2 giri si intende 1 giro si e 1 no. Buon lavoro!
14.07.2021 - 18:20
![]() Christine wrote:
Christine wrote:
I also am confused after placing markers. I do not see instructions as to how many times to increase every round and how many times to increase every other rounds for the raglan.
23.01.2021 - 19:06DROPS Design answered:
Dear Christine, you then increase for raglan as explained under RAGLAN at the very beginning of the pattern. You will incrase with/without yarn overs and on a different rythm on body and sleeve. Happy knitting!
25.01.2021 - 08:55
![]() Janner wrote:
Janner wrote:
Size XL yoke has 106 stitches, first row with markers has 104 stitches (22 +22+8+22+22+8). What happened to the other 2 stitches?
17.01.2021 - 02:16DROPS Design answered:
Dear Janner, your 2 missing stitches look to be the one on mid back and mid front, so that you have: 22 + 1 + 22 + 8 + 22 + 1 + 22 + 8 = 106 sts. Happy knitting!
18.01.2021 - 09:22
![]() Stacy wrote:
Stacy wrote:
I'm still working on the yoke, and the every row increases have made it way more full than it would need to lay flat if spread out and if I fold in in half and lay it down like it will be when it's worn, the shoulders are sticking up from the neck at a 45 degree angle. Is this as it should be, or am I ending up with too much fullness?
07.04.2020 - 23:09DROPS Design answered:
Dear Stacy, this could be a good idea to show your work to your store - even sending them a picture per mail, so that you could be totally sure and this would be also much easier for them to help you. You can also ask other knitters in our DROPS Workshopo. Happy knitting!
09.04.2020 - 16:13
![]() Klein Clarisse wrote:
Klein Clarisse wrote:
Je suis assez débutante en tricot, j'ai déjà fait 2-3 pull selon les modèles drops mais là je ne comprends rien à vos explications. Comment commence-t-on ce tricot ? Combien de mailles faut-il monter ? Sur le schéma habituellement vous indiquez le sens du tricot mais là rien n'est indiqué. Merci d'avance pour votre aide...
13.10.2019 - 13:09DROPS Design answered:
Bonjour Mme Klein, ce pull se tricote de haut en bas en commençant par le col; on va monter 62-66-70-74-78-82 m (cf taille), tricoter 2 côtes mousse puis augmenter à 86-90-98-106-110-118 m. On va ensuite augmenter pour le raglan des manches et en même temps au milieu devant et au milieu dos - cf RAGLAN (attention les augmentations sur le dos/le devant et celles des manches ne se font pas en même temps en fonction de la taille). Bon tricot!
14.10.2019 - 10:24
![]() Hadass wrote:
Hadass wrote:
What is the yardage/meterage needed for size M
13.11.2017 - 21:22DROPS Design answered:
Dear Hadass, you will find total amount of yarn required in size M under tab "Materials", you can calculate the yardage for this size with the help of the informations in the shadecard and get some further assistance from your DROPS store in your country. Happy knitting!
14.11.2017 - 09:12
![]() Jen wrote:
Jen wrote:
I am having trouble understanding the Raglan increase instructions after placing the markers. Pattern says inc for Raglan see explanation above but that is explaining increases not the actual rows.
21.11.2016 - 02:49DROPS Design answered:
Dear Jen, the inc for raglan will be different on body and on sleeve, on body you will inc on each side of 2nd and 5th marker (mid front + mid back every round then every other round (see your size for the number of times), and for sleeves you will inc after 3rd/6th marker + before 4th/1st marker every round/other round/4th round. Happy knitting!
21.11.2016 - 10:39Marta wrote:
Well, well - almost like the famous "Forbrydelsen/The Killing" sweater. Just several slight adjustments and it will be the same model. I'm gonna go for it, I think! :)
08.11.2016 - 13:45
![]() Hanne wrote:
Hanne wrote:
Jeg er nu igang med trøje nr. 2. Ang. Hulborten foran og bagpå, den bliver usymmetrisk, med større huller på venstre side, set som når man sidder og strikker på arbejdet. Kan det afhjælpes?
06.10.2016 - 12:39DROPS Design answered:
Hej Hanne. Nu tager du ud med 1 slaa om paa begge sider af midtfor/midtbag i samme pind og strikker dem ogsaa begge ret. Jeg kan ikke forstaa hvordan du saa faar större huller paa den ene side i forhold til den anden - andet at det har noget at göre med hvor stramt de strikkes. Jeg har desvaerre ikke nogen ideer paa det.
06.10.2016 - 14:25
![]() Hanne wrote:
Hanne wrote:
Skal man ikke skifte til et pindenummer mindre på den nederste kant af kroppen? Det står ikke nævnt? Men på ærmerne skal man skifte pind?
03.10.2016 - 11:59DROPS Design answered:
Hej Hanne. Nej, det tror jeg ikke. Jeg tror underkanten kan blive for stram hvis du skifter til en mindre p
03.10.2016 - 12:23
|
|
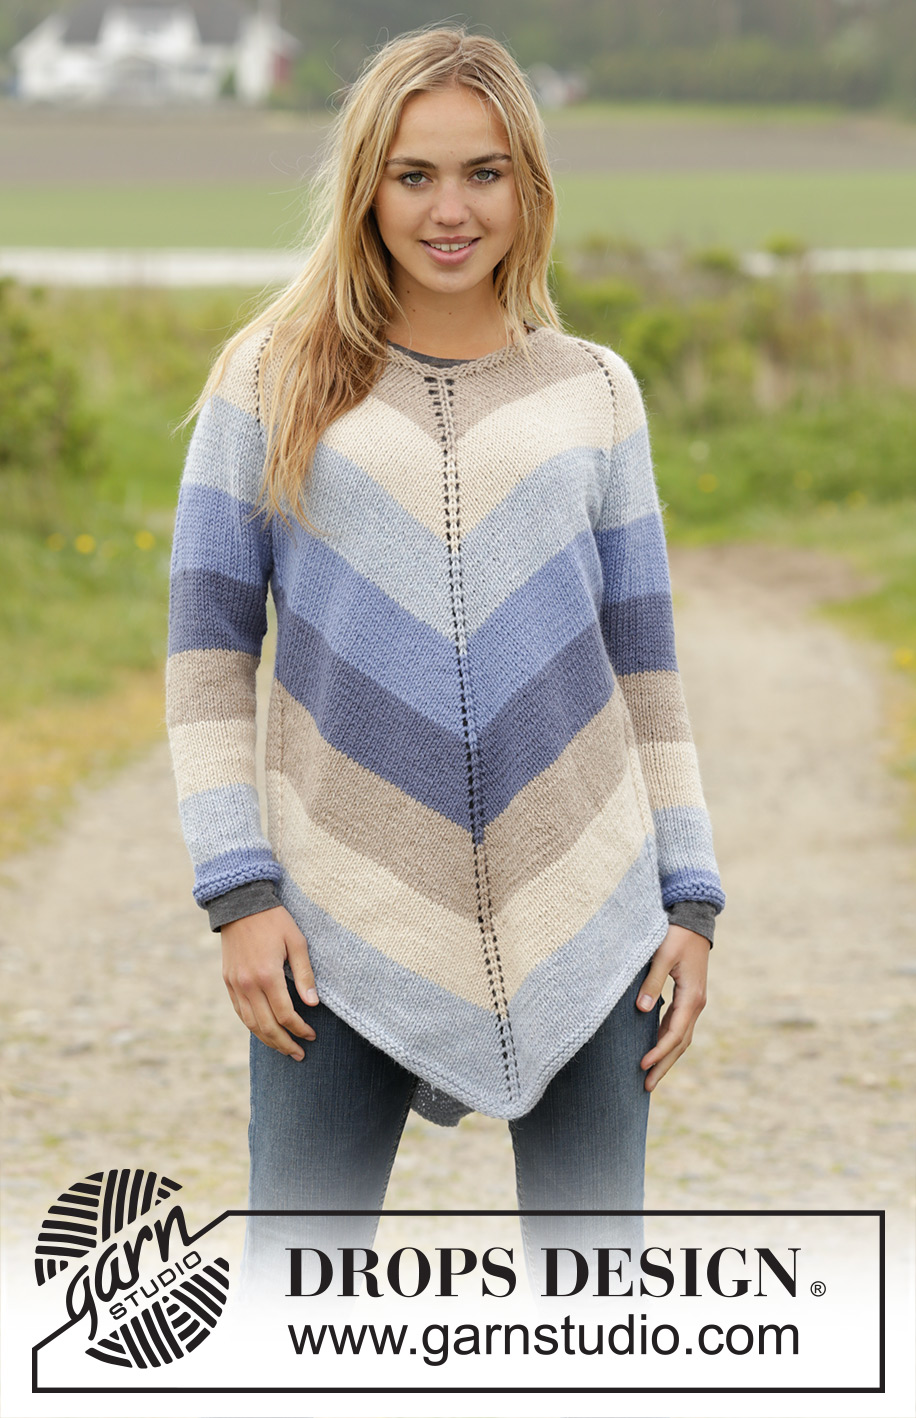
Ocean Stripes#oceanstripestunic |
|
|
|
|
Knitted DROPS tunic with raglan and stripes, worked top down in ”Nepal”. Size: S - XXXL.
DROPS 171-32 |
|
|
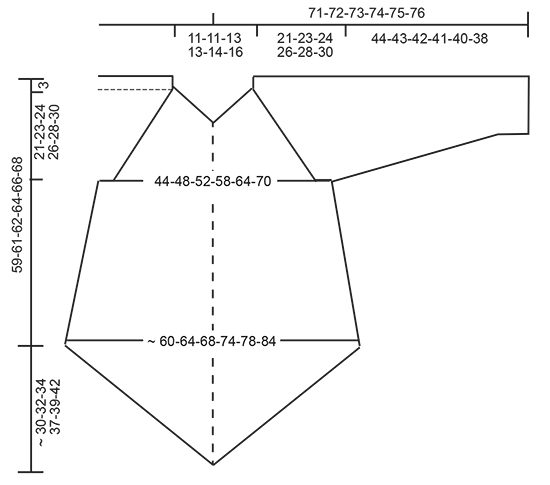
GARTER ST (worked in the round): 1 ridge = 2 rounds. * K 1 round and P 1 round *, repeat from *-*. STRIPES: STRIPE 1: Work 7 cm in stocking st with beige. STRIPE 2: Work 7 cm in stocking st with light beige. STRIPE 3: Work 7 cm in stocking st with fog. STRIPE 4: Work 7 cm in stocking st with medium blue. STRIPE 5: Work 7 cm in stocking st with denim blue. Repeat 1st to 5th stripe until finished measurements. RAGLAN: Inc differently on sleeves and body. Inc with YOs. When inc on every round, work YOs as follows: K every other YO twisted, i.e. K 1st YO (it should make a hole), K 2nd YO twisted (it should NOT make a hole). I.e. every other YO will make a hole and every other YO is worked twisted. When inc on every other round, K all YOs (they should make holes). BODY: Inc with 1 YO on each side of 2nd and 5th marker as follows: Inc every round 16-18-20-24-28-32 times in total. Inc on every other round a total of 11-12-12-12-12-12 times (= 27-30-32-36-40-44 times in total). SLEEVE: Inc with 1 YO after 3rd and 6th marker and before 4th and 1st marker as follows: Inc every round 0-0-2-2-0-0 times in total. Inc every other round 17-21-21-23-24-26 times in total. Inc on every 4th round a total of 1-0-0-0-1-1 time (= 18-21-23-25-25-27 times in total). DECREASE TIP: Dec as follows: Work until 3 sts remain before marker, K the next 2 sts tog (= 1 st dec), K 2 (marker is in the middle of these sts), slip 1 st as if to K, K 1, psso (= 1 st dec). CAST-OFF TIP: If cast-off edge is tight, cast off on a larger needle size. ---------------------------------------------------------- YOKE: Work in the round in STRIPES - see explanation above. Cast on 62-66-70-74-78-82 sts on circular needle size 5.5 mm with beige. Work 2 ridges in GARTER ST - see explanation above and inc 24-24-28-32-32-36 sts evenly on last round with K = 86-90-98-106-110-118 sts. Switch to circular needle size 6 mm. On next round insert 6 markers as follows (insert 2nd and 5th marker in st, insert the others in piece) as follows: Insert 1st marker at beg of round, work 17-18-20-22-23-25 sts, insert 2nd marker in next st (= mid back), work 17-18-20-22-23-25 sts (= back piece), insert 3rd marker, work 8 sts, insert 4th marker (= sleeve), work 17-18-20-22-23-25 sts, insert 5th marker in st (= mid front), work 17-18-20-22-23-25 sts (= front piece), insert 6th marker, work the last 8 sts (= sleeve). Inc for RAGLAN – see explanation above! REMEMBER THE KNITTING TENSION After raglan inc there are 44-50-54-58-58-62 sts on each of the sleeves and 89-97-105-117-127-139 sts on back piece and front piece (i.e. 44-48-52-58-63-69 sts on each side of st with marker) = 266-294-318-350-370-402 sts. Work next round as follows: Work 44-48-52-58-63-69 sts, 1 YO, work st with 2nd marker (= mid back), 1 YO, work 44-48-52-58-63-69 sts, slip the next 44-50-54-58-58-62 sts on a stitch holder for sleeve, cast on 6-6-8-8-10-10 sts under sleeve (insert 1 marker in the middle of the new sts), work 44-48-52-58-63-69 sts, 1 YO, work st with 5th marker (= mid front), 1 YO, work 44-48-52-58-63-69 sts, slip the next 44-50-54-58-58-62 sts on a stitch holder for sleeve, cast on 6-6-8-8-10-10 sts under sleeve (insert 1 marker in the middle of the new sts) = 194-210-230-254-278-302 sts on needle. BODY: Insert 1 marker in the piece. NOW MEASURE PIECE FROM HERE! ROUND 1: K all sts. ROUND 2 (round with YO and dec): Inc 1 YO on each side of st with marker mid front and mid back (= 4 sts inc) and dec 1 st on each side of marker under each of the sleeves – READ DECREASE TIP, (= 4 sts dec, i.e. no of sts is the same). ROUND 3: K all sts. ROUND 4 (round with YO and dec): Work as 2nd round. ROUND 5: K all sts. ROUND 6 (round with YO): Inc 1 YO on each side of st with marker mid front and mid back (= 4 sts inc). ROUND 7: K all sts. ROUND 8 (round with YO): As 6th round = 4 sts inc. Repeat 1st to 8th round until piece measures 35 cm from marker (or continue to desired length) = approx. 64-68-73-79-85-91 sts on each side of st with marker = approx. 258-274-294-318-342-366 sts in total. Work 2 ridges. Loosely cast off - READ CAST-OFF TIP. SLEEVE: = 44-50-54-58-58-62 sts. Work sleeve in stocking st with stripes as before. Slip sts from stitch holder back on double pointed needles size 6 mm and cast on 6-6-8-8-10-10 sts under sleeve = 50-56-62-66-68-72 sts. Insert 1 marker in the middle of the new sts under the sleeve. NOW MEASURE THE PIECE FROM HERE. When piece measures 3 cm, dec 1 st on each side of marker. Dec like this approx. every 4-3½-2½-2-2-2 cm 9-11-14-15-15-16 times in total = 32-34-34-36-38-40 sts. When sleeve measures 44-43-42-41-40-38 cm (NOTE: Shorter measurements in the larger sizes because of longer yoke), switch to double pointed needles size 5.5 mm. Work 2 ridges. Cast off. Work the other sleeve the same way. ASSEMBLY: Sew the opening under the sleeves. |
|
 |
|
Have you finished this pattern?Tag your pictures with #dropspattern #oceanstripestunic or submit them to the #dropsfan gallery. Do you need help with this pattern?You'll find 24 tutorial videos, a Comments/Questions area and more by visiting the pattern on garnstudio.com. © 1982-2026 DROPS Design A/S. We reserve all rights. This document, including all its sub-sections, has copyrights. Read more about what you can do with our patterns at the bottom of each pattern on our site. |


With over 40 years in knitting and crochet design, DROPS Design offers one of the most extensive collections of free patterns on the internet - translated to 17 languages. As of today we count 324 catalogues and 12290 patterns translated into English (UK/cm).
We work hard to bring you the best knitting and crochet have to offer, inspiration and advice as well as great quality yarns at incredible prices! Would you like to use our patterns for other than personal use? You can read what you are allowed to do in the Copyright text at the bottom of all our patterns. Happy crafting!
Post a comment to pattern DROPS 171-32
We would love to hear what you have to say about this pattern!
If you want to leave a question, please make sure you select the correct category in the form below, to speed up the answering process. Required fields are marked *.