
Popular categories
Looking for a yarn?


Comments / Questions (58)
![]() Corina wrote:
Corina wrote:
Ik ben heel blij met mijn zelf gebreide zomerjurk. 🫶🏻
18.02.2026 - 15:54
![]() Eva wrote:
Eva wrote:
Hej! Jag undrar hur mycket garn som går åt om man vill sticka denna tröja i en färg? /Eva
05.05.2025 - 16:05DROPS Design answered:
Hei Eva. Det har vi dessverre ikke oversikt over, men vil tippe ca 700-750-850-900-1000-1100 i de forskejllige størrelsene. mvh DROPS Design
12.05.2025 - 07:42
![]() Tanja wrote:
Tanja wrote:
Hej! Jag vill byta till ett mjukare, mindre sticksigt garn men jag hittar inget bra alternativ. Något tips?
27.01.2025 - 11:50DROPS Design answered:
Hej Tanja. Du kan sticka denna i ett annat garn i garngrupp B. De mjukaste garnen i den garngruppen är DROPS Daisy och DROPS Merino Extra Fine. Mvh DROPS Design
28.01.2025 - 08:20
![]() Tanja Giacomelli wrote:
Tanja Giacomelli wrote:
Hej! Jag vill byta till ett mjukare, mindre sticksigt garn men jag hittar inget bra alternativ. Något tips?
23.01.2025 - 09:42
![]() Virginie wrote:
Virginie wrote:
Merci beaucoup ;)
07.09.2024 - 11:19
![]() Virginie wrote:
Virginie wrote:
Bonjour, je souhaiterais tricoter cette robe sans jacquard. Combien de pelotes aurais-je besoin? Merci beaucoup ! Bien cordialement
27.08.2024 - 07:08DROPS Design answered:
Bonjour Virginie, comme cette robe a été tricotée en jacquard, nous avons seulement les quantités indiquées pour chaque couleur (et nous n'avons plus la robe), vous pouvez additionner les différentes couleurs entre elles, il vous en faudra probablement un peu moins, vous pouvez également vous inspirer d'un modèle similaire de même tension (cf ici pour trouver les robes de tension similaire). Bon tricot!
28.08.2024 - 07:43
![]() Isabelle Francesconi wrote:
Isabelle Francesconi wrote:
Bonjour, Merci beaucoup pour votre réponse. Et toutes mes excuses pour vous avoir dérangé avec mes questions. Car après plusieurs lectures, j'ai enfin compris comment tricoter ! Et c'est superbe ! Pour moi, il fallait lire et relire plusieurs fois les explications. Peut-être encore besoin de vous un peu plus tard :)) Merci beaucoup de votre aide, Bonne journée
01.12.2023 - 12:59
![]() Isabelle Francesconi wrote:
Isabelle Francesconi wrote:
Je ne sais pas commencer le jacquard. Suis en L. Si je fais correspondre ma maille avec le marqueur dans le dos avec le milieu du diagramme (avec la flèche) le jacquard ne suit pas. Tricoter 1 maille de chaque coté des fils marqueurs (ceux des raglans) veut dire augmenter 1 maille de chaque coté ? Je dois commencer le jacquard (là ou il y a la flèche) après combien de mailles en partant du milieu du dos ? Merci d'avance pour vos explications.
30.11.2023 - 17:44DROPS Design answered:
Bonjour Mme Francesconi, dans cette leçon, nous expliquons comment centrer un diagrammes vous allez procéder de la même façon de sorte que la maille avec le marqueur dans le dos, le devant et les manches doit être celle avec la flèche dans le diagramme (ainsi cette maille est au milieu dos/devant/manche); les 2 mailles des raglans (1 maille de chaque côté des fils marqueurs) se tricotent en jersey simplement (pas en jacquard) dans la couleur de fond. Bon tricot!
01.12.2023 - 08:22
![]() Isabelle Francesconi wrote:
Isabelle Francesconi wrote:
Je ne comprends pas très bien la ré-hausse. Il faut à chaque fois tourner, glisser la 1ere maille, serrer le fil, tricoter ? C’est bien cela ? Il faut également glisser à chaque fois la 1ere maille ? Aussi, on ne met pas plutôt le marqueur avant la 1ere maille plutôt que dans la maille ? ce n’est pas mieux de mettre ces marqueurs sur les aiguilles ? plus facile de les faire suivre… Merci beaucoup d’avance pour votre réponse. Isabelle
25.11.2023 - 15:34DROPS Design answered:
Bonjour Mme Francesconi, pour éviter les trous des rangs raccourcis, on va glisser la 1ère maille au début de chacun des rangs raccourcis, ainsi, en taille S, tricotez 10 mailles, tournez, glissez la 1ère maille et tricotez 19 mailles (soit 20 au total en comptant la maille glissée), et ainsi de suite. C'est la technique que l'on montre dans cette vidéo. Bon tricot!
27.11.2023 - 08:37
![]() Stacey Jefferies wrote:
Stacey Jefferies wrote:
When it says "238-262-290 sts. Work 1 round while adjusting the no of sts to 192-204-228-240-264-300", where do you increase the 2 stiches (138-140) wihtout adjusting the side or centre markers???
19.08.2023 - 16:18DROPS Design answered:
Dear Stacey, from here on out, the markers won't matter, since you will simply work the same over all stitches or increase evenly the whole round. So you can increase the stitches wherever you prefer, for example one on each side; it won't affect the pattern in any way. Happy knitting!
20.08.2023 - 17:34
|
|||||||||||||||||||||||||||||||
Highland Heather#highlandheatherdress |
|||||||||||||||||||||||||||||||
|
|
|||||||||||||||||||||||||||||||
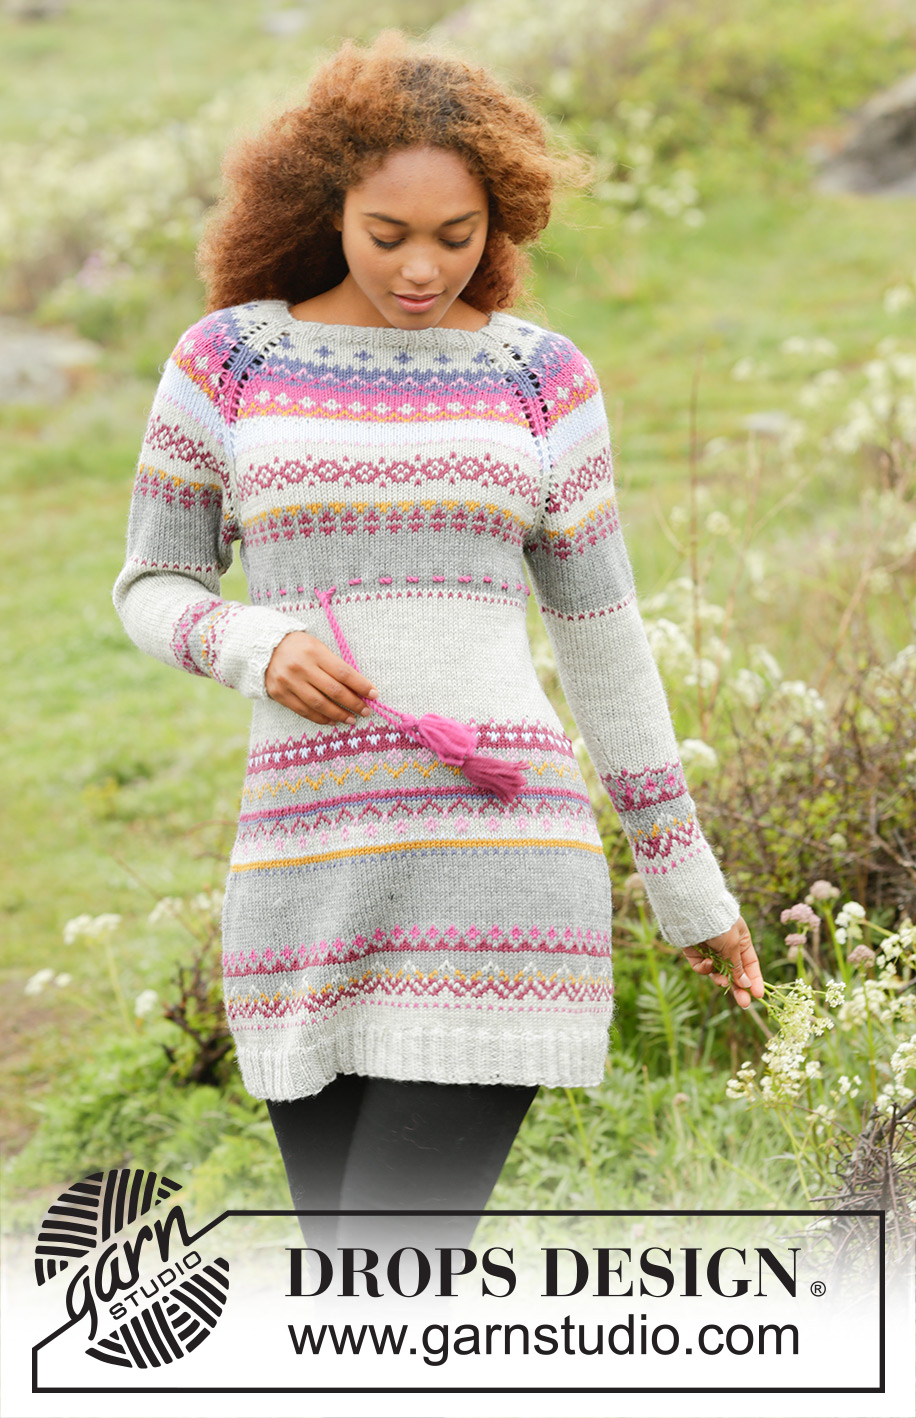
Knitted DROPS dress with multi-coloured pattern, raglan and twined string with tassels in waist, worked top down in ”Karisma”. Size: S - XXXL.
DROPS 172-5 |
|||||||||||||||||||||||||||||||
|
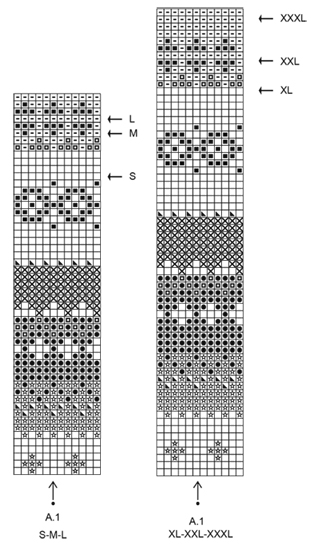
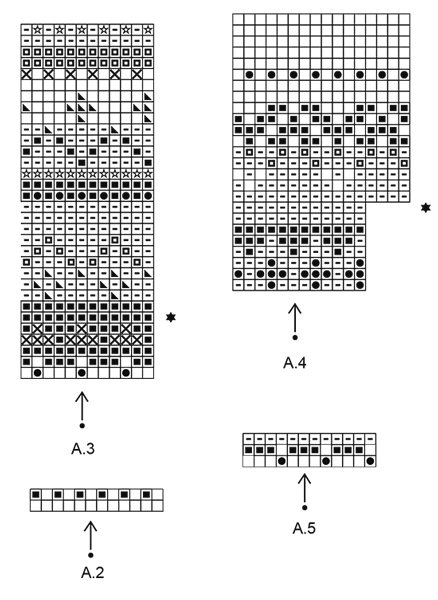
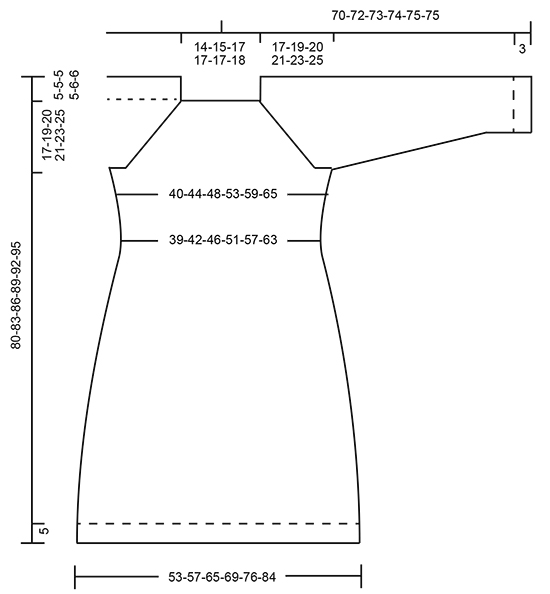
PATTERN: See diagrams A.1 to A.5 – see diagram for correct size. Work all sts in stocking st. PATTERN TIP: In size M, L and XL this round is a round in pattern with 2 colours. Cut the yarn if needed in pattern colour to avoid a long gap under sleeve. In size S, XXL and XXXL cast on on a round in base colour. RAGLAN: Inc 1 st on each side of marker thread as follows: Work until 1 st remains before marker thread, 1 YO, K 2 (marker thread is in the middle of these sts), 1 YO. On next round K the YOs to make holes. INCREASE TIP-1: Work until 2 st remains before marker in the side, 1 YO, K 4 (marker is in the middle of these sts), 1 YO. On next round K YOs twisted to avoid holes. INCREASE TIP-2: To calculate how often inc should be done, use the total no of sts on round (e.g. 192 sts) and divide by no of inc to be done (e.g. 12) = 16. I.e. in this example make a YO after approx. every 16th st worked. On next round work YO´s twisted to avoid holes. ELEVATION: Work an elevation in stocking st in the back of neck from mid back as follows: NOTE: On every turn in the middle of piece slip 1st st, tighten yarn and continue to work. Work 10-11-12-13-13-14 sts, turn, tighten yarn and work 20-22-24-26-26-28 sts. Turn, tighten yarn and work 35-38-41-44-44-47 sts, turn, tighten yarn and work 50-54-58-62-62-66 sts. Turn, tighten yarn and work 65-70-75-80-80-85 sts, turn, tighten yarn and work 80-86-92-98-98-104 sts. Turn and work until mid back. DECREASE TIP: Work until 4 sts remain before marker, K 2 tog, K 4 (marker is in the middle of these sts), slip 1 st as if to K, K 1, psso. CAST-OFF TIP: To avoid a tight cast-off edge you may use a needle ½ size larger. ---------------------------------------------------------- DRESS: Worked in the round, top down. Rounds start mid back. YOKE: Cast on 110-115-130-135-145-150 sts on circular needle size 3.5 mm with light pearl grey. Work rib = K 2/P 3 for 6 rounds. Then work 1 round in stocking st while inc 2-5-10-17-19-26 sts evenly = 112-120-140-152-164-176 sts. Switch to circular needle size 4 mm. Insert 1 marker in the first st = mid back (let this marker follow in piece. Then work ELEVATION - see explanation above - in the neck. REMEMBER THE KNITTING TENSION! Continue in stocking st, on first round insert 4 marker threads and 3 markers more (= 4) in the piece as follows: Work the first 18-19-21-24-27-30 sts (= half back piece), insert a marker thread, work the next 11-12-15-15-15-15 sts, insert a marker in the last st on right needle (= mid st on sleeve), work the next 10-11-14-14-14-14 sts (= sleeve), insert a marker thread, work the next 18-19-21-24-27-30 sts, insert a marker in the last st on right needle (= mid st on front piece), work the next 17-18-20-23-26-29 sts (= front piece), insert a marker thread, work the next 11-12-15-15-15-15 sts, insert a marker in the last st on right needle (= mid st on sleeve), work the next 10-11-14-14-14-14 sts (= sleeve), insert a marker thread, work the last 17-18-20-23-26-29 sts (= half back piece). READ ALL OF THE FOLLOWING SECTION BEFORE CONTINUING! Now work PATTERN according to diagram A.1. NOTE: St with marker on back piece, front piece and sleeves should fit st with arrow in diagram. Count out towards the side (i.e. the pattern will not fit in transitions between body and sleeves). Work st on each side of marker thread (i.e. in each raglan) in base colour in pattern. AT THE SAME TIME on first round inc for RAGLAN - see explanation above, in every transition between body and sleeves (= 8 sts inc on round). Inc like this every other round 21-24-25-27-29-32 times in total = 280-312-340-368-396-432 sts. NOTE: Work the new sts in pattern. When all inc are done, piece measures 22-24-25-26-29-31 cm from shoulder and last round worked is marked with arrow in A.1. Now continue next round in pattern as follows: Work the first 39-43-46-51-56-62 sts (= half back piece), cast on 8-8-10-10-12-14 new sts under sleeve with base colour in pattern – READ PATTERN TIP, put the next 63-71-79-83-87-93 sts on a stitch holder (= sleeve), work the next 77-85-91-101-111-123 sts (= front piece), cast on 8-8-10-10-12-14 new sts under sleeve in base colour in pattern, put the next 63-71-79-83-87-93 sts on a stitch holder (= sleeve), work the remaining 38-42-45-50-55-61 sts on round (= half back piece). BODY: There are now 170-186-202-222-246-274 sts for body. Insert a marker thread in each side, in the middle of the 8-8-10-10-12-14 new sts that were cast on under sleeves. NOW MEASURE PIECE FROM HERE. Continue with the remaining rounds in A.1. NOTE: The pattern will not fit in each side. Then continue with medium grey. When piece measures 4 cm, dec 1 st on each side of marker threads - READ DECREASE TIP (= 4 sts dec). Dec like this every 4th round 2 times in total = 162-178-194-214-238-266 sts. When piece measures 7 cm, work a round with eyelet holes as follows: K 1, * K 2, K 2 tog, 1 YO *, repeat from *-* until 1 sts remain, K 1. Work 2 more rounds in medium grey. Now work pattern A.2 (= 2 rounds). Then work with light pearl grey until piece measures 20 cm in all sizes, AT THE SAME TIME inc 1 st on each side of marker threads in each side – READ INCREASE TIP-1. Inc like this every 5th-5th-5th-4th-4th-4th round 6 times in total = 186-202-218-238-262-290 sts. Work 1 round while adjusting the no of sts to 192-204-228-240-264-300. Work A.3 (= 12 sts) 16-17-19-20-22-25 times on round. On 6th round in A.3 inc 12-12-24-24-24-24 sts evenly – READ INCREASE TIP-2 = 204-216-252-264-288-324 sts. When A.3 has been worked vertically, continue with medium grey. On first round with medium grey inc 12 sts evenly in all sizes = 216-228-264-276-300-336 sts. When piece measures 39-40-42-43-43-44 cm, work A.4 (= 12 sts) 18-19-22-23-25-28 times on round. On 8th round in diagram inc 8-12-8-12-20-16 sts evenly = 224-240-272-288-320-352 sts. When A.4 has been worked, switch to circular needle size 3.5 mm. Work 1 round with light pearl grey while inc 31-45-48-47-55-63 sts evenly = 255-285-320-335-375-415 sts. Work rib = K 2/P 3 for 5 cm. Cast off with K over K and P over P - READ CAST-OFF TIP. Piece measures 80-83-86-89-92-95 cm in total from shoulder. SLEEVE: Worked in the round on double pointed needles. Slip sts from stitch holder back on double pointed needles size 4 mm and pick up 1 st in each of the 8-8-10-10-12-14 sts under sleeve = 71-79-89-93-99-107 sts. Insert 1 marker thread between the new sts under sleeve (= beg of round), and keep the marker in mid st on top of sleeve. NOW MEASURE PIECE FROM HERE! Continue with pattern as on body, i.e. the remaining rounds in A.1 - st with marker in mid on top of sleeve should fit st with arrow in diagram, the pattern will not fit mid under sleeve. When A.1 is done continue with medium grey and A.2 as on body. NOTE! Do not work eyelet row on sleeve, then continue with light pearl grey, AT THE SAME TIME when piece measures 4 cm, dec 1 st on each side of marker thread under sleeve. Dec like this every 8th-6th-5th-5th-4th-3rd round 13-16-20-21-23-26 times in total = 45-47-49-51-53-55 sts. AT THE SAME TIME when sleeve measures 30-29-28-28-27-25 cm (NOTE: Shorter measurements in the larger sizes because of longer yoke) - work A.5 – st with marker mid on top of sleeve should fit st with arrow in diagram. When A.5 has been worked, continue with A.4 over A.5. NOTE: Do not inc on round with star. When A.4 has been worked, continue with light pearl grey until finished measurements. When piece measures 43-42-41-41-40-38 cm, switch to double pointed needles size 3.5 mm. Work 1 round while AT THE SAME TIME inc 5-3-6-4-7-5 sts evenly = 50-50-55-55-60-60 sts. Work rib = K 2/P 3 for 3 cm. Cast off sts with K over K and P over P. Work the other sleeve the same way. TWINED STRING WITH TASSELS: Cut 3 lengths of 3 metres each with cerise. Twine the strands tog until they resist, fold them double so that they twine again. Make a knot at each end. Thread tie up and down through eyelet row in waist. Make a tassel in each end as follows: Cut 12 strands with cerise of 16 cm, thread them through knot at the end of string. Twine a strand around the top of tassel several times and tie this string to keep the tassel tog. Make another tassel in the other end of string with dark old rose. |
|||||||||||||||||||||||||||||||
Diagram explanations |
|||||||||||||||||||||||||||||||
|
|||||||||||||||||||||||||||||||
 |
|||||||||||||||||||||||||||||||
 |
|||||||||||||||||||||||||||||||
 |
|||||||||||||||||||||||||||||||
Have you finished this pattern?Tag your pictures with #dropspattern #highlandheatherdress or submit them to the #dropsfan gallery. Do you need help with this pattern?You'll find 33 tutorial videos, a Comments/Questions area and more by visiting the pattern on garnstudio.com. © 1982-2026 DROPS Design A/S. We reserve all rights. This document, including all its sub-sections, has copyrights. Read more about what you can do with our patterns at the bottom of each pattern on our site. |
|||||||||||||||||||||||||||||||


With over 40 years in knitting and crochet design, DROPS Design offers one of the most extensive collections of free patterns on the internet - translated to 17 languages. As of today we count 325 catalogues and 12291 patterns translated into English (UK/cm).
We work hard to bring you the best knitting and crochet have to offer, inspiration and advice as well as great quality yarns at incredible prices! Would you like to use our patterns for other than personal use? You can read what you are allowed to do in the Copyright text at the bottom of all our patterns. Happy crafting!
Post a comment to pattern DROPS 172-5
We would love to hear what you have to say about this pattern!
If you want to leave a question, please make sure you select the correct category in the form below, to speed up the answering process. Required fields are marked *.