
Popular categories
Looking for a yarn?


Comments / Questions (47)
![]() Nemtanu Anisoara wrote:
Nemtanu Anisoara wrote:
Si puo tradure in italiano?
09.03.2026 - 15:27
![]() Sabine wrote:
Sabine wrote:
Wer das Tuch auch in Big Merino (Garngruppe C) stricken möchte: meines wiegt 349 gr, ich habe 144 gr für den Zopf und 205 gr für den Hauptteil des Schals benötigt. Viel Spaß, es lohnt sich! :-)
28.09.2025 - 15:41
![]() Sabine wrote:
Sabine wrote:
Ein wunderschönes Tuch, das ich, um es etwas dünner zu haben, mit Drops Big Merino (Garngruppe C) gestrickt habe mit einer 6,5er Nadel und zweifarbig, so dass sich der Zopfrand noch mehr hervorhebt. Bei einer Länge von 85cm habe ich, damit sich die Spitze des Tuchs bei dieser dünneren Wolle nicht einrollt 5 verkürzte Reihen gestrickt (statt 3). Beim nächsten Mal stricke ich es wieder mit Garngruppe C mit einer 7 - 8er Nadel und mit 16 Maschen für den Zopf - freue mich schon!
28.09.2025 - 15:25
![]() Carol Maitland wrote:
Carol Maitland wrote:
Hi I was just answered my question by the Drops Team but my question was not really answered.I understand the increase in the first row,it’s the 4 row increase I do not understand.Where do I do this increase on the 4th row and where do I do the decrease on the 4th row, Thks again Carol.
12.09.2025 - 14:16DROPS Design answered:
Dear Carol, you have one 4-row increase section explained in the pattern. In this section, in ROW 1 you increase 1 stitch, by working 2 stitches in the first stitch after the marker. Then you work ROWS 2-4 with knit and A.1. Now you repeat these 4 rows, increasing always in the ROW 1 repeat, in the stitch right after the marker. That is, you increase not in ROW 4 but in every 4th row (out of rows 1-4 you increase in one of them, row 1). The decreases follow the same format, where you decrease 2 stitches after the marker every time that you repeat ROW 1 of the decreases. Happy knitting!
15.09.2025 - 01:39
![]() Carol Maitland wrote:
Carol Maitland wrote:
Hi I sent a question yesterday,about where to add the extra stitch in the 4 th row.Has not been answered.
10.09.2025 - 18:01DROPS Design answered:
Dear Carol, please see our answer above. Happy knitting!
15.09.2025 - 01:40
![]() Carol Maitland wrote:
Carol Maitland wrote:
Hi itsays on the shawl to increase every 4th row,where do I do this and when I decrease where do I do that. Thks Carol.c
09.09.2025 - 21:05DROPS Design answered:
Hi Carol, After the first 14 rows, you work 4 new rows which are then repeated onwards increasing 1 stitch in the first stitch after the marker-thread on the first of these 4 rows. The decreases begin after the short rows, and again 1 stitch is decreased straight after the marker-thread on the first of the 4 rows which are repeated onwards. Regards, Drops Team.
12.09.2025 - 11:03
![]() Carol Maitland wrote:
Carol Maitland wrote:
Then it says repeat 1st to 4th row,so every 4th row I add a stitch,where at the beginning. sorry my keyboard keys were stuck,thks Carol Maitland
15.08.2025 - 19:56DROPS Design answered:
Dear Mrs Maitland, work as previously explained under rows 1-4: you will increase 1 stitch just after A.1 on first row = you will increase 1 stitch on every 4th row. Happy knitting!
18.08.2025 - 08:15
![]() Carol Maitland wrote:
Carol Maitland wrote:
Hi I currently working on this pattern,have some questions. Row 2 on second part says knit until marker then A1 over the next 12 stitches,does this mean I purl them because the pattern says to purl from the wrong side. Row 3,is this the cable row.so I put 6 cable stitches at back and knit the next 6 then do the cable stitches,but have noticed that the beginning of my working yarn is at the cable end.Do I carry it at the back before knitting the 6 stitches on the cable needle.
15.08.2025 - 19:52DROPS Design answered:
Dear Mrs Maitland, from wrong side you will purl the stitches of A.1, on 3rd row start diagram - see in this video how to work this diagram and how to work the cable at the beginning of the row. Happy knitting!
18.08.2025 - 08:13
![]() Renate Huber wrote:
Renate Huber wrote:
Sehr schön gefällt mir ausgezeichnet
03.09.2024 - 15:54
![]() Monique wrote:
Monique wrote:
Une fois le produit fini, avec la même laine et j'ai obtenu un châle beaucoup trop long par rapport à sa largeur. Il faut peut être faire des augmentations plus rapides pour avoir un châle plus large.
09.03.2023 - 09:08
|
|||||||
Winter Cozy#wintercozyset |
|||||||
 |
 |
||||||
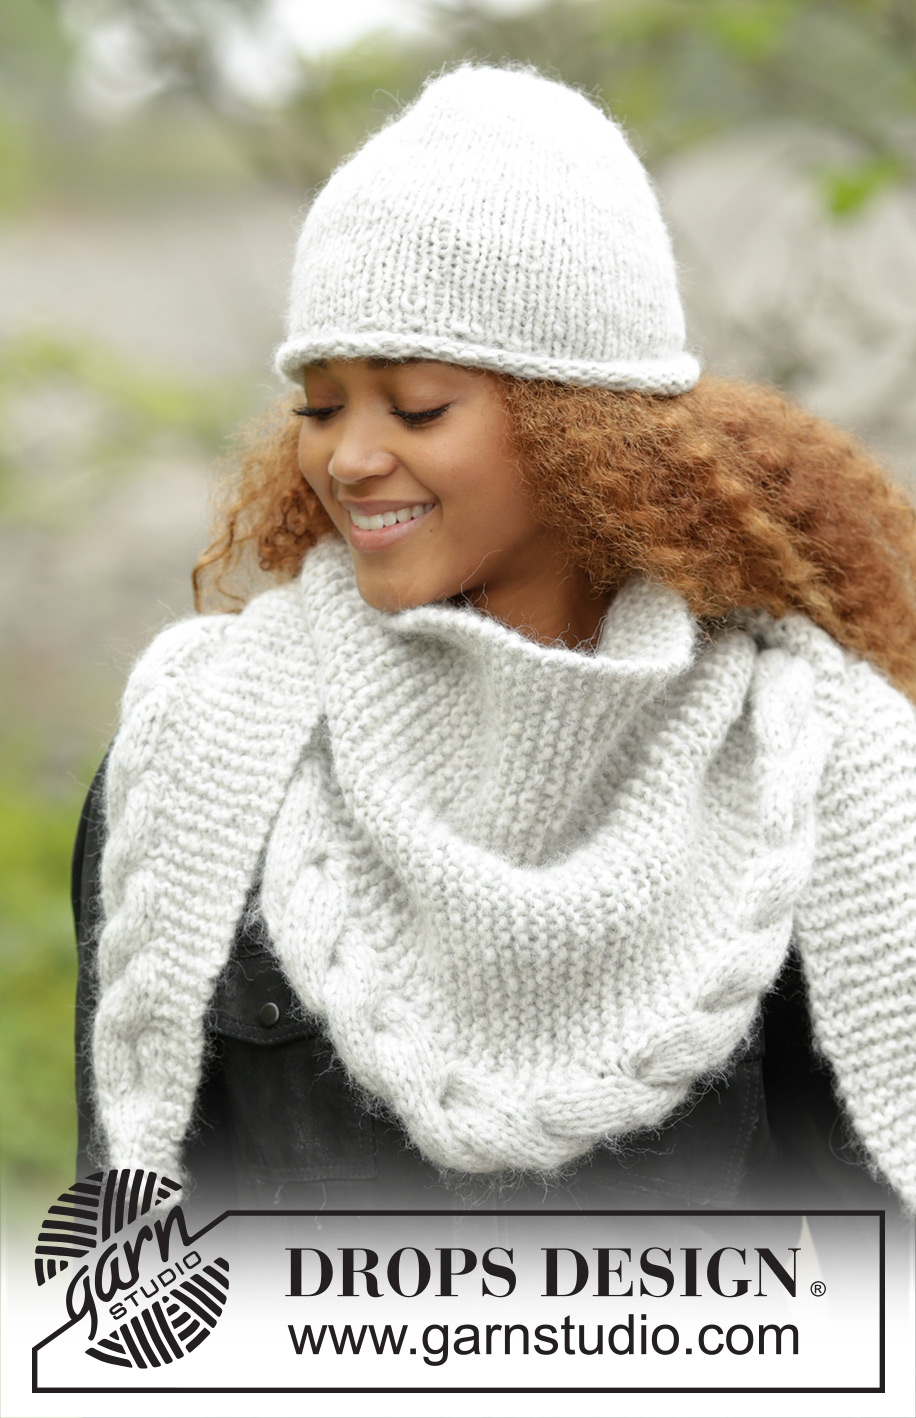
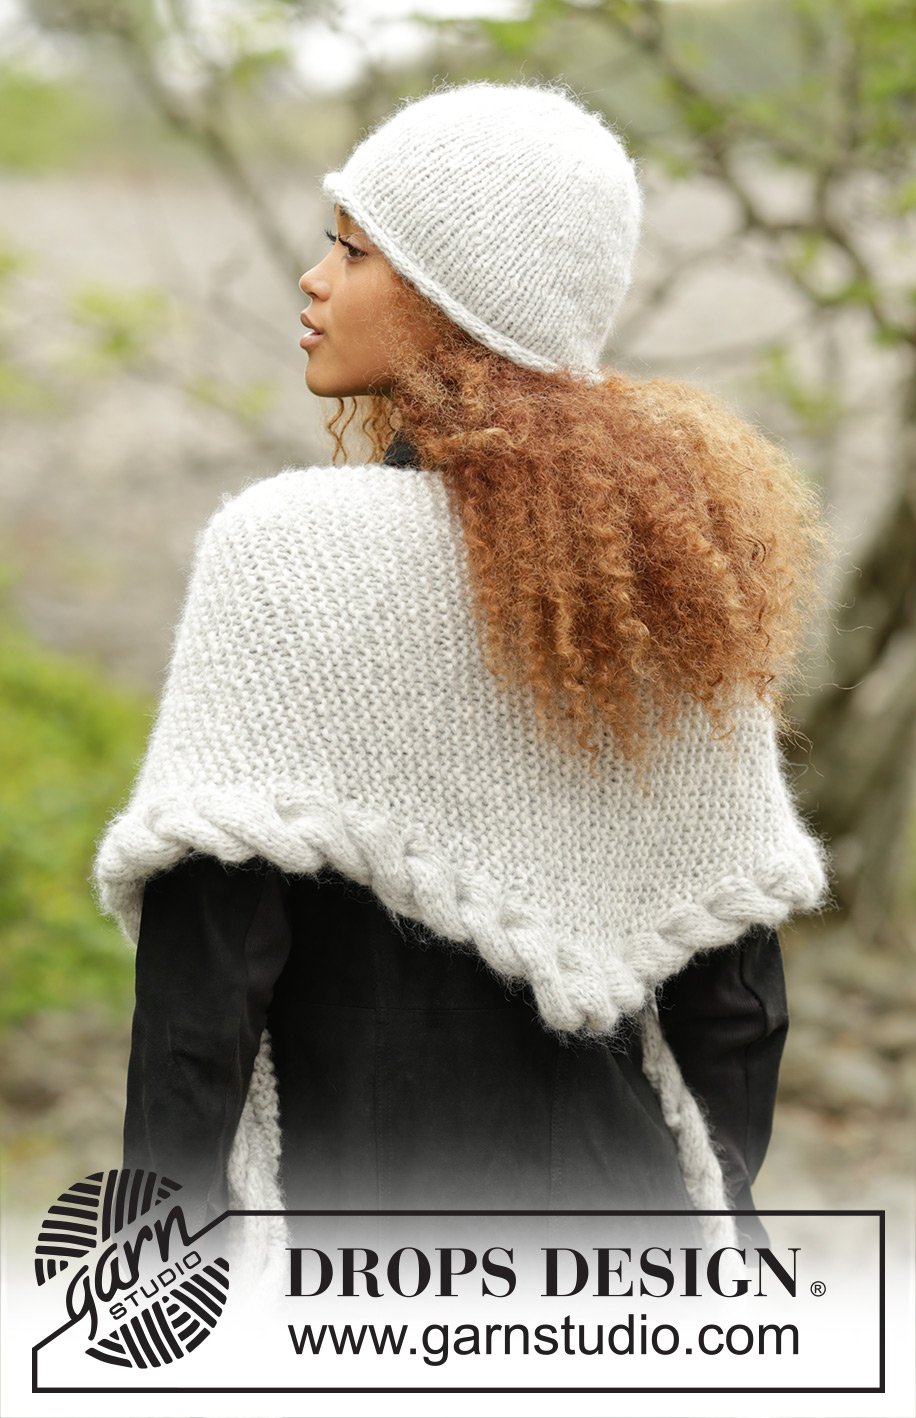
Set consists of: Knitted DROPS hat in “Cloud” or "Air" and shawl worked from side to side in garter st with cable edge in “Cloud” or "Air".
DROPS 172-10 |
|||||||
|
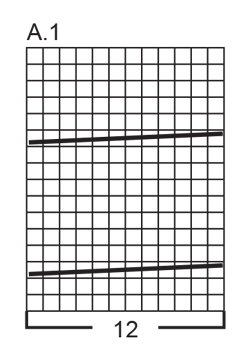
HAT: DECREASE TIP: Slip 1 st as if to K, K 1, psso. ---------------------------------------------------------- HAT: Cast on 56-60 sts on circular needle size 7 mm with Cloud or 2 threads Air. Work 4 rounds in stocking st (= rolling edge). Work next round as follows: * K 1, P 1 *, repeat from *-* the entire round. Work 1 more round with K over K and P over P. Then continue in stocking st until finished measurements. REMEMBER THE KNITTING TENSION When piece measures 21-22 cm, insert 8-10 markers in the piece, 7-6 sts apart. On next round dec 1 st after every marker - SEE DECREASE TIP (= 8-10 sts dec). Dec like this every other round a total of 3 times, then every round a total of 2 times. On next round K all sts twisted tog two by two = 8-5 sts on needle. Cut the yarn and pull it through the remaining sts, tighten tog and fasten. Piece measures approx. 26-27 cm from top and down (incl rolling edge). ---------------------------------------------------------- SHAWL: KNITTING TIP: Work shawl in garter st with a cable edge along bottom edge. Work this cable edge of the outermost 12 sts. Do not work any edge st on the cable (i.e. work outermost st in A.1 as a normal st in stocking st from both RS and WS), otherwise the cable will not roll and get the correct bounce. PATTERN: See diagram A.1. The diagrams show all rows in pattern seen from RS. MEASURING TIP: Measure shawl along the straight edge without inc/dec. ---------------------------------------------------------- SHAWL: Worked from side to side. Cast on 3 sts on circular needle size 8 mm with Cloud or 2 threads Air and work as follows: ROW 1 (= RS): K all sts. ROW 2 (= WS): K 2, K 1 in front and behind in next st = 4 sts on row. ROW 3 (= RS): K 1, 1 YO, K 3 = 5 sts. ROW 4 (= WS): K 3, P YO twisted, P 1. ROW 5 (= RS):K 2, 1 YO, K 3 = 6 sts. ROW 6 (= WS): K 3, P YO twisted, P 2. ROW 7 (= RS):K 3, 1 YO, K 3 = 7 sts. ROW 8 (= WS):K 3, P YO twisted, P 3. ROW 9 (= RS): K 4, 1 YO, K 3 = 8 sts. ROW 10 (= WS): K 3, P YO twisted, P 4. ROW 11 (= RS): K 5, 1 YO, K 3 = 9 sts. ROW 12 (= WS): K 3, P YO twisted, P 5. ROW 13 (= RS): K 1 in front and behind in each of the first 6 sts, insert 1 marker, K 3 = 15 sts. ROW 14 (= WS): K 3, marker, P 12. Continue to work and inc as follows - READ KNITTING TIP AND REMEMBER THE KNITTING TENSION. ROW 1 (= RS): Work pattern according to diagram A.1 over the first 12 sts, work 2 sts in first st after marker and K the rest of row (= 1 st inc). ROW 2 (= WS): K until marker and A.1 over the last 12 sts. ROW 3 (= RS): A.1 over the first 12 sts, marker, K the rest of row. ROW 4 (= WS): K until marker and A.1 over the last 12 sts. Repeat 1st- 4th row (i.e. inc 1 st every 4th row) until there are 56 sts on row. Piece now measures approx. 81 cm - READ MEASURING TIP. Now work short rows to avoid a tight cable over the tip as follows: * Work 2 rows back and forth over the 12 sts in A.1, work 2 rows back and forth over all sts on row as before but do not inc *, repeat from *-* 3 times in total, then work 2 rows back and forth over the 12 sts A.1 again. Then work and dec as follows: ROW 1 (= RS): Work pattern according to diagram A.1 over the first 12 sts, K the 2 first sts after marker tog and K the rest of row (= 1 st dec). ROW 2 (= WS): K until marker and A.1 over the last 12 sts. ROW 3 (= RS): A.1 over the first 12 sts, marker, K the rest of row. ROW 4 (= WS): K until marker and A.1 over the last 12 sts. Repeat 1st- 4th row (i.e. dec 1 st every 4th row) until 15 sts remain on row (piece now measures approx. 159 cm). Then work as follows: ROW 1 (= RS): K all sts in A.1 tog tog 2 by 2, marker, K 3 = 9 sts remain on needle. ROW 2 (= WS): K 3, P 6. ROW 3 (= RS): K 4, K 2 tog, K 3 = 8 sts. ROW 4 (= WS): K 3, P 5. ROW 5 (= RS):K 3, K 2 tog, K 3 = 7 sts. ROW 6 (= WS): K 3, P 4. ROW 7 (= RS):K 2, K 2 tog, K 3 = 6 sts. ROW 8 (= WS):K 3, P 3. ROW 9 (= RS): K 1, K 2 tog, K 3 = 5 sts. ROW 10 (= WS): K 3, P 2. ROW 11 (= RS): K 2 tog, K 3 = 4 sts. ROW 12 (= WS): K 4. ROW 13 (= RS): K 2 tog, K 2. ROW 14 (= WS): Cast off with K. |
|||||||
Diagram explanations |
|||||||
|
|||||||
 |
|||||||
Have you finished this pattern?Tag your pictures with #dropspattern #wintercozyset or submit them to the #dropsfan gallery. Do you need help with this pattern?You'll find 25 tutorial videos, a Comments/Questions area and more by visiting the pattern on garnstudio.com. © 1982-2026 DROPS Design A/S. We reserve all rights. This document, including all its sub-sections, has copyrights. Read more about what you can do with our patterns at the bottom of each pattern on our site. |
|||||||


With over 40 years in knitting and crochet design, DROPS Design offers one of the most extensive collections of free patterns on the internet - translated to 17 languages. As of today we count 324 catalogues and 12290 patterns translated into English (UK/cm).
We work hard to bring you the best knitting and crochet have to offer, inspiration and advice as well as great quality yarns at incredible prices! Would you like to use our patterns for other than personal use? You can read what you are allowed to do in the Copyright text at the bottom of all our patterns. Happy crafting!
Post a comment to pattern DROPS 172-10
We would love to hear what you have to say about this pattern!
If you want to leave a question, please make sure you select the correct category in the form below, to speed up the answering process. Required fields are marked *.