
Popular categories
Looking for a yarn?


Comments / Questions (86)
![]() Hanneke wrote:
Hanneke wrote:
Wat betekent 1 stk om l/l-lus
21.03.2019 - 14:57DROPS Design answered:
Dag Hanneke,
Hiermee wordt bedoeld dat je de haaknaald om de lossenlus steekt en niet in de steek.
21.03.2019 - 16:28
![]() Lydia Philippo wrote:
Lydia Philippo wrote:
Hoi hoi. Na de bloem haak je 9 losse klopt dat? Want eronder kom ik op totaal 7. Van rechts naar links. Eerst 4 vaste dan 9 losse. Onder de bloem heb je totaal 4 losse en 3 vaste is 7 totaal. Groetjes lydia. P.s Die vest is geweldig mooi ga ik maken
12.03.2019 - 13:51DROPS Design answered:
Dag Lydia,
Bij A.1 haak je dan inderdaad eerst 4 vasten en dan A.1 en overgang naar A.2, 9 lossen, warna je weer een vaste maakt bovenop de 'bloem'.
12.03.2019 - 15:09
![]() Jill wrote:
Jill wrote:
Please help me with the ffg questions what does work 1 dc in each 4 whole ch-spaces (i.e. ch-spaces with 2 ch), work 1 dc in next dc means? work 24 dc evenly over the next 10 ch-spaces?work 1 dc in the next dc and 1 dc around next chain space? does it mean that the back part has 3 parts also?
08.08.2018 - 15:36DROPS Design answered:
Dear Jill, you continue working the next 4 whole ch-spaces as before and work trebles at the beg of row, after the 4 whole ch-spaces, 24-26 tr (see size) over the next 10-11 ch-spaces ... ie you will work this row with trebles and ch-spaces (as in diagram A.5/A.7). Happy crocheting!
03.09.2018 - 14:42Joan Co wrote:
Help I'm stuck in right front piece. after i finish the 4th row on A.4. what will i do next? it say (rep 2nd and 3rd row in A.5 and A.6 vertically) does it mean i will not work on A.4 for 2 rows? then rep 3rs and 4th row in diagram A.4 (does it mean i wil not work on A.5 and A.6 for 3rows?
07.08.2018 - 15:20DROPS Design answered:
Dear Mrs Co, while working A.4 to the 4th row including, you repeat row 2 and 3 in A.5 and A.6. Then repeat row 3 and 4 in A.4 and at the same time continue working A.5 and A.6 repeating row 2 and 3. Happy crocheting!
07.08.2018 - 15:50Joan Co wrote:
Hi i would like to know if after the 2" base before going to start the diagram A1 - A3 shoud i have 166 dc row? then start the row 2 of diagram? i do that and i end up having around 21 (A2 repeats) on row 3 of the diagram.
04.08.2018 - 00:16DROPS Design answered:
Dear Joan, if you are making size S, then yes, you should end up with a row of 166 dc. Then as you crochet the second row of the patterns you do pattern A.1 (= 8)+ Pattern A.2 (19x8= 152), + A.3 (=7) that is all together 167 stitches (including th on to turn with. Happy Crocheting!
04.08.2018 - 23:35
![]() Nina Schmidt wrote:
Nina Schmidt wrote:
Ich scheitere leider schon an der ersten Reihe... \"dann je 1 Stb in die nächsten 3-5-3-1-1-5 Lm, Ich lese es so: Stäcbchen nach 3 LM, dann Stäbchen nach 5 LM, nach 3 LM .... das wird bei mir aber eher \"kringelig\" danach folgen ja dann die 6 Stäbchen, eine LM auslassen... dieser 3-5-3-1-1-5 taucht für mich nirgendwo mehr auf, lese ich da was falsch?
20.06.2018 - 11:41DROPS Design answered:
Liebe Frau Schmidt, diese 3-5-3-1-1-5 Maschen sind je für die Größe, dh je nach der Größe werden Sie 1 Stb in die nächsten 3 Lm (= in S und L), in die nächsten 5 Lm (M und XXXL) und in die nächste (= 1) Lm (in XL und XXL). Beim Lm überspringen wird der erste Reihe nicht zu eng. Viel Spaß beim häkeln!
20.06.2018 - 11:59Nadine wrote:
Hi, I am confused about 2nd part of pattern: (after decreases), “ then work pattern from 2nd row in A 1,2,&3 as before (but work 16 repetitions of A2). Does this mean instead of working 8, I work 16 stitches? Also, do I work A3 continuously with A1&2 or at the end of row? Thank you in advance for your help😀
09.06.2018 - 04:04DROPS Design answered:
Dear Nadine, before decreasing you had to repeat A.2 a total of 19 times, but now you have decreased 32 sts and there are enough sts to work 16 repeats of A.2 (= 8 sts a total of 16 times in width). From RS work: A.1, repeat A.2 and finish with A.3 and from WS work: A.3, repeat A.2 and finish with A.1, always read diagram from the bottom corner on the right side towards the left from RS and from the left towards the right from WS. Happy crocheting!
11.06.2018 - 08:41
![]() Miss Holliman wrote:
Miss Holliman wrote:
I am having issue with the vest area; last row of diagram a.1 to a.3 dec 32 dc evenly in all sizes: am I decreasing at the beginning, middle or end of row? Or am I reading this incorrectly?
28.05.2018 - 22:46DROPS Design answered:
Dear Miss Holliman, to "decrease/increase evenly in a row" means that you place the dereases/increases along the row evenly spaced. To do this, take the number of stitches you have in the row (for example 60) and divide it by the bumber of stitches you have to decrease (for this example let's say 10) = 6 So in this example you have to decrease every sixth stitch, Use the numbers you have on your own piece. Happy Crafting!
29.05.2018 - 07:20
![]() Gisela wrote:
Gisela wrote:
Hej. Jag virkar en i storlek L allså 225 maskor. Nu är jag på detta På sista v i diag A.1 till A.3 minskas det 32 st jämnt fördelat i alla stl - LÄS MINSKNTIPS = 135-143-159-175-199-215 st. Ska jag minska 32 st? Och ska det bli 159?? 225-159= då blir minskningen 66. Hur ska jag göra?
29.04.2018 - 16:25DROPS Design answered:
Hej, i stl L har du 190 maskor och då du minskar 32 maskor så blir det 159 maskor kvar.
30.04.2018 - 17:21
![]() Aafke Van Der Veer wrote:
Aafke Van Der Veer wrote:
Wat een prachtig en leuk patroon! Heerlijk met die duidelijke video's erbij, wat een uitvinding! Ik beleef hier zoveel plezier aan! Eerst ga ik wat uitproberen met restgaren en daarna ga ik met de prachtige Drops aan de slag. Hartelijk dank en vriendelijke groet, Aafke
26.03.2018 - 12:37
|
|||||||||||||||||||||||||||||||||||||
Summer Bliss Vest#summerblissvestvest |
|||||||||||||||||||||||||||||||||||||
 |
 |
||||||||||||||||||||||||||||||||||||
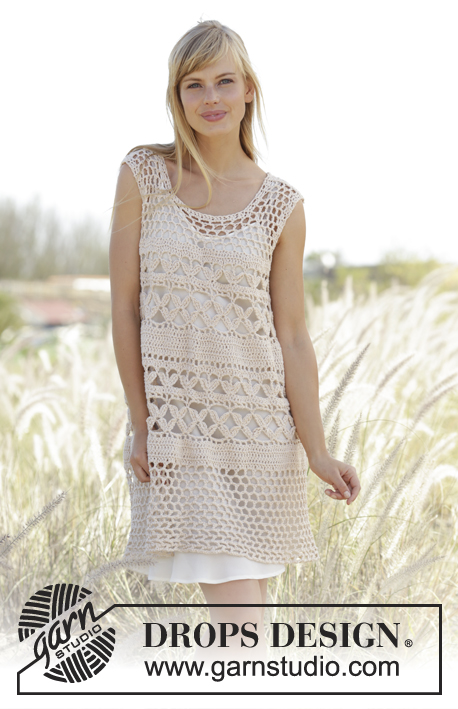
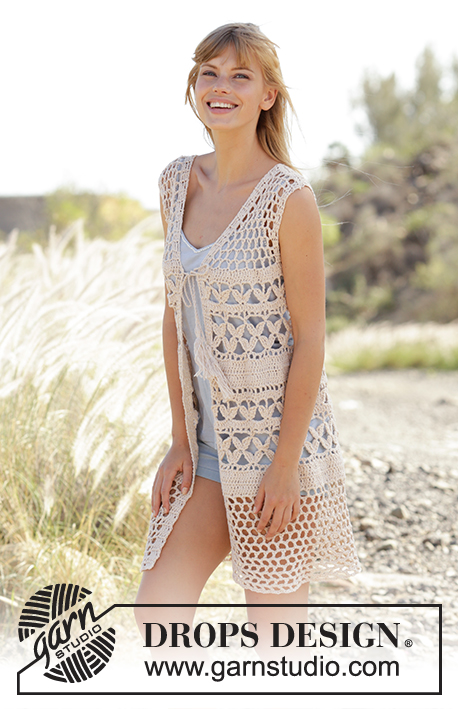
Crochet DROPS vest with A-shape, lace pattern and ties in ”Belle”. Size S-XXXL.
DROPS 167-19 |
|||||||||||||||||||||||||||||||||||||
|
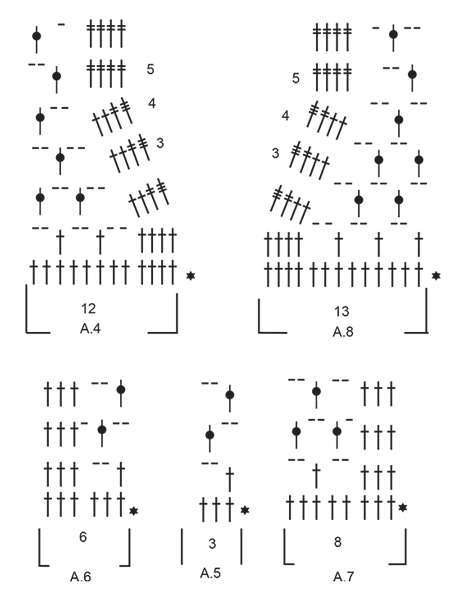
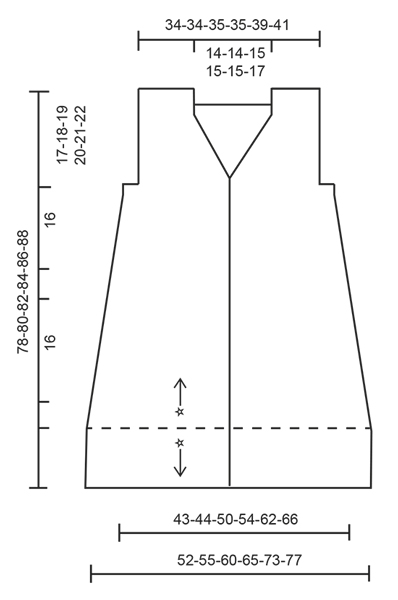
CROCHET INFO: On every tr row replace first tr with 4 ch. Replace first dtr on every dtr row with 5 ch. Replace first triple tr on every triple tr row with 6 ch. Beg every dc row with 1 ch. Ch does not replace first dc. PATTERN: See diagrams A.1 to A.8. DECREASE TIP: Dec 1 tr by working the next 2 tr tog as follows: Work 1 tr but wait with last pull through (= 2 loops on hook), then work next tr but on last pull through, pull yarn through all 3 loops on hook. DECREASE TIP CH-SPACES: Dec 1 ch-space at beg of row as follows seen from RS: Work 2 ch, skip the first ch-space, work 1 tr around next ch-space. On next row skip the last ch-space seen from WS (= first ch-space seen from RS). Dec 1 ch-space at end of row as follows seen from RS: Work until 1 ch-space remains, 2 ch, skip the last ch-space, work 1 st in each of the remaining sts. On next row skip the first ch-space, work 2 ch, and 1 tr around next ch-space seen from WS (= last ch-space seen from RS). ---------------------------------------------------------- VEST: Worked back and forth, bottom up. Then divide piece at the armholes and work front and back piece separately. Work an edge at the bottom of with mesh pattern at the end. Work 197-206-225-244-272-290 loose ch (incl 4 ch to turn with) on hook size 4.5 mm with Belle. Turn and work as follows: Work 1 tr in 5th ch from hook, then work 1 tr in each of the next 3-5-3-1-1-5 ch, * skip 1 ch, work 1 tr in each of the next 6 ch *, repeat from *-* 26-27-30-33-37-39 more times = 166-174-190-206-230-246 tr and 4 ch to turn with - READ CROCHET INFO. REMEMBER THE CROCHET TENSION! Continue back and forth with 1 tr in every tr until piece measures 5-5-6-6-7-7 cm. Now work pattern from 2nd row in diagram from RS as follows: Work A.1 (= 8 tr), then work A.2 (= 8 tr) 19-20-22-24-27-29 times in width, A.3 (= 7 tr). On last row in diagram A.1 to A.3 dec 32 tr evenly in all sizes - READ DECREASE TIP = 135-143-159-175-199-215 tr. Continue with 1 tr in every tr until piece measures 25-25-26-26-27-27 cm vertically. Then work pattern from 2nd row in A.1, A.2 and A.3 as before (but now work 15-16-18-20-23-25 repetitions of A.2 in width). Finish before the last 2 rows in diagram A.1 to A.3. Now work 1 row with 1 tr in every tr and adjust no of sts to 136-140-161-173-197-210 tr. Cut the yarn. Insert a marker here. NOW MEASURE THE PIECE FROM HERE. Now divide the piece into 2 front pieces and one back piece. RIGHT FRONT PIECE: Work first row as follows: A.4 over the first 12 tr, then work A.5 over the next 15-15-21-24-30-33 tr (= 5-5-7-8-10-11 repetitions in width), A.6 over the next 6 tr = 9-9-11-12-14-15 ch-spaces on first row. Now work as explained in the different sizes below: SIZE S and M: Continue back and forth until 4th row in A.4 has been worked vertically. NOTE: Repeat 2nd and 3rd row in A.5 and A.6 vertically. 2 ch-spaces have been dec for neck mid front in both sizes. Then repeat 3rd and 4th row in diagram A.4 3-3 more times vertically = 5-5 ch-spaces dec in total for neck mid front and 4-4 ch-spaces (with 2 ch) remain for shoulder. Piece measures approx. 13-13 cm. SIZE L, XL, XXL and XXXL: Continue back and forth with ch-spaces, AT THE SAME TIME on next row dec ch-spaces for neck towards mid front and dec ch-spaces for armhole as follows: DECREASE ARMHOLE: On next row dec 1 ch-space for armhole – READ DECREASE TIP CH-SPACES. Repeat dec 0-1-2-2) more times = 1-2-3-3 ch-spaces dec in total for armhole. DECREASE NECK: When 4th row in A.4 has been worked, 2 ch-spaces have been dec in size L, XL, XXL and XXXL. Then repeat dec for neck (i.e. 3rd and 4th row in A.4) 3-3-3-4 more times = 6-6-6-7 ch-spaces dec in total for neck. ALL SIZES: Continue with ch-spaces as before but now work 5th and 6th row in A.4 towards the neck until piece measures 16-17-18-19-20-21 cm. Turn and work 16-16-16-16-19-19 tr evenly over shoulder. Fasten off. Piece measures approx. 17-18-19-20-21-22 cm. BACK PIECE: Beg at armhole on right front piece and skip 4-6-6-6-6-8 tr for armhole. Work A.7 (= 8 tr), A.5 (= 3 tr) 16-16-19-21-25-26 times in width, work A.6 (= 6 tr) = 19-19-22-24-28-29 ch-spaces on first row. Continue as explained in the different sizes below: SIZE S and M: Continue back and forth with pattern as shown on 2nd and 3rd row in A.5 to A.7 until piece measures 14-15 cm – adjust so that next row is worked as 3rd row. SIZE L, XL, XXL and XXXL: Continue back and forth with pattern as shown on 2nd and 3rd row in A.5 to A.7, AT THE SAME TIME on next row dec for armholes in each side inside 3 sts - READ DECREASE TIP CH-SPACES. NOTE: Work 3 dtr instead of 3 tr in each side on the rows with dec (this is done to avoid tight edges). Repeat dec 0-1-2-2 more times (= 1-2-3-3 dec in total in each side) = 20-20-22-23 ch-spaces remain. Then continue with ch-spaces as shown on 2nd and 3rd row in diagram A.5 to A.7 until piece measures 16-17-18-19 cm – adjust so that next row is worked as 3rd row. Then continue as explained below in all sizes: Work 1 tr in each of the first 3 tr and 4-4-4-4-5-5 whole ch-spaces (i.e. ch-spaces with 2 ch), work 1 tr in next tr, then work 24-24-26-26-26-28 tr evenly over the next 10-10-11-11-11-12 ch-spaces from previous row, work 1 tr in next tr, and 1 tr around next ch-space, continue with 4-4-4-4-5-5 whole ch-spaces (i.e. ch-spaces with 2 ch) and 1 tr in each of the outermost 3 tr. There are now 26-26-28-28-28-30 tr consecutively in the middle of back piece. Then finish each shoulder separately. Turn, work 1 tr in each of the first 3 tr, then work as before over the 4-4-4-4-5-5 ch-spaces, work 1 tr in each of the first 3 tr of the 26-26-28-28-28-30 tr. Turn and work 16-16-16-16-19-19 tr evenly over shoulder. Fasten off. Work the other shoulder the same way but reversed. Beg at the armhole, and work 1 tr in each of the outermost 3 tr, then work ch-spaces as before over the 4-4-4-4-5-5 ch-spaces, and 1 tr in each of the next 3 tr. Turn and work 16-16-16-16-19-19 tr evenly over shoulder. Fasten off. LEFT FRONT PIECE: Beg at armhole on back piece and skip 4-6-6-6-6-7 tr for armhole. Work A.7 (= 8 tr), A.5 (= 3 tr) 4-4-6-7-9-10 times in width, finish with A.8 (= 13 tr). Continue like this back and forth as on right front piece but reversed. Adjust according to right front piece. ASSEMBLY: Sew the shoulder seams tog. Sew one and one stitch neatly tog and make sure to avoid a tight seam. Fasten off. EDGE AT THE BOTTOM: Now work an edge at the bottom of vest as follows: ROW 1: Fasten yarn with 1 dc and 3 ch in the first ch worked at beg of piece, work 1 tr in each of the next 3 ch (= band), then work * 2 ch, skip approx. 1½ cm, work 1 tr in next ch *, repeat from *-* along entire edge until approx. 1½ cm remain before the last 4 ch on row, work 2 ch and finish with 1 tr in each of the last 4 ch. There are now approx. 66-69-76-83-93-99 ch-spaces and 4 tr for band in each side - remember crochet info. ROW 2: Work 1 tr in each of the first 4 tr, work 1 ch, 1 tr around next ch-space, * 2 ch, 1 tr around next ch-space * in every ch-space on row, and finish with 1 ch and 1 tr in each of the 4 tr for band. ROW 3: Work 1 tr in each of the first 4 tr, work 2 ch, skip 1 ch and 1 tr, * 1 tr around next ch-space, 2 ch *, repeat from *-* until 1 ch-space remains with 2 ch, work 1 tr around this ch-space, 2 ch, and finish with 1 tr in each of the 4 tr for band. Repeat 2nd and 3rd row until piece measures 78-80-82-84-86-88 cm in total (measured from shoulder) or to desired length. Fasten off. TIES WITH TASSEL: Cut 2 lengths of yarn of 90 cm. Twine them until the resist. Thread one end through last tr-row worked before piece was divided for front pieces and back piece and place tie double so that it twines again. Tie a knot in the loose end. Repeat in the other side. Then make a tassel in the end of each of the ties: Cut 14 strands of 24 cm, thread them through one end on one of the ties and distribute the ends so that they are even. Wind a strand several times around the tassel approx. 1 cm from the top, to get a nice top and fasten the strand. |
|||||||||||||||||||||||||||||||||||||
Diagram explanations |
|||||||||||||||||||||||||||||||||||||
|
|||||||||||||||||||||||||||||||||||||
 |
|||||||||||||||||||||||||||||||||||||
 |
|||||||||||||||||||||||||||||||||||||
 |
|||||||||||||||||||||||||||||||||||||
Have you finished this pattern?Tag your pictures with #dropspattern #summerblissvestvest or submit them to the #dropsfan gallery. Do you need help with this pattern?You'll find 11 tutorial videos, a Comments/Questions area and more by visiting the pattern on garnstudio.com. © 1982-2026 DROPS Design A/S. We reserve all rights. This document, including all its sub-sections, has copyrights. Read more about what you can do with our patterns at the bottom of each pattern on our site. |
|||||||||||||||||||||||||||||||||||||


With over 40 years in knitting and crochet design, DROPS Design offers one of the most extensive collections of free patterns on the internet - translated to 17 languages. As of today we count 324 catalogues and 12290 patterns translated into English (UK/cm).
We work hard to bring you the best knitting and crochet have to offer, inspiration and advice as well as great quality yarns at incredible prices! Would you like to use our patterns for other than personal use? You can read what you are allowed to do in the Copyright text at the bottom of all our patterns. Happy crafting!
Post a comment to pattern DROPS 167-19
We would love to hear what you have to say about this pattern!
If you want to leave a question, please make sure you select the correct category in the form below, to speed up the answering process. Required fields are marked *.