
Popular categories
Looking for a yarn?


Comments / Questions (144)
![]() Madelon wrote:
Madelon wrote:
Hoi, Ik ben op weg met dit patroon in maat M maar nu loop ik vast. Ik ben bij het deel ‘alle maten’ onder pas. Ik heb gemeerderd tussen markeerders zoals aangegeven. Vervolgens staat er ‘herhaald A1 2 keer tussen de 2e en 3e markeerder, 7 keer tussen de 4e en 5e markeerder, 2 keer tussen de 6e en 7e markeerder en 7 keer tussen de 8e en 1e markeerder. Waar begin ik dan met A1? Bij het begin of ga ik verder vanaf de 7e ronde van A1? Hoor graag!
17.03.2021 - 15:55DROPS Design answered:
Dag Madelon,
Er wordt bedoeld dat je de betreffende patronen 7 of 2 keer in de breedte herhaald. In de hoogte ga je gewoon verder met de toer in de telpatronen waar je was gebleven.
27.03.2021 - 15:44
![]() Greet De Houwer wrote:
Greet De Houwer wrote:
Ik heb nog een bijkomende vraag: ik heb tot hiertoe nog geen gesloten pas gehaakt. Is het de bedoeling dat je op het einde van een toer verder doorhaakt of moet je het werkje keren voor de volgende toer?
23.12.2020 - 11:19DROPS Design answered:
Dag Greet,
Het staat inderdaad niet expliciet aangegeven of je al dan niet moet keren bij elke toer, maar om ervoor te zorgen dat het patroon niet scheef trekt is het wel het mooiste om telkens te keren.
17.01.2021 - 14:26
![]() Greet wrote:
Greet wrote:
Het proeflapje 10 x 10 cm dat ik eerst maak, moet dat gehaakt worden in het telpatroon of gewoon vb. in vaste steken? Alvast bedankt
09.12.2020 - 16:53DROPS Design answered:
Dag Greet,M/p>
Het proeflapje maak je in stokjes.
14.12.2020 - 13:05
![]() Asheley Carpenter wrote:
Asheley Carpenter wrote:
In the chart at the bottom where the measurements are listed, are those numbers in inches?
28.04.2020 - 19:50DROPS Design answered:
Dear Asheley, in the US version the chart measurements are in cm but in the pattern the measurements given are in inches. In the english UK version the numbers are always in cm. Happy crocheting!
28.04.2020 - 23:33
![]() Stefania wrote:
Stefania wrote:
Hallo, habe noch eine Frage zur Häkelschrift. In A2 Reihe 2 habe ich ein Stäbchen, drei Lfm, 2 Feste M und wieder drei Lfm gehäkelt. In Reihe 3 1 Stb in der FM der Vorreihe und jetzt sollte ich drei Stäbchen um die LM der Vorreihe häkeln.... ich habe aber keine Luftmaschen, nur 2 feste Maschen in der Vorreihe. Im Diagramm sind zwar die 2 Luftmaschen zwischen den festen Maschen und den Stäbchen eingezeichnet, aber wann werden diese gehäkelt? 🙏🏼
30.03.2020 - 15:27DROPS Design answered:
Liebe Stefania, bei der 2. Reihe in A.2 häkeln Sie: 1 Stb in das fM, 3 lm, 1 fM + 2 Lm + 1 fM in das Stb, 3 Lm - bei der 3. Reihe häkeln Sie: 1 fM in das Stb, 3 Stb + 2 Lm + 3 Stb um die 2 Lm von der 2. Reihe. Viel Spaß beim häkeln!
31.03.2020 - 10:24
![]() Stefania wrote:
Stefania wrote:
Hallo, ich möchte sicher sein, dass ich die Häkelschrift richtig verstehe. Bei A2 über vier Stäbchen, nach den letzten 3 Luftmaschen geht es dann mit der festen Masche beim ersten Stäbchen A1 weiter etc. Stimmt das? Und noch eine Frage, da die Runde mit drei Luftmaschen beginnt, die das erste Stäbchen ersetzen, beginnt die Runde eigentlich mit dem 2. Stäbchen der Vorrunde, oder? Vielen Dank für Ihre Hilfe. Bleiben Sie gesund
27.03.2020 - 15:30DROPS Design answered:
Liebe Stefania, ja genau nach A.2 häkeln Sie A.2, so nach die 3 letzten Luftmaschen in A.2 überspringen Sie 1 Stb (= A.2 ist zur Ende) und häkeln Sie A.1 (= 1 fM in das nächste Stb). < a href="https://www.garnstudio.com/lesson.php?id=69&cid=9#c3">siehe auch hier - bei der Passe häkeln Sie A.4 am Anfang und Ende jeder Runde - dh bei der 1. Reihe in A.1 häkeln Sie 1 Lm (= 1. fM), bei der 2. Reihe in A.1 häkeln Sie 3 LM (= 1. Stb), usw.. und die Runde endet mit 1 fM in das erste Lm (1. Reihe z.B.) bzw 3. Lm (2. Reihe z.B.). Viel Spaß beim häkeln!
27.03.2020 - 16:38
![]() Fernanda Piattelli wrote:
Fernanda Piattelli wrote:
Scusate ma continuo a non capire partendo dalla xl alla fine del diagramma sono 2 giri Quando dovrò ripetere in ulteriori Ferri devo riprendere sempre da la cioè il diagramma a 1 A per la XL è formato da due giri ho da dove devo riprendere non capisco Grazie Fernanda
24.03.2020 - 14:02DROPS Design answered:
Buongiorno Fernanda. Per la taglia XL, inizia dalla freccia con la sua taglia; terminato l'ultimo giro, riprende a lavorare dal primo giro del diagramma A1.a (dove trova la freccia per la taglia XXXL).Deve lavorare tutti i giri compresi nella parentesi con indicato A.1a. Buon lavoro!
24.03.2020 - 14:14
![]() Fernanda Piattelli wrote:
Fernanda Piattelli wrote:
Buongiorno volevo un chiarimento non riesco a capire il diagramma A1 che passi differenzia con una parentesi con A1 a io devo fare una taglia XL da dove devo partire quando devo usare il diagramma a1a Vi ringrazio infinitamente Fernanda
24.03.2020 - 12:39DROPS Design answered:
Buongiorno Fernando. Quando inizia il diagramma A.1a, inizia dalla riga indicata dalla freccia con vicino l'indicazione della taglia XL (quindi la penultima riga). Buon lavoro!
24.03.2020 - 13:29
![]() Julia wrote:
Julia wrote:
Hallo, ich häkel Größe S und habe nun den Armausschnitt fertig gehäkelt. (Rd in der Mitte unter dem Arm) Im letzten Satz heißt es: Die 8 M unter jedem Arm nachfolgend wie die 1. M von A. 1a häkeln. Heißt das, dass ich nun immer die 8 festen Maschen unter dem Armausschnitt häkeln muss oder das Muster von A1a hinzufügen muss? Danke für die tolle Arbeit.
12.01.2020 - 18:44DROPS Design answered:
Liebe Julia, bei der 1. Reihe sollen die 8 Maschen unter den Ärmeln wie die 1. Masche in A.1A gehäkelt = entweder 1 Stäbchen oder 1 FMasche (je nach der Runde in A.1). Dann, ab 2. Reihe häkeln Sie A.1 in der Runde wie zuvor. Viel Spaß beim häkeln!
13.01.2020 - 10:02
![]() María wrote:
María wrote:
Hola buenos días , en la vuelta 5 tengo que aumentar entre marca puntos sobre el gráfico directamente o sobre una vuelta de puntos altos ? Gracias
01.09.2019 - 08:31DROPS Design answered:
Hola Maria . Los aumentos se trabajan en las vueltas con puntos altos.
15.12.2019 - 19:55
|
||||||||||||||||||||||||||||
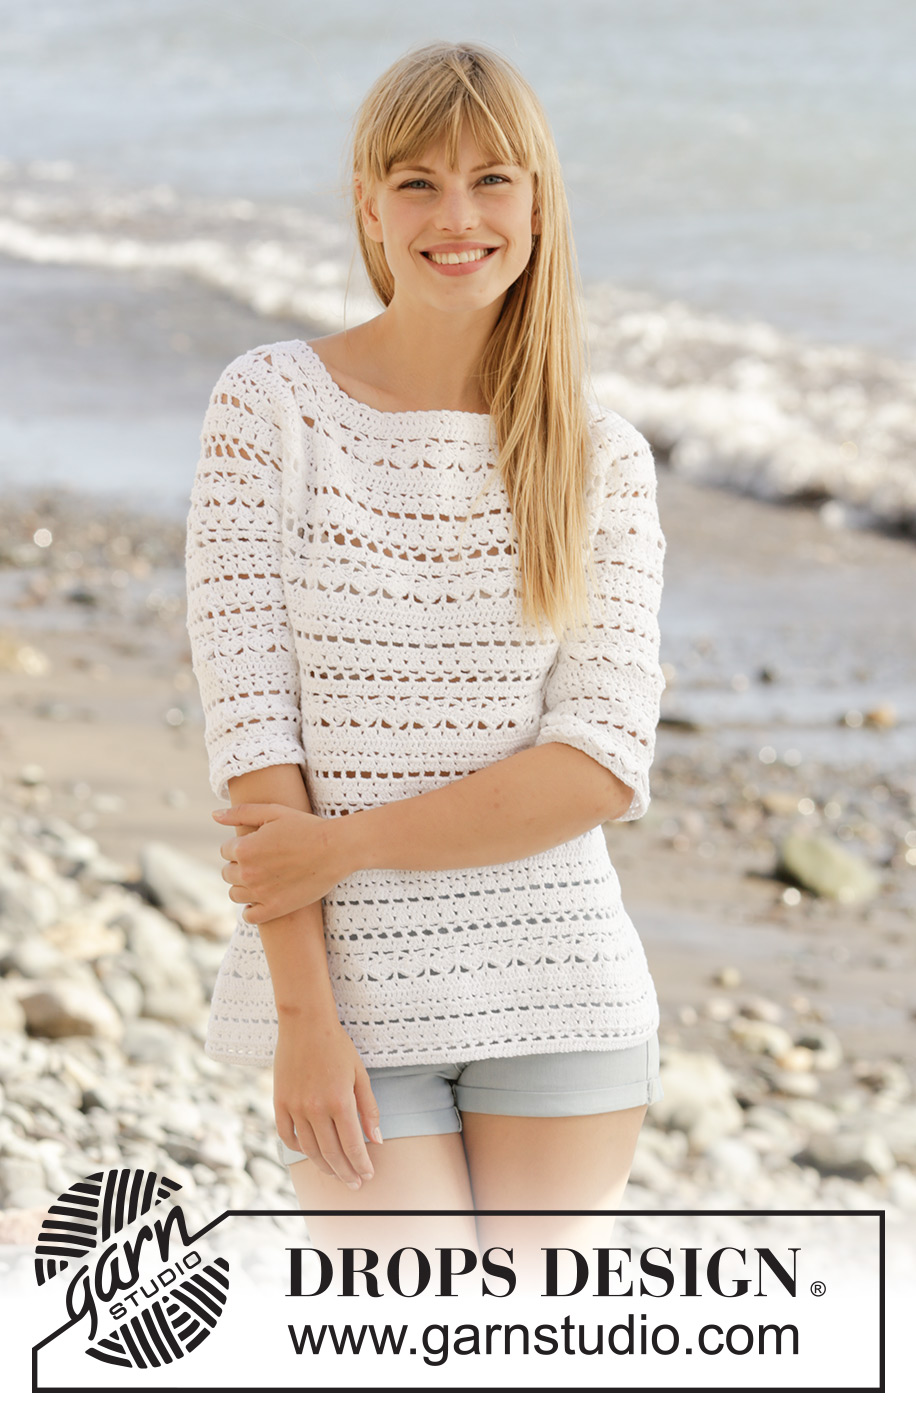
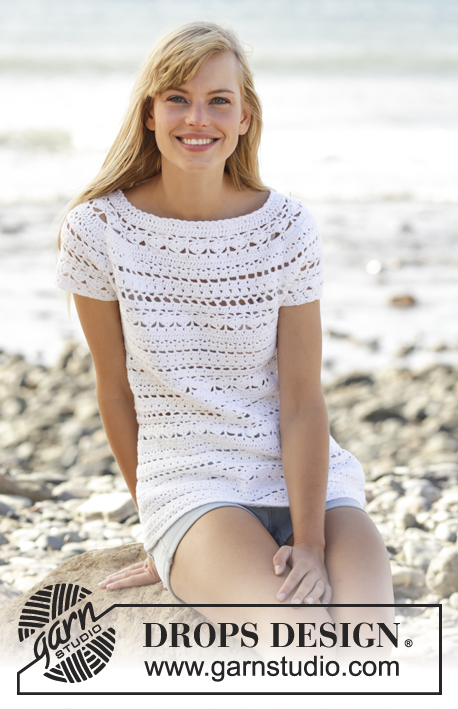
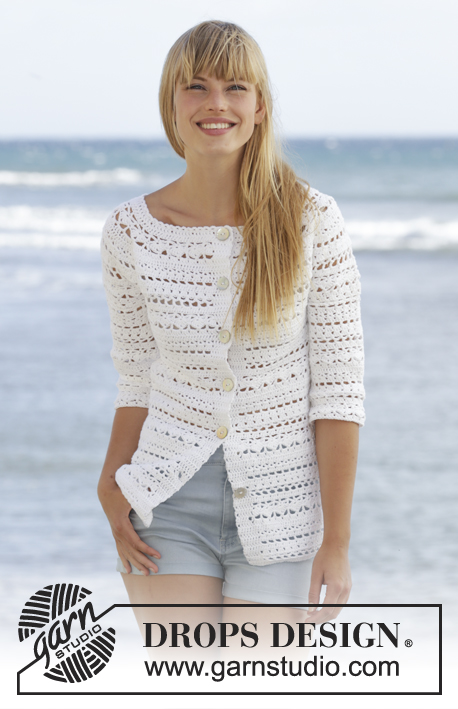
Seashore Bliss#seashoreblisssweater |
||||||||||||||||||||||||||||
|
|
||||||||||||||||||||||||||||
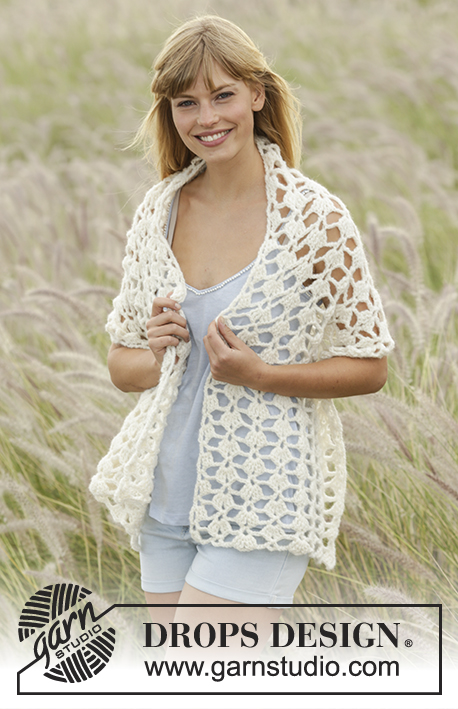
Crochet DROPS jumper with lace pattern and round yoke in ”Muskat”. The piece is worked top down. Size: S - XXXL.
DROPS 169-15 |
||||||||||||||||||||||||||||
|
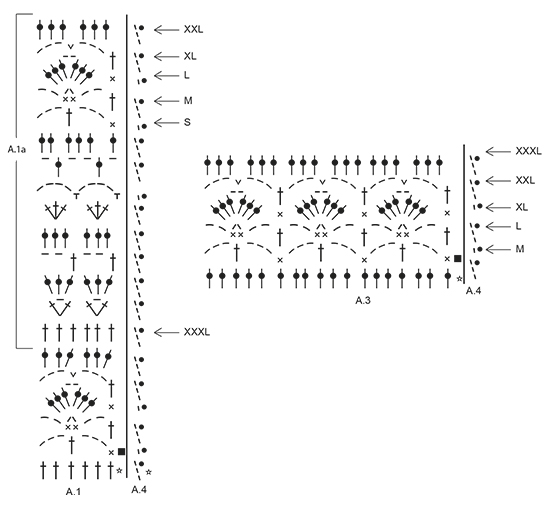
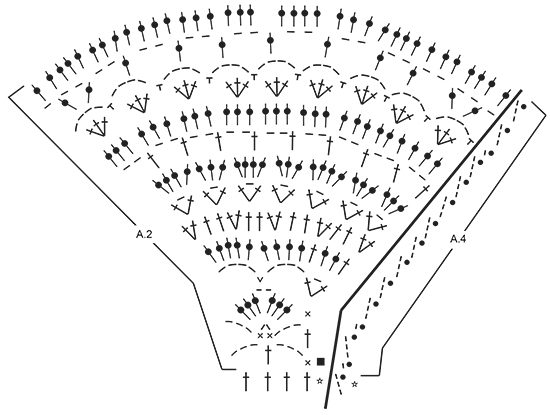
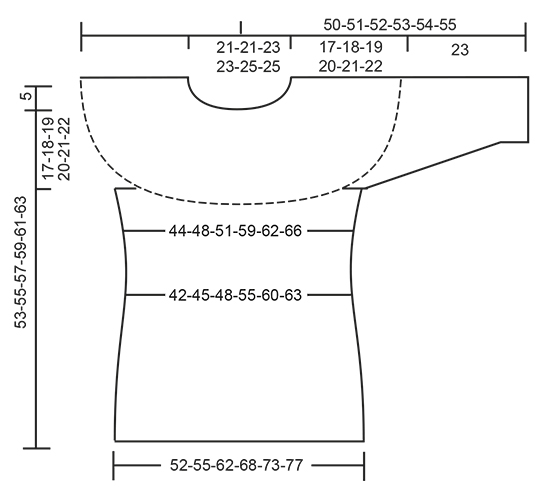
PATTERN: See diagrams A.1 to A.4. Diagram A.4 shows how round beg and ends. CROCHET INFO: Replace first tr at beg of every tr round with 3 ch. Finish round with 1 sl st in 3rd ch at beg of round. Replace first dc at beg of every dc round with 1 ch. Finish every round with 1 sl st in ch from beg of round. INCREASE TIP: Inc 1 tr by working 2 tr in same tr. DECREASE TIP: Dec 1 tr by working 2 tr tog as follows: Work 1 tr but wait with last pull through (= 2 sts on hook), then work next tr but on last pull through, pull yarn through all 3 sts on hook. TIP ARMHOLE: Size S, M and XL: In the last repeat of A.1 before marker 1 and marker 3 (= beginning of armhole), replace the last chain stitch with a treble crochet in the last stitch of the same repeat on previous row. ---------------------------------------------------------- JUMPER: The piece is worked top down. NOTE: It is important to keep the crochet tension vertically so that the measurements on yoke will be correct. YOKE: Work 108-108-117-117-124-124 ch on hook size 4 mm with Muskat and form 1 ring with 1 sl st in first ch. Work first round as follows: Work 3 ch (= 1 tr) - READ CROCHET INFO, 1 tr in each of the next 3-3-5-5-5-5 ch, * skip 1 ch, 1 tr in each of the next 6 ch *, repeat from *-* the entire row = 94-94-102-102-108-108 tr. Work 1 round with 1 tr in every tr and inc 18-18-22-22-28-40 tr evenly - READ INCREASE TIP = 112-112-124-124-136-148 tr. Work next round and insert 8 markers in the piece as follows: A.4 shows how round beg and ends. Insert 1st marker at beg of round, work A.2 over the first 4 tr, insert 2nd marker, A.1 over the next 12 tr (= 2 times in width), insert 3rd marker, A.2 over the next 4 tr, insert 4th marker, work A.1 over the next 36-36-42-42-48-54 tr (= 6-6-7-7-8-9 times in width), insert 5th marker, A.2 over the next 4 tr, insert 6th marker, A.1 over the next 12 tr (= 2 times in width), insert 7th marker, A.2 over the next 4 tr, insert 8th marker, A.1 over the last 36-36-42-42-48-54 tr (= 6-6-7-7-8-9 times in width). REMEMBER THE CROCHET TENSION! SIZE XXL-XXXL: On 5th round (round with tr) in A.1 inc evenly as follows: Between 2nd and 3rd marker and 6th and 7th marker: Inc 6-6 tr. 12-12 tr have been inc in total on round (= 18-18 tr between 2nd and 3rd marker and 6th and 7th marker). Repeat A.1 3-3 times between 2nd and 3rd marker and between 6th and 7th marker: ALL SIZES: On 6th round (round with tr) in A.1 inc evenly as follows: Between 2nd and 3rd marker and 6th and 7th marker: Inc 0-0-6-6-6-6 tr (= 12-12-18-18-24-24 tr between these markers). Between 4th and 5th marker and 8th and 1st marker: Inc 0-6-6-6-6-6 tr (= 36-42-48-48-54-60 tr between each of these markers). Then repeat diagram A.1 2-2-3-3-4-4 times between 2nd and 3rd marker, 6-7-8-8-9-10 times between 4th and 5th marker, 2-2-3-3-4-4 times between 6th and 7th marker and 6-7-8-8-9-10 times between 8th and 1st marker. Work A.2 as before. SIZE XL-XXL-XXXL: On 8th round (round with tr) in A.1 inc evenly as follows: Between 4th and 5th marker and 8th and 1st marker: Inc 6-6-6 tr (= 54-60-66 tr between each of these markers). 12-12-12 tr have been inc in total on round. Repeat A.1 9-10-11 times between 4th and 5th marker and between 8th and 1st marker. Repeat inc on 10th round in A.1 (= 60-66-72 tr between each of these markers). Repeat diagram A.1 10-11-12 times between 4th and 5th marker and between 8th and 1st marker. ALL SIZES: On last round in A.2 insert 1 new marker in the middle of each A.2 (i.e. 18 tr on each side of marker in A.2 = 4 markers). Remove the old markers (= 4 markers remain in piece). Sts between markers are for sleeves (= 48-48-54-54-60-60 tr on each sleeve). When A.2 has been worked 1 time vertically, there are 240-252-276-300-324-336 tr on round. Yoke is now done in size S. SIZE M-L-XL-XXL-XXXL: Continue with pattern A.1 as before but over tr in A.2 (= 36 tr) work A.3 2 times in total in width (marker is in the middle of these repetitions). Work 1-2-3-4-5 rounds of A.3 (see arrow in diagram for correct size). Piece now measures 17-18-19-20-21-22 cm vertically. ALL SIZES: Work A.1a (see arrow on where pattern beg in the different sizes) 3 times in total in width until first marker - SEE ARMHOLE TIP, work 8-8-8-10-10-10 ch, skip sts between the 2 markers (= sleeve), work A.1a 12-13-14-16-17-18 times in total in width until next marker (= front piece), work 8-8-8-10-10-10 ch, skip sts between the 2 markers (= sleeve), work A.1a 9-10-11-13-14-15 times in total in width (= 160-172-184-212-224-236 sts). Fasten off. BODY: Beg round mid under sleeve as follows: Size S-L: Work 1 sl st in 5th ch, 1 ch, work 1 dc in each of the next 3-3 ch, work A.1a as before until ch under 2nd sleeve, 1 dc in each of the 8-8 ch under sleeve, work A.1a as before the rest of round. Work the 8-8 sts under each sleeve as 1st st in A.1a. SIZE M-XL-XXL-XXXL: Work 1 sl st in 5th ch, 3 ch, work 1 tr in each of the next 3-5-5-5 ch, work A.1a as before until ch under 2nd sleeve, 1 tr in each of the 8-10-10-10 ch under sleeve, work A.1a as before the rest of round. Work the 8-10-10-10 sts under each sleeve as 1st st in A.1a. ALL SIZES: Insert 1 marker in piece, NOW MEASURE PIECE FROM HERE. On first round with tr dec 4-4-4-2-2-2 tr evenly - READ DECREASE TIP = 156-168-180-210-222-234 tr. Then repeat A.1a 26-28-30-35-37-39 times in width. Repeat A.1a vertically. When piece measures 12 cm, adjust so that next round is with tr, dec 6 tr evenly = 150-162-174-204-216-228 tr. Now repeat A.1a 25-27-29-34-36-38 times in width. SIZE XL: Repeat dec when piece measures 16 cm from marker = 198 tr. Now repeat A.1a 33 times in width. ALL SIZES: When piece measures 20-21-22-23-24-25 cm from marker – adjust so that next round is with tr, inc 6 tr evenly. Repeat inc every 2-2-1½-1½-1½-1½ cm 5-5-7-7-7-7 more times = 186-198-222-246-264-276 tr. Repeat A.1a 1 more in width on every inc. When all inc are done, repeat A.1a 31-33-37-41-44-46 times in width. Work until piece measures 36-37-38-39-40-41 cm from marker, adjust to finish nicely according to pattern. Fasten off. SLEEVE: SIZE S: Beg by working mid under sleeve as follows: Work 1 sl st in 4th ch of the 8 ch worked in armhole on body. Work 1 ch (= 1 dc). Then work 1 dc in each of the next 4 ch, work A.3 over the next 18 tr, work A.1 (adjust pattern according to A.3) 2 times in total in width as before, work A.3 over the next 18 tr, finish with 1 dc in each of the last 3 ch. Work as 1st st in A.3 in the 8 sts under sleeve. When A.3 has been worked 1 time vertically, there are 56 tr on last round. SIZE M-XL-XXL: Beg by working mid under sleeve as follows: Work 1 sl st in 4th ch of the 8-10-10 ch worked in armhole on body. Work 3 ch (= 1 tr). Then work 1 tr in each of the next 4-6-6 ch, work A.3 as before, work A.1 (adjust pattern according to A.3) 2-3-4 times in total in width as before, work A.3, finish with 1 tr in each of the last 3 ch. Work as 1st st in A.3 in the 8-10-10-10 tr under sleeve. When A.3 has been worked 1 time vertically, there are 56-64-70 tr on last round. SIZE L: Beg by working mid under sleeve as follows: Work 1 sl st in 4th ch of the 8 ch worked in armhole on body. Work 1 ch (= 1 dc). Then work 1 dc in each of the next 4 ch, work A.3 as before, work A.1 (adjust pattern according to A.3) 3 times in total in width as before, work A.3, finish with 1 dc in each of the last 3 ch. Work as 1st st in A.3 in the 8 tr under sleeve. When A.3 has been worked 1 time vertically, there are 62 tr on last round. SIZE XXXL: Beg by working mid under sleeve as follows: Work 1 sl st in 4th ch of the 10 ch worked in armhole on body. Work 3 ch (= 1 tr). Then work 1 tr in each of the next 6 ch, work A.1a over the next 60 tr, finish with 1 tr in each of the last 3 ch = 70 tr. ALL SIZES: = 56-56-62-64-70-70 tr. Repeat A.1a vertically until finished measurements. On first round with tr dec 2-2-2-4-4-4 tr evenly = 54-54-60-60-66-66 tr. Repeat A.1a 9-9-10-10-11-11 times in total in width. When piece measures 10 cm, adjust so that next round is with tr, dec 6 tr evenly = 48-48-54-54-60-60 tr. Then repeat A.1a 8-8-9-9-10-10 times in width. When piece measures 23 cm, adjust to finish nicely according to pattern, fasten off. Work another sleeve the same way. NECK EDGE: Crochet an edge around the neck. Beg mid back. Work * 1 dc in first tr, 3 ch, skip approx. 1 cm *, repeat from *-* around the entire neck. Make sure to avoid a tight neck edge, adjust to finish with 1 sl st in first ch. Fasten off. |
||||||||||||||||||||||||||||
Diagram explanations |
||||||||||||||||||||||||||||
|
||||||||||||||||||||||||||||
 |
||||||||||||||||||||||||||||
 |
||||||||||||||||||||||||||||
 |
||||||||||||||||||||||||||||
Have you finished this pattern?Tag your pictures with #dropspattern #seashoreblisssweater or submit them to the #dropsfan gallery. Do you need help with this pattern?You'll find 10 tutorial videos, a Comments/Questions area and more by visiting the pattern on garnstudio.com. © 1982-2026 DROPS Design A/S. We reserve all rights. This document, including all its sub-sections, has copyrights. Read more about what you can do with our patterns at the bottom of each pattern on our site. |
||||||||||||||||||||||||||||


With over 40 years in knitting and crochet design, DROPS Design offers one of the most extensive collections of free patterns on the internet - translated to 17 languages. As of today we count 324 catalogues and 12290 patterns translated into English (UK/cm).
We work hard to bring you the best knitting and crochet have to offer, inspiration and advice as well as great quality yarns at incredible prices! Would you like to use our patterns for other than personal use? You can read what you are allowed to do in the Copyright text at the bottom of all our patterns. Happy crafting!
Post a comment to pattern DROPS 169-15
We would love to hear what you have to say about this pattern!
If you want to leave a question, please make sure you select the correct category in the form below, to speed up the answering process. Required fields are marked *.