
Popular categories
Looking for a yarn?


Comments / Questions (144)
![]() Nancy wrote:
Nancy wrote:
Maak maat M , zit vast na mij pas, weet niet goed wat je bedoelt bij het lijf: Begin de toer midden onder de mouw als volg. Hoe moet ik nu verder?
22.08.2016 - 22:34DROPS Design answered:
Hoi Nancy. Je hebt net de pas afgerond en heb de losse gehaakt onder elk armsgat. Je begint het lijf in het midden van de lossen onder de mouw en haakt door in de rondte over het lijf zoals beschreven. Veel plezier.
23.08.2016 - 14:22
![]() Heidy Dirks wrote:
Heidy Dirks wrote:
Geachte mevrouw, Ik ben met het patroon 169-15 Seashore Bliss bezig. Ik haak het in maat L. Nu kom ik niet uit het gedeelte van bij 22 cm met 6 stokjes meerderen dit is nog gelukt. Maar dan het gedeelte na elke 1,5 cm 7 keer meerderen. Meerder je dan ook alleen bij een rij stokjes of in een andere toer. Maar hoe moet ik dan meerdere ik moet op 222 stokjes uitkomen. Of moet ik een ander patroon aan houden i.p.v. A.1a. Ik hoop dat u mijn kan helpen. Groetjes Heidy Dirks
17.08.2016 - 19:11DROPS Design answered:
Beste mevrouw Dirks, die 1,5 cm is ongeveer, het gaat er vooral om dat het meerderen mooi verdeeld gebeurt, dus bij voorkeur in een toer met stokjes, dat is waarschijnlijk het mooist. U herhaalt steeds A.1a, hierin zitten meerdere toeren met stokjes, dus keuze genoeg. Het geeft niet als het zo uitkomt dat u de ene keer na 1,2 cm meerdert en de andere keer na 1,8 cm, bijvoorbeeld.
18.08.2016 - 12:04
![]() Nancy wrote:
Nancy wrote:
Kunnen jullie omschrijven wat we precies moeten doen bij het einde en begin van elke toer, dus het stukje A4, dat is helemaal niet duidelijk.
07.08.2016 - 16:15DROPS Design answered:
De symbooltjes in de tekening staan bovenaan uitgelegd. In A.4 ziet u elke toer een rondje en 3 streepjes. Dit betekent een halve vaste om het begin en eind van de toer met elkaar te verbinden en dan 3 lossen.
08.08.2016 - 07:55
![]() Nancy wrote:
Nancy wrote:
Ik zit hier en begrijp niet hoe ik die rij moet haken en de verdere rijen ook niet,het is voor maat M :en moet de 6 de toer doen en hoe haak ik dan verder? gr. nancy
06.08.2016 - 17:13DROPS Design answered:
Beste Nancy, uw vragen zijn helaas te algemeen voor ons om op afstand te beantwoorden. De toeren staan beschreven en verder getekend in de teltekeningen. ALs u een concrete vraag hebt over een bepaalde toer, kunt u dan precies aangeven wat uw vraag is?
06.08.2016 - 17:19
![]() Antonella wrote:
Antonella wrote:
Buongiorno, sto lavorando il corpo, taglia M. Nello schema è scritto : "sul primo giro a m.a. diminuire 4 m.a.in modo uniforme". Io a questo punto sono arrivata alla 12° riga di A1a. Cosa devo fare? Completo i due giri successivi, ricomincio e faccio le diminuzioni nella prima riga di A1a? Grazie per la risposta e per la disponibilità!
30.07.2016 - 09:16DROPS Design answered:
Buonasera Antonella. Sì è corretto, lavora altri due giri e alla prima riga del diagramma A.1a diminuisce le 4 m.a. Buon lavoro!
30.07.2016 - 16:59Maria wrote:
Thank you. My question was about 13th row, counting frow the row with the black square marker. But now I' m more confused because I was replacing the first dc or sc as states on the instructions: "Replace first dc at beg of every dc round with 3 ch. Replace first sc at beg of every sc round with 1 ch." Could you explain me better this point?
08.07.2016 - 18:09DROPS Design answered:
Dear Maria, that's how A.4 is worked, ie at beg of every round with dc, you work 3 ch in A.4 and at the beg of every round with sc, you work 1 ch in A.4, then after A.4 has been worked 1 time in width (beg of round), continue repeating diagram as before, and crochet 1 sl st in the 1st/3rd ch at beg of round (depending on what you crocheted). Happy crocheting!
11.07.2016 - 08:30Vale wrote:
No comprendo como realizar la instrucción que dice cuando la labor mida 12 cm ajustar para que la siguiente vta sea una vta con pa. Debo insertar una vta de pa adicional a las que tiene el patrón?
07.07.2016 - 13:08DROPS Design answered:
Hola Vale. El diagrama A.1 a en vertical tiene varias filas/vtas de p.a. (por ejemplo la 1ª, la 5ª - contando desde abajo), cuando llegas a 12 cm si la que te toca trabajar no es la fila/vta de p.a. tienes que seguír con el patrón hasta la sig fila/vta de p.a. y ahí trabajas las dism.
12.07.2016 - 23:03
![]() Vale wrote:
Vale wrote:
No comprendo como realizar la instrucción que dice cuando la labor mida 12 cm ajustar para que la siguiente vta sea una vta con pa. Debo insertar una vta de pa adicional a las que tiene el patrón?
06.07.2016 - 14:02
![]() Maria wrote:
Maria wrote:
Sorry, I made a mistake. My question was about the 13th row of the A2 pattern. It starts with 1 ch, then 1 dc, 2 ch...
06.07.2016 - 13:21DROPS Design answered:
Dear Maria, when working A.2, you start with A.4 at beg of round, then work A.2 over the sts in A.2, ie beg round with 1 ch then 1 dc, 4 ch, skip next 3 tr, 1 dc, etc.. as shown in A.2. (UK-Crochet terminology - see US-crochet terminology here. Happy crocheting!
06.07.2016 - 13:38Maria wrote:
Hi, How do I begin the 13th row of pattern A.4, because it doesn't start with a dc or sc, it starts with 1 chain!!. Thanks in advance
06.07.2016 - 00:42DROPS Design answered:
Dear Maria, start row 13 with 1 ch, then 1 sc, 4 ch, skip next 3 dc, 1 sc between next 3 dc, etc.. and finish round with 1 sl st in the first ch at beg of round. Happy crocheting!
06.07.2016 - 08:10
|
||||||||||||||||||||||||||||
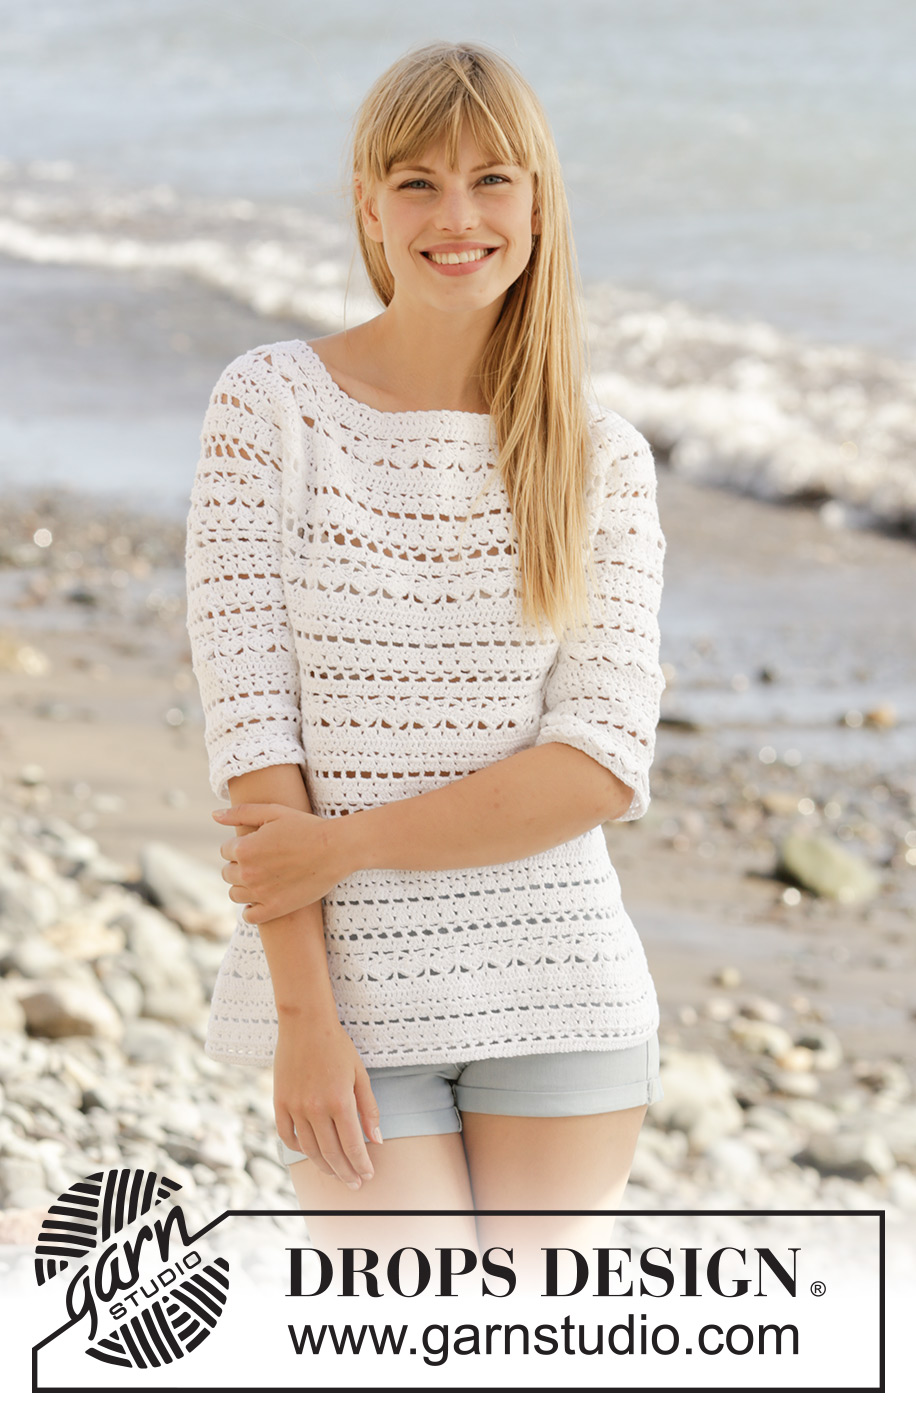
Seashore Bliss#seashoreblisssweater |
||||||||||||||||||||||||||||
|
|
||||||||||||||||||||||||||||
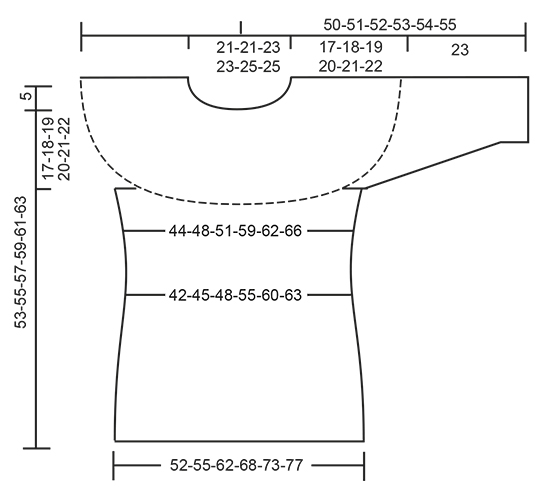
Crochet DROPS jumper with lace pattern and round yoke in ”Muskat”. The piece is worked top down. Size: S - XXXL.
DROPS 169-15 |
||||||||||||||||||||||||||||
|
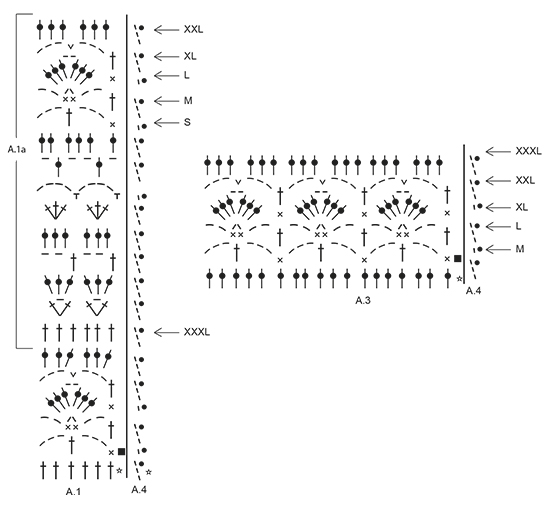
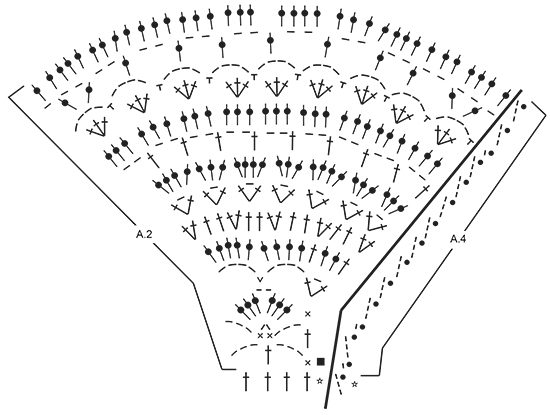
PATTERN: See diagrams A.1 to A.4. Diagram A.4 shows how round beg and ends. CROCHET INFO: Replace first tr at beg of every tr round with 3 ch. Finish round with 1 sl st in 3rd ch at beg of round. Replace first dc at beg of every dc round with 1 ch. Finish every round with 1 sl st in ch from beg of round. INCREASE TIP: Inc 1 tr by working 2 tr in same tr. DECREASE TIP: Dec 1 tr by working 2 tr tog as follows: Work 1 tr but wait with last pull through (= 2 sts on hook), then work next tr but on last pull through, pull yarn through all 3 sts on hook. TIP ARMHOLE: Size S, M and XL: In the last repeat of A.1 before marker 1 and marker 3 (= beginning of armhole), replace the last chain stitch with a treble crochet in the last stitch of the same repeat on previous row. ---------------------------------------------------------- JUMPER: The piece is worked top down. NOTE: It is important to keep the crochet tension vertically so that the measurements on yoke will be correct. YOKE: Work 108-108-117-117-124-124 ch on hook size 4 mm with Muskat and form 1 ring with 1 sl st in first ch. Work first round as follows: Work 3 ch (= 1 tr) - READ CROCHET INFO, 1 tr in each of the next 3-3-5-5-5-5 ch, * skip 1 ch, 1 tr in each of the next 6 ch *, repeat from *-* the entire row = 94-94-102-102-108-108 tr. Work 1 round with 1 tr in every tr and inc 18-18-22-22-28-40 tr evenly - READ INCREASE TIP = 112-112-124-124-136-148 tr. Work next round and insert 8 markers in the piece as follows: A.4 shows how round beg and ends. Insert 1st marker at beg of round, work A.2 over the first 4 tr, insert 2nd marker, A.1 over the next 12 tr (= 2 times in width), insert 3rd marker, A.2 over the next 4 tr, insert 4th marker, work A.1 over the next 36-36-42-42-48-54 tr (= 6-6-7-7-8-9 times in width), insert 5th marker, A.2 over the next 4 tr, insert 6th marker, A.1 over the next 12 tr (= 2 times in width), insert 7th marker, A.2 over the next 4 tr, insert 8th marker, A.1 over the last 36-36-42-42-48-54 tr (= 6-6-7-7-8-9 times in width). REMEMBER THE CROCHET TENSION! SIZE XXL-XXXL: On 5th round (round with tr) in A.1 inc evenly as follows: Between 2nd and 3rd marker and 6th and 7th marker: Inc 6-6 tr. 12-12 tr have been inc in total on round (= 18-18 tr between 2nd and 3rd marker and 6th and 7th marker). Repeat A.1 3-3 times between 2nd and 3rd marker and between 6th and 7th marker: ALL SIZES: On 6th round (round with tr) in A.1 inc evenly as follows: Between 2nd and 3rd marker and 6th and 7th marker: Inc 0-0-6-6-6-6 tr (= 12-12-18-18-24-24 tr between these markers). Between 4th and 5th marker and 8th and 1st marker: Inc 0-6-6-6-6-6 tr (= 36-42-48-48-54-60 tr between each of these markers). Then repeat diagram A.1 2-2-3-3-4-4 times between 2nd and 3rd marker, 6-7-8-8-9-10 times between 4th and 5th marker, 2-2-3-3-4-4 times between 6th and 7th marker and 6-7-8-8-9-10 times between 8th and 1st marker. Work A.2 as before. SIZE XL-XXL-XXXL: On 8th round (round with tr) in A.1 inc evenly as follows: Between 4th and 5th marker and 8th and 1st marker: Inc 6-6-6 tr (= 54-60-66 tr between each of these markers). 12-12-12 tr have been inc in total on round. Repeat A.1 9-10-11 times between 4th and 5th marker and between 8th and 1st marker. Repeat inc on 10th round in A.1 (= 60-66-72 tr between each of these markers). Repeat diagram A.1 10-11-12 times between 4th and 5th marker and between 8th and 1st marker. ALL SIZES: On last round in A.2 insert 1 new marker in the middle of each A.2 (i.e. 18 tr on each side of marker in A.2 = 4 markers). Remove the old markers (= 4 markers remain in piece). Sts between markers are for sleeves (= 48-48-54-54-60-60 tr on each sleeve). When A.2 has been worked 1 time vertically, there are 240-252-276-300-324-336 tr on round. Yoke is now done in size S. SIZE M-L-XL-XXL-XXXL: Continue with pattern A.1 as before but over tr in A.2 (= 36 tr) work A.3 2 times in total in width (marker is in the middle of these repetitions). Work 1-2-3-4-5 rounds of A.3 (see arrow in diagram for correct size). Piece now measures 17-18-19-20-21-22 cm vertically. ALL SIZES: Work A.1a (see arrow on where pattern beg in the different sizes) 3 times in total in width until first marker - SEE ARMHOLE TIP, work 8-8-8-10-10-10 ch, skip sts between the 2 markers (= sleeve), work A.1a 12-13-14-16-17-18 times in total in width until next marker (= front piece), work 8-8-8-10-10-10 ch, skip sts between the 2 markers (= sleeve), work A.1a 9-10-11-13-14-15 times in total in width (= 160-172-184-212-224-236 sts). Fasten off. BODY: Beg round mid under sleeve as follows: Size S-L: Work 1 sl st in 5th ch, 1 ch, work 1 dc in each of the next 3-3 ch, work A.1a as before until ch under 2nd sleeve, 1 dc in each of the 8-8 ch under sleeve, work A.1a as before the rest of round. Work the 8-8 sts under each sleeve as 1st st in A.1a. SIZE M-XL-XXL-XXXL: Work 1 sl st in 5th ch, 3 ch, work 1 tr in each of the next 3-5-5-5 ch, work A.1a as before until ch under 2nd sleeve, 1 tr in each of the 8-10-10-10 ch under sleeve, work A.1a as before the rest of round. Work the 8-10-10-10 sts under each sleeve as 1st st in A.1a. ALL SIZES: Insert 1 marker in piece, NOW MEASURE PIECE FROM HERE. On first round with tr dec 4-4-4-2-2-2 tr evenly - READ DECREASE TIP = 156-168-180-210-222-234 tr. Then repeat A.1a 26-28-30-35-37-39 times in width. Repeat A.1a vertically. When piece measures 12 cm, adjust so that next round is with tr, dec 6 tr evenly = 150-162-174-204-216-228 tr. Now repeat A.1a 25-27-29-34-36-38 times in width. SIZE XL: Repeat dec when piece measures 16 cm from marker = 198 tr. Now repeat A.1a 33 times in width. ALL SIZES: When piece measures 20-21-22-23-24-25 cm from marker – adjust so that next round is with tr, inc 6 tr evenly. Repeat inc every 2-2-1½-1½-1½-1½ cm 5-5-7-7-7-7 more times = 186-198-222-246-264-276 tr. Repeat A.1a 1 more in width on every inc. When all inc are done, repeat A.1a 31-33-37-41-44-46 times in width. Work until piece measures 36-37-38-39-40-41 cm from marker, adjust to finish nicely according to pattern. Fasten off. SLEEVE: SIZE S: Beg by working mid under sleeve as follows: Work 1 sl st in 4th ch of the 8 ch worked in armhole on body. Work 1 ch (= 1 dc). Then work 1 dc in each of the next 4 ch, work A.3 over the next 18 tr, work A.1 (adjust pattern according to A.3) 2 times in total in width as before, work A.3 over the next 18 tr, finish with 1 dc in each of the last 3 ch. Work as 1st st in A.3 in the 8 sts under sleeve. When A.3 has been worked 1 time vertically, there are 56 tr on last round. SIZE M-XL-XXL: Beg by working mid under sleeve as follows: Work 1 sl st in 4th ch of the 8-10-10 ch worked in armhole on body. Work 3 ch (= 1 tr). Then work 1 tr in each of the next 4-6-6 ch, work A.3 as before, work A.1 (adjust pattern according to A.3) 2-3-4 times in total in width as before, work A.3, finish with 1 tr in each of the last 3 ch. Work as 1st st in A.3 in the 8-10-10-10 tr under sleeve. When A.3 has been worked 1 time vertically, there are 56-64-70 tr on last round. SIZE L: Beg by working mid under sleeve as follows: Work 1 sl st in 4th ch of the 8 ch worked in armhole on body. Work 1 ch (= 1 dc). Then work 1 dc in each of the next 4 ch, work A.3 as before, work A.1 (adjust pattern according to A.3) 3 times in total in width as before, work A.3, finish with 1 dc in each of the last 3 ch. Work as 1st st in A.3 in the 8 tr under sleeve. When A.3 has been worked 1 time vertically, there are 62 tr on last round. SIZE XXXL: Beg by working mid under sleeve as follows: Work 1 sl st in 4th ch of the 10 ch worked in armhole on body. Work 3 ch (= 1 tr). Then work 1 tr in each of the next 6 ch, work A.1a over the next 60 tr, finish with 1 tr in each of the last 3 ch = 70 tr. ALL SIZES: = 56-56-62-64-70-70 tr. Repeat A.1a vertically until finished measurements. On first round with tr dec 2-2-2-4-4-4 tr evenly = 54-54-60-60-66-66 tr. Repeat A.1a 9-9-10-10-11-11 times in total in width. When piece measures 10 cm, adjust so that next round is with tr, dec 6 tr evenly = 48-48-54-54-60-60 tr. Then repeat A.1a 8-8-9-9-10-10 times in width. When piece measures 23 cm, adjust to finish nicely according to pattern, fasten off. Work another sleeve the same way. NECK EDGE: Crochet an edge around the neck. Beg mid back. Work * 1 dc in first tr, 3 ch, skip approx. 1 cm *, repeat from *-* around the entire neck. Make sure to avoid a tight neck edge, adjust to finish with 1 sl st in first ch. Fasten off. |
||||||||||||||||||||||||||||
Diagram explanations |
||||||||||||||||||||||||||||
|
||||||||||||||||||||||||||||
 |
||||||||||||||||||||||||||||
 |
||||||||||||||||||||||||||||
 |
||||||||||||||||||||||||||||
Have you finished this pattern?Tag your pictures with #dropspattern #seashoreblisssweater or submit them to the #dropsfan gallery. Do you need help with this pattern?You'll find 10 tutorial videos, a Comments/Questions area and more by visiting the pattern on garnstudio.com. © 1982-2026 DROPS Design A/S. We reserve all rights. This document, including all its sub-sections, has copyrights. Read more about what you can do with our patterns at the bottom of each pattern on our site. |
||||||||||||||||||||||||||||


With over 40 years in knitting and crochet design, DROPS Design offers one of the most extensive collections of free patterns on the internet - translated to 17 languages. As of today we count 324 catalogues and 12290 patterns translated into English (UK/cm).
We work hard to bring you the best knitting and crochet have to offer, inspiration and advice as well as great quality yarns at incredible prices! Would you like to use our patterns for other than personal use? You can read what you are allowed to do in the Copyright text at the bottom of all our patterns. Happy crafting!
Post a comment to pattern DROPS 169-15
We would love to hear what you have to say about this pattern!
If you want to leave a question, please make sure you select the correct category in the form below, to speed up the answering process. Required fields are marked *.