
Popular categories
Looking for a yarn?


Comments / Questions (10)
![]() Eve Havivi wrote:
Eve Havivi wrote:
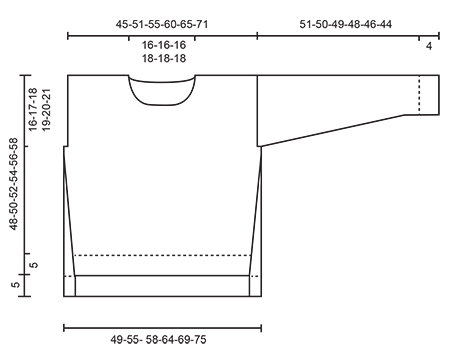
If I wanted to make the front and the back the same length, would I just skip the first ribbing part in the back pattern?
25.11.2019 - 16:26DROPS Design answered:
Hi Eve! Yes, that can work, unfortunately we do not have the opportunity to re-write this pattern at this moment. We do have other patterns on sweaters knitted in garter stitch and with ribbing, like this one. Happy knitting!
26.11.2019 - 09:04
![]() Eve Havivi wrote:
Eve Havivi wrote:
Is the pattern such that the back is longer than the front? It kind of looks like it might be in the picture, but I just wanted to be sure
25.11.2019 - 02:46DROPS Design answered:
Dear Eve Havivi, yes, back part is longer than front- the difference is approx. 5 cm. Happy knitting!
25.11.2019 - 05:59
![]() Susan wrote:
Susan wrote:
Hi. I’m just reading through this and it looks like the body of the jumper is made in garter stitch but the sleeves are in stocking stitch. Is it right that the arms are in a different stitch to the body?
20.08.2019 - 18:03DROPS Design answered:
Hello Susan. Yes, you're right. Back and front are worked in garter stitch and sleeves in stocking stitch. Happy knitting!
20.08.2019 - 18:25
![]() Irena wrote:
Irena wrote:
Prosze mi podac ile potzebuje welny? 200 g to raczej malo . Dziekuje .
18.05.2018 - 15:01DROPS Design answered:
Witaj Ireno! Wystarczy tyle włóczki ile jest podane we wzorze. To bardzo lekka i wydajna włóczka. Dodatkowo sweter jest wykonywany na drutach nr 8. Powodzenia!
18.05.2018 - 20:26
![]() Rianne Wiesje Kompier wrote:
Rianne Wiesje Kompier wrote:
Bij benodigdheden staat als garen alleen Drops Melody Toch staat het volgende bij de beschrijving van de mouw: "Zet 26-26-26-32-32-32 st op (incl. 1 kant st aan elke kant) met rondbreinld 8 mm en 2 draden Brushed Alpaca Silk" Klopt dit of moet het Melody zijn?
24.11.2016 - 08:17DROPS Design answered:
Hoi Rianne. Dat is een foutje in de vertaling. Het moet DROPS Melody zijn zoals er staat in de kop. Ik zal het aanpassen.
24.11.2016 - 11:35
![]() Robin Beecroft wrote:
Robin Beecroft wrote:
Do you have any patterns on straight needles? l
03.07.2016 - 18:02DROPS Design answered:
Dear Mrs Beecroft, this pattern is worked back and forth on circular needle to get enough room for all sts. You can then use straight needle, just remember to keep your tension. Read more about circular needles/straight needles here. Happy knitting!
04.07.2016 - 10:42
![]() Kaz wrote:
Kaz wrote:
Hi , Could you explain please why there is a difference in length before armhole shaping from the front and back piece please !
05.03.2016 - 17:43DROPS Design answered:
Dear Mrs Kaz, back piece is longer than front piece (back piece = 53-63 cm and front piece = 48-58 cm), that's why you will cast on sts for armholes at a different height. Happy knitting!
05.03.2016 - 18:28
![]() Gosia wrote:
Gosia wrote:
Danke für die schnelle Antwort. Ich stricke definitiv kraus rechts. Und 1,5 x glatt rechts wären vielleicht 18 Reihen, keine 23... Es wird nicht besser mit der Maschenprobe, obwohl ich die Versuche nun wiederholt habe. Irgendwas scheint da unrealistisch bemessen zu sein :(( Können Sie noch eine andere Idee? Danke im Voraus
29.02.2016 - 22:51DROPS Design answered:
Liebe Gosia, ich werde die Maschenprobe prüfen und melde mich hier wieder.
01.03.2016 - 09:05
![]() Gosia wrote:
Gosia wrote:
Ich habe ein Problem mit der Maschenprobe - ich stricke mit DROPS Melody. Für 11 M x 23 R kraus re. bin ich mittlerweile bei der Nadelstärke 3 angekommen (Nadel 8 hat die Länge von 17 cm ergeben; die Breite klappt immer) - das Maschenbild wird dann aber nicht annähernd dem Foto entsprechen. Bei "Summer Melody" hat die Maschenprobe (12 R, Nadel 9) perfekt geklappt. Ich vermute einen Fehler in der Anleitung für dieses Model - oder mache ich was falsch?
28.02.2016 - 10:44DROPS Design answered:
Liebe Gosia, haben Sie bei der Maschenprobe wirklich kraus rechts gestrickt wie angegeben? Bei kraus rechts braucht man etwa 1.5 x so viele Reihen in der Höhe wie bei glatt rechts. Die beschriebene Situation (Breite stimmt, Länge nicht) klingt etwas danach.
29.02.2016 - 15:29
![]() Radka wrote:
Radka wrote:
Skvělý návod pro začátečníky :) Upletený svetr je efektní.
09.01.2016 - 11:10
|
|
Merry and Bright |
|
|
|
|
Knitted DROPS jumper in garter st and stocking st in "Melody". Size S-XXXL.
DROPS Extra 0-1191 |
|
|
GARTER ST (back and forth): K all rows. 1 ridge = 2 rows K. INCREASE TIP: Inc 1 st by making 1 YO inside 1 edge st, on next round work YO twisted (i.e. work in back loop of st instead front) to avoid holes. DECREASE TIP: All dec are done from RS. Dec 1 st in each side of piece by K 2 tog inside 1 edge st in each side of piece. ---------------------------------------------------------- BACK PIECE: Worked back and forth on circular needle. Cast on 59-65-71-83-89-95 sts (incl 1 edge st in each side) on circular needle size 8 mm with Melody. Work rib as follows: 4 sts in GARTER ST - see explanation above, rib * K 3, P 3 *, repeat from *-* until 7 sts remain, K 3, 4 sts in garter st. When piece measures 5 cm, insert 1 marker in each side - used for assembly. Then work in garter st while AT THE SAME TIME on 1st row dec 1-1-1-5-5-5 sts evenly = 58-64-70-78-84-90 sts. REMEMBER THE KNITTING TENSION When piece measures 24 cm, dec 1 st in each side of piece - READ DECREASE TIP! Repeat dec every 0-0-6-5-5-6 cm 0-0-1-2-2-2 more times = 56-62-66-72-78-84 sts. When piece measures 37-38-39-40-41-42 cm, cast off 3 sts in each side for armhole = 50-56-60-66-72-78 sts. When piece measures 51-53-55-57-59-61 cm, cast off the middle 16-16-16-18-18-18 sts for neck and finish each shoulder separately. Continue to cast off 1 st on next row from neck = 16-19-21-23-26-29 sts. Cast off when piece measures 53-55-57-59-61-63 cm. Work the other shoulder the same way. FRONT PIECE: Worked back and forth on circular needle. Cast on 53-59-59-65-71-77 sts (incl 1 edge st in each side) on circular needle size 8 mm with Melody. Work rib as follows: 4 sts in garter st, rib * K 3, P 3 *, repeat from *-* until 7 sts remain, K 3, 4 sts in garter st. When piece measures 5 cm, work in garter st while AT THE SAME TIME on 1st row inc 1-1-3-1-1-1 sts evenly - READ INCREASE TIP = 54-60-62-66-72-78 sts. REMEMBER THE KNITTING TENSION When piece measures 19 cm, inc 1 st in each side of piece - READ INCREASE TIP! Repeat inc every 0-0-6-5-5-6 cm 0-0-1-2-2-2 more times = 56-62-66-72-78-84 sts. When piece measures 32-33-34-35-36-37 cm, cast off 3 sts in each side for armhole = 50-56-60-66-72-78 sts. When piece measures 37-39-41-42-44-46 cm, cast off the middle 12 sts for neck and finish each shoulder separately. Continue to cast off for neck on every row from neck as follows: Cast off 2 sts 1 time and 1 st 1-1-1-2-2-2 times = 16-19-21-23-26-29 sts remain for shoulder. Cast off when piece measures 48-50-52-54-56-58 cm. Work the other shoulder the same way. SLEEVE: Worked back and forth on circular needle. Cast on 26-26-26-32-32-32 sts (incl 1 edge st in each side) on circular needle size 8 mm with Melody. Work rib K 3/P 3 with 1 edge st in garter st in each side. When rib measures 4 cm, work in stocking st with 1 edge st in garter st in each side while AT THE SAME TIME adjusting no of sts on 1st row to 25-26-28-28-30-30. When piece measures 7 cm, inc 1 st in each side of piece. Repeat inc every 8-6½-6½-5½-5-4 cm 5-6-6-7-7-8 more times = 37-40-42-44-46-48 sts. Cast off when piece measures 51-50-49-48-46-44 cm (shorter measurements in the larger sizes because of longer sleeve cap and wider shoulders). Knit another sleeve the same way. ASSEMBLY: Sew right shoulder seam. NECK EDGE: Worked back and forth on circular needle. Pick up from RS approx. 50-56 sts around the neck on circular needle size 8 mm with Melody. Work rib = K 3/P 3 with 1 edge st in garter st in each side while AT THE SAME TIME adjusting no of sts on 1st row to 50-50-50-56-56-56. Cast off with K over K and P over P when rib measures approx. 2 cm. ASSEMBLY: Sew left shoulder seam and neck edge. Sew in sleeves. Sew underarm and side seams inside 1 edge st - front piece is 5 cm shorter than back piece (sew down to marker on back piece). |
|
 |
|
Have you finished this pattern?Tag your pictures with #dropspattern or submit them to the #dropsfan gallery. Do you need help with this pattern?You'll find 18 tutorial videos, a Comments/Questions area and more by visiting the pattern on garnstudio.com. © 1982-2026 DROPS Design A/S. We reserve all rights. This document, including all its sub-sections, has copyrights. Read more about what you can do with our patterns at the bottom of each pattern on our site. |


With over 40 years in knitting and crochet design, DROPS Design offers one of the most extensive collections of free patterns on the internet - translated to 17 languages. As of today we count 324 catalogues and 12290 patterns translated into English (UK/cm).
We work hard to bring you the best knitting and crochet have to offer, inspiration and advice as well as great quality yarns at incredible prices! Would you like to use our patterns for other than personal use? You can read what you are allowed to do in the Copyright text at the bottom of all our patterns. Happy crafting!
Post a comment to pattern DROPS Extra 0-1191
We would love to hear what you have to say about this pattern!
If you want to leave a question, please make sure you select the correct category in the form below, to speed up the answering process. Required fields are marked *.