
Popular categories
Looking for a yarn?


Comments / Questions (17)
![]() Lara wrote:
Lara wrote:
Con questo motivo voglio fare una sciarpa. Come si lavora questo motivo con ferri dritti?! Per capirci dia con ferri a doppia punta che circolari il lavoro viene eseguito sempre sul dritto . Con i ferri dritti nel caso appunto di una sciarpa, il rovescio come deve essere lavorato?
05.01.2026 - 15:54DROPS Design answered:
Buonasera Lara, per un'assistenza così personalizzata può rivolgersi al suo rivenditore DROPS di fiducia. Buon lavoro!
06.01.2026 - 22:25
![]() Lara wrote:
Lara wrote:
Mi piacerebbe fare un coordinato di sciarpa che misura cm 25 alta e lunga cm 140 con questo cappello con lo stesso motivo, con il filato puna. Mi potreste dire se 4 gomitoli di puna per la sciarpa sono sufficienti?!
24.12.2025 - 19:17DROPS Design answered:
Buonasera Lara, per un'assistenza così personalizzata può rivolgersi al suo rivenditore DROPS di fiducia. Buon lavoro!
27.12.2025 - 00:50
![]() Tove Torjesen wrote:
Tove Torjesen wrote:
Superfin
17.11.2025 - 21:54
![]() Jeanne wrote:
Jeanne wrote:
For the hat decrease instructions- “Repeat dec every other round 10 times in total = 18 sts”. Does “every other” mean alternate rows with no decreases on the second row? or does it mean every remaining row gets decreased. Thx
28.06.2025 - 01:21DROPS Design answered:
Dear Jeanne, "every other" means "alternate" or "every 2nd" round. So you work decreases on one round and work straight (no decreases) on the 2nd round and repeat like this. Happy knitting!
29.06.2025 - 19:29
![]() Sanna wrote:
Sanna wrote:
Kiinnitetäänkö kavennusmerkot siis oikeassa lapasessa kierroksen alusta 2. , 5., 25. ja 28. silmukalle? Ja kavennukset 1. ja 2. silmukka oikeinyhteen, 3. ja 4. oikeinyhteen ja 25. sekä 28. silmukka nostetaan neulomatta ja vedetään seuraava yli? Neulo 1 s kuten aiemmin, kiinnitä 1.merkki, neulo 2 s kuten aiemmin, kiinnitä 2.merkki, neulo 19 s kuten aiemmin (viimeinen s = oikea s), kiinnitä 3.merkki, neulo 2 s kuten aiemmin, kiinnitä 4.merkki, neulo krs loppuun kuten aiemmin.
01.09.2024 - 21:31
![]() Sanna wrote:
Sanna wrote:
Kavennusohje on todella vaikea hahmottaa ja ymmärtää ilman jonkinlaista selventää kuviota tai piirrosta, joka esittää kavennusmerkkien kohdat jne.
01.09.2024 - 21:18
![]() Marit Bøe wrote:
Marit Bøe wrote:
Jeg får ikke fellingene øverst på høyre vott til å stemme med plasseringen av tommelen, og jeg skjønner ikke at det kan stemme at man skal øke på hver side av den 22. masken på venstre vott. Er det den første votten som er venstre vott og den siste som er høyre? Hvorfor skal man i så fall ikke øke på hver side av den første masken på vott nr. 2; ville ikke det bli det samme?
07.04.2024 - 20:11DROPS Design answered:
Hei Marit. Første vott er høyre vott og der øker du til tommel på begynnelsen av omgangen. Andre vott er venstre vott og for å få tommelen på motsatt side øker du nå ved den 22. masken på omgangen. Da får du tomlene på hver sin side. mvh DROPS Design
15.04.2024 - 08:02
![]() Laura Campanari wrote:
Laura Campanari wrote:
Per quanto riguarda le spiegazioni del berretto non sono riuscita a capire quali sono le maglie a punto legaccio. Grazie
06.04.2024 - 23:25
![]() Silvia wrote:
Silvia wrote:
Buongiorno, ho eseguito il campione con il filato lima per lo scaldacollo, maglia rasata per avere 21 maglie e 28 ferri in 10 cm ho dovuto usare i ferri 3. Quando sono passata al punto dello scaldacollo però avviando 132 maglie ed eseguendo i punti indicati, coste e fantasia, il lavoro si restringe molto rispetto ai 63 cm indicati per una M. Le maglie mi sembrano calcolate sulla maglia rasata e non sul punto coste che è elastico. Potete darmi spiegazioni? Grazie
09.02.2023 - 13:39DROPS Design answered:
Buonasera Silvia, non ci sono errori nelle spiegazioni riportate, provi a riconsiderare il suo campione, magari senza volerlo ha applicato un tensione diversa alla lavorazione del motivo. Buon lavoro!
10.02.2023 - 23:57
![]() Maureen wrote:
Maureen wrote:
This is Avery simple pattern that can be adapted for many styles , it’s great to use for all that stash yarn and for donation for those in need
23.02.2020 - 07:22
|
|||||||
Ruth#ruthset |
|||||||
|
|
|||||||
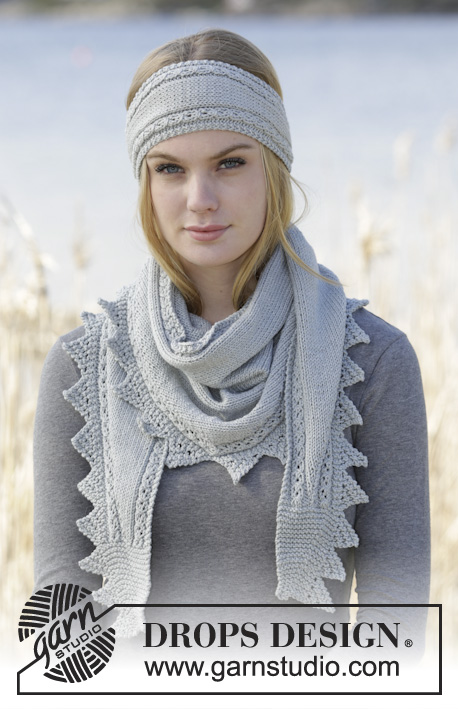
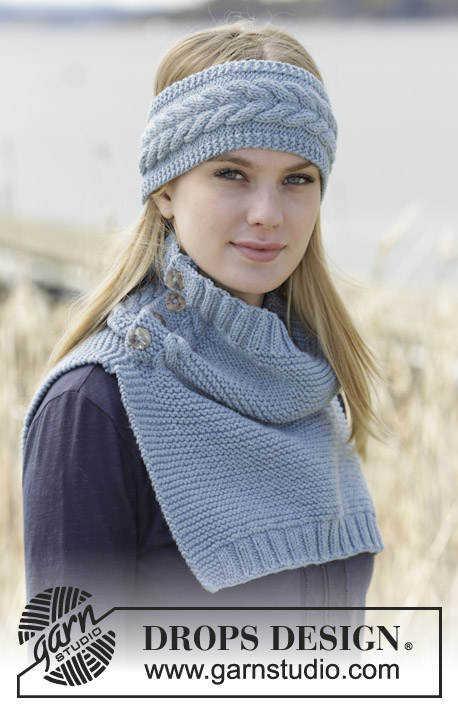
Set consists of: Knitted DROPS hat, neck warmer and mittens with textured pattern in “Lima”.
DROPS 166-13 |
|||||||
|
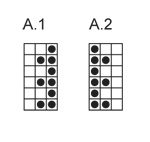
PATTERN: See diagrams A.1-A.2. DECREASE TIP (applies to mittens): Dec before marker as follows: Work until 2 sts remain before marker, K 2 tog. Dec after marker as follows: Work until marker, slip 1 st as if to K, K 1, psso. ---------------------------------------------------------- HAT: Worked in the round on circular needle/double pointed needles. Cast on 108 sts on circular needle size 4 mm with Lima. K 1 round. Then work rib = P 2/K 1 over all sts until piece measures 4 cm. Then work diagram A.1. REMEMBER THE KNITTING TENSION When piece measures 16 cm, insert 9 marker in the hat, 12 sts between each marker, insert first marker after 12 sts (i.e. after 1 st K). On next round, dec 1 st before every marker by K the last 2 sts tog. Continue with K over K, garter st over garter st and P over P. Repeat dec every other round 10 times in total = 18 sts. On next round K tog all sts 2 by 2 = 9 sts. Cut the yarn and pull it through the remaining sts, tighten tog and fasten. The hat measures approx. 25 cm vertically. ---------------------------------------------------------- NECK WARMER: Worked in the round on circular needle. Cast on 120-132-141 sts on circular needle size 4 mm with Lima. K 1 round. Work rib = P 2/K 1. When piece measures 4 cm, work A.1 over all sts. REMEMBER THE KNITTING TENSION When piece measures 18-20-22 cm, work rib over all sts (= P 2/K 1). When piece measures 22-24-26 cm, K 1 round. Cast off. ---------------------------------------------------------- RIGHT MITTEN: Worked in the round on double pointed needles. Cast on 42 sts on double pointed needles size 3.5 mm with Lima. K 1 round. Then work rib = K 1/P 2 over all sts until piece measures 4 cm. Then work A.2 over all sts. Insert 1 marker in the first st on round (= K st). REMEMBER THE KNITTING TENSION! when piece measures 10 cm, inc for thumb by make a YO on each side of st with marker, K YO twisted on next round. Repeat inc every other round 5 more times - inc on each side of all thumb sts every time, i.e. at next inc, inc on every side of 3 sts, then 5 sts etc. – work inc sts in stocking st. After all inc, there are 13 thumb sts and 54 sts in total. After last inc slip thumb sts on a stitch holder and cast on 1 new st over sts on stitch holder = 42 sts. Continue pattern, K the new sts as before. When piece measures 23 cm, insert 4 markers in the piece as follows: Work 1 st as before, insert 1st marker, work 2 sts as before, insert 2nd marker, work 19 sts as before (last st is K 1), insert 3rd marker, work 2 sts as before, insert 4th marker, work the rest of round as before. On next round, dec before 1st and 3rd marker and after 2nd and 4th marker – Read DECREASE TIP (= 4 sts dec). Repeat dec every round, 7 more times = 10 sts. Cut the yarn and pull it through the remaining sts, tighten tog and fasten. Piece measures approx. 26 cm. THUMB: Slip the 13 sts over thumb gusset on double pointed needles size 3.5 mm and pick in addition up 3 sts along the edge behind thumb sts = 16 sts. Work in stocking st until the thumb itself measures approx. 5 cm (try on the mitten, approx. ½ cm remains until finished measurements). K all sts tog 2 by 2 = 8 sts. K 1 round. K all sts tog 2 by 2 = 4 sts. Cut the yarn and pull it through the remaining sts, tighten tog and fasten. LEFT MITTEN: Cast on and work as right mitten. Inc for thumb on each side of the 22nd st on round (= K st). Insert markers as follows: Insert 1st marker at beg of round, work 19 sts as before, insert 2nd marker, work 2 sts as before, insert 3rd marker, work 19 sts as before, insert 4th marker, work the rest of round as before. Dec after 1st and 3rd marker and before 2nd and 4th marker. |
|||||||
Diagram explanations |
|||||||
|
|||||||
 |
|||||||
Have you finished this pattern?Tag your pictures with #dropspattern #ruthset or submit them to the #dropsfan gallery. Do you need help with this pattern?You'll find 25 tutorial videos, a Comments/Questions area and more by visiting the pattern on garnstudio.com. © 1982-2026 DROPS Design A/S. We reserve all rights. This document, including all its sub-sections, has copyrights. Read more about what you can do with our patterns at the bottom of each pattern on our site. |
|||||||


With over 40 years in knitting and crochet design, DROPS Design offers one of the most extensive collections of free patterns on the internet - translated to 17 languages. As of today we count 324 catalogues and 12290 patterns translated into English (UK/cm).
We work hard to bring you the best knitting and crochet have to offer, inspiration and advice as well as great quality yarns at incredible prices! Would you like to use our patterns for other than personal use? You can read what you are allowed to do in the Copyright text at the bottom of all our patterns. Happy crafting!
Post a comment to pattern DROPS 166-13
We would love to hear what you have to say about this pattern!
If you want to leave a question, please make sure you select the correct category in the form below, to speed up the answering process. Required fields are marked *.