
Popular categories
Looking for a yarn?


Comments / Questions (141)
![]() Elina Gaynor wrote:
Elina Gaynor wrote:
Voisitteko laittaa kuvan nappien kohdasta. Tulevatko ne olkapäälle. Myös nämä neljä oikein neulottua keskellä takana on epäselvä minulle. Tulevatko ne kädentien vai pääntie puolelle. Lisätty neljä silmukkaa ovatko ne myös oikein neulottua .
18.10.2025 - 14:16DROPS Design answered:
Hei, keskelle taakse tulee ainaoikeinneulottu reunus ja napit kiinnitetään tähän reunukseen. Lisätyillä 4 silmukalla neulotaan ainaoikeaa.
23.10.2025 - 18:41
![]() Linda Burton wrote:
Linda Burton wrote:
I am not understanding what to do with the 4 stitches held on holders. It says place the 4 sets from right back piece behind the a4 sets on the left back piece and fasten with small stitches. After that i pick up the neck edge. Thanks for any help.
09.10.2025 - 00:25
![]() Solveig Mikkelrud wrote:
Solveig Mikkelrud wrote:
Jeg får ikke ermringingen på ermet like lang som på kjolen. Når jeg skal sy i ermene blir ermringingen altfor kort på ermene
16.09.2025 - 10:36DROPS Design answered:
Hi, I would wash the sleeve, it may be a few cm longer after washing and drying. If it is not enough, you will have to unravel the upper part of the sleeve and make it longer, before starting decreasing 6 stitches for the sleeve cup. Happy knitting!
17.09.2025 - 09:56
![]() Linda Burton wrote:
Linda Burton wrote:
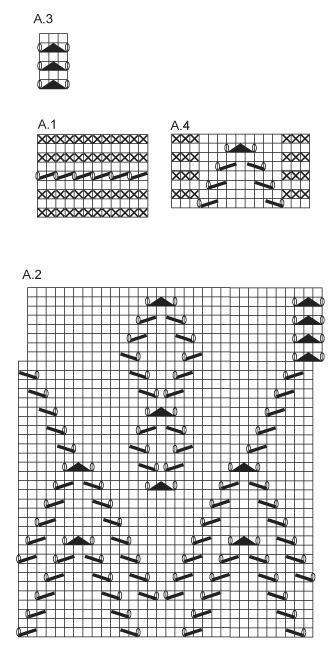
I am not understanding one of the figures on your charts and it is not listed in the diagram explanations. In chart A.1 the solid black line going over two stitches. It travels downward. Is that a k2 tog? And if it is slanting up? I am knitting the WEnday darling dress and it is chart A.1
06.09.2025 - 23:19DROPS Design answered:
Hi Linda, The diagonal line which slants up from left to right is knit 2 together. The diagonal line which slants down from left to right is slip 1 stitch, knit 1 and pass the slipped stitch over. Regards, Drops team.
08.09.2025 - 06:58
![]() Anette wrote:
Anette wrote:
Hej Ökningar i ärmen. Vad betyder "Öka med 6-3 1/2.......cm mellanrum......" ? Ska jag öka med 6cm mellanrum eller 3,5cm mellanrum? Eller är det 6st msk totalt i ökningen? Vänligen Anette
14.07.2025 - 06:54DROPS Design answered:
Hej Anette. I den minsta storleken ökar du med 6 cm mellanrum och i den näst minsta med 3,5 cm mellanrum. Mvh DROPS Design
28.07.2025 - 14:42
![]() Anette wrote:
Anette wrote:
Jag får inte till vänster axel och halsen på vänster axel med knappar, är halsen på samma sida av axelns stycket när jag ska maska av för halsen?
09.07.2025 - 11:03DROPS Design answered:
Hej Anette. Kanterna med knapphål och knappar sitter mitt bak på klänningen, så du gör kant med knapphål mitt bak på den vänstra delen och kant med knappar mitt bak på den högra delen. Du avmaskar maskor närmast halsen/nacken på båda bakstycken. Mvh DROPS Design
10.07.2025 - 09:55
![]() Annemarie wrote:
Annemarie wrote:
Hallo drops design, Ik ben begonnen met het breien van drops children 26-6. Bij A2 verschuift bovenaan het patroon een steek, hoe doe ik dat? Voor A3 staat in het patroon, begin 1 st voor de eerste st op de naald, hoe breien ik die eerste steek? Ik hoor het graag, zodat ik verder kan. Groetjes, Annemarie
17.05.2025 - 22:38DROPS Design answered:
Dag Annemarie,
Bij A.2 begin je op die naald met de laatste steek van het einde van de vorige toer. Hetzelfde geldt voor A.3
18.05.2025 - 08:23
![]() Gill wrote:
Gill wrote:
Hej, det står står så här : Fortsätt avm för ärmhål i varje sida i början på varje v så här: 2 m 1 gång och 1 m 2-2-1-1-2 ggr = 66 m. Ska man då lyfta 1m sticka 1 och drag över 1 ,2gånger efter varandra och i nästa varv lyfta 1, sticka och dra över 1. Om ni förstår min fråga? Alltså jag följer minskninstips i början på varje varv? Mvh Gill
07.05.2025 - 21:10DROPS Design answered:
Hei Gill. Minskninstipset som står øverst i oppskriften gjelder når du strikker etter diagram A.3. mvh DROPS Design
12.05.2025 - 11:49
![]() Birgitte Pettersen wrote:
Birgitte Pettersen wrote:
Er det 12ganger i høyden dere mener angående felling før og etter A3. Får det ikke til å stemme . Mvh Birgitte Pettersen
14.04.2025 - 19:17DROPS Design answered:
Hei Birgitte. Se vårt svar på ditt forrige spørsmål. mvh DROPS Design
28.04.2025 - 09:37
![]() Birgitte Pettersen wrote:
Birgitte Pettersen wrote:
Heisann. Jeg holder på med A3 og felling før og etter A3. Det jeg ikke forstår er at når jeg har helt 8 ganger i høyde så stemmer ikke det med maske antall på 120 m. Får 92 m. Kan dere forklare bedre angående felling før og etter a3 ? Jeg startet med 192 m. Og strikket alt fram til a3 Mvh Birgitte
14.04.2025 - 18:54DROPS Design answered:
Hei Birgitte. I str. 2 år. Du har 192 masker og når du starter med A.3 + glattstrikk, starter du 1 maske før første maske på omgangen. Så skal du felle 1 maske før hver A.3 (man strikker 6 rapporter av A.3) = 6 felte masker = 192-6 =186 masker. Neste gang det skal felles, felles det etter hver A.3 = enda 6 felte masker = 186-6 = 180 masker. Gjenta fellingene vekselsvis før og etter A.3 TOTALT 12 ganger = 6 felte masker pr felle omganger x 12 ganger = 72 felte masker. 192 - 72 = 120 masker. mvh DROPS Design
28.04.2025 - 09:36
|
|||||||||||||||||||
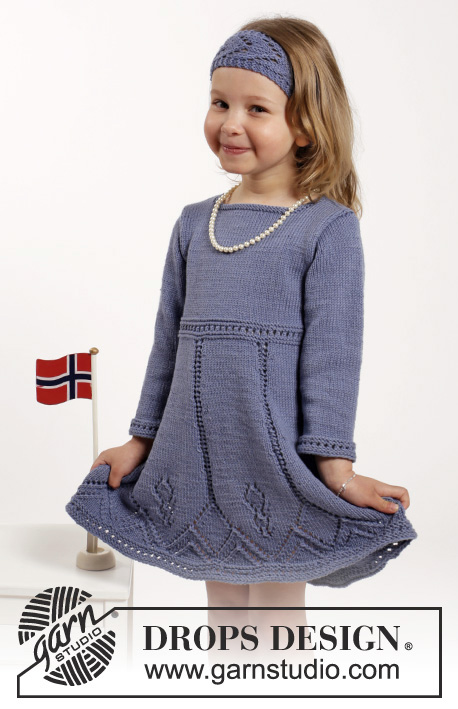
Wendy Darling#wendydarlingdress |
|||||||||||||||||||
 |
 |
||||||||||||||||||
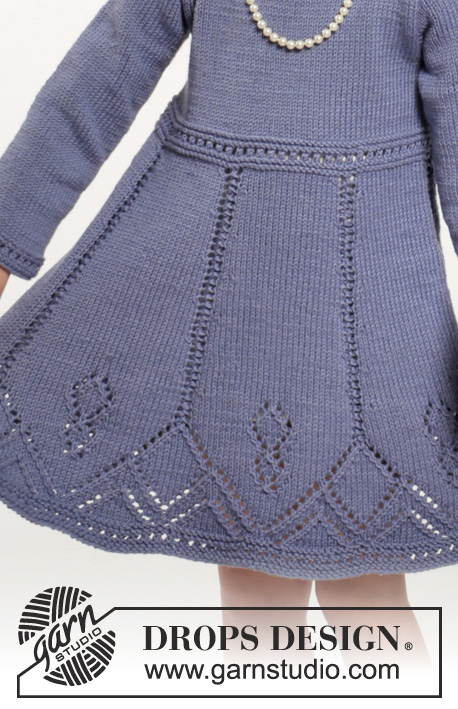
Knitted dress and hair band with lace pattern in DROPS Cotton Merino. Size children 2 - 10 years
DROPS Children 26-6 |
|||||||||||||||||||
|
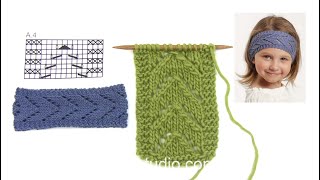
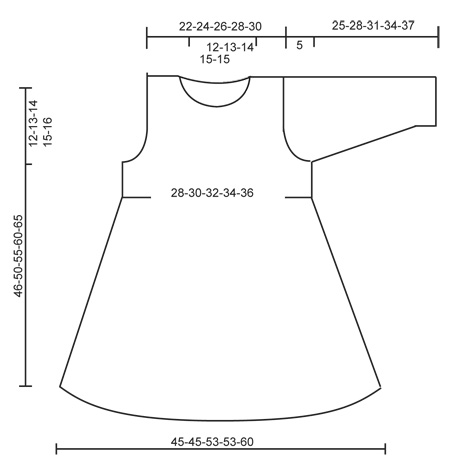
PATTERN: See diagrams A.1 to A.4. DECREASE TIP: Dec as follows before A.3: K 2 tog. Dec as follows after A.3: Slip 1 st as if to K, K 1, psso BUTTONHOLES: Dec for buttonholes on left back piece. Dec by working second and third st tog from mid back, then make a YO. Dec for buttonholes when band measures 2 and 4 cm GARTER ST (back and forth): K all rows. 1 ridge = 2 rows K. ---------------------------------------------------------- DRESS: Worked in the round on circular needle from bottom up. Cast on 192-192-224-224-256 sts on circular needle size 3.5 mm with Cotton Merino. Work A.1. Then work A.2 (= 6-6-7-7-8 repetitions in width). When A.2 has been worked 1 time vertically, work as follows - beg 1 st before first st on round: * A.3 (= 3 sts), 29 sts in stocking st *, repeat from *-* 6-6-7-7-8 times. AT THE SAME TIME when piece measures 15 cm, dec 1 st before every A.3 – READ DECREASE TIP (= 6-6-7-7-8 sts dec). Repeat dec alternately before and after A.3 every every 1-1½-1½-2-2 cm a total of 12-10-12-10-12 times = 120-132-140-154-160 sts. Continue in stocking st and A.3 until piece measures 27-29-32-35-37 cm. Now work A.1 over all sts, on first row in A.1 adjust no of sts to 124-132-140-148-160. Insert 2 markers in the piece; one at the beg of round and 1 after 62-66-70-74-80 sts = sides. Continue in stocking st over all sts. When piece measures 34-37-41-45-49 cm, cast off 6 sts in each side for armholes (i.e. 3 sts on both sides of every marker) and finish each piece separately. BACK PIECE: = 56-60-64-68-74 sts. Continue cast off for armholes in each side at beg of every row as follows: 2 sts 1 time and 1 st 2-2-1-1-2 times = 48-52-58-62-66 sts. When piece measures 38-42-47-52-57 cm, slip the first 22-24-27-29-31 sts (from RS) on 1 stitch holder for right shoulder (work them first) and finish each shoulder separately. LEFT SHOULDER: = 26-28-31-33-35 sts. Continue in stocking st but work the first 4 sts on needle (towards middle) in garter st (= button band). Dec for BUTTONHOLES - see explanation above. When piece measures 44-48-53-58-63 cm, slip the first 4 sts on a stitch holder (work them first), then cast off the next 10-11-12-13-13 sts for neck. Then cast off 1 st on next row towards the neck = 11-12-14-15-17 sts remain on the shoulder. Cast off when piece measures 46-50-55-60-65 cm. RIGHT SHOULDER: Slip the 22-24-27-29-31 sts from stitch holder back on needle and cast on 4 new sts at the end of first row from RS (= button band) = 26-28-31-33-35 sts. Work as left shoulder but reversed, do not dec for buttonholes. FRONT PIECE: = 56-60-64-68-74 sts. Cast off for armhole in the sides as on back piece = 48-52-58-62-66 sts. When piece measures 41-45-50-55-60 cm, slip the middle 18-20-22-24-24 sts on a stitch holder for neck and finish each shoulder separately. Then cast off on every row towards neck: 2 sts 1 time and 1 st 2 times = 11-12-14-15-17 sts remain on shoulder. Cast off when piece measures 46-50-55-60-65 cm. SLEEVE: Worked in the round on double pointed needles. Cast on 40-42-44-46-48 sts on double pointed needles size 3.5 mm with Cotton Merino. Work A.1 over all sts, then work in stocking st. Insert 1 marker at beg of round = mid under sleeve. When piece measures 6 cm, inc 1 st on each side of marker. Inc every 6-3½-3-3-3 cm 2-4-6-7-8 more times = 46-52-58-62-66 sts. When piece measures 20-23-26-29-32 cm, cast off 6 sts mid under sleeve for sleeve cap. Then work sleeve back and forth while AT THE SAME TIME dec for sleeve cap in each side as follows: Cast off 2 sts in each side until piece measures 24-27-30-33-36 cm. Cast off 3 sts in each side, then cast off the remaining sts. Piece measures approx. 25-28-31-34-37 cm. ASSEMBLY: Sew the shoulder seams. Sew in sleeves. Sew the buttons on to right band. Then place the 4 sts from right back piece behind the 4 sts on the left back piece and fasten with small sts. NECK EDGE: Pick up approx. 72 to 88 sts (incl sts on stitch holders) around the neck on circular needle size 3.5 mm. Work 2 ridges. Cast off. ---------------------------------------------------------- HAIR BAND: Cast on 15 sts on needle size 3.5 mm with Cotton Merino. Work 1 ridge in GARTER ST - see explanation above, then work A.4 over all sts. Continue with A.4 until piece measures 41-42-43-44 cm (lightly pull piece when measuring), work a ridge, cast off. Sew cast-on and cast-off edge tog with grafting/kitchener stitches. |
|||||||||||||||||||
Diagram explanations |
|||||||||||||||||||
|
|||||||||||||||||||
 |
|||||||||||||||||||
 |
|||||||||||||||||||
Have you finished this pattern?Tag your pictures with #dropspattern #wendydarlingdress or submit them to the #dropsfan gallery. Do you need help with this pattern?You'll find 31 tutorial videos, a Comments/Questions area and more by visiting the pattern on garnstudio.com. © 1982-2026 DROPS Design A/S. We reserve all rights. This document, including all its sub-sections, has copyrights. Read more about what you can do with our patterns at the bottom of each pattern on our site. |
|||||||||||||||||||


With over 40 years in knitting and crochet design, DROPS Design offers one of the most extensive collections of free patterns on the internet - translated to 17 languages. As of today we count 325 catalogues and 12298 patterns translated into English (UK/cm).
We work hard to bring you the best knitting and crochet have to offer, inspiration and advice as well as great quality yarns at incredible prices! Would you like to use our patterns for other than personal use? You can read what you are allowed to do in the Copyright text at the bottom of all our patterns. Happy crafting!
Post a comment to pattern DROPS Children 26-6
We would love to hear what you have to say about this pattern!
If you want to leave a question, please make sure you select the correct category in the form below, to speed up the answering process. Required fields are marked *.