
Popular categories
Looking for a yarn?


Comments / Questions (151)
![]() VALENTINA wrote:
VALENTINA wrote:
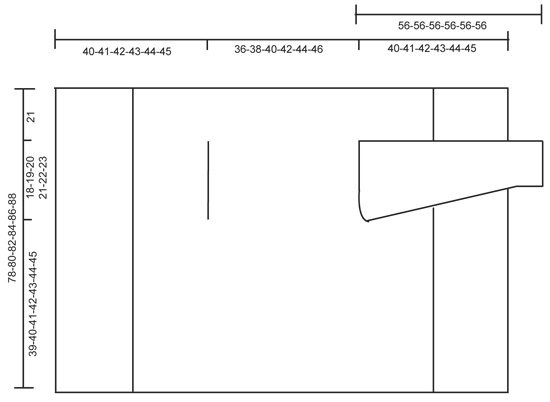
Buongiorno. Non ho ben capito come chiudere il dietro e da che punto poi iniziare il davanti.Grazie, Valentina
26.06.2016 - 18:57DROPS Design answered:
Buongiorno Valentina. Finisce il dietro, dopo aver lavorato circa 21 cm dagli scalfi e finisce con il giro 9 del diagramma. Lavora un davanti iniziando dal primo angolo del quadrato e lavorando verso il secondo angolo. Il secondo davanti verrà lavorato iniziando dal terzo angolo e lavorando verso il quarto angolo. Lo schema con le misure, in fondo alle spiegazioni, può aiutarla a capire meglio. Buon lavoro!
26.06.2016 - 19:16
![]() Sabrina Bierent wrote:
Sabrina Bierent wrote:
Wieviel Knäul Wolke brauche ich für die Jacke in xxl? Danke!
03.06.2016 - 10:39
![]() Paola Mazzinghi wrote:
Paola Mazzinghi wrote:
Buongiorno!!! Come sono calcolate le taglie? Io, a seconda della marca, vario tra una s e una m... c'è una tabella da consultare? Grazie mille :-)
28.05.2016 - 16:56DROPS Design answered:
Buongiorno Paola. Alla fine delle spiegazioni, trova un grafico con le misure espresse in cm. Se ha un capo di forma simile, può confrontare le misure con quelle del suo capo per individuare la taglia corretta da seguire. Generalmente le taglie Drops vestono comodo. Buon lavoro!
28.05.2016 - 18:30
![]() Lauren Harper wrote:
Lauren Harper wrote:
I am confused about this section "Now work armholes as follows: Work as before until first corner, work 3 dc + 3 ch + 3 dc in ch-space in the corner. Now work ch until the middle of next side as follows: Work 1 ch for every ch/dc skipped..." Can you please help me better understand this section?
06.02.2016 - 03:47DROPS Design answered:
Dear Mrs Harper, armholes are worked skipping sts that will be replaced by a chain on both sides to get the 2 armholes. Count the number of sts you will skip and replace these by the same number of chains. On next round, work in pattern in both chains as before. Happy crocheting!
08.02.2016 - 11:05Claudia Sanchez Fomperosa wrote:
Hola me fascinan todos los trabajos están hermosos. Mi problema es q no se como traducir las explicaciones ya q están en inglés y se me dificulta mucho sería exelente estuviera en español.
21.01.2016 - 06:51DROPS Design answered:
Hola Claudia, la mayoría de los patrones ya tienen su traducción al español, y se está trabajando para que sean todos. Son los más antiguos los que faltan por traducir. Pincha en la pestaña debajo de la foto para elegir el idioma.
27.01.2016 - 09:13
![]() Mette Dalum wrote:
Mette Dalum wrote:
Hej :-) Hvis jeg nu vil lave modellen i kid-mohair, så den bliver let og luftig, hvilken hæklenål-str. vil I så anbefale? (jeg er med på, at jeg skal hækle ganske løst) Og hvor mange gram garn vil I tro, jeg skal bruge? Jeg kan nemlig ikke lige i opskriften se noget om garnets løbelængde... Med venlig hilsen Mette Dalum
20.01.2016 - 11:01DROPS Design answered:
Hej Mette. Du skal gaa efter haeklefastheden der staar i mönstret, saa den haeklenaal du skal bruge for at faa 3,5 st-grupper i bredden og 9 omg i høyden på 10 x 10 cm. (Jeg vil anbefale at haekle med dobbelt traad Kid-Silk). Laes her hvordan du beregner maengden (Löbelaengde paa hvert garn staar paa garnkortene).
20.01.2016 - 15:25
![]() Rachel wrote:
Rachel wrote:
Hei. Hekler jakke fra katalog 162 -5. Er på forstykke rad 7. Er usikker på hva som menes ved fm om 5-lm-buen. Jeg skal vel ikke telle meg frem til 5 lm bue for deretter hekle?
29.09.2015 - 13:11DROPS Design answered:
Hej, du har en bue med 5 lm, den kalder vi for 5-lm-buen. God fornøjelse!
02.10.2015 - 16:36
![]() Brenda Baartman wrote:
Brenda Baartman wrote:
Ik zou graag vest willen haken voor mijn dochter maat 146/152.. is dit gelijk aan maat S of moet ik m verder verkleinen en met welke verkleiningstrap zou dit dan moeten... Ik kan namelijk niets bij kinderen vinden waarmee ik kan vergelijken en schatting kan maken alvast bedankt voor het lezen van mijn vraag Mvgr Brenda
16.09.2015 - 22:04DROPS Design answered:
Hoi Brenda. Kijk op de afmetingen van de maattekening onderaan het patroon en vergelijk de afmetingen voor maat S met die van uw dochter.
17.09.2015 - 15:57
![]() Petra wrote:
Petra wrote:
Ich habe die Jacke gestern fertig gestellt und heute gleich angezogen. Sie sieht echt super aus! Vielen Dank für die tolle Anleitung!
27.07.2015 - 18:30
![]() Melanie Reiss wrote:
Melanie Reiss wrote:
Ich habe den Eindruck die Armausschnitte sind riesig. Und eine Ecke ist nur mit den drei Stäbchen, drei Luftmaschen und drei Stäbchen verbunden. Ist das richtig? Vielen Dank im voraus.
20.07.2015 - 20:39DROPS Design answered:
Die Höhe der Armausschnitte ist aus der Maßskizze ersichtlich. In den Ecken des Quadrats häkeln Sie 3 Stb, 3 Lm und 3 Stb. Was genau meinen Sie mit "verbunden"?
29.07.2015 - 11:42
|
||||||||||||||||||||||
Spring Bliss#springblisscardigan |
||||||||||||||||||||||
 |
 |
|||||||||||||||||||||
Crochet DROPS jacket with lace pattern in ”Paris”. Size: S - XXXL.
DROPS 162-5 |
||||||||||||||||||||||
|
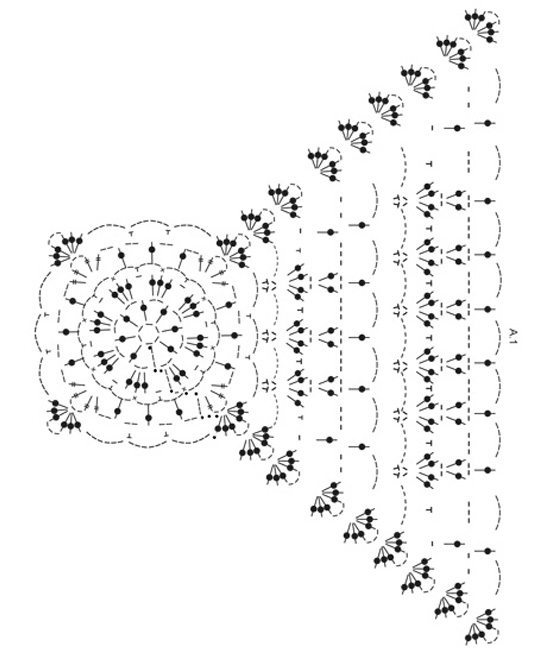
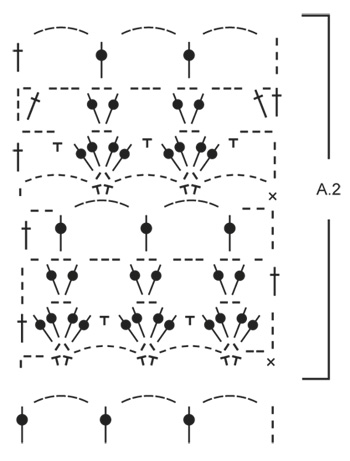
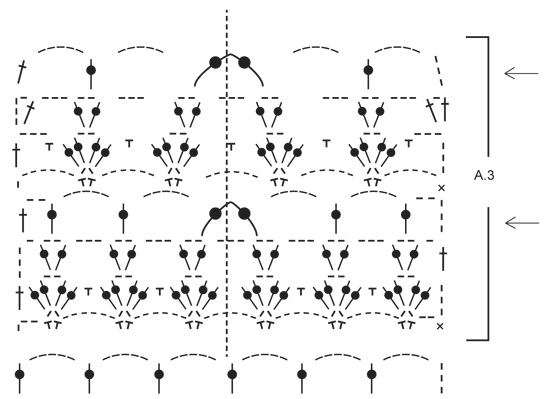
PATTERN: See diagrams A.1 and A.2. DECREASE TIP: Dec 1 tr by working 2 tr tog as follows: Work 1 tr in first ch-space but wait with last pull through, skip 3 ch, work 1 tr in next ch-space but on last pull through, pull yarn through all 3 loops on hook. ---------------------------------------------------------- BODY: Worked in the round from mid back on the back. Work 6 ch with Paris on hook size 5 mm and form a ring with 1 sl st in first ch. Work according to diagram A.1, i.e. work as follows: ROUND 1: 5 ch (= 1 tr + 2 ch), * 1 tr in ring, 2 ch *, repeat from *-* a total of 7 times, finish with 1 sl st in 3rd ch from beg of round = 8 tr with 2 ch between each. ROUND 2: 1 sl st in first ch-space, 3 ch (= 1 tr), 2 tr in same ch-space, * 1 ch, 3 tr in next ch-space *, repeat from *-* 7 times in total, and finish with 1 ch and 1 sl st in 3rd ch from beg of round = 8 tr-groups with 1 ch between each. ROUND 3: 1 ch, 1 dc in the middle tr in tr-group, * 3 ch, 1 dc in ch before next tr-group, 3 ch, 1 dc in the middle tr in next tr-group *, repeat from *-* 7 times in total, 3 ch, 1 dc in last ch, 3 ch and 1 sl st in first dc at beg of round = 16 ch-spaces. ROUND 4: Now work the circle into a square, i.e. work as follows: 1 sl st in first ch-space, 4 ch (= 1 dtr), 1 dtr + 3 ch + 2 dtr in same ch-space (= corner), * (2 ch, 1 tr in next ch-space) repeat from (-) 3 times in total, 2 ch, 2 dtr + 3 ch + 2 dtr in next ch-space (= corner) *, repeat from *-* 3 times in total, repeat from (-) 3 times in total and finish with 2 ch and 1 sl st in 4th ch from beg of round. ROUND 5: Work sl sts until ch-space in the corner, 3 ch (= 1 tr), 2 tr + 3 ch + 3 tr in same ch-space (= corner), * 5 ch, skip 1 ch-space, 1 dc in next ch-space, 5 ch, 1 dc in next ch-space, 5 ch, skip 1 ch-space, in next ch-space (= corner) work 3 tr + 3 ch + 3 tr *, repeat from *-* 3 times in total, 5 ch, skip 1 ch-space, 1 dc in next ch-space, 5 ch, 1 dc in next ch-space, 5 ch, skip last ch-space and finish with 1 sl st in 3rd ch at beg of round. ROUND 6: Work sl sts until ch-space in the corner, 3 ch (= 1 tr), 2 tr + 3 ch + 3 tr in same ch-space (= corner), * (6 ch, 1 dc + 2 ch + dc in next ch-space), repeat from (-) until corner, 6 ch, work 3 tr + 3 ch + 3 tr in ch-space in the corner *, repeat from *-* 3 times in total, repeat from (-) until the corner and finish with 6 ch and 1 sl st in 3rd ch at beg of round. ROUND 7: Work sl sts until ch-space in the corner, 3 ch (= 1 tr), 2 tr + 3 ch + 3 tr in same ch-space (= corner), * 1 ch, (1 dc in 6-ch-space, 2 tr + 2 ch + 2 tr in 2-ch-space), repeat from (-) until one 6-ch-space remains before the corner, 1 dc in 6-ch-space, 1 ch, 3 tr + 3 ch + 3 tr in ch-space in the corner *, repeat from *-* 3 times in total, 1 ch, repeat from (-) until one 6-ch-space remains before the corner and finish with 1 ch and 1 sl st in 3rd ch at beg of round. ROUND 8: Work sl sts until ch-space in the corner, 3 ch (= 1 tr), 2 tr + 3 ch + 3 tr in same ch-space (= corner), * 2 ch, 1 tr in first ch, (3 ch, 1 tr + 2 ch + 1 tr in ch-space in tr-group), repeat from (-) until corner, 3 ch, 1 tr in ch before corner, 2 ch, 3 tr + 3 ch + 3 tr in ch-space in the corner *, repeat from *-* 3 times in total, 2 ch, 1 tr in first ch, repeat from (-) until corner, 3 ch, 1 tr in last ch, 2 ch and 1 sl st in 3rd ch at beg of round. ROUND 9: Work sl sts until ch-space in the corner, 3 ch (= 1 tr), 2 tr + 3 ch + 3 tr in same ch-space (= corner), * 5 ch, 1 tr in first ch-space, (5 ch, 1 tr in ch-space in tr-group), repeat from (-) until 1 ch-space remains before tr-group in the corner, 5 ch, 1 tr in last ch-space before the corner, 5 ch and 3 tr + 3 ch + 3 tr in ch-space in the corner *, repeat from *-* 3 times in total, 5 ch, 1 tr in first ch-space, repeat from (-) until 1 ch-space remains before the corner, 5 ch, 1 tr in last ch-space, 5 ch and 1 sl st in 3rd ch at beg of round. REMEMBER THE CROCHET TENSION! Repeat 6th to 9th round (4 rounds) outwards as shown in diagram. Continue like this until square measures approx. 36-38-40-42-44-46 cm x 36-38-40-42-44-46 cm. Now work arm holes as follows: Work as before until first corner, work 3 tr + 3 ch + 3 tr in ch-space in the corner. Now work ch until the middle of next side (i.e. in the middle between 1st and 2nd corner) as follows: Work 1 ch for every ch/tr skipped. Then work pattern as before until the middle between 3rd and 4th corner. Now work ch until beg of round as follows: Work 1 ch for every ch/tr skipped. On next round work pattern and inc as before over all sts, also in ch for armholes. Continue like this until square measures approx. 78-80-82-84-86-88 cm x 78-80-82-84-86-88 cm (i.e. approx. 21 cm in all sizes from armhole) - adjust to finish after 9th round (round with ch-spaces and trebles). Cut the yarn. FRONT PIECE: Beg from WS and work back and forth between first and second corner. NOTE: Work front piece without inc. Work according to diagram A.2 from first corner, i.e. work as follows: ROW 1: 3 ch (= 1 dc + 2 ch), 1 dc + 2 ch + 1 dc in first ch-space, * 6 ch, 1 dc + 2 ch + 1 dc in next ch-space*, repeat from *-* the entire row and finish with 2 ch and 1 dc in first ch-space in the corner, turn piece. ROW 2 (= RS): 3 ch (= 1 tr), * 2 tr + 2 ch + 2 tr in ch-space between 2 dc, 1 dc in 6-ch-space *, repeat from *-* the entire row and finish with 1 tr in 1st ch from beg of previous row, turn piece. ROW 3: 4 ch (= 1 tr + 1 ch), * 1 tr + 2 ch + 1 tr in ch-space in the middle of tr-group, 3 ch *, repeat from *-* until 1 tr-group remains before the corner, 1 tr + 2 ch + 1 tr in ch-space in last tr-group, finish with 1 ch and 1 tr in 3rd ch from beg of previous row, turn piece. ROW 4 (= RS): 5 ch (= 1 tr + 2 ch), * 1 tr in ch-space in tr-group, 5 ch *, repeat from *-* until 1 tr-group remains, 1 tr in ch-space in last tr-group, 2 ch and 1 tr in 3rd ch from beg of previous row, turn piece. ROW 5: 7 ch (= 1 dc + 6 ch), * 1 dc + 2 ch + 1 dc in 5-ch-space, 6 ch *, repeat from *-* the entire row and finish with 1 dc in 3rd ch from beg of previous row, turn piece. ROW 6 (= RS): 6 ch (= 1 tr + 3 ch), * 1 dc in 6-ch-space, 2 tr + 2 ch + 2 tr in 2-ch-space *, repeat from *-* the entire row and finish with 1 dc in last 6-ch-space, 3 ch and 1 tr in first ch from beg of previous row, turn piece. ROW 7: 4 ch (= 1 tr + 1 ch), 1 tr in same st, * 3 ch, 1 tr + 2 ch + 1 tr in ch-space in the middle of next tr-group *, repeat from *-* the entire row and finish with 3 ch and 1 tr + 1 ch + 1 tr in 3rd ch from beg of previous row, turn piece. ROW 8 (= RS): 8 ch (= 1 tr + 5 ch), * 1 tr in ch-space in the middle of tr-group, 5 ch *, repeat from *-* the entire row and finish with 5 ch and 1 tr in 3rd ch from beg of previous row, turn piece. Repeat rows 1 to 8 outwards. Continue like this until approx. 19-20-21-22-23-24 cm have been worked back and forth, fasten off (adjust after 1st or 5th row in pattern). Repeat on the other side, now work back and forth from third to fourth corner. EDGE: Finally work a round around the entire piece with 2nd or 6th row in pattern but in ch-space in each corner work 6 tr. Fasten off. SLEEVE: Work back and forward and sew togheter at the end. Sleeve is worked straight out of armhole of the body, top down. Beg mid under armhole, from RS. 1 dc in first st, then work ch-space as on 4th or 8th row in A.2. Work so that there are 12-13-14-15-15-16 ch-spaces around armhole. Then continue with pattern according to diagram A.2. Work pattern like this until sleeve measures 26 cm. Now work according to A.3. On every row with arrow work 2 tr tog into 1 tr mid front of sleeve (i.e. dec 1 ch-space on every row with arrow) - READ DECREASE TIP. The dotted line shows mid front of sleeve. Otherwise continue the pattern as before. Dec on every 4th row a total of 4 times. Then work according to diagram A.2 until sleeve measures 56 cm in all sizes. Fasten off. Repeat in the other side. |
||||||||||||||||||||||
Diagram explanations |
||||||||||||||||||||||
|
||||||||||||||||||||||
 |
||||||||||||||||||||||
 |
||||||||||||||||||||||
 |
||||||||||||||||||||||
 |
||||||||||||||||||||||
Have you finished this pattern?Tag your pictures with #dropspattern #springblisscardigan or submit them to the #dropsfan gallery. Do you need help with this pattern?You'll find 12 tutorial videos, a Comments/Questions area and more by visiting the pattern on garnstudio.com. © 1982-2026 DROPS Design A/S. We reserve all rights. This document, including all its sub-sections, has copyrights. Read more about what you can do with our patterns at the bottom of each pattern on our site. |
||||||||||||||||||||||


With over 40 years in knitting and crochet design, DROPS Design offers one of the most extensive collections of free patterns on the internet - translated to 17 languages. As of today we count 325 catalogues and 12298 patterns translated into English (UK/cm).
We work hard to bring you the best knitting and crochet have to offer, inspiration and advice as well as great quality yarns at incredible prices! Would you like to use our patterns for other than personal use? You can read what you are allowed to do in the Copyright text at the bottom of all our patterns. Happy crafting!
Post a comment to pattern DROPS 162-5
We would love to hear what you have to say about this pattern!
If you want to leave a question, please make sure you select the correct category in the form below, to speed up the answering process. Required fields are marked *.