
Popular categories
Looking for a yarn?


Comments / Questions (51)
![]() MARTA PUENTE wrote:
MARTA PUENTE wrote:
Tengo la chaqueta acabada a falta de las mangas. La he tejido siguiendo las instrucciones de una talla M y ha quedado muy pequeña! La prueba de punto inicial era correcta cuando la hice
21.09.2015 - 18:19DROPS Design answered:
Hola Marta, debajo del patrón tienes el diagrama con las medidas. Es recomendable ir comprobando que las medidas se van ajustando a nuestro trabajo porque mantener la tensión del tejido constante puede ser difícil. De todos modos se trata de una chaqueta corta y ajustada.
23.09.2015 - 09:04
![]() María wrote:
María wrote:
Buenos días En las explicaciones para finalizar pone: "Cuando el diagrama completo ha sido tejido verticalmente, tejer 2 hileras en pt jersey en el interior de los pts del borde". ¿Podrían explicarme a qué se refieren? Saludos y muchas gracias.
08.09.2015 - 07:29DROPS Design answered:
Hola Maria. Se refiere a que después de completar los diagramas y antes de comenzar con la cenefa inferior hay que trabajar 2 filas en pt jersey y al mismo tiempo aumentar el número de pts según el patrón.
08.09.2015 - 11:12
![]() LOREDANA wrote:
LOREDANA wrote:
Grazie! mi era sfuggito che il diagramma A2-A4 viene ripetuto ancora.... Un ringraziamento speciale per la pazienza! Loredana
16.07.2015 - 16:18
![]() LOREDANA wrote:
LOREDANA wrote:
Buon pomeriggio! ho letto la vostra risposta ma non mi trovo col numero di maglie.Sto realizzando una L,quindi ho sui ferri 253maglie,ne aumento 4 nel corso del primo ferro diagrammi A2-A3-A4,quindi siamo a 257 maglie alle quali tolgo le 12 del bordo e 7 A2 + 6 A4,restano 232 maglie che pero' non sono divisibili per 6 A3.Potete aiutarmi? Grazie ancora Loredana
16.07.2015 - 15:08DROPS Design answered:
Buongiorno Loredana. Dopo aver lavorato i diag. A.2-A.4 la prima volta, lavora il diag. A.6, poi il diag. A.7, poi il diag. A.8 e qui aumenta 8 m (261 m in tutto); lavora poi il diag. A.x come indicato, poi il diag. A.7. Dopo A.7 lavora di nuovo i diag. A.2-A.4 e qui aumenta 4 m = 265 m. Toglie le 12 m dei bordi e le 13 m di A.2 e A.4 e rimangono 240 m, divisibile per 6. Ci riscriva se non è chiaro. Buon lavoro!
16.07.2015 - 15:22
![]() LOREDANA wrote:
LOREDANA wrote:
Buongiorno!Sto iniziando a lavorare i vari diagrammi. Nei diagrammi A2-A3-A4 nel corso del primo ferro c'e' il simbolo che prevede aumenti,solo che nelle spiegazioni non sono indicate il numero di maglie da aumentare. Grazie per la vostra risposta Loredana
16.07.2015 - 13:26DROPS Design answered:
Buongiorno Loredana. Aumenta nel diagramma A.3, quando questo viene lavorato dopo il diagramma A.7 e aumenta 2-4-4-4-4-2 m a intervalli regolari nel 1° ferro. Buon lavoro!
16.07.2015 - 13:42
![]() Silvia Gruesser Eppler wrote:
Silvia Gruesser Eppler wrote:
Muss man beim Beginn des Rumpfmusters nach den 7 Maschen Diagramm A2 dann nur noch A3 stricken od abwechslungswiese A2 und A3? Danke im Voraus fuer die Hilfe.
26.06.2015 - 03:39DROPS Design answered:
Sie stricken nach A.2 nur A.3 und dann am Ende der R A.4 (+ die Blenden-M). Die Kommata in der Beschreibung trennen immer die einzelnen Musterabschnitte.
28.06.2015 - 19:26
![]() Loredana wrote:
Loredana wrote:
Perfetto!!!! Grazie mille per la tempestività' nella risposta. Loredana
24.06.2015 - 19:12
![]() Loredana wrote:
Loredana wrote:
Buonasera! Aumentare alternativamente a destra e a sinistra di ogni segno (= 10 aumenti). Aumentare ogni 4 ferri 9 volte e ogni 6 ferri 7 volte( L ) Questo significa che se al primo segno aumento a destra e al secondo a sinistra ecc..devo per tutte le 9 volte ed in seguito per le altre 7 volte aumentare al primo segno a destra,al secondo segno a sinistra,al terzo a destra ecc? Grazie per vostra risposta. Loredana
24.06.2015 - 16:58DROPS Design answered:
Buonasera Loredana. Deve aumentare: la prima volta alla destra di ognuno dei 10 segni; la seconda volta alla sinistra di ognuno dei 10 segni; la terza a destra, la quarta a sinistra e così via. Buon lavoro!
24.06.2015 - 17:21
![]() Jane Black wrote:
Jane Black wrote:
Hej Vil gerne lave denne jakke. Men har læst og gransket opskriften, kan ikke finde ud af hvor og hvordan jeg laver de 3 hul rk pinde?
23.05.2015 - 06:41DROPS Design answered:
Hej Jane, jeg er ikke helt sikker på hvilke 3 hul rk pinde du mener.... Men alt står i opskriften, så begynd der hvor der står BÆRESTK og følg opskriften som strikkes ovenfra og ned. God fornøjelse!
25.05.2015 - 09:59
![]() Angelika Moebius wrote:
Angelika Moebius wrote:
Vielen Dank für Ihre nette Hilfe
27.04.2015 - 23:08
|
|||||||||||||||||||
Timeless Beauty Cardigan#timelessbeautycardigan |
|||||||||||||||||||
 |
 |
||||||||||||||||||
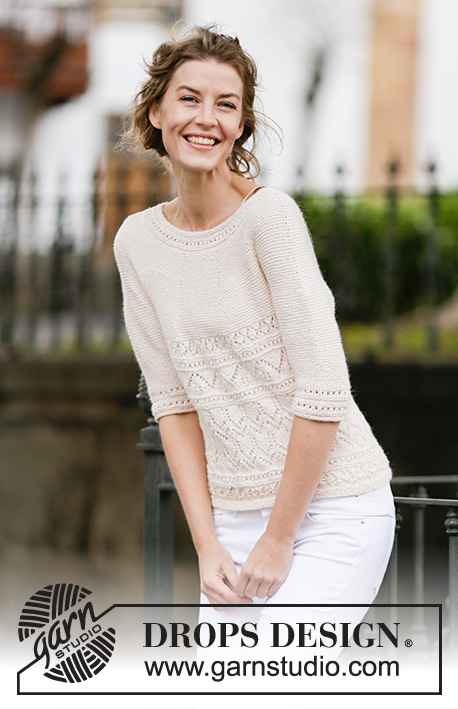
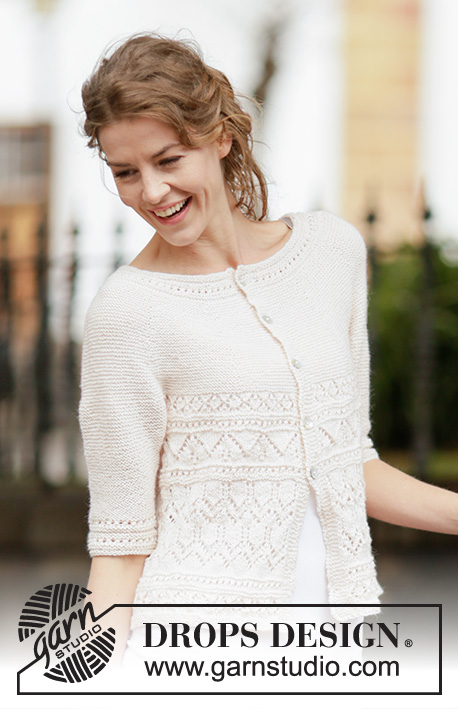
Knitted DROPS jacket in garter st with lace pattern and round yoke, worked top down in ”BabyAlpaca Silk”. Size: S - XXXL.
DROPS 160-8 |
|||||||||||||||||||
|
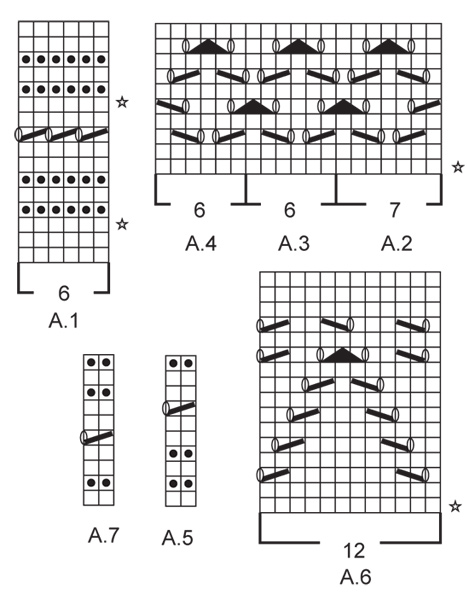
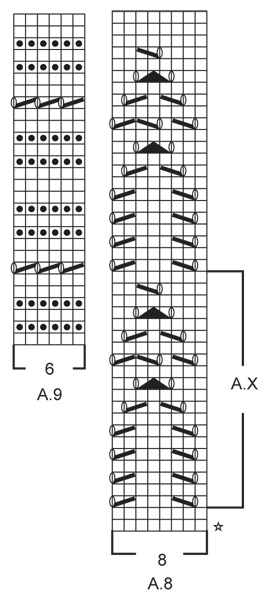
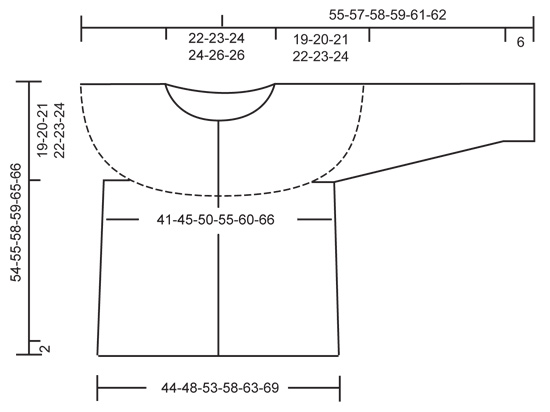
GARTER ST (back and forth): K all rows. 1 ridge = 2 rows K. PATTERN: See diagrams A.1 to A.9. The diagrams show all rows in pattern seen from RS. INCREASE TIP: Inc 1 st by making 1 YO, on next row K YO twisted (i.e. work in the back loop of st instead front) to avoid holes. BUTTONHOLES: Dec for buttonholes on right band, i.e. in right side of piece seen from RS (i.e. seen from knitting direction). 1 buttonhole = K tog third and fourth st from edge and make 1 YO. Dec for buttonholes when piece measures: SIZE S: 2, 9, 16, 23 and 30 cm SIZE M: 2, 9, 16, 23 and 30 cm SIZE L: 2, 10, 18, 26 and 34 cm SIZE XL: 2, 10, 18, 26 and 34 cm SIZE XXL: 2, 9, 16, 23, 30 and 37 cm. SIZE XXXL: 2, 9, 16, 23, 30 and 37 cm. ---------------------------------------------------------- JACKET: Worked top down, back and forth on circular needle. YOKE: Cast on 133-141-157-161-161-177 sts (incl 6 band sts in each side) on circular needle size 2,5 mm with BabyAlpaca Silk. K 1 row from WS. Work 2 ridges in GARTER ST back and forth - see explanation above! Remember BUTTONHOLES on right band - see explanation above. Now work PATTERN A.1 with 6 band sts in garter st in each side (on 9th row K last st before band), AT THE SAME TIME on 3rd row in diagram inc 18-20-30-32-32-34 sts evenly - READ INCREASE TIP, and on 11th row inc 15-19-29-29-29-33 sts evenly = 166-180-216-222-222-244 sts. REMEMBER THE KNITTING TENSION When A.1 has been worked vertically, continue in garter st and insert 10 markers in the piece as follows: Work the first 16-18-18-21-21-23 sts, insert a marker, then insert a marker 15-16-20-20-20-22 sts apart, after last marker there are 15-18-18-21-21-23 sts. On next row from RS beg inc. Inc alternately on right and left side of markers (= 10 inc). Inc every other row 0-2-0-3-7-7 times, every 4th row 10-10-9-9-8-8 times and every 6th row 5-5-7-7-7-8 times = 316-350-376-412-442-474 sts. On next row from RS, inc 7-3-9-1-3-9 sts evenly = 323-353-385-413-445-483 sts. Piece measures approx. 19-20-21-22-23-24 cm. On next row (= from WS) work as follows: K the first 51-55-61-66-72-80 (= front piece), slip the next 66-72-76-80-84-88 sts on a stitch holder (= sleeve), cast on 10-10-10-12-12-12 sts under sleeve, work the next 89-99-111-121-133-147 sts (= back piece), slip the next 66-72-76-80-84-88 sts on a stitch holder (= sleeve), cast on 10-10-10-12-12-12 sts under sleeve, work the remaining 51-55-61-66-72-80 sts (= front piece). BODY: There are now 211-229-253-277-301-331 sts for body. Now switch to circular needle size 3 mm. Then Work as follows: 6 band sts in garter st, A.2, repeat A.3 until 12 sts remain, A.4, 6 band sts in garter st. NOTE: Work the 6 band sts in each side in garter st until finished measurements. When A.2-A.4 have been worked vertically, continue with A.5 (on 7th row K the last st before band). Then work A.6, inc 6-0-0-0-0-6 sts evenly on 1st row (K last st before band) = 217-229-253-277-301-337 sts. When A.6 has been worked vertically, continue with A.7 1 time vertically (on 5th row K the last st before band). Then work A.8, inc 4-8-8-8-8-4 sts evenly on 1st row (K last st before band) = 221-237-261-285-309-341 sts. When A.X has been worked 1 time vertically, repeat A.X 0-0-0-0-1-1 more time before continuing with the rest of diagram. Now continue with A.7 (K last st before band). Then work as follows: A.2, A.3 until 6 sts remain before band, AT THE SAME TIME inc 2-4-4-4-4-2 sts evenly on 1st row in A.3, A.4 = 223-241-265-289-313-343 sts. Finish with A.7 0-0-1-1-0-0 times vertically (on 5th row K last st before band). When entire diagram has been worked vertically, work 2 row in stocking st inside band sts while AT THE SAME TIME on row from RS inc 17-20-23-25-27-27 sts evenly = 240-261-288-314-340-370 sts. Switch to circular needle size 2.5 mm and work in garter st back and forth for 2 cm. Cast off alternately with K 1 and P 1. Piece measures approx. 54-55-58-59-65-66 cm. SLEEVE: Worked in garter st back and forth on circular needle. There are 66-72-76-80-84-88 sts for each sleeve. NOW MEASURE THE PIECE FROM HERE. Slip sts from stitch holder back on circular needle size 2.5 mm and cast on 6-6-6-7-7-7 new sts at the end of the next 2 rows = 78-84-88-94-98-102 sts. When sleeve measures 4 cm, dec 1 st inside 1 edge st in each side of piece by K 2 tog. Repeat dec every 1½-2-2½-3-3½-3½ cm 7-6-5-4-3-3 more times = 62-70-76-84-90-94 sts. When piece measures 19 cm in all sizes, work as follows: 1 edge st in garter st, A.9 until 1 st remains, 1 edge st in garter st. When entire A.9 have been worked vertically, work 1 ridge. Loosely cast off. Knit another sleeve the same way. ASSEMBLY: Sew underarm seams in outer loops of edge sts. Sew the openings under the sleeves. Sew the buttons on to the left band. |
|||||||||||||||||||
Diagram explanations |
|||||||||||||||||||
|
|||||||||||||||||||
 |
|||||||||||||||||||
 |
|||||||||||||||||||
 |
|||||||||||||||||||
Have you finished this pattern?Tag your pictures with #dropspattern #timelessbeautycardigan or submit them to the #dropsfan gallery. Do you need help with this pattern?You'll find 25 tutorial videos, a Comments/Questions area and more by visiting the pattern on garnstudio.com. © 1982-2026 DROPS Design A/S. We reserve all rights. This document, including all its sub-sections, has copyrights. Read more about what you can do with our patterns at the bottom of each pattern on our site. |
|||||||||||||||||||


With over 40 years in knitting and crochet design, DROPS Design offers one of the most extensive collections of free patterns on the internet - translated to 17 languages. As of today we count 325 catalogues and 12298 patterns translated into English (UK/cm).
We work hard to bring you the best knitting and crochet have to offer, inspiration and advice as well as great quality yarns at incredible prices! Would you like to use our patterns for other than personal use? You can read what you are allowed to do in the Copyright text at the bottom of all our patterns. Happy crafting!
Post a comment to pattern DROPS 160-8
We would love to hear what you have to say about this pattern!
If you want to leave a question, please make sure you select the correct category in the form below, to speed up the answering process. Required fields are marked *.