
Popular categories
Looking for a yarn?


Comments / Questions (44)
![]() Cori Lopez wrote:
Cori Lopez wrote:
Row 12 is wrong. I see it was brought to your attention, but it's still not fixed. Please fix and be professional. Thx
26.09.2016 - 03:53DROPS Design answered:
Dear Mrs Lopez, your feedback has been forwarded to our Team and pattern will be checked again, thank you in advance for your patience.
28.09.2016 - 09:33
![]() Patrícia Santos wrote:
Patrícia Santos wrote:
Estou a ter alguns problemas na passagem da carreira 3 para a 4. Dizem para começarmos a carr 4 com 1pc, 1 pb entre os 2 pad do meio do canto, mas no início da carreira 4, não estamos no meio dos 2 pad do canto, mas nos 2 pad do início do canto. O esquema também sugere que estamos no canto, mas não é assim. Reparem no esquema: as correntes que "sobem" para iniciar uma nova carreira, não se encontram no canto do quadrado... Estou errada? Muito obrigada pela vossa disponibilidade! Patrícia
02.09.2016 - 23:49DROPS Design answered:
Foram detectados erros nas carreiras 4 e 12. As devidas correcções já foram feitas. Obrigada pelo seu alerta!
07.09.2016 - 08:54
![]() Leslie wrote:
Leslie wrote:
Round 12 says, "then work 3 sc in every chain space until tr in the corner". These instructions don't match the diagram, which has after the corners - 3 sc, 3 sc, 1 sc, 3sc, 1 sc, 3 sc, 1 sc, 1.sc, 1 sc, 1 sc, 3 sc, 1 sc, 3 sc, 1 sc, 3 sc, 3 sc then corner again. Not sure which to follow?
03.06.2016 - 16:51DROPS Design answered:
Dear Leslie, your feedback will be reported to our Design team, work as shown in diagram, ie 3 sc in each ch-space to the tr, then 1 sc between tr. Happy crocheting!
03.06.2016 - 17:02
![]() Leslie wrote:
Leslie wrote:
Have finished round 3 by 1 so st in 4th chain of beg round which has me starting at the first tr of corner. Reworked round 4 a few times and am starting at first of 6 tr's for corner. Pattern doesn't s have enough 1 sc, and 3 sc for corner to get to the 1 sc in the dc. Is there an error in the pattern?
28.05.2016 - 13:45DROPS Design answered:
Dear Leslie, at the beg of round 4, sl st to the first of 2 tr in the corner (= 3rd tr in the corner) to start round 4 with 1 sc between the 2 middle tr. This has been forwarded to our Design team. Happy crocheting!
31.05.2016 - 15:00
![]() Dani wrote:
Dani wrote:
Awesome pattern! I just discovered DROPS and love it. I'm having trouble with the transition between row 3 and 4. End of 3: "1 sl st in 4th ch from beg of round" Begin 4: ch 1, 1 sc between the middle 2 tr in corner The 4th ch is next to a tr and not in the corner. How do I get there?
21.05.2016 - 21:10DROPS Design answered:
Dear Dani, work sl st to the middle tr in corner so that you will start rounds now here. Happy crocheting!
23.05.2016 - 09:02
![]() Elsa wrote:
Elsa wrote:
Buenos días: He comenzado a hacer el poncho, y la explicación de la vuelta cinco (comienzo y final) y su unión con la seis no lo comprendo. Miro el diagrama, y el dibujo hace una vuelta comenzada, lo cual no me permite ver el comienzo y final de la vuelta cinco y el comienzo de la seis. Al haber comprado por Internet no tengo tienda a la cual preguntar. Ustedes podrían enviarme el diagrama completo? Gracias, Elsa
27.03.2016 - 15:03DROPS Design answered:
Hola Elsa. No enviamos a correos particulares. El diagrama del cuadrado tiene las explicaciones en el texto. La vta 5 se termina con 1 p.e. en el tercer p.de cad. del inicio de la vta y seguido trabajamos 1 p.e. dentro del primer arco de la vta 5. (el comienzo de la vta 6 es en el centro de este arco).
28.03.2016 - 10:53
![]() Elsa Álvarez Arias wrote:
Elsa Álvarez Arias wrote:
Buenas Tardes: He comprado todos los materiales para empezar a hacer el poncho, pero antes voy a hacer la muestra, y no entiendo las instrucciones. Esto es lo que no me queda claro: "o el tamaño necesario para obtener 4 grupos de p.a. en el ancho y 7 filas en vertical". ¿Cuántos puntos de punto alto se necesitan en el ancho y en el alto? Por favor, espero que me contesten rápido, tengo mucha ilusión en empezar. Gracias
16.03.2016 - 15:57DROPS Design answered:
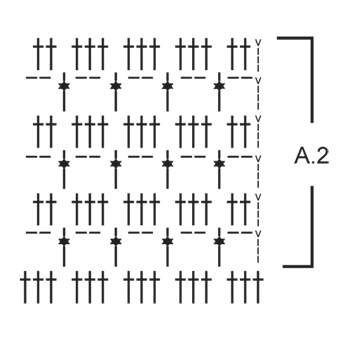
Hola Elsa, la muestra es una repetición del diagrama A.2, es decir, se hace sobre 12 p.de cad + 3 p.de cad para girar y se trabajan 7 filas del diagrama A.2. Esto debería medir 10x10 cm.
17.03.2016 - 08:53
![]() Mieke Vermeeren wrote:
Mieke Vermeeren wrote:
Is het de bedoeling dat je alles op dezelfde kant haakt, of moet je na elke toer je werk keren?
12.03.2016 - 18:23DROPS Design answered:
Hoi Mieke. Je haakt de vierkanten in de rondte aan dezelfde kant. Je keert niet het werk
14.03.2016 - 16:19
![]() Wendy wrote:
Wendy wrote:
First i want to say of all the patterns out there yours is by far the prettiest I've seen. Now having said that they also are the hardest to follow your wording is so strange compared to what I'm used to ! I really want to make this poncho and have looked at it for awhile but was afraid to try due to trying other patterns of yours and being let down and as expected here we go again I think I know what rd two is trying to say but can you please explain better
16.11.2015 - 20:45DROPS Design answered:
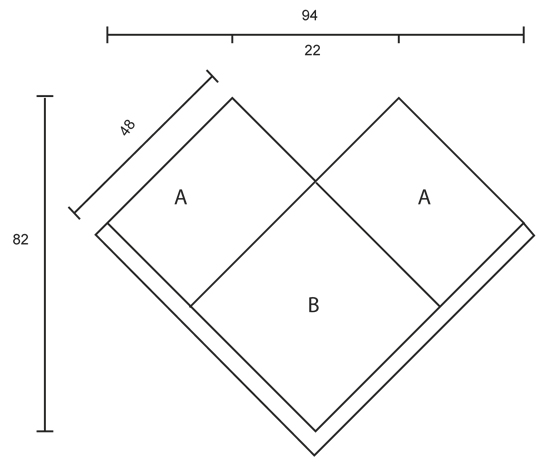
Dear Wendy, to crochet this poncho, you have to work a total of 4 large squares. You can then follow either written instructions (see square 1, from round 1 to round 16 ) or diagram A.1 as you rather like to. Crochet then the squares tog and work an edge at neckline and around bottom - see also under tab "videos" at the right side of the picture. Remember your DROPS store may also give you tips & advices. Happy crocheting!
17.11.2015 - 08:51
![]() Trosse wrote:
Trosse wrote:
Hallo Ich möchte gerne diesen wunderschönen Poncho häkeln nur verstehe ich die Maschenprobe leider nicht. Wie ist das gemeint? 4 Stäbchen-Gruppen in der Breite? Vielen Dank für Ihre Antwort
24.06.2015 - 21:45DROPS Design answered:
1 Stb-Gruppe besteht aus 3 Stb. Sie können die Maschenprobe nach Diagramm A.2 häkeln. Wobei sich die Größe der Quadrate auch noch gut anpassen lässt, indem Sie die 15. und 16. R wdh. Außerdem können Sie die Quadrate ggf. noch spannen und dadurch auch noch etwas formen.
28.06.2015 - 19:40
|
|||||||||||||||||||||||||||||||||||||
Bohemian Blues#bohemianbluesponcho |
|||||||||||||||||||||||||||||||||||||
 |
 |
||||||||||||||||||||||||||||||||||||
Crochet DROPS poncho in "Paris". One-size
DROPS 162-2 |
|||||||||||||||||||||||||||||||||||||
|
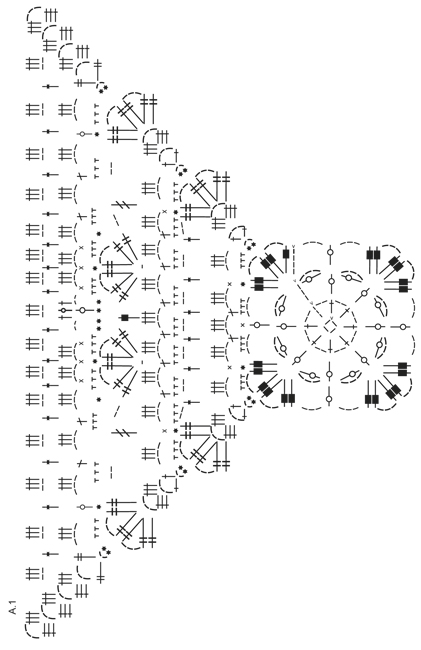
STRIPES SQUARE: ROUND 1: white ROUND 2: light turquoise ROUND 3-4: light ice blue ROUND 5-8: white ROUND 9-10: grey blue ROUND 11-12: light ice blue ROUND 13-14: white ROUND 15-16: grey blue STRIPES-EDGE: 2 rounds white, 1 round light ice blue, 1 round grey blue, 1 round light turquoise, 1 round light ice blue (= 6 rounds in total). PATTERN: See diagrams A.1 and A.2. YARN CHANGE TIP: On the 2 squares worked in stripes it might be wise to finish round entire with colour from last stripe, cut the yarn and beg new round with new colour. ---------------------------------------------------------- PONCHO: Work 4 large squares as explained below. Then work squares tog into a poncho. Finish by working a neck edge and a border along bottom edge before fastening fringes at the bottom around the entire poncho. Work 2 squares in white (= square A) and 2 squares in STRIPES SQUARE – see explanation above (= square B). SQUARE 1: Work 4 ch on hook size 5 mm with white and form a ring with 1 sl st in first ch. Then work according to diagram A.1, i.e. work as follows: ROUND 1: 5 ch (= 1 tr + 2 ch), * 1 tr in ch-ring, 2 ch *, repeat from *-* a total of 7 times, finish with 1 sl st in 3rd ch from beg of round (= 8 tr with 2 ch between each). ROUND 2: 6 ch (= 1 tr + 3 ch), work 1 tr in 3rd ch worked, * work 1 tr in next tr, 3 ch, 1 tr in the first of the 3 ch *, repeat from *-* 7 times in total, finish with 1 sl st in 3rd ch from beg of round (= 8 tr with a space between each). ROUND 3: 4 ch (= 1 dtr), work 1 dtr + 3 ch + 2 dtr + 3 ch + 2 dtr in same st (= corner), * 3 ch, 1 tr in next tr, 3 ch, in next tr work 2 dtr + 3 ch + 2 dtr + 3 ch + 2 dtr (= corner) *, repeat from *-* 3 times in total, 3 ch, 1 tr in next tr, 3 ch and 1 sl st in 4th ch from beg of round. ROUND 4: Work sl st to 2nd dtr in corner, 1 ch, 1 dc between the middle 2 dtr in corner, 3 dc in space, * 1 dc between the next 2 dtr, 3 dc in space, 1 dc in next tr, 3 dc in space, 1 dc between the first 2 dtr in corner, 3 dc in space, 1 dc between the next 2 dtr, 2 ch, 1 dc between the same 2 dtr, 3 dc in space *, repeat from *-* 3 times in total, 1 dc between the next 2 dtr, 3 dc in next space, 1 dc in next tr, 3 dc in next space, 1 dc between the first 2 dtr, 3 dc in space and finish with 1 sl st in first ch from beg of round. ROUND 5: 1 sl st in space in corner, 6 ch (= 1 tr + 3 ch), 1 tr in same space, * 3 ch, skip 3 dc, 1 dc in next st, 3 ch, skip 2 dc, 1 htr in next st, 3 ch, skip 1 dc, 1 htr in next st, 3 ch, skip 2 dc, 1 dc in next st, 3 ch, 1 tr + 3 ch + 1 tr in ch-space in corner *, repeat from *-* 3 times in total, 3 ch, skip 3 dc, 1 dc in next st, 3 ch, skip 2 dc, 1 htr in next st, 3 ch, skip 1 dc, 1 htr in next st, 3 ch, skip 2 dc, 1 dc in next st, 3 ch and finish with 1 sl st in 3rd ch from beg of round. ROUND 6: 1 sl st in ch-space in corner, 3 ch (= 1 tr), 2 tr + 3 ch + 3 tr in same ch-space, * work 3 tr in every ch-space until corner, work 3 tr + 3 ch + 3 tr in ch-space in corner *, repeat from *-* 3 times in total, work 3 tr in every ch-space until corner and finish with 1 sl st in 3rd ch from beg of round. ROUND 7: Work sl sts until ch-space in corner, 4 ch (= 1 dtr), work 1 dtr + 3 ch + 2 dtr + 3 ch + 2 dtr in same ch-space (= corner), ** (2 ch, skip 1 tr-group, 1 tr before next tr-group = between 2 tr-groups), repeat from (-) 6 times in total, 2 ch, 2 dtr + 3 ch + 2 dtr + 3 ch + 2 dtr in ch-space in corner **, repeat from **-** 3 times in total, repeat from (-) 6 times in total and finish with 2 ch and 1 sl st in 4th ch from beg of round. ROUND 8: Work sl sts until the middle of the 2 dtr in corner, 3 ch (= 1 dc + 2 ch), 1 dc between the same middle dtr in corner, * 3 dc in space, 1 dc between the next 2 dtr, then work 3 dc in every ch-space until dtr in corner, 1 dc between the first 2 dtr, 3 dc in next ch-space, 1 dc + 2 ch + 1 dc between the middle 2 dtr in corner *, repeat from *-* 3 times in total, 3 dc in space, 1 dc between the next 2 dtr, then work 3 dc in every ch-space until dtr in corner, 1 dc between the first 2 dtr, 3 dc in ch-space and finish with 1 sl st in first ch from beg of round. ROUND 9: Work sl st in ch-space in corner, 6 ch (= 1 tr + 3 ch), 1 tr in same ch-space, * 3 ch, skip 3 dc, 1 dc in next st, (3 ch, skip 2 dc, 1 htr in next st), repeat from (-) 6 times in total, 3 ch, skip 3 dc, 1 dc in next st, 3 ch, 1 tr + 3 ch + 1 tr in ch-space in corner *, repeat from *-* the entire round, but finish with 1 sl st in 3rd ch from beg of round (instead of 1 tr + 3 ch + 1 tr in corner). ROUND 10: 1 sl st in ch-space in corner, 3 ch (= 1 tr), 2 tr + 3 ch + 3 tr in same ch-space, * work 3 tr in each of the first 3 ch-space, 1 ch, 3 tr in each of the next 3 ch-spaces, 1 ch, 3 tr in each of the next 3 ch-spaces, in corner work 3 tr + 3 ch + 3 tr in ch-space *, repeat from *-* the entire, but finish with 1 sl st in 3rd ch from beg of round (instead 3 tr + 3 ch + 3 tr in corner). ROUND 11: Work sl st until ch-space in corner, 4 ch (= 1 dtr), work 1 dtr + 3 ch + 2 dtr + 3 ch + 2 dtr in same ch-space (= corner), * 2 ch, skip 2 tr-groups, 1 dtr before next tr-group, 2 ch, skip 2 tr-groups, in ch before next tr-group work 2 dtr + 3 ch + 2 dtr + 3 ch + 2 dtr, skip 1 tr-group, 1 dtr in the middle tr in next tr-group, skip 1 tr-group, in ch before next tr-groups work 2 dtr + 3 ch + 2 dtr + 3 ch + 2 dtr, 2 ch, skip 2 tr-groups, 1 dtr before next tr-group, 2 ch, in ch-space in corner work 2 dtr + 3 ch + 2 dtr + 3 ch + 2 dtr *, repeat from *-* the entire round, but finish with 1 sl st in 4th ch from beg of round (instead of dtr-groups in corner). ROUND 12: Work sl sts until the middle of the 2 dtr in corner, 3 ch (= 1 dc + 2 ch), 1 dc between the same middle dtr in corner, then work: * 3 dc around next ch-space, 1 dc between next 2 dtr, 3 dc around next two ch-spaces, 1 dc between next 2 dtr, 3 dc around ch-space, 1 dc between next 2 dtr, 3 dc around ch-space , 1 dc in next 2 dtr, skip next dtr, 1 dc in next 2 dtr, 3 dc around ch-space, 1 dc between next 2 dtr, 3 dc around ch-space, 1 dc between next 2 dtr, 3 dc around next two ch-spaces until first dtr in corner, 1 dc between the first 2 dtr, 3 dc around next ch-space, 1 dc + 2 ch + 1 dc between the middle 2 dtr in corner *, repeat from *-* 3 times in total. Finish with 1 dc between the first 2 dtr, 3 dc around ch-space and finish with 1 sl st in first ch from beg of round. ROUND 13: Work sl st in ch-space in corner, 7 ch (= 1 dtr + 3 ch), 1 dtr in same ch-space, * 3 ch, skip 3 dc, 1 tr in next st, 3 ch, skip 2 dc, 1 htr in next st, 3 ch, skip 1 dc, 1 htr in next st, 3 ch, skip 3 dc, 1 dc in next st, 3 ch, skip 1 dc, 1 dc in next st, 3 ch, skip 1 dc, 1 dc in next st, 2 ch, skip 2 dc, 1 tr in next st, 2 ch, skip 3 dc, 1 dc in next st, 3 ch, skip 1 dc, 1 dc in next st, 3 ch, skip 1 dc, 1 dc in next st, 3 ch, skip 3 dc, 1 htr in next st, 3 ch, skip 1 dc, 1 htr in next st, 3 ch, skip 2 dc, 1 tr in next st, 3 ch, skip 3 dc and work 1 dtr + 3 ch + 1 dtr in ch-space in corner *, repeat from *-* the entire round but finish with 1 sl st in 4th ch from beg of round (instead of 1 dtr + 3 ch + 1 dtr in ch-space in corner). ROUND 14: 1 sl st in ch-space in corner, 3 ch (= 1 tr), 2 tr + 3 ch + 3 tr in same ch-space, * work 3 tr in each of the first 6 ch-spaces, 1 tr in 2-ch-space, 1 tr in tr, 1 tr in 2-ch-space, work 3 tr in each of the next 6 ch-spaces, in corner work 3 tr + 3 ch + 3 tr in ch-space *, repeat from *-* the entire round but finish with 1 sl st in 3rd ch from beg of round (instead of 3 tr + 3 ch + 3 tr in corner). ROUND 15: 1 sl st in ch-space in corner, 3 ch (= 1 tr), 2 tr + 3 ch + 3 tr in same ch-space, * (2 ch, 1 tr before next tr-group), repeat from (-) until corner, 2 ch, in ch-space in corner work 3 tr + 3 ch + 3 tr *, repeat from *-* the entire round, but finish with 1 sl st in 3rd ch from beg of round (instead of tr-group in corner). ROUND 16: 1 sl st in ch-space in corner, 3 ch (= 1 tr), 2 tr + 3 ch + 3 tr in same ch-space, * work 3 tr in every ch-space until corner, work 3 tr + 3 ch + 3 tr in ch-space in corner *, repeat from *-* 3 times in total, work 3 tr in every ch-space until corner and finish with 1 sl st in 3rd ch from beg of round. The square is finished. Fasten off. NOTE: If you want a bigger poncho repeat ROUND 15-16 until desired measurements. ASSEMBLY: Place squares as shown on chart so that a coloured square is mid front and mid back and a white square in each side. Place 2 squares on top of each other WS against WS, and crochet them tog with white as follows: ** Work 1 dc in ch-space in corner on 1st square, 1 ch, 1 dc in ch-space in corner on 2nd square, * 3 ch, 1 dc in next ch-space on 1st square, 1 ch, 1 dc in next ch-space on 2nd square *, repeat from *-* until next corner, finish with 3 ch for transition to next square **, repeat from **-**. NECK EDGE: Work a finishing edge around the neck on hook size 5 mm as follows: Beg with light turquoise and work first round in A.2 but adjust in the corner mid front and mid back so that neck edge lies nicely mid front. Switch to light ice blue and work 2nd round of A.2 the same way. Fasten off. EDGE AROUND THE BOTTOM OF PONCHO: Work a finishing edge around the bottom of poncho on hook size 5 mm as follows: Beg with white and work pattern according to A.2 AT THE SAME TIME work STRIPES-EDGE - see explanation above. NOTE: To continue the edge into a nice tip as on squares it is important to continue inc mid front and mid back, i.e. in the middle ch-space mid front and mid back work 3 tr + 3 ch + 3 tr on every round. When edge is done, fasten off. FRINGES: 1 fringe = 6 threads of approx. 40 cm. Fold the threads double, thread the loop through the opening between 2 tr-groups and pull the yarn ends through the loop (so that 12 strands hang down in every fringe). Beg with 1 fringe in ch-space in the tip mid front and mid back, then insert fringes along the diagonal edge on poncho between every other tr-group. |
|||||||||||||||||||||||||||||||||||||
Diagram explanations |
|||||||||||||||||||||||||||||||||||||
|
|||||||||||||||||||||||||||||||||||||
 |
|||||||||||||||||||||||||||||||||||||
 |
|||||||||||||||||||||||||||||||||||||
 |
|||||||||||||||||||||||||||||||||||||
Have you finished this pattern?Tag your pictures with #dropspattern #bohemianbluesponcho or submit them to the #dropsfan gallery. Do you need help with this pattern?You'll find 9 tutorial videos, a Comments/Questions area and more by visiting the pattern on garnstudio.com. © 1982-2026 DROPS Design A/S. We reserve all rights. This document, including all its sub-sections, has copyrights. Read more about what you can do with our patterns at the bottom of each pattern on our site. |
|||||||||||||||||||||||||||||||||||||


With over 40 years in knitting and crochet design, DROPS Design offers one of the most extensive collections of free patterns on the internet - translated to 17 languages. As of today we count 324 catalogues and 12290 patterns translated into English (UK/cm).
We work hard to bring you the best knitting and crochet have to offer, inspiration and advice as well as great quality yarns at incredible prices! Would you like to use our patterns for other than personal use? You can read what you are allowed to do in the Copyright text at the bottom of all our patterns. Happy crafting!
Post a comment to pattern DROPS 162-2
We would love to hear what you have to say about this pattern!
If you want to leave a question, please make sure you select the correct category in the form below, to speed up the answering process. Required fields are marked *.