
Popular categories
Looking for a yarn?


Comments / Questions (260)
![]() Michaela Schenk wrote:
Michaela Schenk wrote:
Hallo, ich komme nicht weiter bei runde 24 wie ist das gemeint mit Hin und zurück wenn ich einen Kreis habe. Also wenn es heisst die Arbeit wenden., oder kann ich einfach den KREIS weiter umhäkeln.
05.03.2020 - 20:23DROPS Design answered:
Liebe Frau Schenk, ja ab 23. Runde wird die Arbeit am Ende jeder Reihe gewendet so mann abwechslungsweise von der Vorderseite und Rückseite häkelt - so ist die Textur gleich wenn man später nur die Vorderteile häkelt. Viel Spaß beim häkeln!
06.03.2020 - 09:03
![]() Zahraa Madian wrote:
Zahraa Madian wrote:
Can u make it for me so I can buy it And how much does it cost
01.11.2019 - 19:37DROPS Design answered:
Dear Mrs Madian, we only provide free patterns to make the designs; please feel free to contact your DROPS store, they might be able to help you. Thank you!
04.11.2019 - 16:03
![]() Angela wrote:
Angela wrote:
Hi!!! I'm almost finishing my project. I have doubts about the way I should finish my work...the instructions indicate that I work the first laps of A2 is being worked on the rows of high points. Please if you can clarify where I should work the 2 row of A2 and how I must finish my work. Thans a lot!
28.10.2019 - 14:32DROPS Design answered:
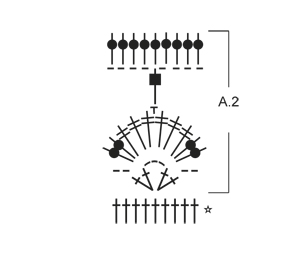
Dear Angela, you are not supposed to have worked the 2nd row in A.2 before working front pieces separately, you may have then to adjust the edge to work either only the 2nd row in A.2 over front pieces adjusting nicely the beg and end of rows or then to work another repeat in A.2 in the round (this might use more yarn than required). Happy crocheting!
04.11.2019 - 13:03
![]() Maria wrote:
Maria wrote:
Hi!!! I'm almost finishing my project. I have doubts about the way I should finish my work...the instructions indicate that I work the first laps of A2 is being worked on the rows of high points. Please if you can clarify where I should work the 2 row of A2 and how I must finish my work. Thans a lot!
28.10.2019 - 14:31DROPS Design answered:
Dear Maria, you are not supposed to have worked the 2nd row in A.2 before working front pieces separately, you may have then to adjust the edge to work either only the 2nd row in A.2 over front pieces adjusting nicely the beg and end of rows or then to work another repeat in A.2 in the round (this might use more yarn than required). Happy crocheting!
04.11.2019 - 13:03
![]() Jerry Degeling wrote:
Jerry Degeling wrote:
Ik vind het een heel mooi patroon en wil het ook in katoen maken, momenteel maak ik het in sokkenwol. Ik ben niet zo goed in het lezen van patronen, daarom heb ik een vraag gesteld hoe ik nu verder moet, ik wil de rand en de mouwen nog maken.
14.10.2019 - 15:24
![]() Jerry Degeling wrote:
Jerry Degeling wrote:
Goede middag, Ik wil verder met de rand, ik weet echter niet waar ik moet beginnen met de rand - helaas kan ik geen foto toevoegen bij het berichtje, zodat u kunt zien waar of ik ben. Met vriendelijke groet, Jerry Degeling
14.10.2019 - 15:22DROPS Design answered:
Dag Jerry,
De rand loopt helemaal rondom de panden en het maakt niet uit waar je begint. Dus je kunt gewoon ergens in een stokje beginnen met haken. Haak dan eerst 3 lossen, welke het eerste stokje (van het stk-groep) vervangt.
15.10.2019 - 15:47
![]() Maria wrote:
Maria wrote:
Do my job umtil insert the 4 bookmarks. The psttern says that you must work between 1 and 2 marker and continue incrrasing in the groups of pa on each side of the front piece an decrease 2 pa at the beginning pf each row. I still knit all the fabric back and forth?
10.10.2019 - 17:32DROPS Design answered:
Dear Maria, you continue now each front piece separately, the right front piece between 1st and 2nd marker and the left front piece will be worked later between 3rd and 4th marker. Each front piece is worked then back and forth increasing in the dc-groups as before and decreasing at the beginning of each row (both from RS and WS) to make the rounded front edge. Happy crocheting!
11.10.2019 - 08:48
![]() Sheila Bonwick wrote:
Sheila Bonwick wrote:
Please disregard my question regarding rnd 23! Totally my misinterpretation!!!
20.08.2019 - 00:06
![]() Sheila Bonwick wrote:
Sheila Bonwick wrote:
On rnd 23, if you rep 11 time plus 8 plus 8 plus 7 this dose not add up to 273 dcs? Also do you not work the entire rnd?
19.08.2019 - 23:22DROPS Design answered:
Dear Mrs Bonwick, you won't crochet in the 3-chain-spaces from previous round (except in the very first one at the beg of the round + the last at the end of the round), ie you have to skip these chain-spaces, the number of stitches will then add up at the end of the round. Happy crocheting!
20.08.2019 - 09:24
![]() Emilie wrote:
Emilie wrote:
Bonjour, tout d’abord , un grand merci pour les magnifiques modèles de tricot et crochet dont vous nous faites profiter gracieusement ! N’y a t il pas une erreur dans la video sensée nous faire démonstration du motif A2 sur l’éventail et n’est il pas sensé être attaché au motif par une bride dans le rang suivant ? Merci, bonne journée
24.06.2019 - 09:23DROPS Design answered:
Bonjour Émilie et merci, la vidéo de A.2 montre bien comment réaliser le diagramme, au dernier rang de A.2 on va crocheter 1 double-bride dans l'arceau du 1er rang de A.2 - pas dans le picot du rang précédent, l'éventail est ainsi en relief et pas directement attaché par la pointe au rang suivant. Bon crochet!
24.06.2019 - 17:04
|
||||||||||||||||||||||||||||||||||||||||
Ros#roscardigan |
||||||||||||||||||||||||||||||||||||||||
 |
 |
|||||||||||||||||||||||||||||||||||||||
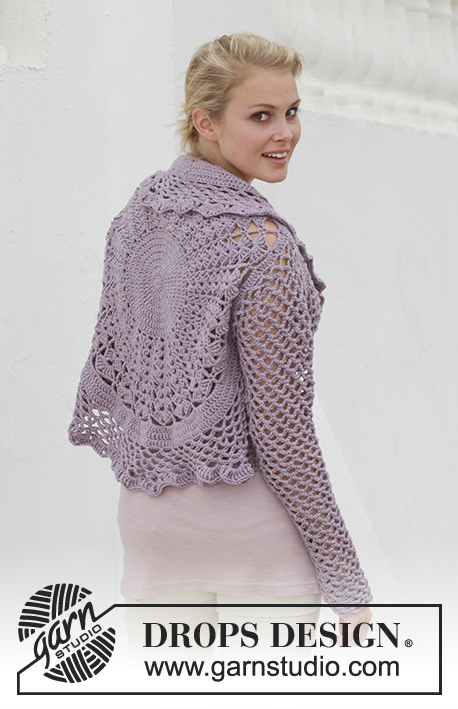
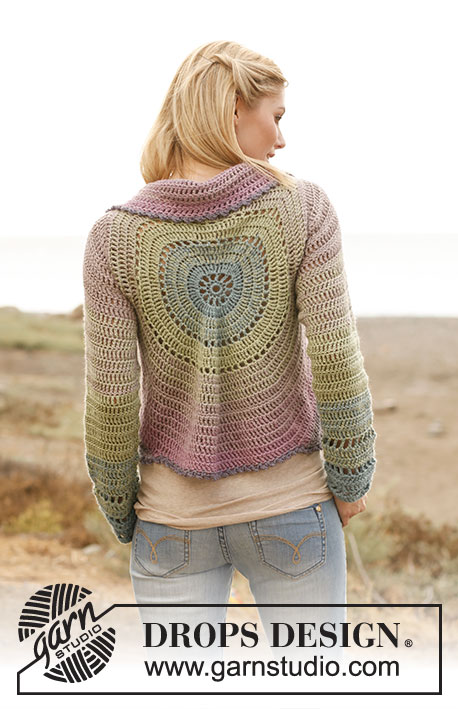
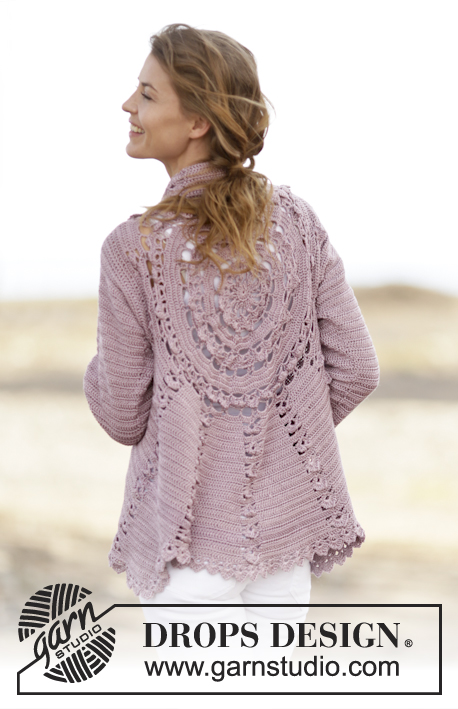
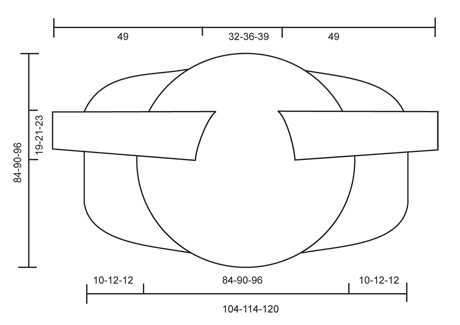
Crochet DROPS jacket worked in a circle with lace pattern in ”Cotton Viscose”. Size: S - XXXL.
DROPS 162-11 |
||||||||||||||||||||||||||||||||||||||||
|
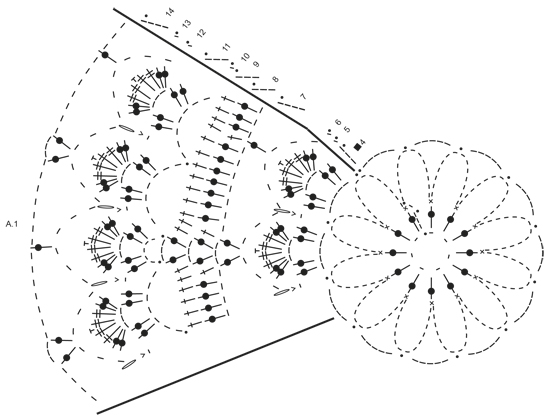
PICOT: Work 2 ch, 1 dc in the 2nd ch from hook. CROCHET INFO: Beg every tr round/row with 3 ch that replace first tr and finish every round/row with 1 sl st in 3rd ch from beg of round/row. PATTERN: See diagrams A.1-A.2. After 3rd round, repeat A.1 6 times in total on round. CROCHET 3 TR TOG: Work 3 tr into 1 tr at beg of row as follows: Work 3 ch (= replace 1 tr), work 1 tr, but wait with last pull through (= 2 strands on hook), then work next tr but on last pull through, pull yarn through all sts on hook. DECREASE TIP (applies to sleeves): Dec at beg of row by working 1 sl st over the tr to be dec. Dec at end of row by working until 1 tr to be dec remains, turn piece. ---------------------------------------------------------- CIRCLE: Work 7 ch on hook size 3.5 mm with Cotton Viscose and form a ring with 1 sl st in first ch. Then work A.1 as follows: ROUND 1: Work 3 ch, 12 tr in ch-ring, finish with 1 sl st in 3rd ch from beg of round. ROUND 2: Work 1 ch, * 1 dc in first tr, 14 ch *, repeat from *-* 12 times in total, finish with 1 sl st in first dc. Fasten off. ROUND 3: Work 1 sl st in first ch-space, 5 ch, * 1 sl st in next ch-space, 5 ch *, repeat from *-* 11 times in total, finish with 1 sl st in first ch-space. A.1 is repeated 6 times in total on round. ROUND 4: Work 3 ch, in first ch-space work: * 2 tr, 3 ch, 2 tr in same ch-space, 1 ch *, repeat from *-* 12 times in total, finish with 1 sl st in 3rd ch from beg of round. ROUND 5: Work 1 ch, in first ch-space work 2 tr, 2 dtr, 1 PICOT – see explanation above, 2 dtr, 2 tr, 1 dc in next ch, * in next ch-space work 2 tr, 2 dtr, 1 picot, 2 dtr, 2 tr, 1 dc in next ch *, repeat from *-* 11 times in total, finish with 1 sl st in first ch = 12 leaves. ROUND 6: Work 1 ch, * 6 ch, 1 dc in dc and ch (from 5th and 4th round) *, repeat from *-* 12 times in total, finish with 1 sl st in first ch. ROUND 7: Work 4 ch, * 3 ch, 1 tr in next ch-space, 7 ch, 1 tr in next ch-space, 3 ch, 1 tr in same ch-space, 4 ch *, repeat from *-* 6 times in total, finish with 1 sl st in 4th ch. ROUND 8: Work 3 ch, 3 tr in next ch-space, * 1 tr in next tr, 7 tr in next ch-space, 1 tr in next tr, 1 tr in next ch-space, 3 ch, 1 tr in same ch-space, 1 tr in next tr, 7 tr in next ch-space *, repeat from *-* 5 times in total, 1 tr in next tr, 7 tr in next ch-space, 1 tr in next tr, 1 tr in next ch-space, 3 ch, 1 tr in same ch-space, 1 tr in next tr, 4 tr in first ch-space, finish with 1 sl st in 3rd ch = 114 tr. REMEMBER THE CROCHET TENSION! ROUND 9: Work 3 ch, * 1 tr in every tr until ch-space, in ch-space as follows: 1 tr, 3 ch, 1 tr *, repeat from *-* the entire round, finish with 1 sl st in 3rd ch = 126 tr. ROUND 10: Work 1 ch, * 7 ch, skip 6 tr, 1 sl st in next tr, 7 ch, skip 6 tr, 1 sl st in next tr, 5 ch, 1 sl st in next tr, 7 ch, skip 6 tr, 1 sl st in next tr *, repeat from *-* 5 times in total, 7 ch, skip 6 tr, 1 sl st in next tr, 7 ch, skip 6 tr, 1 sl st in next tr, 5 ch, 1 sl st in next tr, 7 ch, skip 6 tr, 1 sl st in first ch. ROUND 11: Work 3 ch, in every ch-space work 2 tr, 3 ch, 2 tr, 1 ch, finish with 1 sl st in 3rd ch. ROUND 12: Work 1 ch, * in next ch-space work 2 tr, 2 dtr, 1 picot, 2 dtr, 2 tr, 1 dc in next ch *, repeat from *-* 24 times in total, finish with 1 sl st in first ch = 24 leaves. ROUND 13: Work 1 ch, * 6 ch, 1 dc in dc and ch (from 12th and 11th round) *, repeat from *-* 24 times in total, finish with 1 sl st in first ch. ROUND 14: Work 4 ch, * 3 ch, 1 tr in next ch-space, 7 ch, 1 tr in next ch-space, 3 ch, 1 tr in same ch-space, 4 ch *, repeat from *-* 12 times in total, finish with 1 sl st in 4th ch. ROUND 15: Work 3 ch - READ CROCHET INFO, work 4 tr in first ch-space (i.e. ch-space with 3 ch), now work tr in all ch-space with 7 ch from previous round, do not work in ch-space with 3 ch from previous round. Work * 8 tr in each of the next 7 ch-spaces, 9 tr in next ch-space *, repeat from *-* 2 times in total, 8 tr in each of the next 7 ch-spaces, 5 tr in last ch-space (i.e. ch-space with 4 ch) = 195 tr. ROUND 16: Work * 1 tr in each of the first 14 tr, 2 tr in next tr *, repeat from *-* 13 times in total = 208 tr. ROUND 17: Work * 2 tr in first tr, 1 tr in each of the next 15 tr *, repeat from *-* 13 times in total AT THE SAME TIME inc 1 tr extra on round = 222 tr. ROUND 18: Work 1 ch, * 6 ch, skip 5 tr, 1 sl st in next tr *, repeat from *-* 37 times in total, finish with 1 sl st in first ch. ROUND 19:Work as round 11 in A.1: Work 3 ch, in every ch-space work 2 tr, 3 ch, 2 tr, 1 ch, finish with 1 sl st in 3rd ch. ROUND 20: Work as round 12 in A.1: Work 1 ch, * in next ch-space work 2 tr, 2 dtr, 1 picot, 2 dtr, 2 tr, 1 ch *, repeat from *-* 37 times in total, finish with 1 sl st in first ch = 37 leaves. ROUND 21: Work as round 13 in A.1: Work 1 ch, * 6 ch, 1 dc in dc and ch (from 20th and 19th round) *, repeat from *-* 37 times in total, finish with 1 sl st in first ch. ROUND 22: Work as round 14 in A.1: Work 4 ch, * 3 ch, 1 tr in next ch-space, 7 ch, 1 tr in next ch-space, 3 ch, 1 tr in same ch-space, 4 ch *, repeat from *-* 18 times in total, work 3 ch, 1 tr in last ch-space, 4 ch, finish with 1 sl st in 4th ch. ROUND 23: Work 4 tr in first ch-space (i.e. ch-space with 3 ch), now work tr in all ch-space with 7 ch from previous round, do not work in ch-space with 3 ch from previous round. Work * 7 tr in next ch-space, 8 tr in next ch-space, 7 tr in next ch-space *, repeat from *-* 11 times in total, 8 tr in next ch-space, 8 tr in next ch-space, 7 tr in next ch-space, 4 tr in last ch-space (i.e. ch-space with 4 ch) = 273 tr. Then work piece back and forth. Work every row tog at the end of row with 1 sl st in 3rd ch from beg of row. Turn piece. ROW 24 (= WS): Work * 2 tr in next tr, 1 tr in each of the next 11 tr (= tr-group), A.2 *, repeat from *-* 13 times in total = 169 tr and 13 A.2. Turn piece. A.2 is repeated vertically until finished measurements. ROW 25 (= RS): Work A.2, 2 tr in first tr, 1 tr in each of the next tr in tr-group, * A.2, 2 tr in first tr in tr-group, 1 tr in each of the next tr *, repeat from *-* until 1 tr-group remains, 2 tr in first tr, 1 tr in each of the next tr = 182 tr. Turn piece. ROW 26: Work as row 24 = 195 tr (15 tr between every A.2). ROW 27: Work as row 25 = 208 tr (16 tr between every A.2). Repeat row 24-27 0-1-1 more time = 208-260-260 tr (= 16-20-20 tr between every A.2). Piece measures approx. 20-23-23 cm from centre and outwards. Now work arm holes as follows: ROW 28 (= from WS): Work 2 tr in first tr, 1 tr in each of the next 15-19-19 tr, A.2 as before, 2 tr in next tr, 1 tr in each of the next 15-19-19 tr, A.2, 54-62-62 loose ch (= right armhole), skip: 16-20-20 tr + A.2 + 16-20-20 tr + A.2, work * 2 tr in next tr, 1 tr in each of the next 15-19-19 tr, A.2 *, repeat from *-* 5 times in total, 2 tr in first tr, 1 tr in each of the next 15-19-19 tr, 54-62-62 loose ch (= left armhole), skip: A.2 + 16-20-20 tr + A.2 + 16-20-20 tr, work A.2, 2 tr in next tr, 1 tr in each of the next 15-19-19 tr, A.2 = 153-189-189 tr, 9 A.2 and 108-124-124 ch. ROW 29 (from RS): Work A.2, 2 tr in next tr, 1 tr in each of the next 16-20-20 tr, A.2, in ch-row (= left armhole) work as follows: 1 tr in each of the 54-62-62 ch, * 2 tr in next tr, 1 tr in each of the next 16-20-20 tr, A.2 *, repeat from *-* 5 times in total, 2 tr in next tr, 1 tr in each of the next 16-20-20 tr, in next ch-row (= right armhole) work as follows: 1 tr in each of the 54-62-62 ch, then work A.2, 2 tr in next tr, 1 tr in each of the next 16-20-20 tr, A.2, 2 tr in next tr, 1 tr in each of the next 16-20-20 tr = 270-322-322 tr and 9 A.2. ROW 30 (= from WS): Work 1 tr in each of the next 18-22-22 tr, A.2 as before, 1 tr in each of the next 18-22-22 tr, A.2, 1 tr in each of the next 18-22-22 tr, A.2 (adjust row according to the other repetitions), 1 tr in each of the next 18-22-22 tr, A.2, * 1 tr in each of the next 18-22-22 tr, A.2 *, repeat from *-* 5 times in total, 1 tr in each of the next 18-22-22 tr, A.2, 1 tr in each of the next 18-22-22 tr, A.2, 1 tr in each of the next 18-22-22 tr, A.2, 1 1 tr in each of the next 18-22-22 tr, A.2 = 234-286-286 tr and 13 A.2. Work pattern as before but now inc only on every row from RS until 52-52-60 rows have been worked in total = 377-429-481 tr (29-33-37 tr in every tr-group). Insert 4 markers in the piece as follows from WS: Work 29-33-37 tr, A.2, 14-16-18 tr, insert 1st marker, work 15-17-19 tr, * A.2, 29-33-37 tr *, repeat from *-* 4 times in total, insert 2nd marker here (1st-2nd marker = right front piece). Work A.2, 29-33-37 tr, A.2, 29-33-37 tr and A.2, insert 3rd marker here. * Work 29-33-37 tr, A.2 *, repeat from *-* 4 times in total, 15-17-19 tr, insert 4th marker. (3rd-4th marker = left front piece), 14-16-18 tr, A.2. Tr between 1st and 4th marker are up towards neck. Fasten off. RIGHT FRONT PIECE: Now work right front piece between 1st and 2nd marker, beg from 2nd marker (i.e. from RS) = 131-149-167 tr and 4 A.2. Continue inc in tr-groups as before BUT do not inc in tr-groups in each side of front piece - AT THE SAME TIME dec 2 tr at beg of every row by CROCHET 3 TR TOG - see explanation above. Work until 10-12-12 cm over front piece have been worked, adjust to finish with 1 whole repetition of A.2. Fasten off. LEFT FRONT PIECE: Work left front piece between 3rd and 4th marker the same way as right front piece, beg from 4th marker (i.e. from RS). EDGE: Work an edge around the entire jacket as follows: Work the first 2 rounds of A.2, when working first round of A.2 over tr-rows, skip 2 tr-rows on each side of tr-group. Beg every round with 3 ch and finish with 1 sl st in 3rd ch. SLEEVES: Work back and forth from armhole and down, work every row tog with 1 sl st at the end of row. Insert 1 marker in piece, NOW MEASURE PIECE FROM HERE. Beg by working 86-94-102 tr evenly around the opening for sleeve, beg of row should be under sleeve. Then work 3 rows with 1 tr in every tr. Continue with 1 tr in every tr - AT THE SAME TIME dec differently in the different sizes as follows: READ DECREASE TIP! SIZE S/M: Dec 1 st in each side of piece alternately every 3rd and 2nd row 16 times in total = 54 tr. SIZE L/XL: Dec 1 st in each side of piece every other row 20 times in total = 54 tr. SIZE XXL/XXXL: Dec 1 st in each side of piece every other row 24 times = 54 tr. ALL SIZES: Work 1 tr in every tr until sleeve measures approx. 47 cm, adjust so that next row is from WS. Then work the first 2 rounds of A.2 (= 6 repetitions in width). Fasten off. Work the other sleeve the same way. |
||||||||||||||||||||||||||||||||||||||||
Diagram explanations |
||||||||||||||||||||||||||||||||||||||||
|
||||||||||||||||||||||||||||||||||||||||
 |
||||||||||||||||||||||||||||||||||||||||
 |
||||||||||||||||||||||||||||||||||||||||
 |
||||||||||||||||||||||||||||||||||||||||
Have you finished this pattern?Tag your pictures with #dropspattern #roscardigan or submit them to the #dropsfan gallery. Do you need help with this pattern?You'll find 11 tutorial videos, a Comments/Questions area and more by visiting the pattern on garnstudio.com. © 1982-2026 DROPS Design A/S. We reserve all rights. This document, including all its sub-sections, has copyrights. Read more about what you can do with our patterns at the bottom of each pattern on our site. |
||||||||||||||||||||||||||||||||||||||||


With over 40 years in knitting and crochet design, DROPS Design offers one of the most extensive collections of free patterns on the internet - translated to 17 languages. As of today we count 324 catalogues and 12284 patterns translated into English (UK/cm).
We work hard to bring you the best knitting and crochet have to offer, inspiration and advice as well as great quality yarns at incredible prices! Would you like to use our patterns for other than personal use? You can read what you are allowed to do in the Copyright text at the bottom of all our patterns. Happy crafting!
Post a comment to pattern DROPS 162-11
We would love to hear what you have to say about this pattern!
If you want to leave a question, please make sure you select the correct category in the form below, to speed up the answering process. Required fields are marked *.