
Popular categories
Looking for a yarn?


Comments / Questions (260)
![]() Béatrice Dumont wrote:
Béatrice Dumont wrote:
Bonjour je ne comprends pas comment faire la bordure ,( sauter 2 rangs de bride de chaque coté du groupe de brides)? de quel rang de brides ? je suis perdue !!!!! merci de votre réponse ce modèle est superbe , très joli dans le dos , et malgré quelques difficultés rencontrées , c'est un plaisir de le réaliser .
14.04.2016 - 23:19DROPS Design answered:
Bonjour Mme Dumont, on crochète maintenant tout autour du dos et des devants qui forment un ovale - Au 1er rang de A.2, on doit sauter 4 B, faire 2B, 3 ml, 2B dans la B suivante et sauter 4B. Quand vous allez crocheter le long des rangs de chaque devant, sautez 2 rangs de B au lieu de 4 B, sautez 4B quand vous continuez les motifs comme avant. Bon crochet!
15.04.2016 - 09:07
![]() Jellie Snijders wrote:
Jellie Snijders wrote:
Hoi, ik loop vast bij toer 26, waarbij je het blaadje naar beneden moet vouwen en dan een stokje in de lossenlus op de eerste toer van A2 patroon. Vouw je het blaadje naar je toe ( is de achterkant vh werk) of van je af, dus naar de goede kant? En doe je het stokje door het picootje heen, of sla je dat over? Komt het stokje dus tussen de twee groepjes in? Alvast bedankt voor jullie moeite!
31.03.2016 - 13:37DROPS Design answered:
Hoi Jellie. Je haakt het stk in de lus op de eerste toer. Je vouwt blaadjes (en picot) naar je toe en haakt op de achterkant van het werk in de l-lus (3 l) tussen 2 dstk.
15.04.2016 - 12:20
![]() Marion Van Den Akker wrote:
Marion Van Den Akker wrote:
Hallo ik wil vest 162-11 haken maar ik snap niet na toer 3 staat herhaal a1 zes keer in totaal in de rondte. Ik hoef toch niet het telpatroon zes keer te haken ? ik kan toch gewoon beginnen met toer 4? ps ik wil dit op vakantie haken dus lees ik nu goed de beschrijving en opmerkingen door .
30.03.2016 - 10:24DROPS Design answered:
Hoi Marion. Je haakt 6 keer in de rondte - dus je herhaalt het telpatroon in de rondte (breedte), maar haakt alleen één keer in de hoogte.
30.03.2016 - 12:48Marcia Gingold wrote:
After Row 23, the pattern says work back and forth. Should you be still working in the round, but going back and forth? I am not getting correct number of trebles if I work back and forth. Also I find the diagram for A2 very confusing-looking at the picture all A2s are one above the other, but in the diagram it looks as though there are 6 trebles in the 3 chain space. I find diagrams difficult to follow. HELP!!!! Thank-you for the help last time - now set me right again. thank-you
17.03.2016 - 05:12DROPS Design answered:
Dear Mrs Gingold, after row 23 You continue working in the round but You Will now work alternately from RS and from WS. A.2 is worked over 9 sts from previous row with tr in between each A.2. Happy crocheting!
17.03.2016 - 10:25
![]() Biggi wrote:
Biggi wrote:
Geschafft 😊
06.03.2016 - 01:57
![]() Biggi wrote:
Biggi wrote:
Bin jetzt beim Vorderteil und habe die makierer gesetzt. Da wird aber das ganze Teil schief. Armlöcher sind richtig. Makierer eigentlich auch. Aber alles ist einfach im ganzen dann schief. Hat jemand das selbe Problem ? Bin alles nochmal durch gegangen und kann einfach nichts finden was ich falsch gemacht habe.
06.03.2016 - 01:10DROPS Design answered:
Liebe Biggi, gut, dass Sie es dann gleich geschafft haben. Wollen Sie noch kurz beschreiben, was zunächst das Problem war? Dann können andere davon profitieren.
06.03.2016 - 07:42Marcia Gingold wrote:
Is it possible to get A2 in words. If so where? I have read the explanation for row 24 and it was very helpful. thank-you for a great pattern.
28.02.2016 - 09:07DROPS Design answered:
Dear Mrs Gingold, A.2 is worked over 9 sts, ie on first row work *skip 4 tr, 2tr, 3ch, 2 tr in next tr, skip 4 tr*, continue then as shown in diagram. Happy crocheting!
29.02.2016 - 09:31
![]() Birgit wrote:
Birgit wrote:
Sorry, das war ein Denkfehler.Hat sich erledigt :-)
27.02.2016 - 21:37
![]() Birgit wrote:
Birgit wrote:
Hallo bestimmt eine dämliche Frage. Bin bei Reihe 14. muss ich jetzt mit 15 weiter machen oder erst 6x Reihe 3bis14 nochmal wiederholen. Bitte nicht auslachen
27.02.2016 - 13:41
![]() Dumont Beatrice wrote:
Dumont Beatrice wrote:
Bonsoir j'ai un doute sur mon travail , j'ai fais le rang 30 et continuer jusqu'au rang 40 comme avant , tout en rond , mais en regardant sur la photo du model , je vois qu'il n'y a pas de motif dans le cou ,alors que j'ai 11 rangs depuis les emmanchures ? je suis un peu perdue,on doit faire tout le temps le tour complet jusqu'a avoir 29 bribes dans chaque tour de bride ? merci de votre aide
25.02.2016 - 00:12DROPS Design answered:
Bonjour Mme Dumont, après le rang 30, on continue en brides (avec les augmentations) et A.2 comme auparavant jusqu'à ce que vous ayez 52 rangs au total et 29 B dans chaque groupe de B entre chaque A.2 - les augmentations se font maintenant tous les 2 rangs. Au rang suivant, crochetez comme indiqué en plaçant les marqueurs pour les devants, puis crochetez chaque devant séparément. Bon crochet!
25.02.2016 - 10:18
|
||||||||||||||||||||||||||||||||||||||||
Ros#roscardigan |
||||||||||||||||||||||||||||||||||||||||
 |
 |
|||||||||||||||||||||||||||||||||||||||
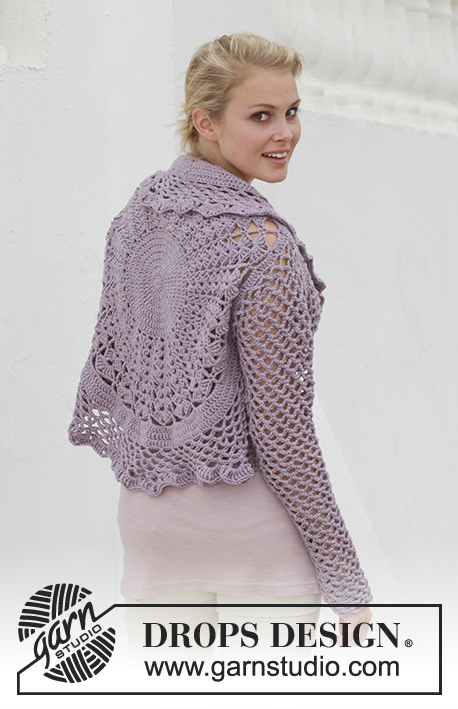
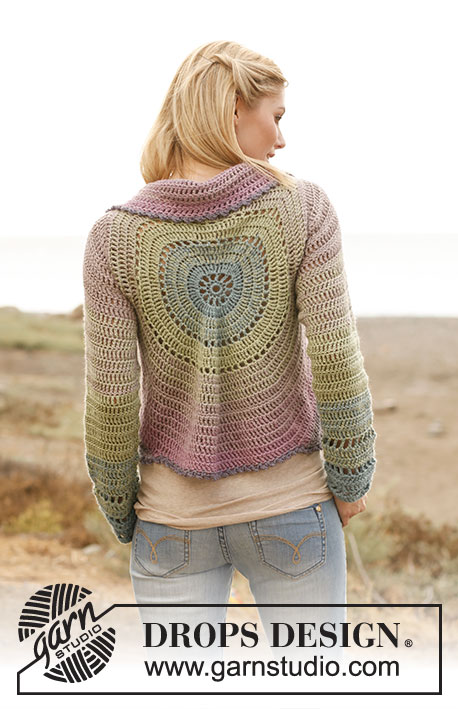
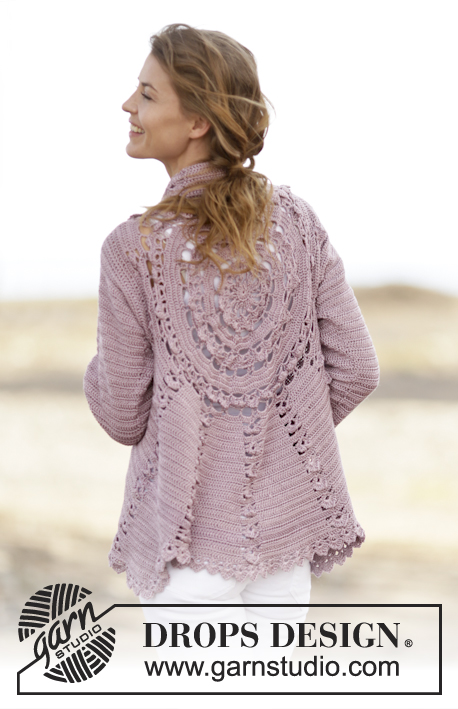
Crochet DROPS jacket worked in a circle with lace pattern in ”Cotton Viscose”. Size: S - XXXL.
DROPS 162-11 |
||||||||||||||||||||||||||||||||||||||||
|
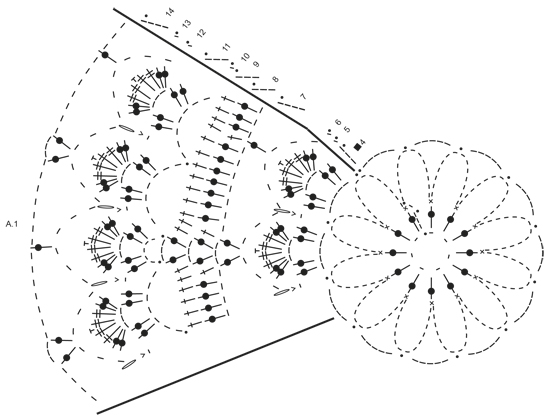
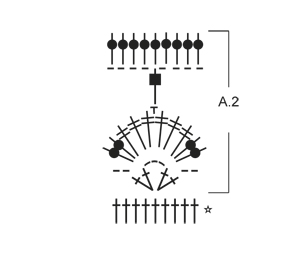
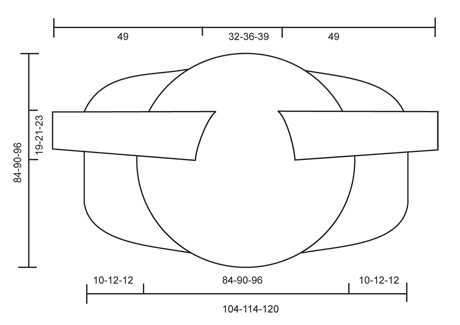
PICOT: Work 2 ch, 1 dc in the 2nd ch from hook. CROCHET INFO: Beg every tr round/row with 3 ch that replace first tr and finish every round/row with 1 sl st in 3rd ch from beg of round/row. PATTERN: See diagrams A.1-A.2. After 3rd round, repeat A.1 6 times in total on round. CROCHET 3 TR TOG: Work 3 tr into 1 tr at beg of row as follows: Work 3 ch (= replace 1 tr), work 1 tr, but wait with last pull through (= 2 strands on hook), then work next tr but on last pull through, pull yarn through all sts on hook. DECREASE TIP (applies to sleeves): Dec at beg of row by working 1 sl st over the tr to be dec. Dec at end of row by working until 1 tr to be dec remains, turn piece. ---------------------------------------------------------- CIRCLE: Work 7 ch on hook size 3.5 mm with Cotton Viscose and form a ring with 1 sl st in first ch. Then work A.1 as follows: ROUND 1: Work 3 ch, 12 tr in ch-ring, finish with 1 sl st in 3rd ch from beg of round. ROUND 2: Work 1 ch, * 1 dc in first tr, 14 ch *, repeat from *-* 12 times in total, finish with 1 sl st in first dc. Fasten off. ROUND 3: Work 1 sl st in first ch-space, 5 ch, * 1 sl st in next ch-space, 5 ch *, repeat from *-* 11 times in total, finish with 1 sl st in first ch-space. A.1 is repeated 6 times in total on round. ROUND 4: Work 3 ch, in first ch-space work: * 2 tr, 3 ch, 2 tr in same ch-space, 1 ch *, repeat from *-* 12 times in total, finish with 1 sl st in 3rd ch from beg of round. ROUND 5: Work 1 ch, in first ch-space work 2 tr, 2 dtr, 1 PICOT – see explanation above, 2 dtr, 2 tr, 1 dc in next ch, * in next ch-space work 2 tr, 2 dtr, 1 picot, 2 dtr, 2 tr, 1 dc in next ch *, repeat from *-* 11 times in total, finish with 1 sl st in first ch = 12 leaves. ROUND 6: Work 1 ch, * 6 ch, 1 dc in dc and ch (from 5th and 4th round) *, repeat from *-* 12 times in total, finish with 1 sl st in first ch. ROUND 7: Work 4 ch, * 3 ch, 1 tr in next ch-space, 7 ch, 1 tr in next ch-space, 3 ch, 1 tr in same ch-space, 4 ch *, repeat from *-* 6 times in total, finish with 1 sl st in 4th ch. ROUND 8: Work 3 ch, 3 tr in next ch-space, * 1 tr in next tr, 7 tr in next ch-space, 1 tr in next tr, 1 tr in next ch-space, 3 ch, 1 tr in same ch-space, 1 tr in next tr, 7 tr in next ch-space *, repeat from *-* 5 times in total, 1 tr in next tr, 7 tr in next ch-space, 1 tr in next tr, 1 tr in next ch-space, 3 ch, 1 tr in same ch-space, 1 tr in next tr, 4 tr in first ch-space, finish with 1 sl st in 3rd ch = 114 tr. REMEMBER THE CROCHET TENSION! ROUND 9: Work 3 ch, * 1 tr in every tr until ch-space, in ch-space as follows: 1 tr, 3 ch, 1 tr *, repeat from *-* the entire round, finish with 1 sl st in 3rd ch = 126 tr. ROUND 10: Work 1 ch, * 7 ch, skip 6 tr, 1 sl st in next tr, 7 ch, skip 6 tr, 1 sl st in next tr, 5 ch, 1 sl st in next tr, 7 ch, skip 6 tr, 1 sl st in next tr *, repeat from *-* 5 times in total, 7 ch, skip 6 tr, 1 sl st in next tr, 7 ch, skip 6 tr, 1 sl st in next tr, 5 ch, 1 sl st in next tr, 7 ch, skip 6 tr, 1 sl st in first ch. ROUND 11: Work 3 ch, in every ch-space work 2 tr, 3 ch, 2 tr, 1 ch, finish with 1 sl st in 3rd ch. ROUND 12: Work 1 ch, * in next ch-space work 2 tr, 2 dtr, 1 picot, 2 dtr, 2 tr, 1 dc in next ch *, repeat from *-* 24 times in total, finish with 1 sl st in first ch = 24 leaves. ROUND 13: Work 1 ch, * 6 ch, 1 dc in dc and ch (from 12th and 11th round) *, repeat from *-* 24 times in total, finish with 1 sl st in first ch. ROUND 14: Work 4 ch, * 3 ch, 1 tr in next ch-space, 7 ch, 1 tr in next ch-space, 3 ch, 1 tr in same ch-space, 4 ch *, repeat from *-* 12 times in total, finish with 1 sl st in 4th ch. ROUND 15: Work 3 ch - READ CROCHET INFO, work 4 tr in first ch-space (i.e. ch-space with 3 ch), now work tr in all ch-space with 7 ch from previous round, do not work in ch-space with 3 ch from previous round. Work * 8 tr in each of the next 7 ch-spaces, 9 tr in next ch-space *, repeat from *-* 2 times in total, 8 tr in each of the next 7 ch-spaces, 5 tr in last ch-space (i.e. ch-space with 4 ch) = 195 tr. ROUND 16: Work * 1 tr in each of the first 14 tr, 2 tr in next tr *, repeat from *-* 13 times in total = 208 tr. ROUND 17: Work * 2 tr in first tr, 1 tr in each of the next 15 tr *, repeat from *-* 13 times in total AT THE SAME TIME inc 1 tr extra on round = 222 tr. ROUND 18: Work 1 ch, * 6 ch, skip 5 tr, 1 sl st in next tr *, repeat from *-* 37 times in total, finish with 1 sl st in first ch. ROUND 19:Work as round 11 in A.1: Work 3 ch, in every ch-space work 2 tr, 3 ch, 2 tr, 1 ch, finish with 1 sl st in 3rd ch. ROUND 20: Work as round 12 in A.1: Work 1 ch, * in next ch-space work 2 tr, 2 dtr, 1 picot, 2 dtr, 2 tr, 1 ch *, repeat from *-* 37 times in total, finish with 1 sl st in first ch = 37 leaves. ROUND 21: Work as round 13 in A.1: Work 1 ch, * 6 ch, 1 dc in dc and ch (from 20th and 19th round) *, repeat from *-* 37 times in total, finish with 1 sl st in first ch. ROUND 22: Work as round 14 in A.1: Work 4 ch, * 3 ch, 1 tr in next ch-space, 7 ch, 1 tr in next ch-space, 3 ch, 1 tr in same ch-space, 4 ch *, repeat from *-* 18 times in total, work 3 ch, 1 tr in last ch-space, 4 ch, finish with 1 sl st in 4th ch. ROUND 23: Work 4 tr in first ch-space (i.e. ch-space with 3 ch), now work tr in all ch-space with 7 ch from previous round, do not work in ch-space with 3 ch from previous round. Work * 7 tr in next ch-space, 8 tr in next ch-space, 7 tr in next ch-space *, repeat from *-* 11 times in total, 8 tr in next ch-space, 8 tr in next ch-space, 7 tr in next ch-space, 4 tr in last ch-space (i.e. ch-space with 4 ch) = 273 tr. Then work piece back and forth. Work every row tog at the end of row with 1 sl st in 3rd ch from beg of row. Turn piece. ROW 24 (= WS): Work * 2 tr in next tr, 1 tr in each of the next 11 tr (= tr-group), A.2 *, repeat from *-* 13 times in total = 169 tr and 13 A.2. Turn piece. A.2 is repeated vertically until finished measurements. ROW 25 (= RS): Work A.2, 2 tr in first tr, 1 tr in each of the next tr in tr-group, * A.2, 2 tr in first tr in tr-group, 1 tr in each of the next tr *, repeat from *-* until 1 tr-group remains, 2 tr in first tr, 1 tr in each of the next tr = 182 tr. Turn piece. ROW 26: Work as row 24 = 195 tr (15 tr between every A.2). ROW 27: Work as row 25 = 208 tr (16 tr between every A.2). Repeat row 24-27 0-1-1 more time = 208-260-260 tr (= 16-20-20 tr between every A.2). Piece measures approx. 20-23-23 cm from centre and outwards. Now work arm holes as follows: ROW 28 (= from WS): Work 2 tr in first tr, 1 tr in each of the next 15-19-19 tr, A.2 as before, 2 tr in next tr, 1 tr in each of the next 15-19-19 tr, A.2, 54-62-62 loose ch (= right armhole), skip: 16-20-20 tr + A.2 + 16-20-20 tr + A.2, work * 2 tr in next tr, 1 tr in each of the next 15-19-19 tr, A.2 *, repeat from *-* 5 times in total, 2 tr in first tr, 1 tr in each of the next 15-19-19 tr, 54-62-62 loose ch (= left armhole), skip: A.2 + 16-20-20 tr + A.2 + 16-20-20 tr, work A.2, 2 tr in next tr, 1 tr in each of the next 15-19-19 tr, A.2 = 153-189-189 tr, 9 A.2 and 108-124-124 ch. ROW 29 (from RS): Work A.2, 2 tr in next tr, 1 tr in each of the next 16-20-20 tr, A.2, in ch-row (= left armhole) work as follows: 1 tr in each of the 54-62-62 ch, * 2 tr in next tr, 1 tr in each of the next 16-20-20 tr, A.2 *, repeat from *-* 5 times in total, 2 tr in next tr, 1 tr in each of the next 16-20-20 tr, in next ch-row (= right armhole) work as follows: 1 tr in each of the 54-62-62 ch, then work A.2, 2 tr in next tr, 1 tr in each of the next 16-20-20 tr, A.2, 2 tr in next tr, 1 tr in each of the next 16-20-20 tr = 270-322-322 tr and 9 A.2. ROW 30 (= from WS): Work 1 tr in each of the next 18-22-22 tr, A.2 as before, 1 tr in each of the next 18-22-22 tr, A.2, 1 tr in each of the next 18-22-22 tr, A.2 (adjust row according to the other repetitions), 1 tr in each of the next 18-22-22 tr, A.2, * 1 tr in each of the next 18-22-22 tr, A.2 *, repeat from *-* 5 times in total, 1 tr in each of the next 18-22-22 tr, A.2, 1 tr in each of the next 18-22-22 tr, A.2, 1 tr in each of the next 18-22-22 tr, A.2, 1 1 tr in each of the next 18-22-22 tr, A.2 = 234-286-286 tr and 13 A.2. Work pattern as before but now inc only on every row from RS until 52-52-60 rows have been worked in total = 377-429-481 tr (29-33-37 tr in every tr-group). Insert 4 markers in the piece as follows from WS: Work 29-33-37 tr, A.2, 14-16-18 tr, insert 1st marker, work 15-17-19 tr, * A.2, 29-33-37 tr *, repeat from *-* 4 times in total, insert 2nd marker here (1st-2nd marker = right front piece). Work A.2, 29-33-37 tr, A.2, 29-33-37 tr and A.2, insert 3rd marker here. * Work 29-33-37 tr, A.2 *, repeat from *-* 4 times in total, 15-17-19 tr, insert 4th marker. (3rd-4th marker = left front piece), 14-16-18 tr, A.2. Tr between 1st and 4th marker are up towards neck. Fasten off. RIGHT FRONT PIECE: Now work right front piece between 1st and 2nd marker, beg from 2nd marker (i.e. from RS) = 131-149-167 tr and 4 A.2. Continue inc in tr-groups as before BUT do not inc in tr-groups in each side of front piece - AT THE SAME TIME dec 2 tr at beg of every row by CROCHET 3 TR TOG - see explanation above. Work until 10-12-12 cm over front piece have been worked, adjust to finish with 1 whole repetition of A.2. Fasten off. LEFT FRONT PIECE: Work left front piece between 3rd and 4th marker the same way as right front piece, beg from 4th marker (i.e. from RS). EDGE: Work an edge around the entire jacket as follows: Work the first 2 rounds of A.2, when working first round of A.2 over tr-rows, skip 2 tr-rows on each side of tr-group. Beg every round with 3 ch and finish with 1 sl st in 3rd ch. SLEEVES: Work back and forth from armhole and down, work every row tog with 1 sl st at the end of row. Insert 1 marker in piece, NOW MEASURE PIECE FROM HERE. Beg by working 86-94-102 tr evenly around the opening for sleeve, beg of row should be under sleeve. Then work 3 rows with 1 tr in every tr. Continue with 1 tr in every tr - AT THE SAME TIME dec differently in the different sizes as follows: READ DECREASE TIP! SIZE S/M: Dec 1 st in each side of piece alternately every 3rd and 2nd row 16 times in total = 54 tr. SIZE L/XL: Dec 1 st in each side of piece every other row 20 times in total = 54 tr. SIZE XXL/XXXL: Dec 1 st in each side of piece every other row 24 times = 54 tr. ALL SIZES: Work 1 tr in every tr until sleeve measures approx. 47 cm, adjust so that next row is from WS. Then work the first 2 rounds of A.2 (= 6 repetitions in width). Fasten off. Work the other sleeve the same way. |
||||||||||||||||||||||||||||||||||||||||
Diagram explanations |
||||||||||||||||||||||||||||||||||||||||
|
||||||||||||||||||||||||||||||||||||||||
 |
||||||||||||||||||||||||||||||||||||||||
 |
||||||||||||||||||||||||||||||||||||||||
 |
||||||||||||||||||||||||||||||||||||||||
Have you finished this pattern?Tag your pictures with #dropspattern #roscardigan or submit them to the #dropsfan gallery. Do you need help with this pattern?You'll find 11 tutorial videos, a Comments/Questions area and more by visiting the pattern on garnstudio.com. © 1982-2026 DROPS Design A/S. We reserve all rights. This document, including all its sub-sections, has copyrights. Read more about what you can do with our patterns at the bottom of each pattern on our site. |
||||||||||||||||||||||||||||||||||||||||


With over 40 years in knitting and crochet design, DROPS Design offers one of the most extensive collections of free patterns on the internet - translated to 17 languages. As of today we count 324 catalogues and 12284 patterns translated into English (UK/cm).
We work hard to bring you the best knitting and crochet have to offer, inspiration and advice as well as great quality yarns at incredible prices! Would you like to use our patterns for other than personal use? You can read what you are allowed to do in the Copyright text at the bottom of all our patterns. Happy crafting!
Post a comment to pattern DROPS 162-11
We would love to hear what you have to say about this pattern!
If you want to leave a question, please make sure you select the correct category in the form below, to speed up the answering process. Required fields are marked *.