
Popular categories
Looking for a yarn?


Comments / Questions (110)
Jean wrote:
Hi When knitting the raglan do I increase every row 15 times or every other row? The raglan instructions give instructions for two rows, one to increase and one to knit across the YO stitches. If it is every row, am I knitting into the back of the YO stitch of the row before then creating another YO stitch immediately on the second row?
11.04.2018 - 08:06DROPS Design answered:
Dear Jean, in size L you will inc first a total of 16 times every round (=15 more times), ie on next round, K YO twisted, make a new YO, K5, make a YO, and K the next YO twisted (= you have worked the previous Yos twisted and make 2 new YO for raglan inc). Happy knitting!
11.04.2018 - 09:50
![]() Marlene wrote:
Marlene wrote:
Fout in het patroon bedoelde ik natuurlijk.
22.02.2018 - 22:56
![]() Marlene wrote:
Marlene wrote:
Nav de eerdere vraag van Janneke over de ronding in het achterpand. In het patroon ( zowel Engels als Nederlands) staat dat deze in ribbelsteek gebreid moet worden. Is dit een door in het patroon of klopt de reactie op de site niet?
22.02.2018 - 22:49DROPS Design answered:
Hoi Marlene, Bedankt voor je opmerking. Ik denk inderdaad, zoals je zet, dat er een foutje in het patroon zit en dat de verhoging in tricotsteek moet en niet in ribbelsteek. Het is doorgegeven aan de designafdeling.
23.02.2018 - 16:08
![]() Janneke wrote:
Janneke wrote:
Ik heb een vraag over het meten van de schouder: Moet de lijn van de raglan gemeten worden of moet je meten vanaf de hals over de kop van de schouder? Dank!
10.11.2017 - 15:53DROPS Design answered:
Hallo Janneke, Je legt het werk plat op tafel en meet vanaf de bovenkant, vanaf de kop van de schouder recht naar beneden, dus niet schuin over de raglan meten.
13.11.2017 - 22:20
![]() Janneke wrote:
Janneke wrote:
Maak je, na de 3 begin-ribbels, de ronding in het achterpand in ribbelsteek of in tricotsteek?
05.11.2017 - 12:54DROPS Design answered:
Hallo Janneke, De verhoging brei je in tricotsteek; niet in ribbelsteek. Ribbelsteek is alleen voor de rand.
06.02.2018 - 17:14
![]() Barbara Mack wrote:
Barbara Mack wrote:
In the pattern it says to knit the yoke for a total of 8 3/4" (for med) from the shoulder. Where does the shoulder start?
18.09.2017 - 02:52DROPS Design answered:
Dear Barbara, this is a round yoke piece, the shoulder starts with the cast on. Happy Knitting!
18.09.2017 - 06:47
![]() Barbara Mack wrote:
Barbara Mack wrote:
I have a question about the YO inc. The video mentions that the YO leaves a hole but the picture looks like the dress does not have holes in it. Does the YO stitch used in the pattern use a technique that does not leave a hole?
16.09.2017 - 02:12DROPS Design answered:
Hi Barbara, In the text of the pattern it says knit the yarn overs twisted to avoid holes. Happy knitting!
17.09.2017 - 12:47
![]() Cynthia Caloz wrote:
Cynthia Caloz wrote:
Bonjour ! La ré-hausse me pose pas le problème du passage du point mousse tricoté en rond (un tour endroit, un tour envers) au point mousse tricoté en plan (tout à l'endroit) : comment ne pas avoir d'irrégularités à l'endroit du changement de tour, comme lorsqu'on tricote directement tout à l'endroit ?? J'espère que vous comprenez ma question et que vous pouvez m'aider dans ce qui m'est personnellement un casse-tête chinois !!
01.05.2017 - 13:55DROPS Design answered:
Bonjour Mme Caloz, commencez la réhausse par 1 rang en mailles endroit (= sur l'endroit) et terminez par 1 rang en mailles endroit (sur l'envers), ainsi, vous aurez des côtes mousse bien régulières. Bon tricot!
02.05.2017 - 11:34
![]() Anette Skov wrote:
Anette Skov wrote:
Det er første gang, jeg forsøger med en raglan og jeg forstår måske ikke rigtigt, hvordan man kan både kan tage ud på hver omg, og hver 2. og 3. omg.? Skal det forstås sådan, at jeg skal tage ud på hver omg. de første 12 (M) omg. og derefter hver 2. i 4 og slutte af med hver 3. i 5 omg.?
21.01.2017 - 13:46DROPS Design answered:
Hej Anette. Du starter med först at tage ud paa hver omgang x antal gange (det tal som er for din str). Bagefter tager du ud x gange i hver 2. pind og til sidst x gange i hver 3. p. Dvs, du gör det efter hinanden - ikke paa én gang.
26.01.2017 - 12:09
![]() Eva Spedtsberg wrote:
Eva Spedtsberg wrote:
Fantastisk kjole! Men jeg synes ikke jeg kan se nogle mål på størrelserne. Hvor gør jeg det?
04.01.2017 - 19:28
|
|
Angel Falls#angelfallsdress |
|
 |
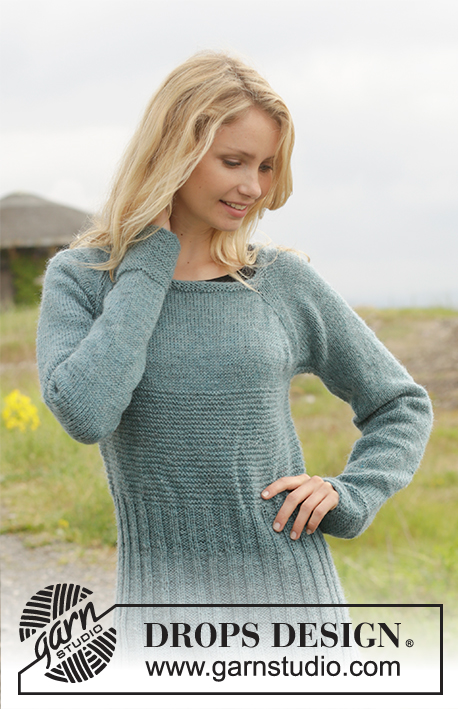 |
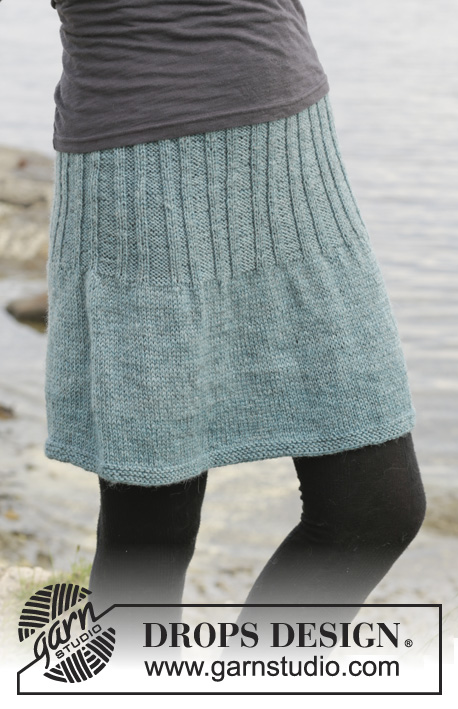
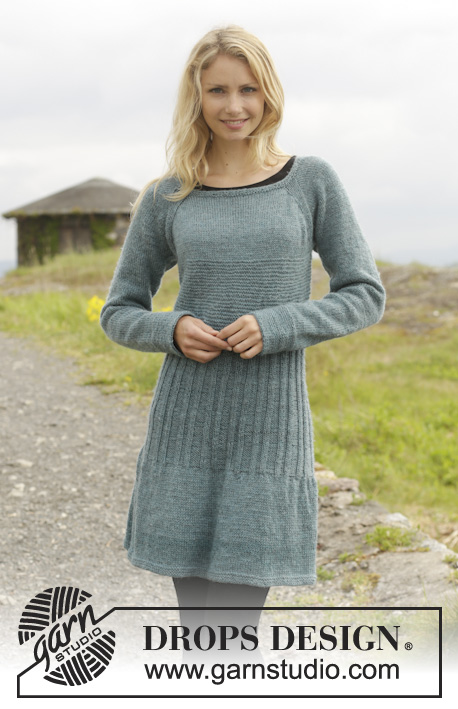
Knitted DROPS dress in garter st with rib and raglan, worked top down in ”Karisma”. Size: S - XXXL.
DROPS 156-3 |
|
|
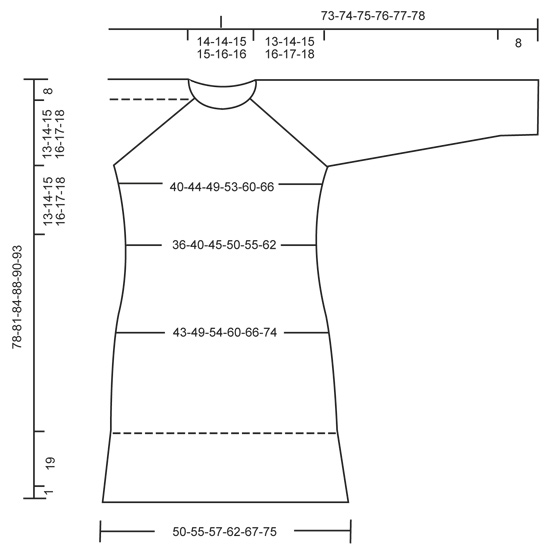
GARTER ST (in the round on double pointed needles/circular needle): * K 1 round and P 1 round *, repeat from *-*. 1 ridge = 2 rounds. RAGLAN: Inc on each side of marker as follows: Work until 2 sts before 1st marker, 1 YO, K 5, 1 YO, continue until 3 sts before 2nd marker, 1 YO, K 5, 1 YO, continue until 2 sts before 3rd marker, 1 YO, K 5, 1 YO, continue until 3 sts before 4th marker, 1 YO, K 5, 1 YO, work the rest of round (= 8 sts inc on round). On next round K YO twisted (i.e. work in back loop of st instead of front) to avoid holes. DECREASE TIP: Dec on each side of marker as follows: Work until 3 sts before marker, K 2 tog, K 2 (marker is between these sts), slip 1 st as if to K, K 1, psso. ---------------------------------------------------------- DRESS: Worked top down in the round on circular needle. YOKE: Cast on 126-126-132-132-136-136 sts on circular needle size 3.5 mm with Karisma. Work 3 ridges in GARTER ST – see explanation above, AT THE SAME TIME on last round in garter st inc 24-24-24-26-26-26 sts evenly on round = 150-150-156-158-162-162 sts. Now work an elevation in the back of neck in garter st as follows: Work 10-10-12-12-14-14 sts, turn, work 20-20-24-24-28-28 sts, turn, work 25-25-29-29-33-33 sts, turn, work 30-30-34-34-38-38 sts, turn. Continue like this by working 5 sts more on every turn until 70-70-74-74-78-78 sts are worked. Turn and work back to beg of round. Switch to circular needle size 4 mm and work as follows from mid back: 21-21-22-23-24-24 sts in stocking st, insert 1st marker, 34 sts in stocking st, insert 2nd marker, 41-41-44-45-47-47 sts in stocking st, insert 3rd marker, 34 sts in stocking st, insert 4th marker, 20-20-22-22-23-23 sts in stocking st. REMEMBER THE KNITTING TENSION! Continue in stocking st, AT THE SAME TIME on next round beg inc for RAGLAN – see explanation above! Repeat inc every round 7-12-15-21-27-37 more times, every other round 5-4-4-4-4-3 times and every 3rd round 5-5-5-4-3-1 times = 294-326-356-398-442-498 sts. When all inc are done and piece measures 21-22-23-24-25-26 cm from shoulder, work as follows: Work 39-43-47-53-59-66 sts (= half back piece), slip the next 70-78-84-94-104-118 sts on 1 stitch holder (= sleeve), cast on 8 new sts for armhole, insert a marker in the middle of these 8 sts, work 77-85-94-105-117-131 sts (= front piece), slip the next 70-78-84-94-104-118 sts on a stitch holder (= sleeve), cast on 8 new sts for armhole, insert a marker in the middle of these 8 sts, work the remaining 38-42-47-52-58-65 sts (= half back piece). BODY: There are now 170-186-204-226-250-278 sts for body. Now work 1 round in stocking st AT THE SAME TIME dec 30-32-36-40-44-50 sts evenly = 140-154-168-186-206-228 sts. Switch to circular needle size 3.5 mm. Then work in garter st, AT THE SAME TIME when piece measures 4 cm from the new sts under sleeves, dec 1 st on each side of marker in each side of piece – READ DECREASE TIP. Repeat dec every 2-2½-2½-2½-3-3½ cm 3 more times = 124-138-152-170-190-212 sts on round. When piece measures 13-14-15-16-17-18 cm from new sts under sleeve, work in stocking st AT THE SAME TIME inc 26-32-38-40-40-48 sts evenly = 150-170-190-210-230-260 sts. Continue to work rib as follows: K 1, P 3, * K 2, P 3 *, repeat from *-* the entire round until 1 st remains, K 1. When rib has been worked for 7 cm, inc 1 st in every other repetition with P sts (= 15-17-19-21-23-26 sts inc) = 165-187-209-231-253-286 sts. When rib has been worked for 14 cm, inc the same way in every repetition with 4 P sts (= 15-17-19-21-23-26 sts inc) = 180-204-228-252-276-312 sts. Continue like this until rib has been worked for 24-25-26-27-28-29 cm. On next round switch to circular needle size 4 mm and work in stocking st, AT THE SAME TIME inc 30-26-12-8-4-4 sts = 210-230-240-260-280-316 sts. Continue in stocking st for 19 cm. Switch to circular needle size 3.5 mm and work 3 ridges. Loosely cast off. SLEEVE: Worked in the round on double pointed needles. Slip the 70-78-84-94-104-118 sts back on double pointed needles size 4 mm. Work in stocking st over all sts and cast on 8 sts under sleeve = 78-86-92-102-112-126 sts. Insert a marker in the middle of the new sts. On first round dec 1 st on each side of marker - READ DECREASE TIP. Repeat dec every other round 7 more times = 62-70-76-86-96-110 sts. Then dec every 5½-3½-3-2-1½-1 cm 7-10-12-16-21-27 times = 48-50-52-54-54-56 sts. When sleeve measures 45-45-44-44-44-44 cm from marker mid under sleeve, switch to needle size 3.5 mm and work in garter st for 8 cm. Cast off. ASSEMBLY: Sew the openings under the sleeves tog. |
|
 |
|
Have you finished this pattern?Tag your pictures with #dropspattern #angelfallsdress or submit them to the #dropsfan gallery. Do you need help with this pattern?You'll find 26 tutorial videos, a Comments/Questions area and more by visiting the pattern on garnstudio.com. © 1982-2026 DROPS Design A/S. We reserve all rights. This document, including all its sub-sections, has copyrights. Read more about what you can do with our patterns at the bottom of each pattern on our site. |
|


With over 40 years in knitting and crochet design, DROPS Design offers one of the most extensive collections of free patterns on the internet - translated to 17 languages. As of today we count 324 catalogues and 12290 patterns translated into English (UK/cm).
We work hard to bring you the best knitting and crochet have to offer, inspiration and advice as well as great quality yarns at incredible prices! Would you like to use our patterns for other than personal use? You can read what you are allowed to do in the Copyright text at the bottom of all our patterns. Happy crafting!
Post a comment to pattern DROPS 156-3
We would love to hear what you have to say about this pattern!
If you want to leave a question, please make sure you select the correct category in the form below, to speed up the answering process. Required fields are marked *.