
Popular categories
Looking for a yarn?


Comments / Questions (273)
![]() Mona Ringdahl wrote:
Mona Ringdahl wrote:
Hej ang. raglan. Det står öka på varje sida m raglanmaskan. Vilken ska jag markera som raglanmaska? A1 och A2 börjar och slutar med avig maska, är det en av dem eller ska jag lägga till en maska emellan?
24.10.2024 - 14:53DROPS Design answered:
Hej Mona, du strikker raglanudtagningerne på hver side af de markører du har sat i arbejdet sådan her: Det ökas på varje sida av raglan-m såhär: raglanökning - A.1ellerA.2, markör, A.2ellerA.1 raglanökning - (du har antigen A.1 eller A.2 på varje sida om markören)
25.10.2024 - 09:43
![]() Mieke Baras wrote:
Mieke Baras wrote:
Na de meerderingen en minderingen, begin ik nu met A4 en A5 in te voegen. Ga ik na de middelste kabel op rug en voorpand (A3 die verderging in A2) verder met A2 of met A4 ? Ik probeer het begin van de ronde te vinden. Alvast bedankt!
08.10.2024 - 10:56DROPS Design answered:
Dag Mieke,
Ja, je gaat verder met A.2. Dit staat ook zo aangegeven in die paragraaf, dus dat je verder gaat met A.2.
08.10.2024 - 20:53
![]() Mieke Baras wrote:
Mieke Baras wrote:
Maat L dus. Alle meerderingen en minderingen gedaan. Totaal 228 st in de volgende indeling (ik begin bij de 12 bijgezette st onder de mouw): 7 a- A2- 7a- (A2-5a) x8 - A2 (halverwege), 7a-A2-7a- A2- (5a-A2) x 8. Ik zie niet hoe ik het volgende patroon met A4 en A5 kan inpassen. Waar begint de ronde eigenlijk? Ik zie echt niet waar het begin is! 6a-A2-6a-A4-(A5-A4) x4 (halfweg) - en dan nog es hetzelfde, dat staat in het patroon. Kan je me helpen?
07.10.2024 - 18:23
![]() Mieke Baras wrote:
Mieke Baras wrote:
In welke volgorde wordt de naald gebreid na het kraagje? Waar begint de naald, bij de raglan, bij de mouw ? Ik snap niet welke van de motieven A1/A2/A3 horen bij de rug en het voorpand, welke bij de raglan, welke bij de mouwen? Ik stelde hier al een vraag maar heb nog steeds geen antwoord gekregen. Alvast bedankt! Zeer mooie trui!
17.09.2024 - 12:08DROPS Design answered:
Dag Mieke,
A.2, 2av, A.2 is de raglanlijn. A.1 hoort op de mouw en A.3 op de panden.
17.09.2024 - 20:04
![]() Mieke Baras wrote:
Mieke Baras wrote:
De meerderingen voor de raglan: telkens VOOR en telkens NA A1 of A2? Niet onmiddellijk voor of na de markeerder? De eerste 6 gemeerderde st in A2: welke 6 st bedoel je? Per naald? Idem voor : brei de volgende 8 gemeerderde st averecht enz. Per nld zijn er 8 meerderingen. Ik snap het niet
10.09.2024 - 16:03
![]() McKenna Considine wrote:
McKenna Considine wrote:
I'm looking at this pattern as a possibility for my mom. Unfortunately she is VERY sensitive to fabrics. Is there a cotton yarn that would suit this pattern?
15.08.2024 - 17:31DROPS Design answered:
Hi, yes - you can use DROPS Muskat instead, which has similar gauge. Happy knitting!
15.08.2024 - 17:54
![]() Catherine wrote:
Catherine wrote:
Rebonjour, Je n'ai peut être pas été assez claire dans ma question précédente concernant la torsade A1. Pour la faire, on glisse 2 mailles devant le travail or A4 on glisse 2 mailles derrière... Après 12 cm, où A1 a été tricoté on reprend le point fantaisie avec A4. La torsade est alors inversée : c'est cela que je ne comprends pas. Merci de m'éclairer !
11.07.2024 - 18:27DROPS Design answered:
Bonjour Catherine, adaptez alors simplement la torsades de A.4 pour qu'elle continue comme dans A.1, ainsi les mailles seront toujours croisées dans le bon sens tout du long. Bon tricot!
02.08.2024 - 15:08
![]() Catherine wrote:
Catherine wrote:
Bonjour J'ai tricoté les augmentations et diminutions du dos/devant, j'ai bien 228 mailles en taille L. Cependant, je me pose une question : jusque là j'ai continué de tricoter la torsade A1 et je vais commencer A4 et A5. Or, celle-ci a disparu ! Que dois-je faire ? Ai-je raté qqch ? Merci beaucoup de l'aide précieuse que vous apportez à chacune de mes sollicitations.
11.07.2024 - 09:07DROPS Design answered:
Bonjour Catherine, suivez les diagrammes comme indiqué mais conservez le sens des torsades comme auparavant pour les continuer, autrement dit, continuez le croisement de A.1 comme avant mais tricotez les mailles envers comme dans A.4 avec les augmentations. Bon tricot!
29.07.2024 - 09:13
![]() Catherine wrote:
Catherine wrote:
Bonjour Je trouve l'encolure du pull trop échancrée (20 cm au lieu de 15). J'ai pourtant pris des aiguilles plus fines. J'ai tricoté jusqu'aux emmanchures et ne souhaite pas défaire tout cela... Est-il possible de démonter uniquement le col et le refaire de bas en haut avec moins de mailles ? Merci d'avance pour vos conseils
24.06.2024 - 16:03DROPS Design answered:
Bonjour Catherine, votre tension en largeur (et en hauteur) est-elle juste? Et surtout, avez-vous bien conservé la même tension en tricotant? Vous pouvez défaire ensuite les premiers tours pour les tricoter dans l'autre sens et ajouter des diminutions, tricoter des côtes, etc... en fonction de ce que vous souhaitez, la technique de cette vidéo pourrait alors vous aider. Bon tricot!
25.06.2024 - 08:40
![]() Catherine wrote:
Catherine wrote:
Bonjour, J'ai beaucoup de mal à faire les augmentations du raglan. Parfois jetés envers parfois endroits et même en les tricotant torse cela me fait des trous trop gros. Pourriez vous m'indiquer un tuto vidéo ou me conseiller une autre façon de réaliser le raglan. Merci de votre réponse
10.06.2024 - 16:41DROPS Design answered:
Bonjour Catherine, veillez bien à ce que vos jetés ne soient pas trop lâches pour éviter de gros trous - dans cette vidéo nous montrons comment tricoter un raglan avec des jetés torse à l'endroit et dans cette vidéo comment tricoter un jeté torse à l'envers; en espérant que ces vidéos pourront vous aider. Bon tricot!
11.06.2024 - 07:55
|
||||||||||||||||||||||||||||
Alana#alanasweater |
||||||||||||||||||||||||||||
 |
 |
|||||||||||||||||||||||||||
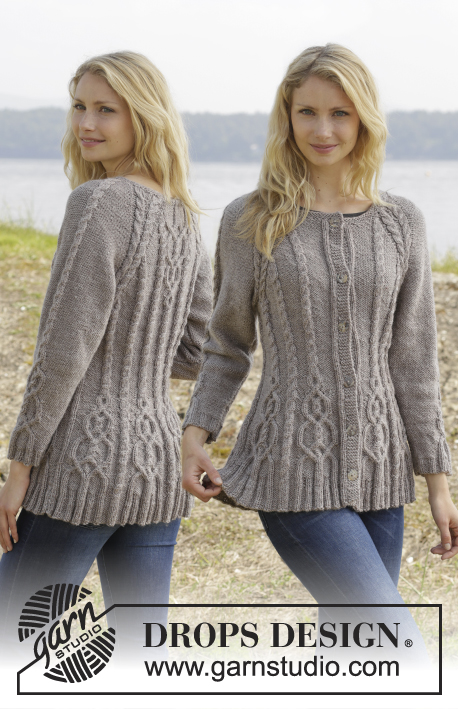
Knitted DROPS jumper with cables and raglan, worked top down in ”Karisma”. Size S-XXL
DROPS 156-19 |
||||||||||||||||||||||||||||
|
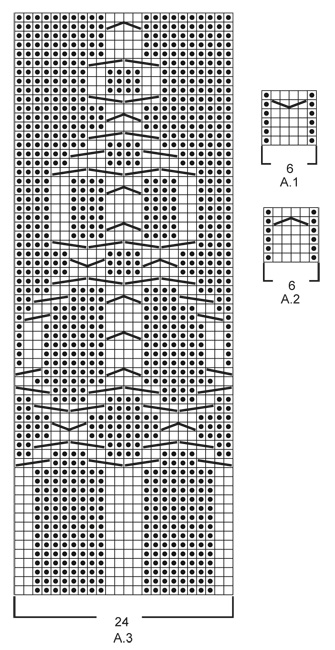
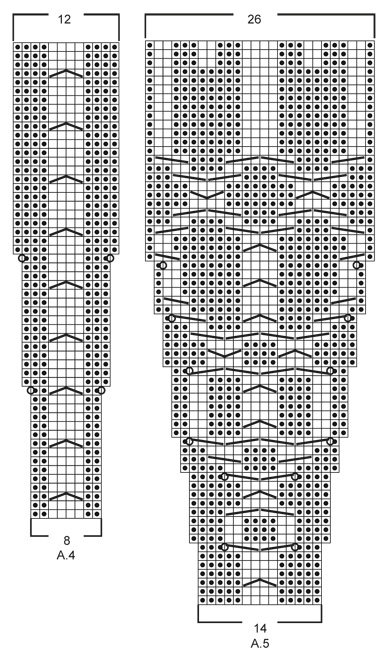
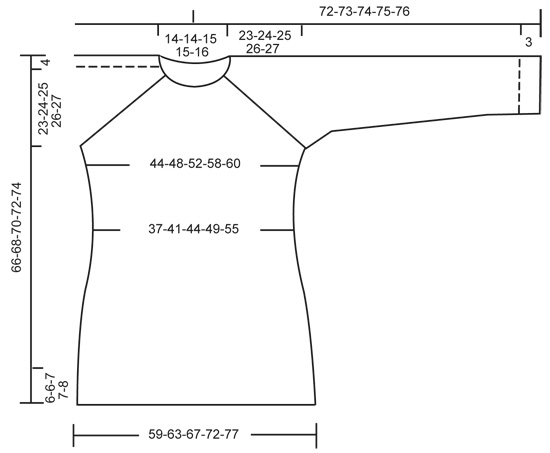
GARTER ST (in the round on circular needle): * K 1 round and P 1 round *, repeat from *-*. 1 ridge = 2 rounds. GARTER ST (back and forth on needle): K all rows. 1 ridge = 2 rows K. PATTERN: See diagrams A.1 - A.5. The diagrams show all rows in pattern seen from RS. RAGLAN: Inc on each side of raglan sts (A.1/A.2, marker, A.2/A.1) by making 1 YO = 8 inc on round. On next round K the YOs twisted to avoid holes. Then P the new sts on sleeves, and on front and back piece work the new sts in pattern as explained below. DECREASE TIP (applies to sleeves): Dec on each side of marker as follows: Work until 3 sts remain before marker, P 2 tog, P 2, P 2 tog = 2 sts dec. INCREASE TIP: Inc 1 st by making a YO. On next round P YOs twisted, i.e. work in the back loop of st instead of front to avoid holes. P the new sts. ---------------------------------------------------------- JUMPER: Worked top down in the round on circular needle. Work sleeve in the round on circular needle/double pointed needles. YOKE: Cast on 92-92-97-97-101 sts on circular needle size 4 mm with Karisma. Work 3 ridges in GARTER ST in the round on circular needle - see explanation above. Continue to work an elevation in GARTER ST back and forth -see explanation above, from mid back as follows (1st row = RS): Now work 5-5-7-7-9 sts, turn, work 10-10-14-14-18 sts, turn, work 15-15-19-19-23 sts, turn, work 20-20-24-24-28 sts, turn, work 25-25-29-29-33 sts, turn, work 30-30-34-34-38 sts, turn, work 35-35-39-39-43 sts, turn, work 40-40-43-43-48 sts, turn, work back to beg of round. Now K 1 round AT THE SAME TIME inc 24-24-23-23-27 sts evenly = 116-116-120-120-128 sts. P 18-18-19-19-21, insert 1st marker here (= this is now beg of round), A.2, P 2, A.2, P 2, A.1, insert 2nd marker here, A.2, P 0-0-1-1-3, A.3, P 0-0-1-1-3, A.1, insert 3rd marker here, A.2, P 2, A.2, P 2, A.1, insert 4th marker here, A.2, P 0-0-1-1-3, A.3, P 0-0-1-1-3, A.1. READ THE NEXT 2 SECTIONS BEFORE CONTINUING! REMEMBER THE KNITTING TENSION! On next round beg inc for RAGLAN – see explanation above, AT THE SAME TIME work pattern as follows: RAGLAN: Repeat inc every round 0-2-10-20-20 times in total. Then inc every other round 23-32-30-26-27 times and every 3rd round 6-0-0-0-0 times = 348-388-440-488-504 sts. PATTERN: Work pattern on body as follows (P the inc sts on sleeves): Work the first 6 sts inc in A.2, then P next 8-9-7-8-8 inc sts, work the next 6 inc sts in A.2, P the next 8-9-7-8-8 inc sts. NOTE: (Size M-L-XL-XXL): When A.3 has been worked 1 time vertically, continue with A.2 over cable and P the remaining sts from A.3 until start of body. S/M: Then inc as before on sleeve and inc inside A.1/A.2 (i.e. between A.1 and A.2, towards marker for raglan) on front and back piece 1-4 more times. P the new sts. L/XL/XXL: Continue with A.2 over the next 6 inc sts, P the next 7-8-8 inc sts, then inc as before on sleeve and inc inside A.1/A.2 (i.e. between A.1 and A.2, towards marker for raglan) on front and back piece 1-4-5 more times. P the last 1-4-5 inc sts. Piece now measures 27-28-29-30-31 cm from shoulder. Now work as follows: Slip the first 80-90-102-114-116 sts on a stitch holder for sleeve, cast on 12 new sts under sleeve, insert a blue marker in the middle of these new sts, work the next 94-104-118-130-136 sts (= front piece), slip the next 80-90-102-114-116 sts on a stitch holder for sleeve, cast on 12 new sts under sleeve, insert a blue marker in the middle of these new sts, work the remaining 94-104-118-130-136 sts on round (= back piece). NOW MEASURE THE PIECE FROM HERE. BODY: There are now 212-232-260-284-296 sts for body. Then continue pattern as follows: S/M: P 6-3, * A.2 0-1 time in width, P 7-7, A.2, P 8-9, insert a marker, A.2, P 8-9, insert a marker, A.2, P 9-9, A.2, P 9-9, A.2, insert a marker, P 8-9, A.2, insert a marker, P 8-9, A.1*, P 7-7, repeat from *-* 1 more time, P 1-4 L/XL/XXL: P 3-3-0, * A.2 1-1-2 times in width, P 4-6-5, A.2, P 7-8-8, insert a marker, A.2, P 7-8-8, insert a marker, A.2, P 7-8-8, insert a marker, A.2, P 10-11-12, A.2, P 10-11-12, A.2, insert a marker, P 7-8-8, A.2, insert a marker, P 7-8-8, A.2, insert a marker, P 7-8-8, A.1 *, P 4-6-5, repeat from *-* 1 more time, P 1-3-5. READ THE NEXT 2 SECTIONS BEFORE CONTINUING! Now dec and inc at the same time as follows: DECREASE: Dec differently as follows - READ DECREASE TIP: Dec 1 st on each side of the middle cable on front and back piece. Repeat dec every 2-2-1½-1½-1½ cm 3-3-4-4-6 more times. AT THE SAME TIME dec 1 st towards cable in every section with P sts with marker in (= 8-8-12-12-12 markers). Repeat dec every 3-2½-5-4-4 cm 2-3-1-2-2 more times. INCREASE (towards the sides): When piece measures 3 cm, inc along the cable towards the sleeve (i.e. cable from raglan) in P section towards the sides – READ INCREASE TIP! Inc 4 sts on round. Repeat inc every 1½-1½-2½-1½-1 cm 3-4-2-4-10 more times. When all dec and inc are done, 188-204-228-248-276 sts remain. When piece measures 11-12-12-13-14 cm, work pattern as follows: P 6-3-6-6-0, A.2 0-1-1-1-2 times in width, P 7-8-6-11-15, A.4 0-0-1-1-1 time in width, * A.5, A.4 *, repeat from *-* 2-2-3-3-3 more times in width, A.5 1-1-0-0-0 times in width, P 7-8-6-11-15, A.2 0-1-1-1-2 times in width, P 7-8-6-11-15, A.4 0-0-1-1-1 time in width, * A.5, A.4 *, repeat from *-* 2-2-3-3-3 more times in width, A.5 1-1-0-0-0 times in width, P 1-5-0-5-15. NOTE: Adjust the first cable in A.4 and A.5 to get a nice transition between diagrams. Continue with pattern and inc according to diagram. When A.4 and A.5 have been worked vertically and piece measures approx. 33-34-34-35-35 cm, there are 308-324-364-384-412 sts on round. Insert a marker here. NOW MEASURE THE PIECE FROM HERE. Now work rib as follows: S/M: * Work K over K and P over P until 7-11 sts remain before the blue marker in the side, P 2, K 2, P 3-4 *, repeat from *-* 1 more time and continue with K over K and P over P the rest of round. L/XL/XXL: * Work K over K and P over P until 8-14-21 sts remain before the blue marker in the side, K 2-2-2, P 3-4-3, K 0-2-2, P 0-3-3, K 0-0-2, P 0-0-3 *, repeat from *-* 1 more time and continue with K over K and P over P the rest of round. When rib has been worked for 2 cm from marker, inc by making 1 YO before first P st in every P section - remember INCREASE TIP. When rib has been worked for 5-5-6-6-6 cm, cast off with K over K and P over P. SLEEVES: Slip the 80-90-102-114-116 sts from stitch holder back on circular needle. K 1 row over all sts and cast on 12 new sts at the end of row = 92-102-114-126-128 sts. Insert a marker in the middle of the new sts (i.e. 6 sts on each side of marker). NOW MEASURE THE PIECE FROM HERE. Then work sleeve in the round on circular needle/double pointed needles. Continue the middle cable on sleeve as before but work P over cables in raglan. On 2nd round beg dec on each side of marker - READ DECREASE TIP. Repeat dec in every other round 6 more times = 78-88-100-112-114 sts. Then dec 1 st on each side of marker every 2-1½-1-1-1 cm 13-17-22-27-27 times = 52-54-56-58-60 sts. AT THE SAME TIME when piece measures 15 cm, work A.5 over cable in the middle of sleeve - adjust the first cable in A.5 to get a nice transition between diagrams. NOTE: Do not inc in A.5 on sleeve, i.e. do not work YOs in diagram. When A.5 is finished and sleeve measures 37 cm, work rib as follows from marker at beg of round: P 0-0-1-2-3, K 1-2-2-2-2, P 3, K 2, P 3, K 2, P 2, continue rib as on last row in A.5 (= 26 sts), P 2, K 2, P 3, K 2, P 3, K 1-2-2-2-2, P 0-0-1-2-3. Continue like this for 3 cm, cast off with K over K and P over P. ASSEMBLY: Sew the holes under the sleeves. |
||||||||||||||||||||||||||||
Diagram explanations |
||||||||||||||||||||||||||||
|
||||||||||||||||||||||||||||
 |
||||||||||||||||||||||||||||
 |
||||||||||||||||||||||||||||
 |
||||||||||||||||||||||||||||
Have you finished this pattern?Tag your pictures with #dropspattern #alanasweater or submit them to the #dropsfan gallery. Do you need help with this pattern?You'll find 24 tutorial videos, a Comments/Questions area and more by visiting the pattern on garnstudio.com. © 1982-2026 DROPS Design A/S. We reserve all rights. This document, including all its sub-sections, has copyrights. Read more about what you can do with our patterns at the bottom of each pattern on our site. |
||||||||||||||||||||||||||||


With over 40 years in knitting and crochet design, DROPS Design offers one of the most extensive collections of free patterns on the internet - translated to 17 languages. As of today we count 324 catalogues and 12284 patterns translated into English (UK/cm).
We work hard to bring you the best knitting and crochet have to offer, inspiration and advice as well as great quality yarns at incredible prices! Would you like to use our patterns for other than personal use? You can read what you are allowed to do in the Copyright text at the bottom of all our patterns. Happy crafting!
Post a comment to pattern DROPS 156-19
We would love to hear what you have to say about this pattern!
If you want to leave a question, please make sure you select the correct category in the form below, to speed up the answering process. Required fields are marked *.