
Popular categories
Looking for a yarn?


Comments / Questions (273)
![]() Linda H Långström wrote:
Linda H Långström wrote:
Kan någon förklara det här stycket? Får inte ihop det på några villkors vis... S/M: 6-3 am, * A.2 0-1 gång på bredden, 7-7 am, A.2, 8-9 am, sätt en markör, A.2, 8-9 am, sätt en markör, A.2, 9-9 am, A.2, 9-9 am, A.2, sätt en markör, 8-9 am, A.2, sätt en markör, 8-9 am, A.1*, 7-7 am, upprepa *-* 1 gång till, 1-4 am
26.02.2025 - 19:53DROPS Design answered:
Hej Linda, ja, hvilken størrelse strikker du? Om du strikker str S: 6 am, * 7 am, A.2, 8 am, sätt en markör, A.2, 8 am, sätt en markör, A.2, 9 am, A.2, 9 am, A.2, sätt en markör, 8 am, A.2, sätt en markör, 8 am, A.1*, 7 am, upprepa *-* 1 gång till, 1 am
05.03.2025 - 15:17
![]() Anne Yarborough wrote:
Anne Yarborough wrote:
I’d love to try to knot this sweater.
28.01.2025 - 21:07
![]() Spørsmål wrote:
Spørsmål wrote:
Forstår ikke hvor jeg skal øke i ragland. Mellom A1 og A2. Skal jeg ta 2 kast etter hverandre, for å få 8 rundt?
18.01.2025 - 20:28DROPS Design answered:
Hei. Tenk deg at jakken har 4 raglanslinjer og 1 raglanslinje består av: (A.1-merke-A.2). Når du skal øke til raglan, skal du øke med 1 kast før raglanslinjen og med 1 kast etter raglanslinjen = 2 kast pr raglanslinje x 4 steder = 8 økte masker pr økeomgang. mvh DROPS Design
20.01.2025 - 11:27
![]() Valérie Baillat wrote:
Valérie Baillat wrote:
Comment repartir les augmentations à partir du col jusqu'à la séparation des manches ? Merci d'avance
11.01.2025 - 16:20DROPS Design answered:
Bonjour Mme Baillat, vous parlez des augmentations des raglans? Vous augmentez pour le raglan comme indiqué sous RAGLAN au tout début des explications, vous retrouverez la fréquence de ces augmentations et comment les tricoter sous l'empiècement. Bon tricot!
13.01.2025 - 08:54
![]() Benedek Ildikó wrote:
Benedek Ildikó wrote:
Boldog Újévet kívánok, ezt a részt nem igazán értem,hogy kell eljárjak ...és mikor fog megtörténni a szaporítás 140 szemre( M méret).Sehol nem látok még 8 sor lustakötést a pulóveren,mit nem értelmezek jól? : háta rész megemelésének elkészítésével. Lustakötéssel dolgozunk, oda-vissza haladva (lásd a fenti magyarázatot) az eleje közepétől kezdve. Kössünk 5-5-7-7-9 szemet, fordítsuk meg a munkát, kössünk 10-10-14-14-18 szemet...Köszönöm szépen.
31.12.2024 - 19:29
![]() Marie France Binder wrote:
Marie France Binder wrote:
Pour la taille M, après les 24 augmentations, j'ai 116m comme indiqué. Par contre pour le paragraphe après le total fait 134 m et non 116. Vous remerciant par avance Cordialement
23.12.2024 - 07:03DROPS Design answered:
Bonjour Mme Binder, vous tricotez d'abord des rangs raccourcis pour la réhausse dos, puis vous tricotez 1 tour entier sur les 92 mailles en augmentant en même temps 24 mailles = vous aurez ainsi 92+24=116 mailles au total. Bon tricot!
02.01.2025 - 10:24
![]() Elly Meye-Witjens wrote:
Elly Meye-Witjens wrote:
Ik ben net begonnen met het patroon en ben dus bij de pas. Ik brei op 4 pennen maat XL. Na alle stukjes heen en weer in ribbelsteek eindigt de zin met 'brei de teruggaande nld tot het begin van de nld'. Betekent dat dat ik nu 43 steken terug moet breien? Of moet ik nu breien tot middenachter?
22.12.2024 - 12:48DROPS Design answered:
Dag Elly,
Het begin van de naald is waar je steeds begonnen bent met breien. Ik weet zo uit mijn hoofd niet hoeveel steken dat zijn, maar je hebt eerst 3 ribbels gebreid. Als het goed is kun je een beetje aan de ribbels zien waar het begin/einde steeds is geweest. (Misschien zit dit precies op een overgang tussen 2 naalden, je moet de steken op die plek dan even bij elkaar zetten op een naald om het beter te kunnen zien)
11.01.2025 - 15:30
![]() Mieke Baras wrote:
Mieke Baras wrote:
De enige manier om het A5 motief te breien in de mouw om te kunnen eindigen met 56 st in maat L, met 15 st aan elke kant van de 26st van A5, is dus NIET door de omslagen niet te breien, maar door in de averechte steken aan weerszijden van de 26 st telkens 2a samen te breien telkens er in het A5 motief moet gemeerderd worden. Anders kom je NOOIT aan de stekenindeling die jullie opgeven voor de boord, nl 1a-2r-3a-2r-3a-2r -2a (=15st) - 26st A5- 2a - 2r - 3a-2r- 3a-2r-1a! = 56 st
30.10.2024 - 15:10
![]() Mieke Baras wrote:
Mieke Baras wrote:
Ik vraag mij af hoe je in de mouw het A5 motief kunt breien als je de omslagen van de meerderingen niet moogt breien?! Je vertrekt met 14 st, maar met14st kan je dit motief toch niet breien? Kan ik aub een antwoord krijgen?
30.10.2024 - 10:13DROPS Design answered:
Dag Mieke,
A.5 zit midden boven op de mouw, dus op de middelste boven steken van de mouw en niet over de gehele mouw.
30.10.2024 - 19:17
![]() Mieke Baras wrote:
Mieke Baras wrote:
Ik vraag mij af hoe je in de mouw het A5 motief kunt breien als je de omslagen van de meerderingen niet moogt breien?! Je vertrekt met 14 st, maar met14st kan je dit motief toch niet breien?
27.10.2024 - 18:06DROPS Design answered:
Dag Mieke,
Je positioneert het telpatroon midden boven op de mouw en je gebruikt steeds de steken die al aanwezig zijn op de mouw. Dus als je op een gegeven moment op een rij komt waar het patroon breder wordt, dan gebruik je dus aan elke kant een steek van de mouw die eerst in tricotsteek werd gebruikt.
31.10.2024 - 20:53
|
||||||||||||||||||||||||||||
Alana#alanasweater |
||||||||||||||||||||||||||||
 |
 |
|||||||||||||||||||||||||||
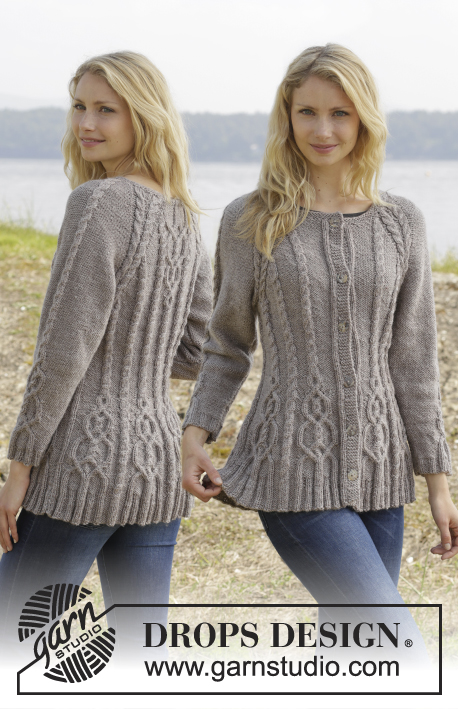
Knitted DROPS jumper with cables and raglan, worked top down in ”Karisma”. Size S-XXL
DROPS 156-19 |
||||||||||||||||||||||||||||
|
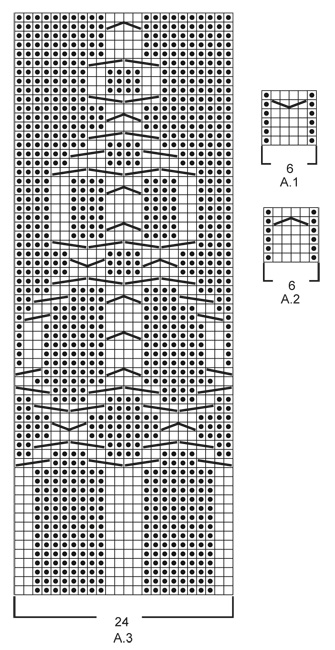
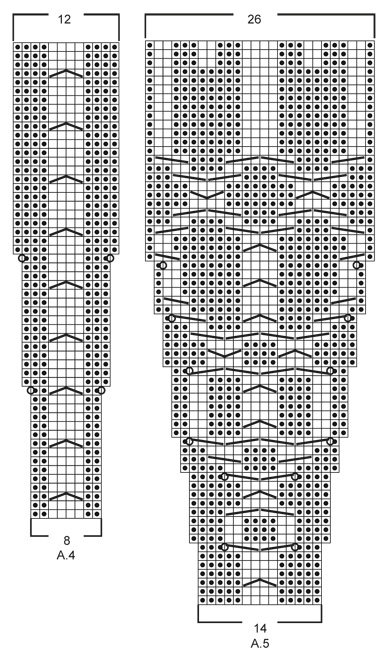
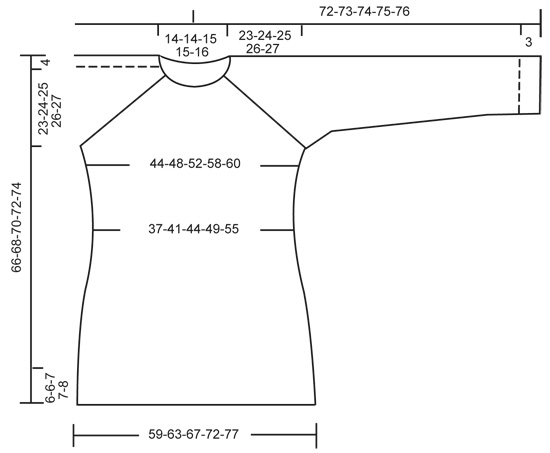
GARTER ST (in the round on circular needle): * K 1 round and P 1 round *, repeat from *-*. 1 ridge = 2 rounds. GARTER ST (back and forth on needle): K all rows. 1 ridge = 2 rows K. PATTERN: See diagrams A.1 - A.5. The diagrams show all rows in pattern seen from RS. RAGLAN: Inc on each side of raglan sts (A.1/A.2, marker, A.2/A.1) by making 1 YO = 8 inc on round. On next round K the YOs twisted to avoid holes. Then P the new sts on sleeves, and on front and back piece work the new sts in pattern as explained below. DECREASE TIP (applies to sleeves): Dec on each side of marker as follows: Work until 3 sts remain before marker, P 2 tog, P 2, P 2 tog = 2 sts dec. INCREASE TIP: Inc 1 st by making a YO. On next round P YOs twisted, i.e. work in the back loop of st instead of front to avoid holes. P the new sts. ---------------------------------------------------------- JUMPER: Worked top down in the round on circular needle. Work sleeve in the round on circular needle/double pointed needles. YOKE: Cast on 92-92-97-97-101 sts on circular needle size 4 mm with Karisma. Work 3 ridges in GARTER ST in the round on circular needle - see explanation above. Continue to work an elevation in GARTER ST back and forth -see explanation above, from mid back as follows (1st row = RS): Now work 5-5-7-7-9 sts, turn, work 10-10-14-14-18 sts, turn, work 15-15-19-19-23 sts, turn, work 20-20-24-24-28 sts, turn, work 25-25-29-29-33 sts, turn, work 30-30-34-34-38 sts, turn, work 35-35-39-39-43 sts, turn, work 40-40-43-43-48 sts, turn, work back to beg of round. Now K 1 round AT THE SAME TIME inc 24-24-23-23-27 sts evenly = 116-116-120-120-128 sts. P 18-18-19-19-21, insert 1st marker here (= this is now beg of round), A.2, P 2, A.2, P 2, A.1, insert 2nd marker here, A.2, P 0-0-1-1-3, A.3, P 0-0-1-1-3, A.1, insert 3rd marker here, A.2, P 2, A.2, P 2, A.1, insert 4th marker here, A.2, P 0-0-1-1-3, A.3, P 0-0-1-1-3, A.1. READ THE NEXT 2 SECTIONS BEFORE CONTINUING! REMEMBER THE KNITTING TENSION! On next round beg inc for RAGLAN – see explanation above, AT THE SAME TIME work pattern as follows: RAGLAN: Repeat inc every round 0-2-10-20-20 times in total. Then inc every other round 23-32-30-26-27 times and every 3rd round 6-0-0-0-0 times = 348-388-440-488-504 sts. PATTERN: Work pattern on body as follows (P the inc sts on sleeves): Work the first 6 sts inc in A.2, then P next 8-9-7-8-8 inc sts, work the next 6 inc sts in A.2, P the next 8-9-7-8-8 inc sts. NOTE: (Size M-L-XL-XXL): When A.3 has been worked 1 time vertically, continue with A.2 over cable and P the remaining sts from A.3 until start of body. S/M: Then inc as before on sleeve and inc inside A.1/A.2 (i.e. between A.1 and A.2, towards marker for raglan) on front and back piece 1-4 more times. P the new sts. L/XL/XXL: Continue with A.2 over the next 6 inc sts, P the next 7-8-8 inc sts, then inc as before on sleeve and inc inside A.1/A.2 (i.e. between A.1 and A.2, towards marker for raglan) on front and back piece 1-4-5 more times. P the last 1-4-5 inc sts. Piece now measures 27-28-29-30-31 cm from shoulder. Now work as follows: Slip the first 80-90-102-114-116 sts on a stitch holder for sleeve, cast on 12 new sts under sleeve, insert a blue marker in the middle of these new sts, work the next 94-104-118-130-136 sts (= front piece), slip the next 80-90-102-114-116 sts on a stitch holder for sleeve, cast on 12 new sts under sleeve, insert a blue marker in the middle of these new sts, work the remaining 94-104-118-130-136 sts on round (= back piece). NOW MEASURE THE PIECE FROM HERE. BODY: There are now 212-232-260-284-296 sts for body. Then continue pattern as follows: S/M: P 6-3, * A.2 0-1 time in width, P 7-7, A.2, P 8-9, insert a marker, A.2, P 8-9, insert a marker, A.2, P 9-9, A.2, P 9-9, A.2, insert a marker, P 8-9, A.2, insert a marker, P 8-9, A.1*, P 7-7, repeat from *-* 1 more time, P 1-4 L/XL/XXL: P 3-3-0, * A.2 1-1-2 times in width, P 4-6-5, A.2, P 7-8-8, insert a marker, A.2, P 7-8-8, insert a marker, A.2, P 7-8-8, insert a marker, A.2, P 10-11-12, A.2, P 10-11-12, A.2, insert a marker, P 7-8-8, A.2, insert a marker, P 7-8-8, A.2, insert a marker, P 7-8-8, A.1 *, P 4-6-5, repeat from *-* 1 more time, P 1-3-5. READ THE NEXT 2 SECTIONS BEFORE CONTINUING! Now dec and inc at the same time as follows: DECREASE: Dec differently as follows - READ DECREASE TIP: Dec 1 st on each side of the middle cable on front and back piece. Repeat dec every 2-2-1½-1½-1½ cm 3-3-4-4-6 more times. AT THE SAME TIME dec 1 st towards cable in every section with P sts with marker in (= 8-8-12-12-12 markers). Repeat dec every 3-2½-5-4-4 cm 2-3-1-2-2 more times. INCREASE (towards the sides): When piece measures 3 cm, inc along the cable towards the sleeve (i.e. cable from raglan) in P section towards the sides – READ INCREASE TIP! Inc 4 sts on round. Repeat inc every 1½-1½-2½-1½-1 cm 3-4-2-4-10 more times. When all dec and inc are done, 188-204-228-248-276 sts remain. When piece measures 11-12-12-13-14 cm, work pattern as follows: P 6-3-6-6-0, A.2 0-1-1-1-2 times in width, P 7-8-6-11-15, A.4 0-0-1-1-1 time in width, * A.5, A.4 *, repeat from *-* 2-2-3-3-3 more times in width, A.5 1-1-0-0-0 times in width, P 7-8-6-11-15, A.2 0-1-1-1-2 times in width, P 7-8-6-11-15, A.4 0-0-1-1-1 time in width, * A.5, A.4 *, repeat from *-* 2-2-3-3-3 more times in width, A.5 1-1-0-0-0 times in width, P 1-5-0-5-15. NOTE: Adjust the first cable in A.4 and A.5 to get a nice transition between diagrams. Continue with pattern and inc according to diagram. When A.4 and A.5 have been worked vertically and piece measures approx. 33-34-34-35-35 cm, there are 308-324-364-384-412 sts on round. Insert a marker here. NOW MEASURE THE PIECE FROM HERE. Now work rib as follows: S/M: * Work K over K and P over P until 7-11 sts remain before the blue marker in the side, P 2, K 2, P 3-4 *, repeat from *-* 1 more time and continue with K over K and P over P the rest of round. L/XL/XXL: * Work K over K and P over P until 8-14-21 sts remain before the blue marker in the side, K 2-2-2, P 3-4-3, K 0-2-2, P 0-3-3, K 0-0-2, P 0-0-3 *, repeat from *-* 1 more time and continue with K over K and P over P the rest of round. When rib has been worked for 2 cm from marker, inc by making 1 YO before first P st in every P section - remember INCREASE TIP. When rib has been worked for 5-5-6-6-6 cm, cast off with K over K and P over P. SLEEVES: Slip the 80-90-102-114-116 sts from stitch holder back on circular needle. K 1 row over all sts and cast on 12 new sts at the end of row = 92-102-114-126-128 sts. Insert a marker in the middle of the new sts (i.e. 6 sts on each side of marker). NOW MEASURE THE PIECE FROM HERE. Then work sleeve in the round on circular needle/double pointed needles. Continue the middle cable on sleeve as before but work P over cables in raglan. On 2nd round beg dec on each side of marker - READ DECREASE TIP. Repeat dec in every other round 6 more times = 78-88-100-112-114 sts. Then dec 1 st on each side of marker every 2-1½-1-1-1 cm 13-17-22-27-27 times = 52-54-56-58-60 sts. AT THE SAME TIME when piece measures 15 cm, work A.5 over cable in the middle of sleeve - adjust the first cable in A.5 to get a nice transition between diagrams. NOTE: Do not inc in A.5 on sleeve, i.e. do not work YOs in diagram. When A.5 is finished and sleeve measures 37 cm, work rib as follows from marker at beg of round: P 0-0-1-2-3, K 1-2-2-2-2, P 3, K 2, P 3, K 2, P 2, continue rib as on last row in A.5 (= 26 sts), P 2, K 2, P 3, K 2, P 3, K 1-2-2-2-2, P 0-0-1-2-3. Continue like this for 3 cm, cast off with K over K and P over P. ASSEMBLY: Sew the holes under the sleeves. |
||||||||||||||||||||||||||||
Diagram explanations |
||||||||||||||||||||||||||||
|
||||||||||||||||||||||||||||
 |
||||||||||||||||||||||||||||
 |
||||||||||||||||||||||||||||
 |
||||||||||||||||||||||||||||
Have you finished this pattern?Tag your pictures with #dropspattern #alanasweater or submit them to the #dropsfan gallery. Do you need help with this pattern?You'll find 24 tutorial videos, a Comments/Questions area and more by visiting the pattern on garnstudio.com. © 1982-2026 DROPS Design A/S. We reserve all rights. This document, including all its sub-sections, has copyrights. Read more about what you can do with our patterns at the bottom of each pattern on our site. |
||||||||||||||||||||||||||||


With over 40 years in knitting and crochet design, DROPS Design offers one of the most extensive collections of free patterns on the internet - translated to 17 languages. As of today we count 324 catalogues and 12284 patterns translated into English (UK/cm).
We work hard to bring you the best knitting and crochet have to offer, inspiration and advice as well as great quality yarns at incredible prices! Would you like to use our patterns for other than personal use? You can read what you are allowed to do in the Copyright text at the bottom of all our patterns. Happy crafting!
Post a comment to pattern DROPS 156-19
We would love to hear what you have to say about this pattern!
If you want to leave a question, please make sure you select the correct category in the form below, to speed up the answering process. Required fields are marked *.