
Popular categories
Looking for a yarn?


Comments / Questions (273)
![]() Fausta Esguerra wrote:
Fausta Esguerra wrote:
Thank you very much for this lovely design. I did some slight modifications to the pattern (which made me "tink" several times) for a custom fit, but all in all, I am very pleased with the result - and so is my husband, who usually does not comment on my knitting projects. I just wish I still had my girlish figure to do justice to your design, but alas - that I could not "tink!" I am looking forward to knitting more of your patterns. Thank you again.
22.02.2015 - 04:22Kerstin Sheldrake wrote:
Ich würde den Pullover gerene in doppelfädigem Alpaka stricken. Für Größe S, wieviel würde ich brauchen? Danke! ;)
19.02.2015 - 18:07DROPS Design answered:
An sich ist doppelfädiges Alpaca nicht so gut als Ersatz geeignet, da es zu dick wird. Garne der Garngruppe B (wie hier Karisma) lassen sich leider nicht mit Garngruppe A ersetzen. Falls Sie aber noch einen Rest Alpaca zu Hause haben, würde ich Ihnen empfehlen, eine doppelfädige Maschenprobe (und eine Musterprobe) zu machen und zu schauen, ob Sie die angegebene Maschenprobe erreichen können und wie fest Ihr Gestrick wird. Wenn es Ihnen gefällt und Sie die Maschenprobe einhalten, können Sie es als Ersatz benutzen. Sie würden dann 2600m Garn benötigen (1300m x 2)
21.02.2015 - 10:15
![]() Marleen wrote:
Marleen wrote:
Sorry had NL vlaggetje moeten aanvinken..
17.02.2015 - 16:14
![]() Marleen wrote:
Marleen wrote:
Ik ben inmiddels zover dat ik de mouwen op een hulpdraad heb staan. Maar dan.. waar begin ik nu met tellen (maat L) van de 3 av, A2 1 keer in de breedte, 4 av, A2, 7 av, markeerder en zo verder.. wat is het begin van de telling? Het midden van de gemeerderde steken onder de mouw? Of de kabel van de raglan? Of komt die kabel nu te vervallen? Ik begrijp het echt even niet.
17.02.2015 - 16:13DROPS Design answered:
Hoi Marleen. Je telt vanaf het begin van de nld (de markeerder die je aan het begin hebt gezet). Volg de beschrijving van de LIJF voor de maat L.
18.02.2015 - 13:20
![]() Marleen wrote:
Marleen wrote:
Ik heb de nld recht gebreid en tegelijkertijd gemerderd tot 120 st. (Maat L). Nu zou ik 19 st. av moeten breien, A2, 1av, A3 enzo verder. Máár dan komt de ronding die ik heb gemaakt op een schouder te liggen. Nam aan dat die middenachter zou uitkomen?? Waar ben ik fout gegaan.
14.01.2015 - 14:55DROPS Design answered:
Hoi Marleen. Je moet na het breien van de ronding de 1e markeerder verplaatsen: Brei nu 1 nld recht en meerder TEGELIJKERTIJD 24-24-23-23-27 st gelijkmatig = 116-116-120-120-128 st. Brei 18-18-19-19-21 av, plaats de 1e markeerder hier (= dit is nu het begin van de nld).
12.02.2015 - 17:21
![]() Nick Harber wrote:
Nick Harber wrote:
Yippee, any day now....Just waiting for my yarn to arrive in the post! This design is cracking! Claire, if you get no joy, we could compare notes when I "cast on" on Rav... I'm Morty42uk :)
14.11.2014 - 00:44
![]() Astrid. Meeuwsen wrote:
Astrid. Meeuwsen wrote:
Dank je wel voor je duidelijke antwoord ga gelijk weer beginnen
13.11.2014 - 18:39Kay Ashton wrote:
Just another addition - i know this is a free pattern, but i would be more than happy to pay for a version of it that makes sense :)
12.11.2014 - 20:36Kay Ashton wrote:
(continued 2) So, to sum up.... Are the sleeves worked on the stitches between markers 1 and 2 (1st sleeve) and 3 and 4 (second sleeve)? Where are the sleeve increases supposed to be done? and finally, how are the stitch patterns placed for the front and back?
12.11.2014 - 20:33DROPS Design answered:
You are correct, sleeves are between markers 1-2 and between 3-4. Raglan inc for sleeve are done inside sleeve - after diagram and marker at beg of sleeve, and before diagram and next marker at the end of sleeve. Remember you can get more individual help from your DROPS store if required. Happy knitting!
13.11.2014 - 09:16
![]() Kay Ashton wrote:
Kay Ashton wrote:
(continued) it is also not very clear as to WHERE the increasing is to be, (a1/a2, marker, a2/a1) is not very clear when a1 is used four times across the row and a2 six times!Then we move on to the READ THE NEXT 2 SECTIONS BEFORE CONTINUING part I totally understand how frequently I need to increase for the raglans, but the PATTERN part is is made even more confusing by the size variations listed beneath it!
12.11.2014 - 20:32DROPS Design answered:
You will inc for raglan at each marker, before A.1 and the marker, and after A.2 and the marker as follows: inc, A.1/A.2, marker, A.1/A.2, inc. Happy knitting!
13.11.2014 - 09:14
|
||||||||||||||||||||||||||||
Alana#alanasweater |
||||||||||||||||||||||||||||
 |
 |
|||||||||||||||||||||||||||
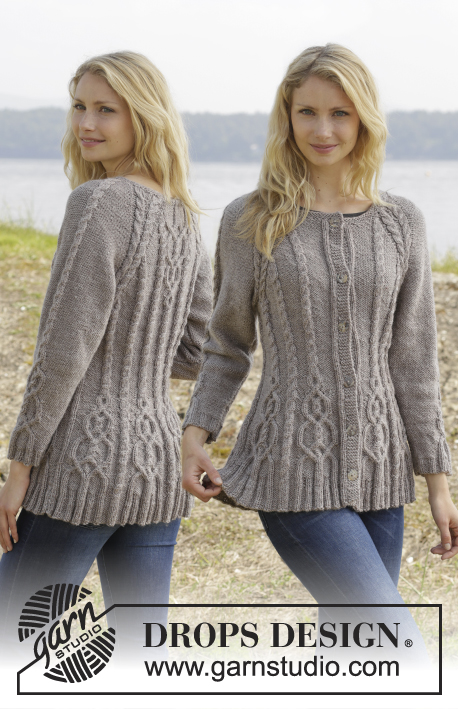
Knitted DROPS jumper with cables and raglan, worked top down in ”Karisma”. Size S-XXL
DROPS 156-19 |
||||||||||||||||||||||||||||
|
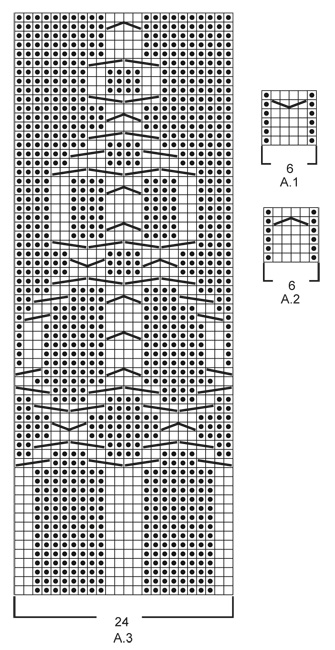
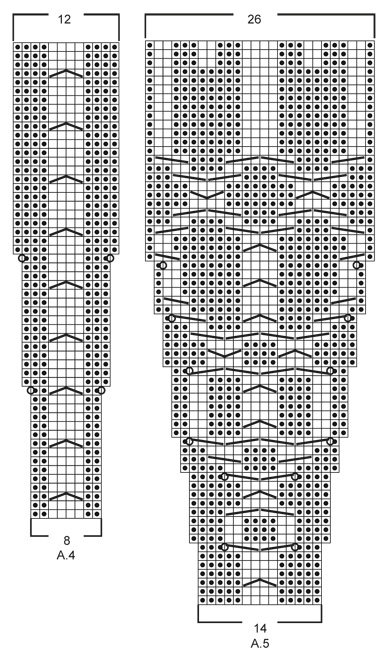
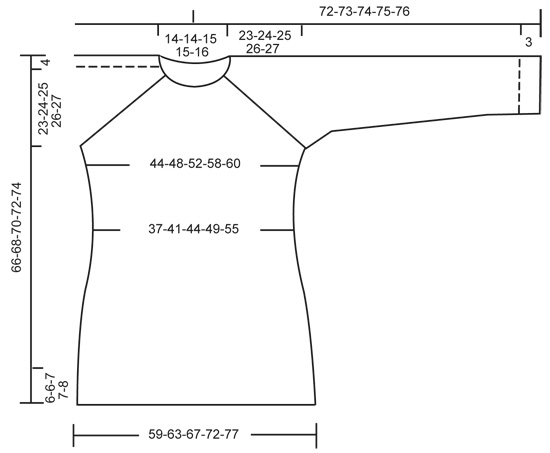
GARTER ST (in the round on circular needle): * K 1 round and P 1 round *, repeat from *-*. 1 ridge = 2 rounds. GARTER ST (back and forth on needle): K all rows. 1 ridge = 2 rows K. PATTERN: See diagrams A.1 - A.5. The diagrams show all rows in pattern seen from RS. RAGLAN: Inc on each side of raglan sts (A.1/A.2, marker, A.2/A.1) by making 1 YO = 8 inc on round. On next round K the YOs twisted to avoid holes. Then P the new sts on sleeves, and on front and back piece work the new sts in pattern as explained below. DECREASE TIP (applies to sleeves): Dec on each side of marker as follows: Work until 3 sts remain before marker, P 2 tog, P 2, P 2 tog = 2 sts dec. INCREASE TIP: Inc 1 st by making a YO. On next round P YOs twisted, i.e. work in the back loop of st instead of front to avoid holes. P the new sts. ---------------------------------------------------------- JUMPER: Worked top down in the round on circular needle. Work sleeve in the round on circular needle/double pointed needles. YOKE: Cast on 92-92-97-97-101 sts on circular needle size 4 mm with Karisma. Work 3 ridges in GARTER ST in the round on circular needle - see explanation above. Continue to work an elevation in GARTER ST back and forth -see explanation above, from mid back as follows (1st row = RS): Now work 5-5-7-7-9 sts, turn, work 10-10-14-14-18 sts, turn, work 15-15-19-19-23 sts, turn, work 20-20-24-24-28 sts, turn, work 25-25-29-29-33 sts, turn, work 30-30-34-34-38 sts, turn, work 35-35-39-39-43 sts, turn, work 40-40-43-43-48 sts, turn, work back to beg of round. Now K 1 round AT THE SAME TIME inc 24-24-23-23-27 sts evenly = 116-116-120-120-128 sts. P 18-18-19-19-21, insert 1st marker here (= this is now beg of round), A.2, P 2, A.2, P 2, A.1, insert 2nd marker here, A.2, P 0-0-1-1-3, A.3, P 0-0-1-1-3, A.1, insert 3rd marker here, A.2, P 2, A.2, P 2, A.1, insert 4th marker here, A.2, P 0-0-1-1-3, A.3, P 0-0-1-1-3, A.1. READ THE NEXT 2 SECTIONS BEFORE CONTINUING! REMEMBER THE KNITTING TENSION! On next round beg inc for RAGLAN – see explanation above, AT THE SAME TIME work pattern as follows: RAGLAN: Repeat inc every round 0-2-10-20-20 times in total. Then inc every other round 23-32-30-26-27 times and every 3rd round 6-0-0-0-0 times = 348-388-440-488-504 sts. PATTERN: Work pattern on body as follows (P the inc sts on sleeves): Work the first 6 sts inc in A.2, then P next 8-9-7-8-8 inc sts, work the next 6 inc sts in A.2, P the next 8-9-7-8-8 inc sts. NOTE: (Size M-L-XL-XXL): When A.3 has been worked 1 time vertically, continue with A.2 over cable and P the remaining sts from A.3 until start of body. S/M: Then inc as before on sleeve and inc inside A.1/A.2 (i.e. between A.1 and A.2, towards marker for raglan) on front and back piece 1-4 more times. P the new sts. L/XL/XXL: Continue with A.2 over the next 6 inc sts, P the next 7-8-8 inc sts, then inc as before on sleeve and inc inside A.1/A.2 (i.e. between A.1 and A.2, towards marker for raglan) on front and back piece 1-4-5 more times. P the last 1-4-5 inc sts. Piece now measures 27-28-29-30-31 cm from shoulder. Now work as follows: Slip the first 80-90-102-114-116 sts on a stitch holder for sleeve, cast on 12 new sts under sleeve, insert a blue marker in the middle of these new sts, work the next 94-104-118-130-136 sts (= front piece), slip the next 80-90-102-114-116 sts on a stitch holder for sleeve, cast on 12 new sts under sleeve, insert a blue marker in the middle of these new sts, work the remaining 94-104-118-130-136 sts on round (= back piece). NOW MEASURE THE PIECE FROM HERE. BODY: There are now 212-232-260-284-296 sts for body. Then continue pattern as follows: S/M: P 6-3, * A.2 0-1 time in width, P 7-7, A.2, P 8-9, insert a marker, A.2, P 8-9, insert a marker, A.2, P 9-9, A.2, P 9-9, A.2, insert a marker, P 8-9, A.2, insert a marker, P 8-9, A.1*, P 7-7, repeat from *-* 1 more time, P 1-4 L/XL/XXL: P 3-3-0, * A.2 1-1-2 times in width, P 4-6-5, A.2, P 7-8-8, insert a marker, A.2, P 7-8-8, insert a marker, A.2, P 7-8-8, insert a marker, A.2, P 10-11-12, A.2, P 10-11-12, A.2, insert a marker, P 7-8-8, A.2, insert a marker, P 7-8-8, A.2, insert a marker, P 7-8-8, A.1 *, P 4-6-5, repeat from *-* 1 more time, P 1-3-5. READ THE NEXT 2 SECTIONS BEFORE CONTINUING! Now dec and inc at the same time as follows: DECREASE: Dec differently as follows - READ DECREASE TIP: Dec 1 st on each side of the middle cable on front and back piece. Repeat dec every 2-2-1½-1½-1½ cm 3-3-4-4-6 more times. AT THE SAME TIME dec 1 st towards cable in every section with P sts with marker in (= 8-8-12-12-12 markers). Repeat dec every 3-2½-5-4-4 cm 2-3-1-2-2 more times. INCREASE (towards the sides): When piece measures 3 cm, inc along the cable towards the sleeve (i.e. cable from raglan) in P section towards the sides – READ INCREASE TIP! Inc 4 sts on round. Repeat inc every 1½-1½-2½-1½-1 cm 3-4-2-4-10 more times. When all dec and inc are done, 188-204-228-248-276 sts remain. When piece measures 11-12-12-13-14 cm, work pattern as follows: P 6-3-6-6-0, A.2 0-1-1-1-2 times in width, P 7-8-6-11-15, A.4 0-0-1-1-1 time in width, * A.5, A.4 *, repeat from *-* 2-2-3-3-3 more times in width, A.5 1-1-0-0-0 times in width, P 7-8-6-11-15, A.2 0-1-1-1-2 times in width, P 7-8-6-11-15, A.4 0-0-1-1-1 time in width, * A.5, A.4 *, repeat from *-* 2-2-3-3-3 more times in width, A.5 1-1-0-0-0 times in width, P 1-5-0-5-15. NOTE: Adjust the first cable in A.4 and A.5 to get a nice transition between diagrams. Continue with pattern and inc according to diagram. When A.4 and A.5 have been worked vertically and piece measures approx. 33-34-34-35-35 cm, there are 308-324-364-384-412 sts on round. Insert a marker here. NOW MEASURE THE PIECE FROM HERE. Now work rib as follows: S/M: * Work K over K and P over P until 7-11 sts remain before the blue marker in the side, P 2, K 2, P 3-4 *, repeat from *-* 1 more time and continue with K over K and P over P the rest of round. L/XL/XXL: * Work K over K and P over P until 8-14-21 sts remain before the blue marker in the side, K 2-2-2, P 3-4-3, K 0-2-2, P 0-3-3, K 0-0-2, P 0-0-3 *, repeat from *-* 1 more time and continue with K over K and P over P the rest of round. When rib has been worked for 2 cm from marker, inc by making 1 YO before first P st in every P section - remember INCREASE TIP. When rib has been worked for 5-5-6-6-6 cm, cast off with K over K and P over P. SLEEVES: Slip the 80-90-102-114-116 sts from stitch holder back on circular needle. K 1 row over all sts and cast on 12 new sts at the end of row = 92-102-114-126-128 sts. Insert a marker in the middle of the new sts (i.e. 6 sts on each side of marker). NOW MEASURE THE PIECE FROM HERE. Then work sleeve in the round on circular needle/double pointed needles. Continue the middle cable on sleeve as before but work P over cables in raglan. On 2nd round beg dec on each side of marker - READ DECREASE TIP. Repeat dec in every other round 6 more times = 78-88-100-112-114 sts. Then dec 1 st on each side of marker every 2-1½-1-1-1 cm 13-17-22-27-27 times = 52-54-56-58-60 sts. AT THE SAME TIME when piece measures 15 cm, work A.5 over cable in the middle of sleeve - adjust the first cable in A.5 to get a nice transition between diagrams. NOTE: Do not inc in A.5 on sleeve, i.e. do not work YOs in diagram. When A.5 is finished and sleeve measures 37 cm, work rib as follows from marker at beg of round: P 0-0-1-2-3, K 1-2-2-2-2, P 3, K 2, P 3, K 2, P 2, continue rib as on last row in A.5 (= 26 sts), P 2, K 2, P 3, K 2, P 3, K 1-2-2-2-2, P 0-0-1-2-3. Continue like this for 3 cm, cast off with K over K and P over P. ASSEMBLY: Sew the holes under the sleeves. |
||||||||||||||||||||||||||||
Diagram explanations |
||||||||||||||||||||||||||||
|
||||||||||||||||||||||||||||
 |
||||||||||||||||||||||||||||
 |
||||||||||||||||||||||||||||
 |
||||||||||||||||||||||||||||
Have you finished this pattern?Tag your pictures with #dropspattern #alanasweater or submit them to the #dropsfan gallery. Do you need help with this pattern?You'll find 24 tutorial videos, a Comments/Questions area and more by visiting the pattern on garnstudio.com. © 1982-2026 DROPS Design A/S. We reserve all rights. This document, including all its sub-sections, has copyrights. Read more about what you can do with our patterns at the bottom of each pattern on our site. |
||||||||||||||||||||||||||||


With over 40 years in knitting and crochet design, DROPS Design offers one of the most extensive collections of free patterns on the internet - translated to 17 languages. As of today we count 324 catalogues and 12284 patterns translated into English (UK/cm).
We work hard to bring you the best knitting and crochet have to offer, inspiration and advice as well as great quality yarns at incredible prices! Would you like to use our patterns for other than personal use? You can read what you are allowed to do in the Copyright text at the bottom of all our patterns. Happy crafting!
Post a comment to pattern DROPS 156-19
We would love to hear what you have to say about this pattern!
If you want to leave a question, please make sure you select the correct category in the form below, to speed up the answering process. Required fields are marked *.