
Popular categories
Looking for a yarn?


Comments / Questions (273)
![]() Tina Strøm wrote:
Tina Strøm wrote:
Jeg er nået til ribben på ryg og forstykke. Har strikket de første 2 cm. Hvor mange masker skal der tages ud ved " ... slå om før første vr - m i hvert parti vr - .... ? Er det kun på den første pind eller fortsætter udtagningen på hver pind i resten af ribben ?
16.01.2016 - 10:18DROPS Design answered:
Hej Tina, Du tager kun ud én gang men i hvert vrang-parti. God fornøjelse!
11.03.2016 - 11:17
![]() Gunilla Kofoed wrote:
Gunilla Kofoed wrote:
Mönster 156-19. Ett fel i den svenska diagramförklaringen. Rad 5: de två maskorna på hjälpstickan ska stickas aviga (eftersom de lyfts aviga)
28.12.2015 - 14:09
![]() Rose wrote:
Rose wrote:
Regarding the diagrams, since this design is worked top-down, are the diagrams read top-down too? And is each diagram worked in its entirety (thus, back-and-forth) before completing a round? Example: A.2 (all 6 rows), P2, A.2 (all 6 rows), P2, A.1 (all 6 rows)
18.10.2015 - 14:55DROPS Design answered:
Dear Rose, start reading diagram from the bottom corner on the right side towards the left on every round (1 square = 1 st x 1 row) - read more here. Follow same round on every diagram, in your example: A.2, P.2, A.1, work 1st row in A.2, then P2 sts, work 1st row in A.1 and so on on next row. Happy knitting!
19.10.2015 - 09:17
![]() Lara wrote:
Lara wrote:
This sweater is SO beautiful! I'd love to make it but my guage with my yarn is 26 stitches for 4 inches. I could make it tighter but not looser. I am a small. Could I possibly make the medium with a tighter gauge? If so, what? Thank you so much for your wonderful patterns!
15.10.2015 - 01:34DROPS Design answered:
Dear Lara, for any personnal assistance, you are welcome to contact the store where you bought your yarn. Happy knitting!
15.10.2015 - 08:58Shelly wrote:
I'm making the M size. I finished row number 60 on A3 diagram. I inc A2+9p+a2+9p in front and back. I have a problem with this:"S/M: Then inc as before you n sleeve and inc inside A.1/A.2 (i.e between A.1 and A.2, towards marker for raglan)....." Do I inc just after the marker or do I continue to inc the same as before?
05.10.2015 - 20:06DROPS Design answered:
Dear Shelly, after A.3, continue increase for raglan on sleeve as before (at the beg + at the end of sleeve), and inc on body (front + back piece) only 1 time in first size and 4 times in size M. Piece will be then divided when it measures 27-28 cm. Happy knitting!
06.10.2015 - 09:05
![]() Merete Petersen wrote:
Merete Petersen wrote:
Tak for svaret den 18.09.2015 vedr. strørrelse L. Diagram A.1, som også skal strikkes efter afslutningen af raglan fortsætter ikke i A.5, og man skal vel ikke vende snoningerne som A.4. Skal man ikke undlade A.1 efter afslutning af raglan?
19.09.2015 - 14:07DROPS Design answered:
Hej Merete, Se også 156-4 her har du flere billeder, så du kan se hvordan det ser ud i siden. God fornøjelse!
24.09.2015 - 11:35
![]() Merete Petersen wrote:
Merete Petersen wrote:
156-19 størrelse L. Efter indtagninger og udtagninger skal der startes på diagram A.4 og A.5. Skal slutmaskerne i diagram A.4 fortsættes, som de er indtil A.5 slutter, eller skal man vente med udtagningerne i diagram A.4 til de passer med diagram A.5? Hvor er snoningsrækken A.1 blevet af?
27.08.2015 - 15:58DROPS Design answered:
Hej Merete, Nej du strikker diagrammerne uafhængig af hinanden, når du er på en mønsterp i A.4 strikker du den (uanset hvilken pind du er på i A.4). God fornøjelse!
18.09.2015 - 14:11
![]() Merete Petersen wrote:
Merete Petersen wrote:
Strikker 156-19 i størrelse Large Hvis man følger opdelingen af vrangmasker og A.2 og A.1, så passer maskeantallet ikke, fordi vrangmaske grupperne omkring midter A.2 (den oprindelige A.5) skal være 9 og ikke 10, og fordi denne fejl er der, så er der også fejl i vrangmaskegrupperne ved raglan A.2 og A.1. Jeg startede omgangen ved det oprindelige mærke og strikkede 5 vrang, A.2, 5 vrang, og så fulgte jeg opskriftens opdeling frem til slut stjernen - altså -*.
25.08.2015 - 16:14
![]() Merete Petersen wrote:
Merete Petersen wrote:
Strikker model 156-19 i størrelse Large. Når der er slået 12 nye masker op under armene, og man skal begynde at strikke bullen, så står der ikke, hvor omgangen begynder. Det ser ud , som om den begynder en maske efter det oprindelige startmærke. Der står ikke, at raglan maskerne A.2 og A.1 skal forskubbes, og det kan godt forvirre.
25.08.2015 - 16:13
![]() Eli Svarva wrote:
Eli Svarva wrote:
Nydelig genser som jeg har tenkt å strikke. På et av bildene ser det ut som det er knappestolpe og knapper. Stemmer det?
09.03.2015 - 17:20DROPS Design answered:
Hei Eli. Der er ingen knappestolpe eller knapper paa denne tröje.
10.03.2015 - 16:16
|
||||||||||||||||||||||||||||
Alana#alanasweater |
||||||||||||||||||||||||||||
 |
 |
|||||||||||||||||||||||||||
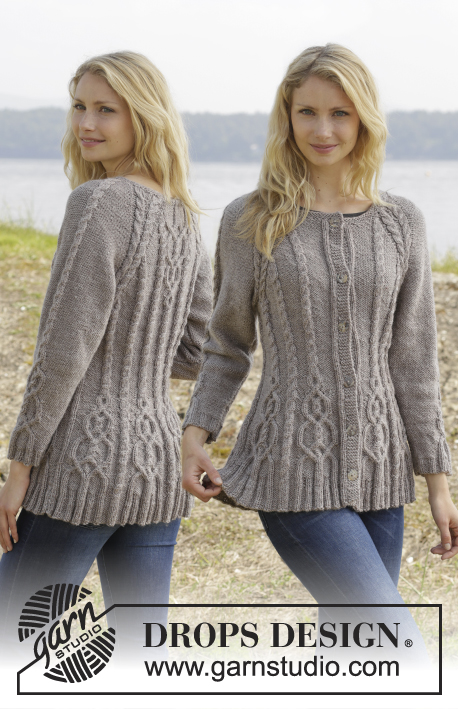
Knitted DROPS jumper with cables and raglan, worked top down in ”Karisma”. Size S-XXL
DROPS 156-19 |
||||||||||||||||||||||||||||
|
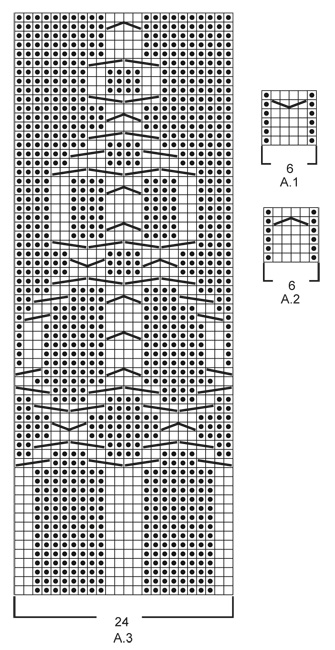
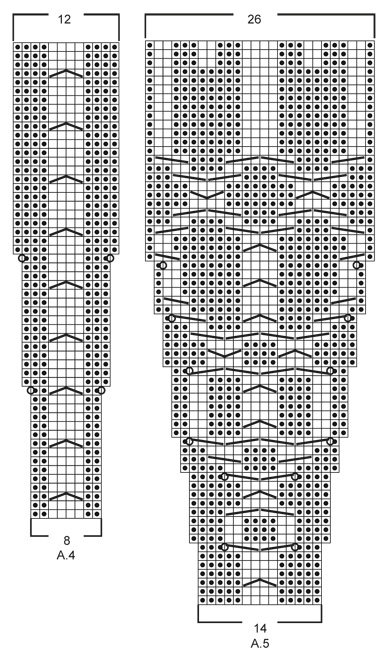
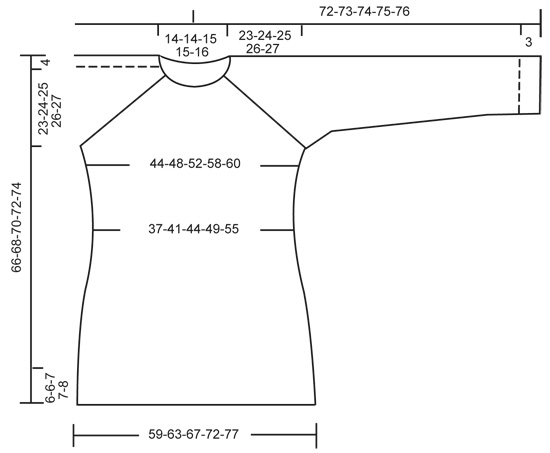
GARTER ST (in the round on circular needle): * K 1 round and P 1 round *, repeat from *-*. 1 ridge = 2 rounds. GARTER ST (back and forth on needle): K all rows. 1 ridge = 2 rows K. PATTERN: See diagrams A.1 - A.5. The diagrams show all rows in pattern seen from RS. RAGLAN: Inc on each side of raglan sts (A.1/A.2, marker, A.2/A.1) by making 1 YO = 8 inc on round. On next round K the YOs twisted to avoid holes. Then P the new sts on sleeves, and on front and back piece work the new sts in pattern as explained below. DECREASE TIP (applies to sleeves): Dec on each side of marker as follows: Work until 3 sts remain before marker, P 2 tog, P 2, P 2 tog = 2 sts dec. INCREASE TIP: Inc 1 st by making a YO. On next round P YOs twisted, i.e. work in the back loop of st instead of front to avoid holes. P the new sts. ---------------------------------------------------------- JUMPER: Worked top down in the round on circular needle. Work sleeve in the round on circular needle/double pointed needles. YOKE: Cast on 92-92-97-97-101 sts on circular needle size 4 mm with Karisma. Work 3 ridges in GARTER ST in the round on circular needle - see explanation above. Continue to work an elevation in GARTER ST back and forth -see explanation above, from mid back as follows (1st row = RS): Now work 5-5-7-7-9 sts, turn, work 10-10-14-14-18 sts, turn, work 15-15-19-19-23 sts, turn, work 20-20-24-24-28 sts, turn, work 25-25-29-29-33 sts, turn, work 30-30-34-34-38 sts, turn, work 35-35-39-39-43 sts, turn, work 40-40-43-43-48 sts, turn, work back to beg of round. Now K 1 round AT THE SAME TIME inc 24-24-23-23-27 sts evenly = 116-116-120-120-128 sts. P 18-18-19-19-21, insert 1st marker here (= this is now beg of round), A.2, P 2, A.2, P 2, A.1, insert 2nd marker here, A.2, P 0-0-1-1-3, A.3, P 0-0-1-1-3, A.1, insert 3rd marker here, A.2, P 2, A.2, P 2, A.1, insert 4th marker here, A.2, P 0-0-1-1-3, A.3, P 0-0-1-1-3, A.1. READ THE NEXT 2 SECTIONS BEFORE CONTINUING! REMEMBER THE KNITTING TENSION! On next round beg inc for RAGLAN – see explanation above, AT THE SAME TIME work pattern as follows: RAGLAN: Repeat inc every round 0-2-10-20-20 times in total. Then inc every other round 23-32-30-26-27 times and every 3rd round 6-0-0-0-0 times = 348-388-440-488-504 sts. PATTERN: Work pattern on body as follows (P the inc sts on sleeves): Work the first 6 sts inc in A.2, then P next 8-9-7-8-8 inc sts, work the next 6 inc sts in A.2, P the next 8-9-7-8-8 inc sts. NOTE: (Size M-L-XL-XXL): When A.3 has been worked 1 time vertically, continue with A.2 over cable and P the remaining sts from A.3 until start of body. S/M: Then inc as before on sleeve and inc inside A.1/A.2 (i.e. between A.1 and A.2, towards marker for raglan) on front and back piece 1-4 more times. P the new sts. L/XL/XXL: Continue with A.2 over the next 6 inc sts, P the next 7-8-8 inc sts, then inc as before on sleeve and inc inside A.1/A.2 (i.e. between A.1 and A.2, towards marker for raglan) on front and back piece 1-4-5 more times. P the last 1-4-5 inc sts. Piece now measures 27-28-29-30-31 cm from shoulder. Now work as follows: Slip the first 80-90-102-114-116 sts on a stitch holder for sleeve, cast on 12 new sts under sleeve, insert a blue marker in the middle of these new sts, work the next 94-104-118-130-136 sts (= front piece), slip the next 80-90-102-114-116 sts on a stitch holder for sleeve, cast on 12 new sts under sleeve, insert a blue marker in the middle of these new sts, work the remaining 94-104-118-130-136 sts on round (= back piece). NOW MEASURE THE PIECE FROM HERE. BODY: There are now 212-232-260-284-296 sts for body. Then continue pattern as follows: S/M: P 6-3, * A.2 0-1 time in width, P 7-7, A.2, P 8-9, insert a marker, A.2, P 8-9, insert a marker, A.2, P 9-9, A.2, P 9-9, A.2, insert a marker, P 8-9, A.2, insert a marker, P 8-9, A.1*, P 7-7, repeat from *-* 1 more time, P 1-4 L/XL/XXL: P 3-3-0, * A.2 1-1-2 times in width, P 4-6-5, A.2, P 7-8-8, insert a marker, A.2, P 7-8-8, insert a marker, A.2, P 7-8-8, insert a marker, A.2, P 10-11-12, A.2, P 10-11-12, A.2, insert a marker, P 7-8-8, A.2, insert a marker, P 7-8-8, A.2, insert a marker, P 7-8-8, A.1 *, P 4-6-5, repeat from *-* 1 more time, P 1-3-5. READ THE NEXT 2 SECTIONS BEFORE CONTINUING! Now dec and inc at the same time as follows: DECREASE: Dec differently as follows - READ DECREASE TIP: Dec 1 st on each side of the middle cable on front and back piece. Repeat dec every 2-2-1½-1½-1½ cm 3-3-4-4-6 more times. AT THE SAME TIME dec 1 st towards cable in every section with P sts with marker in (= 8-8-12-12-12 markers). Repeat dec every 3-2½-5-4-4 cm 2-3-1-2-2 more times. INCREASE (towards the sides): When piece measures 3 cm, inc along the cable towards the sleeve (i.e. cable from raglan) in P section towards the sides – READ INCREASE TIP! Inc 4 sts on round. Repeat inc every 1½-1½-2½-1½-1 cm 3-4-2-4-10 more times. When all dec and inc are done, 188-204-228-248-276 sts remain. When piece measures 11-12-12-13-14 cm, work pattern as follows: P 6-3-6-6-0, A.2 0-1-1-1-2 times in width, P 7-8-6-11-15, A.4 0-0-1-1-1 time in width, * A.5, A.4 *, repeat from *-* 2-2-3-3-3 more times in width, A.5 1-1-0-0-0 times in width, P 7-8-6-11-15, A.2 0-1-1-1-2 times in width, P 7-8-6-11-15, A.4 0-0-1-1-1 time in width, * A.5, A.4 *, repeat from *-* 2-2-3-3-3 more times in width, A.5 1-1-0-0-0 times in width, P 1-5-0-5-15. NOTE: Adjust the first cable in A.4 and A.5 to get a nice transition between diagrams. Continue with pattern and inc according to diagram. When A.4 and A.5 have been worked vertically and piece measures approx. 33-34-34-35-35 cm, there are 308-324-364-384-412 sts on round. Insert a marker here. NOW MEASURE THE PIECE FROM HERE. Now work rib as follows: S/M: * Work K over K and P over P until 7-11 sts remain before the blue marker in the side, P 2, K 2, P 3-4 *, repeat from *-* 1 more time and continue with K over K and P over P the rest of round. L/XL/XXL: * Work K over K and P over P until 8-14-21 sts remain before the blue marker in the side, K 2-2-2, P 3-4-3, K 0-2-2, P 0-3-3, K 0-0-2, P 0-0-3 *, repeat from *-* 1 more time and continue with K over K and P over P the rest of round. When rib has been worked for 2 cm from marker, inc by making 1 YO before first P st in every P section - remember INCREASE TIP. When rib has been worked for 5-5-6-6-6 cm, cast off with K over K and P over P. SLEEVES: Slip the 80-90-102-114-116 sts from stitch holder back on circular needle. K 1 row over all sts and cast on 12 new sts at the end of row = 92-102-114-126-128 sts. Insert a marker in the middle of the new sts (i.e. 6 sts on each side of marker). NOW MEASURE THE PIECE FROM HERE. Then work sleeve in the round on circular needle/double pointed needles. Continue the middle cable on sleeve as before but work P over cables in raglan. On 2nd round beg dec on each side of marker - READ DECREASE TIP. Repeat dec in every other round 6 more times = 78-88-100-112-114 sts. Then dec 1 st on each side of marker every 2-1½-1-1-1 cm 13-17-22-27-27 times = 52-54-56-58-60 sts. AT THE SAME TIME when piece measures 15 cm, work A.5 over cable in the middle of sleeve - adjust the first cable in A.5 to get a nice transition between diagrams. NOTE: Do not inc in A.5 on sleeve, i.e. do not work YOs in diagram. When A.5 is finished and sleeve measures 37 cm, work rib as follows from marker at beg of round: P 0-0-1-2-3, K 1-2-2-2-2, P 3, K 2, P 3, K 2, P 2, continue rib as on last row in A.5 (= 26 sts), P 2, K 2, P 3, K 2, P 3, K 1-2-2-2-2, P 0-0-1-2-3. Continue like this for 3 cm, cast off with K over K and P over P. ASSEMBLY: Sew the holes under the sleeves. |
||||||||||||||||||||||||||||
Diagram explanations |
||||||||||||||||||||||||||||
|
||||||||||||||||||||||||||||
 |
||||||||||||||||||||||||||||
 |
||||||||||||||||||||||||||||
 |
||||||||||||||||||||||||||||
Have you finished this pattern?Tag your pictures with #dropspattern #alanasweater or submit them to the #dropsfan gallery. Do you need help with this pattern?You'll find 24 tutorial videos, a Comments/Questions area and more by visiting the pattern on garnstudio.com. © 1982-2026 DROPS Design A/S. We reserve all rights. This document, including all its sub-sections, has copyrights. Read more about what you can do with our patterns at the bottom of each pattern on our site. |
||||||||||||||||||||||||||||


With over 40 years in knitting and crochet design, DROPS Design offers one of the most extensive collections of free patterns on the internet - translated to 17 languages. As of today we count 324 catalogues and 12284 patterns translated into English (UK/cm).
We work hard to bring you the best knitting and crochet have to offer, inspiration and advice as well as great quality yarns at incredible prices! Would you like to use our patterns for other than personal use? You can read what you are allowed to do in the Copyright text at the bottom of all our patterns. Happy crafting!
Post a comment to pattern DROPS 156-19
We would love to hear what you have to say about this pattern!
If you want to leave a question, please make sure you select the correct category in the form below, to speed up the answering process. Required fields are marked *.