
Popular categories
Looking for a yarn?


Comments / Questions (273)
Angeline wrote:
Question 3 and the third cable A2 to become design, how many stitches needed, and how many purls. The pattern is vague so I would appreciate your help. Sorry, i had three questions and it wouldn't let me put them together.
14.05.2016 - 22:01DROPS Design answered:
Dear Angeline, after you have inc in pattern (2 new A.2 on each side in body), continue to inc with P sts 4 more times. Happy knitting!
17.05.2016 - 09:53Angeline wrote:
Question 2. How many stiches to I increase to incorporate the next set of A2s? second cable set that will become A4? I only have the picture, nothing in the pattern that I can tell. The pattern goes from s/m 1-4 more times to when you have 29 cm to body Recap for medium? how many stitches to add second cable A2 to become A4 and how many purls between?
14.05.2016 - 22:00DROPS Design answered:
Dear Angeline, when inc in A.2, you have to P first inc st, then K the next 4 inc st, and P the 6th inc st, at the same time, follow diagram (reading from bottom corner on the rights side towards the left) and start cable when you have enough sts.
17.05.2016 - 09:45Angeline wrote:
This pattern does have a lot of imagination build in. Now this pattern misses the indications on a Med at what stitch number on the front and back when I start the new cables. Assuming since I start with 36 stiches, when I increase 12 more I will incorporate A2, A2, A3, A2, A1, which would be approximately row 11 of the A3 pattern; Correct??????
14.05.2016 - 21:55DROPS Design answered:
Dear Angeline, the first 6 raglan inc on body are worked in A.2, then P the next 9 inc sts, then work the next 6 inc sts in A.2, P the next 9 inc sts - see "pattern" under "Raglan". Happy knitting!
17.05.2016 - 09:29
![]() Chrysis wrote:
Chrysis wrote:
Everyone else is much more experienced than I. my question is where or when am I suppose to start the new a.2 between the front and back after the raglan. I've studied the picture and still cannot figure it out
25.03.2016 - 21:45DROPS Design answered:
Dear Chrysis, when inc on body, inc in A.2 means to work the new sts following A.2 so that after 6 sts inc they can be then worked in A.2, ie (P1, K4, P1) seen from RS. Happy knitting!
29.03.2016 - 08:39
![]() Christina Olsson wrote:
Christina Olsson wrote:
Kan ni ange cm övervidd för de olika storklekarna , alt färdigt mått på tröjan? Tack/ Christina
15.03.2016 - 11:05DROPS Design answered:
Hej. Längst ner på mönstret hittar du en måttskiss med mått i cm på samtliga storlekar. Lycka till!
15.03.2016 - 14:19
![]() Marianne Rasmussen wrote:
Marianne Rasmussen wrote:
Hvor mange masker skal der helt nøjagtig tages ud i ribben efter 2 cm på 156-19,xxl? (12 eller 64)
24.02.2016 - 04:13DROPS Design answered:
Hej, Jeg kan ikke finde hverken rib eller efter hvilke 2 cm du skal tage ud. Vil du skrive nøjagtig hvor i opskriften du er?
25.02.2016 - 16:06
![]() Marianne Rasmussen wrote:
Marianne Rasmussen wrote:
Strikker 156-19, xxl. Hvorfor er diagram A4 og A5 ikke lige lange/høje? Iflg. opskrift begyndes A4 og A5 samtidig.
18.02.2016 - 09:33DROPS Design answered:
Hej Marianne, Det ved jeg ikke, men du bør være færdig med diagrammet når du når til målet i opskriften, ellers er det bare at fortsætte snoningen på hver 6.p ifølge A.4. God fornøjelse!
03.03.2016 - 11:52
![]() Merja Schroeder wrote:
Merja Schroeder wrote:
Dus dat betekend 20 naalden elke naald 8 meerderen daarna 54 naalden om de naald 8 meerderen
28.01.2016 - 18:52DROPS Design answered:
Hoi Merja, Ja klopt.
29.01.2016 - 12:21
![]() Merja Schroeder wrote:
Merja Schroeder wrote:
Hallo Ik zit met het eerste deel van het patroon al een beetje in de knoei. Het volgende Herhaal dit meerderen elke nld 0-2-10-20-20 keer in totaal. Meerder dan om de nld 23-32-30-26-27 keer = 348-388-440-488-504 st. Ik ga de. Trui in xxl breien. Waar moet ik die meerderingen pewcies maken. Als ik alleen tussen de raglan in meerder dan heb ik maar acht meerderingen per naald en het meteen er twintig zijn een daarna 27.
26.01.2016 - 20:30DROPS Design answered:
Hoi Merja. Je meerdert inderdaad 8 st per naald, maar je moet het herhalen eerst in elke nld in totaal 20 keer en daarna om de nld (elke 2e nld) totaal 27 keer.
28.01.2016 - 12:55
![]() Lorraine Veillette wrote:
Lorraine Veillette wrote:
Bonjour, J'ai presque terminé le chandail, taille moyenne. Il est magnifique. Je suis rendue aux augmentations dans les côtes au bas. Combien dois-je faire d'augmentations au total? Je ne retrouve plus mes sections de mailles envers. Merci.
26.01.2016 - 14:55DROPS Design answered:
Bonjour Mme Veillette, après avoir tricoté 2 cm de côtes, augmentez 1 m env (= faites 1 jeté) avant la 1ère m env de chaque section envers: à la fin de chaque section en mailles endroit des côtes, faites 1 jeté, tricotez les mailles envers des côtes suivantes et ainsi de suite. Au tour suivant, tricotez bien les jetés torse à l'envers (= dans le brin arrière) pour éviter des trous. Vous avez 1 m env en plus dans chacune des sections en m envers tout le tour. Bon tricot!
26.01.2016 - 15:49
|
||||||||||||||||||||||||||||
Alana#alanasweater |
||||||||||||||||||||||||||||
 |
 |
|||||||||||||||||||||||||||
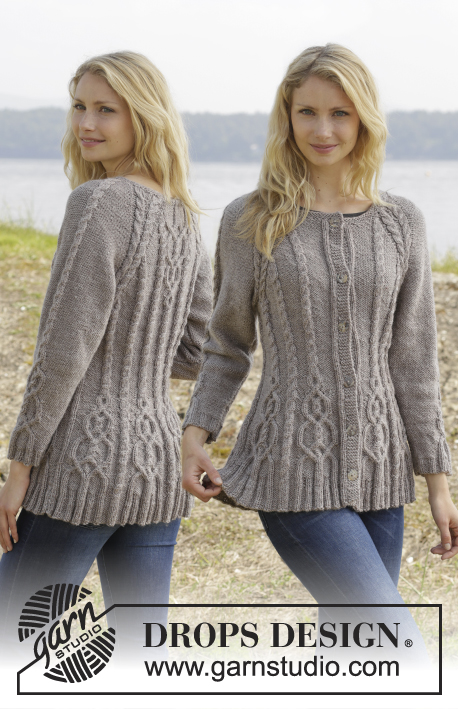
Knitted DROPS jumper with cables and raglan, worked top down in ”Karisma”. Size S-XXL
DROPS 156-19 |
||||||||||||||||||||||||||||
|
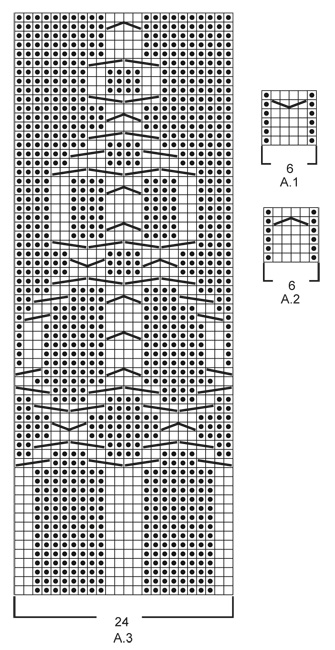
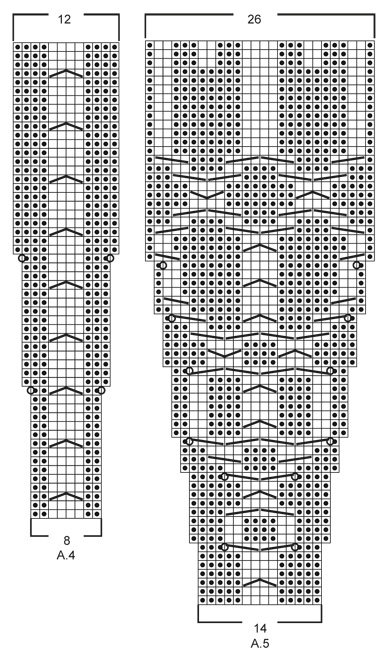
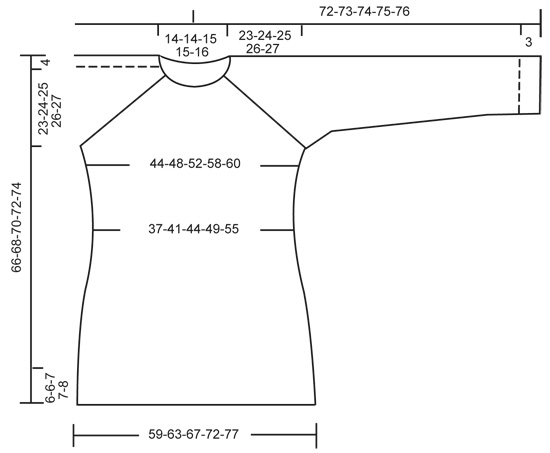
GARTER ST (in the round on circular needle): * K 1 round and P 1 round *, repeat from *-*. 1 ridge = 2 rounds. GARTER ST (back and forth on needle): K all rows. 1 ridge = 2 rows K. PATTERN: See diagrams A.1 - A.5. The diagrams show all rows in pattern seen from RS. RAGLAN: Inc on each side of raglan sts (A.1/A.2, marker, A.2/A.1) by making 1 YO = 8 inc on round. On next round K the YOs twisted to avoid holes. Then P the new sts on sleeves, and on front and back piece work the new sts in pattern as explained below. DECREASE TIP (applies to sleeves): Dec on each side of marker as follows: Work until 3 sts remain before marker, P 2 tog, P 2, P 2 tog = 2 sts dec. INCREASE TIP: Inc 1 st by making a YO. On next round P YOs twisted, i.e. work in the back loop of st instead of front to avoid holes. P the new sts. ---------------------------------------------------------- JUMPER: Worked top down in the round on circular needle. Work sleeve in the round on circular needle/double pointed needles. YOKE: Cast on 92-92-97-97-101 sts on circular needle size 4 mm with Karisma. Work 3 ridges in GARTER ST in the round on circular needle - see explanation above. Continue to work an elevation in GARTER ST back and forth -see explanation above, from mid back as follows (1st row = RS): Now work 5-5-7-7-9 sts, turn, work 10-10-14-14-18 sts, turn, work 15-15-19-19-23 sts, turn, work 20-20-24-24-28 sts, turn, work 25-25-29-29-33 sts, turn, work 30-30-34-34-38 sts, turn, work 35-35-39-39-43 sts, turn, work 40-40-43-43-48 sts, turn, work back to beg of round. Now K 1 round AT THE SAME TIME inc 24-24-23-23-27 sts evenly = 116-116-120-120-128 sts. P 18-18-19-19-21, insert 1st marker here (= this is now beg of round), A.2, P 2, A.2, P 2, A.1, insert 2nd marker here, A.2, P 0-0-1-1-3, A.3, P 0-0-1-1-3, A.1, insert 3rd marker here, A.2, P 2, A.2, P 2, A.1, insert 4th marker here, A.2, P 0-0-1-1-3, A.3, P 0-0-1-1-3, A.1. READ THE NEXT 2 SECTIONS BEFORE CONTINUING! REMEMBER THE KNITTING TENSION! On next round beg inc for RAGLAN – see explanation above, AT THE SAME TIME work pattern as follows: RAGLAN: Repeat inc every round 0-2-10-20-20 times in total. Then inc every other round 23-32-30-26-27 times and every 3rd round 6-0-0-0-0 times = 348-388-440-488-504 sts. PATTERN: Work pattern on body as follows (P the inc sts on sleeves): Work the first 6 sts inc in A.2, then P next 8-9-7-8-8 inc sts, work the next 6 inc sts in A.2, P the next 8-9-7-8-8 inc sts. NOTE: (Size M-L-XL-XXL): When A.3 has been worked 1 time vertically, continue with A.2 over cable and P the remaining sts from A.3 until start of body. S/M: Then inc as before on sleeve and inc inside A.1/A.2 (i.e. between A.1 and A.2, towards marker for raglan) on front and back piece 1-4 more times. P the new sts. L/XL/XXL: Continue with A.2 over the next 6 inc sts, P the next 7-8-8 inc sts, then inc as before on sleeve and inc inside A.1/A.2 (i.e. between A.1 and A.2, towards marker for raglan) on front and back piece 1-4-5 more times. P the last 1-4-5 inc sts. Piece now measures 27-28-29-30-31 cm from shoulder. Now work as follows: Slip the first 80-90-102-114-116 sts on a stitch holder for sleeve, cast on 12 new sts under sleeve, insert a blue marker in the middle of these new sts, work the next 94-104-118-130-136 sts (= front piece), slip the next 80-90-102-114-116 sts on a stitch holder for sleeve, cast on 12 new sts under sleeve, insert a blue marker in the middle of these new sts, work the remaining 94-104-118-130-136 sts on round (= back piece). NOW MEASURE THE PIECE FROM HERE. BODY: There are now 212-232-260-284-296 sts for body. Then continue pattern as follows: S/M: P 6-3, * A.2 0-1 time in width, P 7-7, A.2, P 8-9, insert a marker, A.2, P 8-9, insert a marker, A.2, P 9-9, A.2, P 9-9, A.2, insert a marker, P 8-9, A.2, insert a marker, P 8-9, A.1*, P 7-7, repeat from *-* 1 more time, P 1-4 L/XL/XXL: P 3-3-0, * A.2 1-1-2 times in width, P 4-6-5, A.2, P 7-8-8, insert a marker, A.2, P 7-8-8, insert a marker, A.2, P 7-8-8, insert a marker, A.2, P 10-11-12, A.2, P 10-11-12, A.2, insert a marker, P 7-8-8, A.2, insert a marker, P 7-8-8, A.2, insert a marker, P 7-8-8, A.1 *, P 4-6-5, repeat from *-* 1 more time, P 1-3-5. READ THE NEXT 2 SECTIONS BEFORE CONTINUING! Now dec and inc at the same time as follows: DECREASE: Dec differently as follows - READ DECREASE TIP: Dec 1 st on each side of the middle cable on front and back piece. Repeat dec every 2-2-1½-1½-1½ cm 3-3-4-4-6 more times. AT THE SAME TIME dec 1 st towards cable in every section with P sts with marker in (= 8-8-12-12-12 markers). Repeat dec every 3-2½-5-4-4 cm 2-3-1-2-2 more times. INCREASE (towards the sides): When piece measures 3 cm, inc along the cable towards the sleeve (i.e. cable from raglan) in P section towards the sides – READ INCREASE TIP! Inc 4 sts on round. Repeat inc every 1½-1½-2½-1½-1 cm 3-4-2-4-10 more times. When all dec and inc are done, 188-204-228-248-276 sts remain. When piece measures 11-12-12-13-14 cm, work pattern as follows: P 6-3-6-6-0, A.2 0-1-1-1-2 times in width, P 7-8-6-11-15, A.4 0-0-1-1-1 time in width, * A.5, A.4 *, repeat from *-* 2-2-3-3-3 more times in width, A.5 1-1-0-0-0 times in width, P 7-8-6-11-15, A.2 0-1-1-1-2 times in width, P 7-8-6-11-15, A.4 0-0-1-1-1 time in width, * A.5, A.4 *, repeat from *-* 2-2-3-3-3 more times in width, A.5 1-1-0-0-0 times in width, P 1-5-0-5-15. NOTE: Adjust the first cable in A.4 and A.5 to get a nice transition between diagrams. Continue with pattern and inc according to diagram. When A.4 and A.5 have been worked vertically and piece measures approx. 33-34-34-35-35 cm, there are 308-324-364-384-412 sts on round. Insert a marker here. NOW MEASURE THE PIECE FROM HERE. Now work rib as follows: S/M: * Work K over K and P over P until 7-11 sts remain before the blue marker in the side, P 2, K 2, P 3-4 *, repeat from *-* 1 more time and continue with K over K and P over P the rest of round. L/XL/XXL: * Work K over K and P over P until 8-14-21 sts remain before the blue marker in the side, K 2-2-2, P 3-4-3, K 0-2-2, P 0-3-3, K 0-0-2, P 0-0-3 *, repeat from *-* 1 more time and continue with K over K and P over P the rest of round. When rib has been worked for 2 cm from marker, inc by making 1 YO before first P st in every P section - remember INCREASE TIP. When rib has been worked for 5-5-6-6-6 cm, cast off with K over K and P over P. SLEEVES: Slip the 80-90-102-114-116 sts from stitch holder back on circular needle. K 1 row over all sts and cast on 12 new sts at the end of row = 92-102-114-126-128 sts. Insert a marker in the middle of the new sts (i.e. 6 sts on each side of marker). NOW MEASURE THE PIECE FROM HERE. Then work sleeve in the round on circular needle/double pointed needles. Continue the middle cable on sleeve as before but work P over cables in raglan. On 2nd round beg dec on each side of marker - READ DECREASE TIP. Repeat dec in every other round 6 more times = 78-88-100-112-114 sts. Then dec 1 st on each side of marker every 2-1½-1-1-1 cm 13-17-22-27-27 times = 52-54-56-58-60 sts. AT THE SAME TIME when piece measures 15 cm, work A.5 over cable in the middle of sleeve - adjust the first cable in A.5 to get a nice transition between diagrams. NOTE: Do not inc in A.5 on sleeve, i.e. do not work YOs in diagram. When A.5 is finished and sleeve measures 37 cm, work rib as follows from marker at beg of round: P 0-0-1-2-3, K 1-2-2-2-2, P 3, K 2, P 3, K 2, P 2, continue rib as on last row in A.5 (= 26 sts), P 2, K 2, P 3, K 2, P 3, K 1-2-2-2-2, P 0-0-1-2-3. Continue like this for 3 cm, cast off with K over K and P over P. ASSEMBLY: Sew the holes under the sleeves. |
||||||||||||||||||||||||||||
Diagram explanations |
||||||||||||||||||||||||||||
|
||||||||||||||||||||||||||||
 |
||||||||||||||||||||||||||||
 |
||||||||||||||||||||||||||||
 |
||||||||||||||||||||||||||||
Have you finished this pattern?Tag your pictures with #dropspattern #alanasweater or submit them to the #dropsfan gallery. Do you need help with this pattern?You'll find 24 tutorial videos, a Comments/Questions area and more by visiting the pattern on garnstudio.com. © 1982-2026 DROPS Design A/S. We reserve all rights. This document, including all its sub-sections, has copyrights. Read more about what you can do with our patterns at the bottom of each pattern on our site. |
||||||||||||||||||||||||||||


With over 40 years in knitting and crochet design, DROPS Design offers one of the most extensive collections of free patterns on the internet - translated to 17 languages. As of today we count 324 catalogues and 12284 patterns translated into English (UK/cm).
We work hard to bring you the best knitting and crochet have to offer, inspiration and advice as well as great quality yarns at incredible prices! Would you like to use our patterns for other than personal use? You can read what you are allowed to do in the Copyright text at the bottom of all our patterns. Happy crafting!
Post a comment to pattern DROPS 156-19
We would love to hear what you have to say about this pattern!
If you want to leave a question, please make sure you select the correct category in the form below, to speed up the answering process. Required fields are marked *.