
Popular categories
Looking for a yarn?


Comments / Questions (273)
![]() Prisca Cheung wrote:
Prisca Cheung wrote:
More I read more confuse. I work size S. question is increase stitches sleeves. Start on 1st marker A2 increase,p2,A2,p2,A1, increase, then 2 markers. On the body start A2, A3,A1. Where should I increase? Marker 3 is it same as marker 1to marker 2? And the last back of body where should I increase? Thanks
13.05.2017 - 01:31DROPS Design answered:
Dear Mrs Cheung, you inc on each side of A.2/A.1 or A.1/A.2: ie from beg of round: (1st marker) A.2, inc, P 2, A.2, P 2, inc, A.1, 2nd marker, A.2, inc, A.3, inc, A.1, 3rd marker, A.2, inc, P 2, A.2, P 2, inc, A.1, 4th marker, A.2, inc, A.3, A.1, inc. = 8 inc per round. Happy knitting!
15.05.2017 - 09:03
![]() Bonita wrote:
Bonita wrote:
I wish to thank you for the help and the very quick responses to all of my queries! Also to make a suggestion. If is is not possible to amend the wording of the pattern text to make it more easily understood, perhaps extra pictures could be added, showing the back, underarm area as much as possible and close up of the neck. The added ability to zoom in on certain points would also be great!
21.02.2017 - 17:14
![]() Bonita wrote:
Bonita wrote:
I have been thinking about my previous question and wondering if maybe that sentence means that the cables that previously were close to the raglan seam, will now move away from the raglan seam on the front and back pieces but stay close to the raglan seam on the sleeves.
21.02.2017 - 17:07
![]() Bonita wrote:
Bonita wrote:
I am making the size small. After the 23 increases every other round and the 6 increases every 3rd round, there is a sentence I don't understand. It says: S/M: Then inc as before on sleeve and inc inside A. 1/A. 2 (i.e. between A.1 and A. 2, towards marker for raglan) on front and back piece 1-4 more times. Does this mean just to increase the way increases have been done all along, adding 8 new stitches each inc round?
21.02.2017 - 14:21DROPS Design answered:
Dear Bonita, in size S you are inc 23 times every other round and 6 times every 3rd round (= 29 times). Work these inc on body as follows: first 6 inc sts in A.2, then P the next 8 sts, then work the next 6 sts in A.2, P the next 8 sts, then P the next st inc (= 6+8+6+8+1=29). Happy knitting!
21.02.2017 - 14:50
![]() Bonita wrote:
Bonita wrote:
It would be a tremendous help to have a larger, more complete chart of the Front/Back section showing the addition of the new cables!
20.02.2017 - 18:45
![]() Bonita wrote:
Bonita wrote:
I am having a very difficult time trying to figure out how and when to add the extra cables. Once there are enough increased stitches to work the 8 purl stitches as well as the new cable, would the next four stitches to be increased, be knit stitches?
20.02.2017 - 18:30DROPS Design answered:
Dear Bonita, when the next inc have to be worked in A.2, work them as in A.2, ie: P1, K4, P1 ( 6 inc sts). Happy knitting!
21.02.2017 - 09:10
![]() Bonita wrote:
Bonita wrote:
This pattern is very difficult to interpret as the instructions are not always complete. I have read all the other English comments and responses, and it would help a great deal if the raglan instructions were more complete, as well as when exactly to start adding in the new cables.
20.02.2017 - 15:15DROPS Design answered:
Dear Bonita, pattern is complete, you will find how work the new sts inc under PATTERN, just below "Raglan". Happy knitting!
20.02.2017 - 16:22
![]() Jana wrote:
Jana wrote:
Ohh, wer lesen kann..... Ich ziehe meine Frage zurück
28.01.2017 - 17:56
![]() Jana wrote:
Jana wrote:
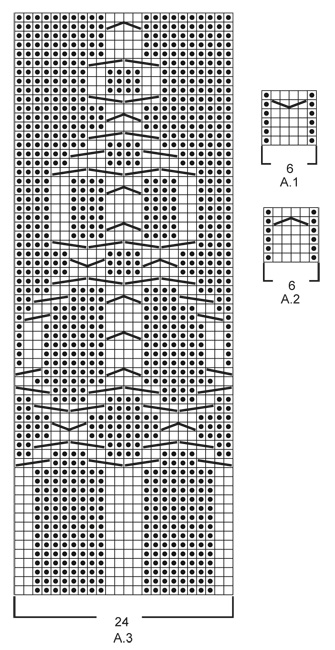
Hallo, im Diagramm A3 Runde 19 ist ein Fehler? Ich kann nicht 2 Maschen rechts auf die Hilfsnadel nehmen und 1 Masche links stricken. Dann eine (linke) Masche auf der Hilfsnadel nach hinten und zwei rechts stricken, dann bleiben keine 8 linken Maschen in der Mitte übrig. In der nächsten Reihe (20) hätte man dann auch keine 4 linken Maschen am Anfang, sondern 5. Was verstehe ich nicht?
28.01.2017 - 17:44DROPS Design answered:
Liebe Jana, im A3, Runde 19 sollen Sie die Zöpfe so stricken, dh zuerst "2 M auf eine Hilfsnadel hinter die Arbeit legen, 2 M re, 2 M re von der Hilfsnadel" dann "2 M auf eine Hilfsnadel vor die Arbeit legen, 2 M re, 2 M re von der Hilfsnadel". Viel Spaß beim stricken!
30.01.2017 - 11:27
![]() Madeline Aileo wrote:
Madeline Aileo wrote:
I have a question about row 39 in A.5. This should be a wrong side row and therefore shouldn't have any cables... but it does. Is that correct? I haven't started yet but I've been doing samples while I've been waiting for my yarn. Thanks k you. Madeline
20.01.2017 - 03:33DROPS Design answered:
Dear Mrs Aileo, diagram is worked in the round, so that all rounds will be worked from RS and any will be worked from WS. Happy knitting!
20.01.2017 - 09:20
|
||||||||||||||||||||||||||||
Alana#alanasweater |
||||||||||||||||||||||||||||
 |
 |
|||||||||||||||||||||||||||
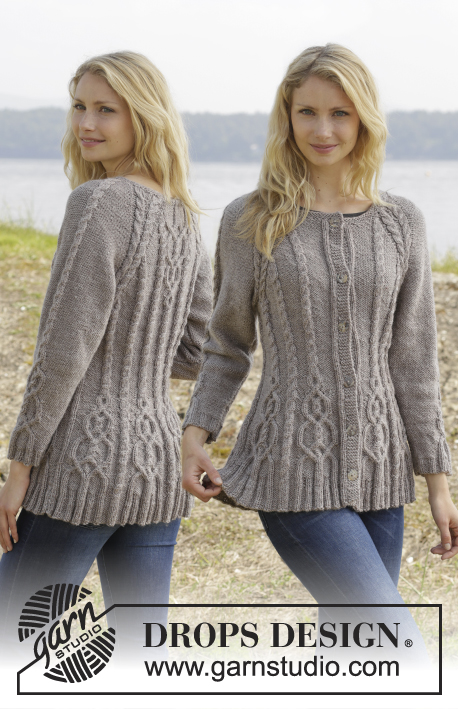
Knitted DROPS jumper with cables and raglan, worked top down in ”Karisma”. Size S-XXL
DROPS 156-19 |
||||||||||||||||||||||||||||
|
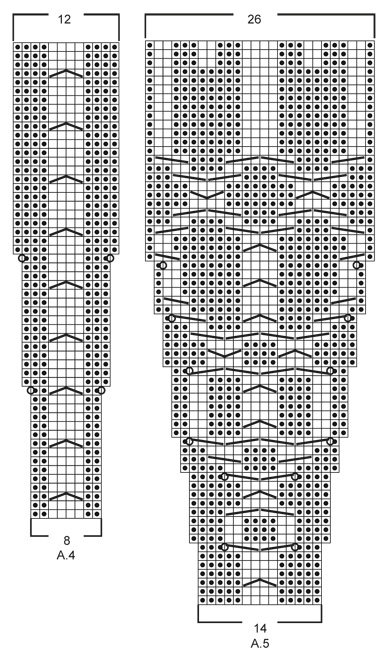
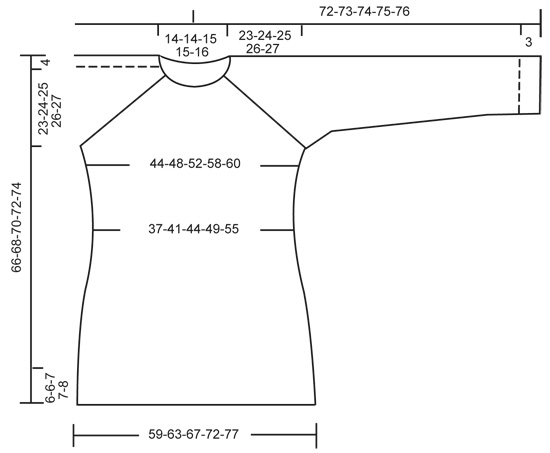
GARTER ST (in the round on circular needle): * K 1 round and P 1 round *, repeat from *-*. 1 ridge = 2 rounds. GARTER ST (back and forth on needle): K all rows. 1 ridge = 2 rows K. PATTERN: See diagrams A.1 - A.5. The diagrams show all rows in pattern seen from RS. RAGLAN: Inc on each side of raglan sts (A.1/A.2, marker, A.2/A.1) by making 1 YO = 8 inc on round. On next round K the YOs twisted to avoid holes. Then P the new sts on sleeves, and on front and back piece work the new sts in pattern as explained below. DECREASE TIP (applies to sleeves): Dec on each side of marker as follows: Work until 3 sts remain before marker, P 2 tog, P 2, P 2 tog = 2 sts dec. INCREASE TIP: Inc 1 st by making a YO. On next round P YOs twisted, i.e. work in the back loop of st instead of front to avoid holes. P the new sts. ---------------------------------------------------------- JUMPER: Worked top down in the round on circular needle. Work sleeve in the round on circular needle/double pointed needles. YOKE: Cast on 92-92-97-97-101 sts on circular needle size 4 mm with Karisma. Work 3 ridges in GARTER ST in the round on circular needle - see explanation above. Continue to work an elevation in GARTER ST back and forth -see explanation above, from mid back as follows (1st row = RS): Now work 5-5-7-7-9 sts, turn, work 10-10-14-14-18 sts, turn, work 15-15-19-19-23 sts, turn, work 20-20-24-24-28 sts, turn, work 25-25-29-29-33 sts, turn, work 30-30-34-34-38 sts, turn, work 35-35-39-39-43 sts, turn, work 40-40-43-43-48 sts, turn, work back to beg of round. Now K 1 round AT THE SAME TIME inc 24-24-23-23-27 sts evenly = 116-116-120-120-128 sts. P 18-18-19-19-21, insert 1st marker here (= this is now beg of round), A.2, P 2, A.2, P 2, A.1, insert 2nd marker here, A.2, P 0-0-1-1-3, A.3, P 0-0-1-1-3, A.1, insert 3rd marker here, A.2, P 2, A.2, P 2, A.1, insert 4th marker here, A.2, P 0-0-1-1-3, A.3, P 0-0-1-1-3, A.1. READ THE NEXT 2 SECTIONS BEFORE CONTINUING! REMEMBER THE KNITTING TENSION! On next round beg inc for RAGLAN – see explanation above, AT THE SAME TIME work pattern as follows: RAGLAN: Repeat inc every round 0-2-10-20-20 times in total. Then inc every other round 23-32-30-26-27 times and every 3rd round 6-0-0-0-0 times = 348-388-440-488-504 sts. PATTERN: Work pattern on body as follows (P the inc sts on sleeves): Work the first 6 sts inc in A.2, then P next 8-9-7-8-8 inc sts, work the next 6 inc sts in A.2, P the next 8-9-7-8-8 inc sts. NOTE: (Size M-L-XL-XXL): When A.3 has been worked 1 time vertically, continue with A.2 over cable and P the remaining sts from A.3 until start of body. S/M: Then inc as before on sleeve and inc inside A.1/A.2 (i.e. between A.1 and A.2, towards marker for raglan) on front and back piece 1-4 more times. P the new sts. L/XL/XXL: Continue with A.2 over the next 6 inc sts, P the next 7-8-8 inc sts, then inc as before on sleeve and inc inside A.1/A.2 (i.e. between A.1 and A.2, towards marker for raglan) on front and back piece 1-4-5 more times. P the last 1-4-5 inc sts. Piece now measures 27-28-29-30-31 cm from shoulder. Now work as follows: Slip the first 80-90-102-114-116 sts on a stitch holder for sleeve, cast on 12 new sts under sleeve, insert a blue marker in the middle of these new sts, work the next 94-104-118-130-136 sts (= front piece), slip the next 80-90-102-114-116 sts on a stitch holder for sleeve, cast on 12 new sts under sleeve, insert a blue marker in the middle of these new sts, work the remaining 94-104-118-130-136 sts on round (= back piece). NOW MEASURE THE PIECE FROM HERE. BODY: There are now 212-232-260-284-296 sts for body. Then continue pattern as follows: S/M: P 6-3, * A.2 0-1 time in width, P 7-7, A.2, P 8-9, insert a marker, A.2, P 8-9, insert a marker, A.2, P 9-9, A.2, P 9-9, A.2, insert a marker, P 8-9, A.2, insert a marker, P 8-9, A.1*, P 7-7, repeat from *-* 1 more time, P 1-4 L/XL/XXL: P 3-3-0, * A.2 1-1-2 times in width, P 4-6-5, A.2, P 7-8-8, insert a marker, A.2, P 7-8-8, insert a marker, A.2, P 7-8-8, insert a marker, A.2, P 10-11-12, A.2, P 10-11-12, A.2, insert a marker, P 7-8-8, A.2, insert a marker, P 7-8-8, A.2, insert a marker, P 7-8-8, A.1 *, P 4-6-5, repeat from *-* 1 more time, P 1-3-5. READ THE NEXT 2 SECTIONS BEFORE CONTINUING! Now dec and inc at the same time as follows: DECREASE: Dec differently as follows - READ DECREASE TIP: Dec 1 st on each side of the middle cable on front and back piece. Repeat dec every 2-2-1½-1½-1½ cm 3-3-4-4-6 more times. AT THE SAME TIME dec 1 st towards cable in every section with P sts with marker in (= 8-8-12-12-12 markers). Repeat dec every 3-2½-5-4-4 cm 2-3-1-2-2 more times. INCREASE (towards the sides): When piece measures 3 cm, inc along the cable towards the sleeve (i.e. cable from raglan) in P section towards the sides – READ INCREASE TIP! Inc 4 sts on round. Repeat inc every 1½-1½-2½-1½-1 cm 3-4-2-4-10 more times. When all dec and inc are done, 188-204-228-248-276 sts remain. When piece measures 11-12-12-13-14 cm, work pattern as follows: P 6-3-6-6-0, A.2 0-1-1-1-2 times in width, P 7-8-6-11-15, A.4 0-0-1-1-1 time in width, * A.5, A.4 *, repeat from *-* 2-2-3-3-3 more times in width, A.5 1-1-0-0-0 times in width, P 7-8-6-11-15, A.2 0-1-1-1-2 times in width, P 7-8-6-11-15, A.4 0-0-1-1-1 time in width, * A.5, A.4 *, repeat from *-* 2-2-3-3-3 more times in width, A.5 1-1-0-0-0 times in width, P 1-5-0-5-15. NOTE: Adjust the first cable in A.4 and A.5 to get a nice transition between diagrams. Continue with pattern and inc according to diagram. When A.4 and A.5 have been worked vertically and piece measures approx. 33-34-34-35-35 cm, there are 308-324-364-384-412 sts on round. Insert a marker here. NOW MEASURE THE PIECE FROM HERE. Now work rib as follows: S/M: * Work K over K and P over P until 7-11 sts remain before the blue marker in the side, P 2, K 2, P 3-4 *, repeat from *-* 1 more time and continue with K over K and P over P the rest of round. L/XL/XXL: * Work K over K and P over P until 8-14-21 sts remain before the blue marker in the side, K 2-2-2, P 3-4-3, K 0-2-2, P 0-3-3, K 0-0-2, P 0-0-3 *, repeat from *-* 1 more time and continue with K over K and P over P the rest of round. When rib has been worked for 2 cm from marker, inc by making 1 YO before first P st in every P section - remember INCREASE TIP. When rib has been worked for 5-5-6-6-6 cm, cast off with K over K and P over P. SLEEVES: Slip the 80-90-102-114-116 sts from stitch holder back on circular needle. K 1 row over all sts and cast on 12 new sts at the end of row = 92-102-114-126-128 sts. Insert a marker in the middle of the new sts (i.e. 6 sts on each side of marker). NOW MEASURE THE PIECE FROM HERE. Then work sleeve in the round on circular needle/double pointed needles. Continue the middle cable on sleeve as before but work P over cables in raglan. On 2nd round beg dec on each side of marker - READ DECREASE TIP. Repeat dec in every other round 6 more times = 78-88-100-112-114 sts. Then dec 1 st on each side of marker every 2-1½-1-1-1 cm 13-17-22-27-27 times = 52-54-56-58-60 sts. AT THE SAME TIME when piece measures 15 cm, work A.5 over cable in the middle of sleeve - adjust the first cable in A.5 to get a nice transition between diagrams. NOTE: Do not inc in A.5 on sleeve, i.e. do not work YOs in diagram. When A.5 is finished and sleeve measures 37 cm, work rib as follows from marker at beg of round: P 0-0-1-2-3, K 1-2-2-2-2, P 3, K 2, P 3, K 2, P 2, continue rib as on last row in A.5 (= 26 sts), P 2, K 2, P 3, K 2, P 3, K 1-2-2-2-2, P 0-0-1-2-3. Continue like this for 3 cm, cast off with K over K and P over P. ASSEMBLY: Sew the holes under the sleeves. |
||||||||||||||||||||||||||||
Diagram explanations |
||||||||||||||||||||||||||||
|
||||||||||||||||||||||||||||
 |
||||||||||||||||||||||||||||
 |
||||||||||||||||||||||||||||
 |
||||||||||||||||||||||||||||
Have you finished this pattern?Tag your pictures with #dropspattern #alanasweater or submit them to the #dropsfan gallery. Do you need help with this pattern?You'll find 24 tutorial videos, a Comments/Questions area and more by visiting the pattern on garnstudio.com. © 1982-2026 DROPS Design A/S. We reserve all rights. This document, including all its sub-sections, has copyrights. Read more about what you can do with our patterns at the bottom of each pattern on our site. |
||||||||||||||||||||||||||||


With over 40 years in knitting and crochet design, DROPS Design offers one of the most extensive collections of free patterns on the internet - translated to 17 languages. As of today we count 324 catalogues and 12284 patterns translated into English (UK/cm).
We work hard to bring you the best knitting and crochet have to offer, inspiration and advice as well as great quality yarns at incredible prices! Would you like to use our patterns for other than personal use? You can read what you are allowed to do in the Copyright text at the bottom of all our patterns. Happy crafting!
Post a comment to pattern DROPS 156-19
We would love to hear what you have to say about this pattern!
If you want to leave a question, please make sure you select the correct category in the form below, to speed up the answering process. Required fields are marked *.