
Popular categories
Looking for a yarn?


Comments / Questions (273)
![]() Han Essers wrote:
Han Essers wrote:
Waarom zijn de meeste patronen zodanig ontworpen dat zij van boven naar benedengebreid worden? Dit is veel moeilijker ook in het lezen van het patroon. Is er iets fout moetje meteen het hele bovenstukuithalen nog heb je een goed overzicht of de maat ook inderdaad goed is.
22.09.2017 - 17:18DROPS Design answered:
Hallo Han, Dit is hoe de ontwerpers het patroon bedacht hebben. Als de stekenverhouding klopt en je controleert de maten aan de hand van de schematekening onderaan het patroon, dan zou je uit moeten komen. Aan beide werkwijzen zitten voor een nadelen. Zo kun je, als je van boven naar beneden breit, makkelijker passen en de mouwen en panden op maat maken.
27.09.2017 - 20:43
![]() Astrid Margrethe wrote:
Astrid Margrethe wrote:
Ang vrangbord "designet jeg det selv på sidene til 3vr, 2r, 3vr, 2r, 3vr, 4r. ville ikke dele fletta på siden :) Om det er rett eller galt gjør meg ingenting, jeg synes det ble fint :D
24.08.2017 - 09:06
![]() Astrid Margrethe wrote:
Astrid Margrethe wrote:
Nå strikkes det vrbord slik: S/M: * Strikk r over r og vr over vr til det gjenstår 7-11 m før det blå merket i siden, 2 vr, 2 r, 3-4 vr *, gjenta *-* 1 gang til, og fortsett med r over r og vr over vr ut omg. strikker M - men 2 vr, 2 r, 4 vr er ikke 11 ? hvordan løses det?
07.08.2017 - 22:14DROPS Design answered:
Hej igen Astrid, er du kommet så langt i opskriften at du strikker vrbord? Jeg tror nemlig at det stemmer med r over r og vr over vr = 2 r og 2 vr hele vejen rundt. Kan du ikke prøve og så komme tilbage hvis du må strikke 3 eller 4 vrang over maskerne i siden ? Tak for hjælpen!
18.08.2017 - 14:10
![]() Astrid Margrethe wrote:
Astrid Margrethe wrote:
Også lurer jeg på om de økningene der også skal før og etter raglanmerket? (øk, A.1, A.2, øk) eller er det her raglanflettene deler seg? (A1, øk, øk, A2) Håper på ett fint svar, hilsen nybegynner
29.07.2017 - 12:43DROPS Design answered:
Hej igen Astrid, økningerne her skal strikkes som tidligere, så har du ret antal masker inden du længere nede i opskriften skal dele arbejdet. God fornøjelse!
18.08.2017 - 11:35
![]() Astrid Margrethe wrote:
Astrid Margrethe wrote:
S/M: Videre økes det som før på ermet og det økes innenfor A.1/A.2 (dvs mellom A.1 og A.2, mot merket til raglan) på for- og bakstk 1-4 ganger til. De nye m strikkes vr. hei, er dette økninger etter de 32 økningene på bærestykket eller betyr 1-4 ganger de 2 økningene som gjenstår etter A.2, 9 vr , A.2, 9vr (=30) ? (str m)
29.07.2017 - 12:43DROPS Design answered:
Hej, det hører til forklaringen på mønsteret. Du skal have antal masker som står sidst i RAGLAN forklaringen. Da vil det stemmer når du deler arbejdet og strikker BOLEN færdig for sig. God fornøjelse!
18.08.2017 - 11:29
![]() Angie wrote:
Angie wrote:
Please explain to me where to increase after I have increased every third row six times please.
29.07.2017 - 02:44DROPS Design answered:
Dear Angie, after you have inc for raglan in size S every 2nd round 23 times and every 3rd round 3 times, yoke is done, and piece should measure 27 cm from shoulder, work then next row as explained dividing body and sleeves. Happy knitting!
31.07.2017 - 09:47
![]() Angie wrote:
Angie wrote:
When you get to the increase every third row six times part, do you purl those increases?
27.07.2017 - 04:24DROPS Design answered:
Dear Angie, if your question refers to the increases on the body for the raglan shaping, then the increased stitches are purled through the back (twisted, to avoid holes). Happy knitting!
27.07.2017 - 09:13
![]() Agnès wrote:
Agnès wrote:
Merci :-) En fait cela ne concerne que la dernière taille XXL qui nécessite de tricoter 2 fois A2, donc sur douze mailles.Merci encore!
01.06.2017 - 21:00DROPS Design answered:
Vous avez raison. Bon tricot!
01.06.2017 - 22:38
![]() Agnès wrote:
Agnès wrote:
Merci de votre réponse, mais ce qui me gène, c'est "en largeur". Que dois-je comprendre? Comment tricote-t-on A2 "en largeur"?
01.06.2017 - 11:09DROPS Design answered:
Bonjour Agnes, cela veut dire un a cote de l'autre, sur le meme rang-tour. Bon tricot!
01.06.2017 - 11:16
![]() Agnès wrote:
Agnès wrote:
Bonjour, pouvez vous m'expliquer :"Continuer ensuite en point fantaisie ainsi: L/XL/XXL: 3-3-0 m env, *1-1-2 fois A.2 en largeur," ? Je ne comprends pas ! Que voulez-vous dire par "en largeur"? Merci de m'éclairer, je pourrai ainsi me lancer dans la confection de ce pull que je trouve magnifique!
31.05.2017 - 19:40DROPS Design answered:
Bonjour Agnès, vous tricotez A.2 1 seule fois en largeur = sur les 6 m suivantes en taille L et XL et vous tricotez 2 fois A.2 en largeur = sur les 12 m suivantes en taille XXL. Bon tricot!
01.06.2017 - 08:46
|
||||||||||||||||||||||||||||
Alana#alanasweater |
||||||||||||||||||||||||||||
 |
 |
|||||||||||||||||||||||||||
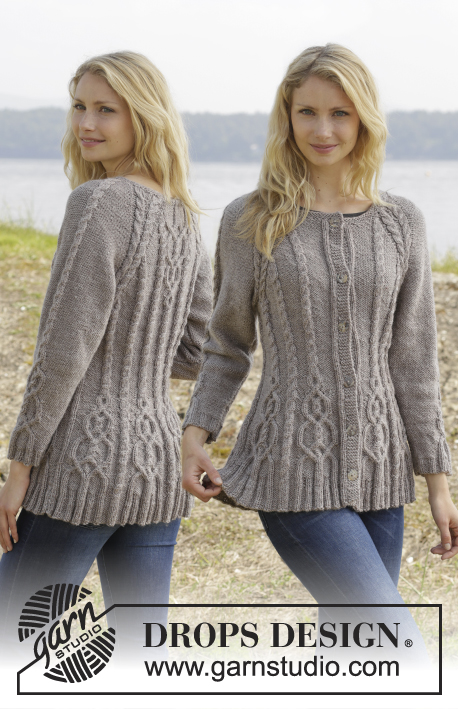
Knitted DROPS jumper with cables and raglan, worked top down in ”Karisma”. Size S-XXL
DROPS 156-19 |
||||||||||||||||||||||||||||
|
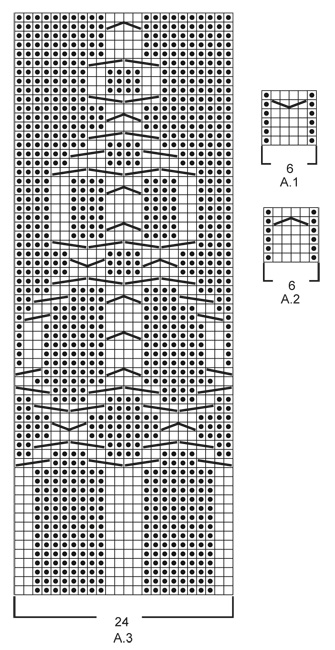
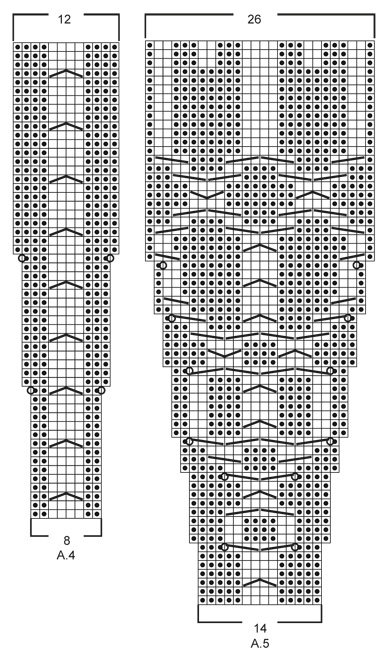
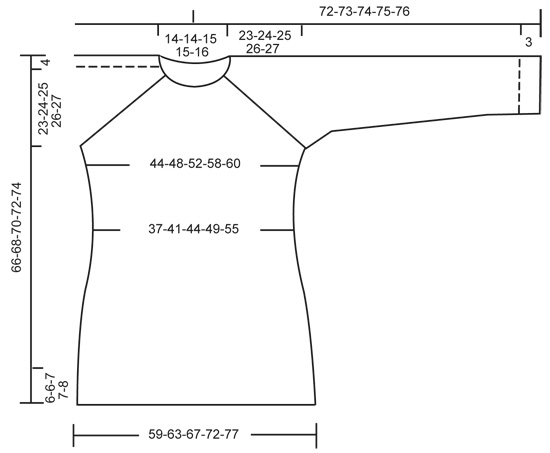
GARTER ST (in the round on circular needle): * K 1 round and P 1 round *, repeat from *-*. 1 ridge = 2 rounds. GARTER ST (back and forth on needle): K all rows. 1 ridge = 2 rows K. PATTERN: See diagrams A.1 - A.5. The diagrams show all rows in pattern seen from RS. RAGLAN: Inc on each side of raglan sts (A.1/A.2, marker, A.2/A.1) by making 1 YO = 8 inc on round. On next round K the YOs twisted to avoid holes. Then P the new sts on sleeves, and on front and back piece work the new sts in pattern as explained below. DECREASE TIP (applies to sleeves): Dec on each side of marker as follows: Work until 3 sts remain before marker, P 2 tog, P 2, P 2 tog = 2 sts dec. INCREASE TIP: Inc 1 st by making a YO. On next round P YOs twisted, i.e. work in the back loop of st instead of front to avoid holes. P the new sts. ---------------------------------------------------------- JUMPER: Worked top down in the round on circular needle. Work sleeve in the round on circular needle/double pointed needles. YOKE: Cast on 92-92-97-97-101 sts on circular needle size 4 mm with Karisma. Work 3 ridges in GARTER ST in the round on circular needle - see explanation above. Continue to work an elevation in GARTER ST back and forth -see explanation above, from mid back as follows (1st row = RS): Now work 5-5-7-7-9 sts, turn, work 10-10-14-14-18 sts, turn, work 15-15-19-19-23 sts, turn, work 20-20-24-24-28 sts, turn, work 25-25-29-29-33 sts, turn, work 30-30-34-34-38 sts, turn, work 35-35-39-39-43 sts, turn, work 40-40-43-43-48 sts, turn, work back to beg of round. Now K 1 round AT THE SAME TIME inc 24-24-23-23-27 sts evenly = 116-116-120-120-128 sts. P 18-18-19-19-21, insert 1st marker here (= this is now beg of round), A.2, P 2, A.2, P 2, A.1, insert 2nd marker here, A.2, P 0-0-1-1-3, A.3, P 0-0-1-1-3, A.1, insert 3rd marker here, A.2, P 2, A.2, P 2, A.1, insert 4th marker here, A.2, P 0-0-1-1-3, A.3, P 0-0-1-1-3, A.1. READ THE NEXT 2 SECTIONS BEFORE CONTINUING! REMEMBER THE KNITTING TENSION! On next round beg inc for RAGLAN – see explanation above, AT THE SAME TIME work pattern as follows: RAGLAN: Repeat inc every round 0-2-10-20-20 times in total. Then inc every other round 23-32-30-26-27 times and every 3rd round 6-0-0-0-0 times = 348-388-440-488-504 sts. PATTERN: Work pattern on body as follows (P the inc sts on sleeves): Work the first 6 sts inc in A.2, then P next 8-9-7-8-8 inc sts, work the next 6 inc sts in A.2, P the next 8-9-7-8-8 inc sts. NOTE: (Size M-L-XL-XXL): When A.3 has been worked 1 time vertically, continue with A.2 over cable and P the remaining sts from A.3 until start of body. S/M: Then inc as before on sleeve and inc inside A.1/A.2 (i.e. between A.1 and A.2, towards marker for raglan) on front and back piece 1-4 more times. P the new sts. L/XL/XXL: Continue with A.2 over the next 6 inc sts, P the next 7-8-8 inc sts, then inc as before on sleeve and inc inside A.1/A.2 (i.e. between A.1 and A.2, towards marker for raglan) on front and back piece 1-4-5 more times. P the last 1-4-5 inc sts. Piece now measures 27-28-29-30-31 cm from shoulder. Now work as follows: Slip the first 80-90-102-114-116 sts on a stitch holder for sleeve, cast on 12 new sts under sleeve, insert a blue marker in the middle of these new sts, work the next 94-104-118-130-136 sts (= front piece), slip the next 80-90-102-114-116 sts on a stitch holder for sleeve, cast on 12 new sts under sleeve, insert a blue marker in the middle of these new sts, work the remaining 94-104-118-130-136 sts on round (= back piece). NOW MEASURE THE PIECE FROM HERE. BODY: There are now 212-232-260-284-296 sts for body. Then continue pattern as follows: S/M: P 6-3, * A.2 0-1 time in width, P 7-7, A.2, P 8-9, insert a marker, A.2, P 8-9, insert a marker, A.2, P 9-9, A.2, P 9-9, A.2, insert a marker, P 8-9, A.2, insert a marker, P 8-9, A.1*, P 7-7, repeat from *-* 1 more time, P 1-4 L/XL/XXL: P 3-3-0, * A.2 1-1-2 times in width, P 4-6-5, A.2, P 7-8-8, insert a marker, A.2, P 7-8-8, insert a marker, A.2, P 7-8-8, insert a marker, A.2, P 10-11-12, A.2, P 10-11-12, A.2, insert a marker, P 7-8-8, A.2, insert a marker, P 7-8-8, A.2, insert a marker, P 7-8-8, A.1 *, P 4-6-5, repeat from *-* 1 more time, P 1-3-5. READ THE NEXT 2 SECTIONS BEFORE CONTINUING! Now dec and inc at the same time as follows: DECREASE: Dec differently as follows - READ DECREASE TIP: Dec 1 st on each side of the middle cable on front and back piece. Repeat dec every 2-2-1½-1½-1½ cm 3-3-4-4-6 more times. AT THE SAME TIME dec 1 st towards cable in every section with P sts with marker in (= 8-8-12-12-12 markers). Repeat dec every 3-2½-5-4-4 cm 2-3-1-2-2 more times. INCREASE (towards the sides): When piece measures 3 cm, inc along the cable towards the sleeve (i.e. cable from raglan) in P section towards the sides – READ INCREASE TIP! Inc 4 sts on round. Repeat inc every 1½-1½-2½-1½-1 cm 3-4-2-4-10 more times. When all dec and inc are done, 188-204-228-248-276 sts remain. When piece measures 11-12-12-13-14 cm, work pattern as follows: P 6-3-6-6-0, A.2 0-1-1-1-2 times in width, P 7-8-6-11-15, A.4 0-0-1-1-1 time in width, * A.5, A.4 *, repeat from *-* 2-2-3-3-3 more times in width, A.5 1-1-0-0-0 times in width, P 7-8-6-11-15, A.2 0-1-1-1-2 times in width, P 7-8-6-11-15, A.4 0-0-1-1-1 time in width, * A.5, A.4 *, repeat from *-* 2-2-3-3-3 more times in width, A.5 1-1-0-0-0 times in width, P 1-5-0-5-15. NOTE: Adjust the first cable in A.4 and A.5 to get a nice transition between diagrams. Continue with pattern and inc according to diagram. When A.4 and A.5 have been worked vertically and piece measures approx. 33-34-34-35-35 cm, there are 308-324-364-384-412 sts on round. Insert a marker here. NOW MEASURE THE PIECE FROM HERE. Now work rib as follows: S/M: * Work K over K and P over P until 7-11 sts remain before the blue marker in the side, P 2, K 2, P 3-4 *, repeat from *-* 1 more time and continue with K over K and P over P the rest of round. L/XL/XXL: * Work K over K and P over P until 8-14-21 sts remain before the blue marker in the side, K 2-2-2, P 3-4-3, K 0-2-2, P 0-3-3, K 0-0-2, P 0-0-3 *, repeat from *-* 1 more time and continue with K over K and P over P the rest of round. When rib has been worked for 2 cm from marker, inc by making 1 YO before first P st in every P section - remember INCREASE TIP. When rib has been worked for 5-5-6-6-6 cm, cast off with K over K and P over P. SLEEVES: Slip the 80-90-102-114-116 sts from stitch holder back on circular needle. K 1 row over all sts and cast on 12 new sts at the end of row = 92-102-114-126-128 sts. Insert a marker in the middle of the new sts (i.e. 6 sts on each side of marker). NOW MEASURE THE PIECE FROM HERE. Then work sleeve in the round on circular needle/double pointed needles. Continue the middle cable on sleeve as before but work P over cables in raglan. On 2nd round beg dec on each side of marker - READ DECREASE TIP. Repeat dec in every other round 6 more times = 78-88-100-112-114 sts. Then dec 1 st on each side of marker every 2-1½-1-1-1 cm 13-17-22-27-27 times = 52-54-56-58-60 sts. AT THE SAME TIME when piece measures 15 cm, work A.5 over cable in the middle of sleeve - adjust the first cable in A.5 to get a nice transition between diagrams. NOTE: Do not inc in A.5 on sleeve, i.e. do not work YOs in diagram. When A.5 is finished and sleeve measures 37 cm, work rib as follows from marker at beg of round: P 0-0-1-2-3, K 1-2-2-2-2, P 3, K 2, P 3, K 2, P 2, continue rib as on last row in A.5 (= 26 sts), P 2, K 2, P 3, K 2, P 3, K 1-2-2-2-2, P 0-0-1-2-3. Continue like this for 3 cm, cast off with K over K and P over P. ASSEMBLY: Sew the holes under the sleeves. |
||||||||||||||||||||||||||||
Diagram explanations |
||||||||||||||||||||||||||||
|
||||||||||||||||||||||||||||
 |
||||||||||||||||||||||||||||
 |
||||||||||||||||||||||||||||
 |
||||||||||||||||||||||||||||
Have you finished this pattern?Tag your pictures with #dropspattern #alanasweater or submit them to the #dropsfan gallery. Do you need help with this pattern?You'll find 24 tutorial videos, a Comments/Questions area and more by visiting the pattern on garnstudio.com. © 1982-2026 DROPS Design A/S. We reserve all rights. This document, including all its sub-sections, has copyrights. Read more about what you can do with our patterns at the bottom of each pattern on our site. |
||||||||||||||||||||||||||||


With over 40 years in knitting and crochet design, DROPS Design offers one of the most extensive collections of free patterns on the internet - translated to 17 languages. As of today we count 324 catalogues and 12284 patterns translated into English (UK/cm).
We work hard to bring you the best knitting and crochet have to offer, inspiration and advice as well as great quality yarns at incredible prices! Would you like to use our patterns for other than personal use? You can read what you are allowed to do in the Copyright text at the bottom of all our patterns. Happy crafting!
Post a comment to pattern DROPS 156-19
We would love to hear what you have to say about this pattern!
If you want to leave a question, please make sure you select the correct category in the form below, to speed up the answering process. Required fields are marked *.