
Popular categories
Looking for a yarn?


Comments / Questions (273)
![]() Stefania Marina Alati wrote:
Stefania Marina Alati wrote:
Ho bisogno di un chiarimento: sto lavorando una S e sono all'inizio del corpo. Ho 212 maglie. Se lavoro per il corpo 6 rovesci, *7 rovesci, A2, 8 rov, A2, 8 rov, A2, 9 rov, A2, 9 rov, A2, 8 rov, A1, *7 rov, e poi ripeto da * a * ed alla fine ne aggiungo uno, la prima treccia A2 non è in continuità con la prima treccia A2 dopo il raglan delle maniche ma mi risulta spostata di 7 maglie? E' possibile? Cosa sbaglio? Grazie mille
06.03.2018 - 13:13DROPS Design answered:
Buongiorno Stefania. Nella sequenza indicata mancano un diagramma A2 e 8 rov prima del diagramma A1. Verifichi che il problema sia legato a questo. La sequenza corretta è la seguente: 6 rovesci, *7 rovesci, A2, 8 rov, A2, 8 rov, A2, 9 rov, A2, 9 rov, A2, 8 rov, A2, 8 rov, A1, *7 rov. Buon lavoro!
06.03.2018 - 14:37
![]() Leah wrote:
Leah wrote:
For size xl, to line the cables from the yoke up with the ones in the pattern directions - 5 to one side of center and 4 to other side in directions. Also, coming out of the yoke, really 12 stitches between last pattern and the raglan cable and this is ignored in directions - seem to be written evenly distributed. Is there an update to the instructions?
02.03.2018 - 19:33DROPS Design answered:
Dear Leah, when increasing for raglan you will have 3 more repeats of A.2 on each side of front/back piece and the last 12 sts increased are purled. Happy knitting!
05.03.2018 - 08:12
![]() Margit wrote:
Margit wrote:
Jeg er kommet til hvor jeg skal lave udtagning men har svært ved at læse om der skal tages ud før og efter mærkerne. Hvad er det korrekte?
20.02.2018 - 15:44
![]() COUDOR Lydie wrote:
COUDOR Lydie wrote:
Merci de me confirmer ce qui suit : pour taille L, faire 6 augm en A2 (12 m) puisque 1 de chq côté du marqueur) qui sont à tricoter à l'end ou à l'env ? ensuite 7 augm env (14 m puisque 1 de chq côté du marqueur) puis 6 augm en A2 (12 m) qui sont à tricoter à l'end ou à l'env ? et enfin 7 augm env (14 m) soit total 52 m. Pour le paragraphe suivant, je ne comprends rien. J'espère que vous allez réussir à m'aider ? Très cordialement Lydie
12.02.2018 - 18:42DROPS Design answered:
Bonjour Mme Coudor, les augmentations du devant et du dos (après le marqueur et avant le marqueur) vont se tricoter progressivement ainsi: A.2 (= 6 m), 7 m env, (A.2), 7 m env, (A.2), 7 m env, A.2, 7 m env, 1 m env = 40 augmentations (10 x tous les tours et 30 fois tous les 2 tours) - En même temps, quand A.3 est terminé, tricotez A.2 au-dessus de la torsade et les autres mailles de A.3 à l'envers. Les augmentations des manches vont toujours se tricoter à l'envers. Bon tricot!
13.02.2018 - 10:25
![]() COUDOR Lydie wrote:
COUDOR Lydie wrote:
Bonjour, je me suis lancée à faire le modèle 156-19 taille L et je ne saisis pas votre explication POINT FANTAISIE au bas de votre page 2. Auriez-vous la gentillesse de m'apporter votre aide ? Dans l'attente, très cordialement . Lydie
10.02.2018 - 16:56DROPS Design answered:
Bonjour Mme Coudor, cette partie explique comment tricoter les augmentations du raglan: d'abord en A.2, puis à l'env, puis A.2, puis à l'env, puis différemment en fonction de la taille. Bon tricot!
12.02.2018 - 08:48
![]() Lorraine wrote:
Lorraine wrote:
I have been increasing on the body part up to row 33 onA3, and now have 14 stitches between the raglan and the cable before A3. There appears to be a new cable starting next to the raglan about here. Have I increased too many stitches? How do I introduce the new cable
06.02.2018 - 15:15DROPS Design answered:
Dear Lorraine, you will find under the written pattern (section starting with READ THE NEXT 2 SECTIONS BEFORE CONTINUING! - PATTERN) how to knit the increase sts for raglan for each size. Happy knitting!
06.02.2018 - 16:02
![]() Lorraine wrote:
Lorraine wrote:
What is meant by "REMEBER THE KNITTING TENSION" I thought it was what one did before starting the garment, does it change throughout the garment?
30.01.2018 - 12:17DROPS Design answered:
Dear Lorraine, that's it: you should keep the same tension you get when working your swatch to check your gauge, ie do not knit tighter nor looser so that you give correct measurements. Happy knitting!
30.01.2018 - 13:56
![]() Lorraine wrote:
Lorraine wrote:
What is a blue marker, is it a special device?
30.01.2018 - 12:13DROPS Design answered:
Dear Lorraine, you can use any other colour, that's just to make a difference between other markers already inserted. Happy knitting!
30.01.2018 - 13:55
![]() Lorraine wrote:
Lorraine wrote:
Re pattern Alana 156-19. How many purl stitches are there between the 2 cables of the raglan, one or two ?
30.01.2018 - 12:11DROPS Design answered:
Dear Lorraine, you are working A.1/A.2, marker, A.2/A.1, there is P1 at the end + at the beg of the diagrams, so that you will have P1 from each diagram = P2. Happy knitting!
30.01.2018 - 13:54
![]() Mary wrote:
Mary wrote:
Ich stricke in Größe M. An der Passe müsste ich insgesamt 34 mal zunehmen. An Vorder- und Rücken teil entstehen zusätzliche A2 Zöpfe. Die ersten 6 zugenommen Maschen werden zu A2, die nächsten 9 Maschen links stricken, dann wieder 6 für A2 und nochmals 9 links. Soweit habe ich es auch verstanden. Macht 30 Maschen zugenommen. Aber wie werden die restlichen 4 zusätzlichen Maschen gestrickt? Auch einfach links oder wird noch ein neuer Zopf begonnen?
21.12.2017 - 19:01DROPS Design answered:
Liebe Mary, die 4 letzten Zunahmen werden links gestrickt. Viel Spaß beim stricken!
22.12.2017 - 07:53
|
||||||||||||||||||||||||||||
Alana#alanasweater |
||||||||||||||||||||||||||||
 |
 |
|||||||||||||||||||||||||||
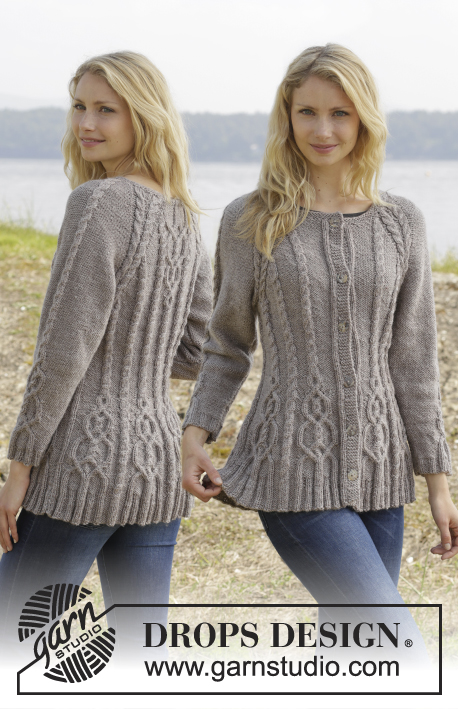
Knitted DROPS jumper with cables and raglan, worked top down in ”Karisma”. Size S-XXL
DROPS 156-19 |
||||||||||||||||||||||||||||
|
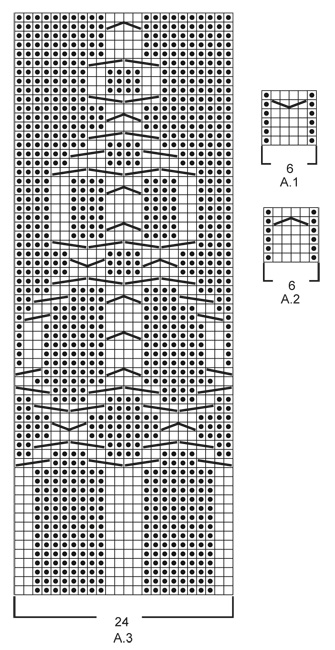
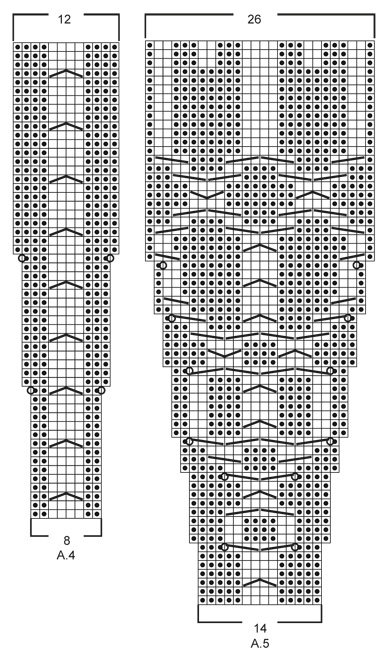
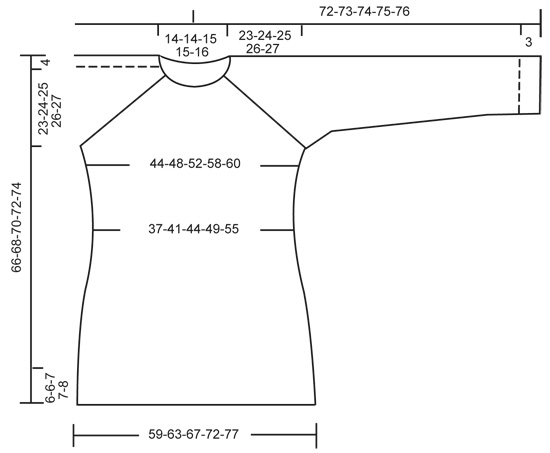
GARTER ST (in the round on circular needle): * K 1 round and P 1 round *, repeat from *-*. 1 ridge = 2 rounds. GARTER ST (back and forth on needle): K all rows. 1 ridge = 2 rows K. PATTERN: See diagrams A.1 - A.5. The diagrams show all rows in pattern seen from RS. RAGLAN: Inc on each side of raglan sts (A.1/A.2, marker, A.2/A.1) by making 1 YO = 8 inc on round. On next round K the YOs twisted to avoid holes. Then P the new sts on sleeves, and on front and back piece work the new sts in pattern as explained below. DECREASE TIP (applies to sleeves): Dec on each side of marker as follows: Work until 3 sts remain before marker, P 2 tog, P 2, P 2 tog = 2 sts dec. INCREASE TIP: Inc 1 st by making a YO. On next round P YOs twisted, i.e. work in the back loop of st instead of front to avoid holes. P the new sts. ---------------------------------------------------------- JUMPER: Worked top down in the round on circular needle. Work sleeve in the round on circular needle/double pointed needles. YOKE: Cast on 92-92-97-97-101 sts on circular needle size 4 mm with Karisma. Work 3 ridges in GARTER ST in the round on circular needle - see explanation above. Continue to work an elevation in GARTER ST back and forth -see explanation above, from mid back as follows (1st row = RS): Now work 5-5-7-7-9 sts, turn, work 10-10-14-14-18 sts, turn, work 15-15-19-19-23 sts, turn, work 20-20-24-24-28 sts, turn, work 25-25-29-29-33 sts, turn, work 30-30-34-34-38 sts, turn, work 35-35-39-39-43 sts, turn, work 40-40-43-43-48 sts, turn, work back to beg of round. Now K 1 round AT THE SAME TIME inc 24-24-23-23-27 sts evenly = 116-116-120-120-128 sts. P 18-18-19-19-21, insert 1st marker here (= this is now beg of round), A.2, P 2, A.2, P 2, A.1, insert 2nd marker here, A.2, P 0-0-1-1-3, A.3, P 0-0-1-1-3, A.1, insert 3rd marker here, A.2, P 2, A.2, P 2, A.1, insert 4th marker here, A.2, P 0-0-1-1-3, A.3, P 0-0-1-1-3, A.1. READ THE NEXT 2 SECTIONS BEFORE CONTINUING! REMEMBER THE KNITTING TENSION! On next round beg inc for RAGLAN – see explanation above, AT THE SAME TIME work pattern as follows: RAGLAN: Repeat inc every round 0-2-10-20-20 times in total. Then inc every other round 23-32-30-26-27 times and every 3rd round 6-0-0-0-0 times = 348-388-440-488-504 sts. PATTERN: Work pattern on body as follows (P the inc sts on sleeves): Work the first 6 sts inc in A.2, then P next 8-9-7-8-8 inc sts, work the next 6 inc sts in A.2, P the next 8-9-7-8-8 inc sts. NOTE: (Size M-L-XL-XXL): When A.3 has been worked 1 time vertically, continue with A.2 over cable and P the remaining sts from A.3 until start of body. S/M: Then inc as before on sleeve and inc inside A.1/A.2 (i.e. between A.1 and A.2, towards marker for raglan) on front and back piece 1-4 more times. P the new sts. L/XL/XXL: Continue with A.2 over the next 6 inc sts, P the next 7-8-8 inc sts, then inc as before on sleeve and inc inside A.1/A.2 (i.e. between A.1 and A.2, towards marker for raglan) on front and back piece 1-4-5 more times. P the last 1-4-5 inc sts. Piece now measures 27-28-29-30-31 cm from shoulder. Now work as follows: Slip the first 80-90-102-114-116 sts on a stitch holder for sleeve, cast on 12 new sts under sleeve, insert a blue marker in the middle of these new sts, work the next 94-104-118-130-136 sts (= front piece), slip the next 80-90-102-114-116 sts on a stitch holder for sleeve, cast on 12 new sts under sleeve, insert a blue marker in the middle of these new sts, work the remaining 94-104-118-130-136 sts on round (= back piece). NOW MEASURE THE PIECE FROM HERE. BODY: There are now 212-232-260-284-296 sts for body. Then continue pattern as follows: S/M: P 6-3, * A.2 0-1 time in width, P 7-7, A.2, P 8-9, insert a marker, A.2, P 8-9, insert a marker, A.2, P 9-9, A.2, P 9-9, A.2, insert a marker, P 8-9, A.2, insert a marker, P 8-9, A.1*, P 7-7, repeat from *-* 1 more time, P 1-4 L/XL/XXL: P 3-3-0, * A.2 1-1-2 times in width, P 4-6-5, A.2, P 7-8-8, insert a marker, A.2, P 7-8-8, insert a marker, A.2, P 7-8-8, insert a marker, A.2, P 10-11-12, A.2, P 10-11-12, A.2, insert a marker, P 7-8-8, A.2, insert a marker, P 7-8-8, A.2, insert a marker, P 7-8-8, A.1 *, P 4-6-5, repeat from *-* 1 more time, P 1-3-5. READ THE NEXT 2 SECTIONS BEFORE CONTINUING! Now dec and inc at the same time as follows: DECREASE: Dec differently as follows - READ DECREASE TIP: Dec 1 st on each side of the middle cable on front and back piece. Repeat dec every 2-2-1½-1½-1½ cm 3-3-4-4-6 more times. AT THE SAME TIME dec 1 st towards cable in every section with P sts with marker in (= 8-8-12-12-12 markers). Repeat dec every 3-2½-5-4-4 cm 2-3-1-2-2 more times. INCREASE (towards the sides): When piece measures 3 cm, inc along the cable towards the sleeve (i.e. cable from raglan) in P section towards the sides – READ INCREASE TIP! Inc 4 sts on round. Repeat inc every 1½-1½-2½-1½-1 cm 3-4-2-4-10 more times. When all dec and inc are done, 188-204-228-248-276 sts remain. When piece measures 11-12-12-13-14 cm, work pattern as follows: P 6-3-6-6-0, A.2 0-1-1-1-2 times in width, P 7-8-6-11-15, A.4 0-0-1-1-1 time in width, * A.5, A.4 *, repeat from *-* 2-2-3-3-3 more times in width, A.5 1-1-0-0-0 times in width, P 7-8-6-11-15, A.2 0-1-1-1-2 times in width, P 7-8-6-11-15, A.4 0-0-1-1-1 time in width, * A.5, A.4 *, repeat from *-* 2-2-3-3-3 more times in width, A.5 1-1-0-0-0 times in width, P 1-5-0-5-15. NOTE: Adjust the first cable in A.4 and A.5 to get a nice transition between diagrams. Continue with pattern and inc according to diagram. When A.4 and A.5 have been worked vertically and piece measures approx. 33-34-34-35-35 cm, there are 308-324-364-384-412 sts on round. Insert a marker here. NOW MEASURE THE PIECE FROM HERE. Now work rib as follows: S/M: * Work K over K and P over P until 7-11 sts remain before the blue marker in the side, P 2, K 2, P 3-4 *, repeat from *-* 1 more time and continue with K over K and P over P the rest of round. L/XL/XXL: * Work K over K and P over P until 8-14-21 sts remain before the blue marker in the side, K 2-2-2, P 3-4-3, K 0-2-2, P 0-3-3, K 0-0-2, P 0-0-3 *, repeat from *-* 1 more time and continue with K over K and P over P the rest of round. When rib has been worked for 2 cm from marker, inc by making 1 YO before first P st in every P section - remember INCREASE TIP. When rib has been worked for 5-5-6-6-6 cm, cast off with K over K and P over P. SLEEVES: Slip the 80-90-102-114-116 sts from stitch holder back on circular needle. K 1 row over all sts and cast on 12 new sts at the end of row = 92-102-114-126-128 sts. Insert a marker in the middle of the new sts (i.e. 6 sts on each side of marker). NOW MEASURE THE PIECE FROM HERE. Then work sleeve in the round on circular needle/double pointed needles. Continue the middle cable on sleeve as before but work P over cables in raglan. On 2nd round beg dec on each side of marker - READ DECREASE TIP. Repeat dec in every other round 6 more times = 78-88-100-112-114 sts. Then dec 1 st on each side of marker every 2-1½-1-1-1 cm 13-17-22-27-27 times = 52-54-56-58-60 sts. AT THE SAME TIME when piece measures 15 cm, work A.5 over cable in the middle of sleeve - adjust the first cable in A.5 to get a nice transition between diagrams. NOTE: Do not inc in A.5 on sleeve, i.e. do not work YOs in diagram. When A.5 is finished and sleeve measures 37 cm, work rib as follows from marker at beg of round: P 0-0-1-2-3, K 1-2-2-2-2, P 3, K 2, P 3, K 2, P 2, continue rib as on last row in A.5 (= 26 sts), P 2, K 2, P 3, K 2, P 3, K 1-2-2-2-2, P 0-0-1-2-3. Continue like this for 3 cm, cast off with K over K and P over P. ASSEMBLY: Sew the holes under the sleeves. |
||||||||||||||||||||||||||||
Diagram explanations |
||||||||||||||||||||||||||||
|
||||||||||||||||||||||||||||
 |
||||||||||||||||||||||||||||
 |
||||||||||||||||||||||||||||
 |
||||||||||||||||||||||||||||
Have you finished this pattern?Tag your pictures with #dropspattern #alanasweater or submit them to the #dropsfan gallery. Do you need help with this pattern?You'll find 24 tutorial videos, a Comments/Questions area and more by visiting the pattern on garnstudio.com. © 1982-2026 DROPS Design A/S. We reserve all rights. This document, including all its sub-sections, has copyrights. Read more about what you can do with our patterns at the bottom of each pattern on our site. |
||||||||||||||||||||||||||||


With over 40 years in knitting and crochet design, DROPS Design offers one of the most extensive collections of free patterns on the internet - translated to 17 languages. As of today we count 324 catalogues and 12284 patterns translated into English (UK/cm).
We work hard to bring you the best knitting and crochet have to offer, inspiration and advice as well as great quality yarns at incredible prices! Would you like to use our patterns for other than personal use? You can read what you are allowed to do in the Copyright text at the bottom of all our patterns. Happy crafting!
Post a comment to pattern DROPS 156-19
We would love to hear what you have to say about this pattern!
If you want to leave a question, please make sure you select the correct category in the form below, to speed up the answering process. Required fields are marked *.