
Popular categories
Looking for a yarn?


Comments / Questions (273)
![]() Ina Groenier wrote:
Ina Groenier wrote:
Ik begrijp het begin niet met de ronding sla je die later naar binnen ofzo
11.03.2021 - 16:29DROPS Design answered:
Dag Ina,
Nee, deze 'ronding' is eigenlijk een verhoging op het achterpand in de vorm van verkorte toeren. Als je heen en weer breit zoals beschreven, wordt het achterpand ietsje hoger dan het voorpand.
18.03.2021 - 11:42
![]() Marie-Astrid wrote:
Marie-Astrid wrote:
Voila j'ai tricoter tout le raglan je dois poser les marqueurs mais voilà a partir de où dois je compter du dessous de la manche? Simplifier vos explications car je viens de lire 20 fois vos explications et je n'est toujours pas compris et je ne veux pas abandonnée modèle 156-19
01.02.2021 - 17:10DROPS Design answered:
Bonjour Marie-Astrid, après la division des manches, les tours commencent comme avant, sur le côté, avant les nouvelles mailles montées sur le côté. Tricotez à l'envers et les torsades comme avant. Bon tricot!
05.02.2021 - 14:25
![]() Ann wrote:
Ann wrote:
Hallo, Ik zou graag deze trui willen breien in maar M. Ik wil de trui echter iets verlengen zodat de onderste rand ongeveer 20 cm boven de knie uitkomt; het wordt dan meer een jurk-model. Hoeveel extra garen zou ik dan nodig hebben?
02.01.2021 - 10:41DROPS Design answered:
Dag Ann,
Het hangt o.a. van je maat af. Je zou bijv. 6 extra bollen kunnen bestellen. Vraag je verkooppunt welke mogelijkheden er zijn m.b.t. het terug sturen van overgebleven bollen, zodat je evt. wat extra kunt bestellen.
10.01.2021 - 12:31
![]() Lisa wrote:
Lisa wrote:
I’m a long time knitter, but really could not understand this pattern at all. I looked at the notes in Ravelry, and everyone says the markers are in the wrong place,. There are a lot of suggested corrections within Ravelry, but overall, it is way too much work. I will be abandoning this one and knitting something that is written properly, tech edited, and test knit. This one obviously has not been. It would be impossible to get what’s shown in the photos with the markers placed as written.
01.01.2021 - 05:38
![]() Ann-Sofie Bergh wrote:
Ann-Sofie Bergh wrote:
Det verkar ha blivit fel i "Diagram förklaring" vid översättningen till svenska. Det 3:e diagrammet beskrivs som "= sätt 2 m på hj-st bakom arb, 2 rm, 2 rm från hj-st" men i den norska originalbeskrivningen står det att det ska vara 2 am från hj-st.
31.10.2020 - 17:41DROPS Design answered:
Hej Ann-Sofie. Tack för info, detta har nu rättats! Mvh DROPS Design
03.11.2020 - 10:29
![]() Marianne wrote:
Marianne wrote:
Nu er jeg nået til efter ærmegab ,og kan igen ikke få et til at gå op. Strikker medium. Man skal tage ind på hver side af midter snonig 3 gange =12 masker Dernæst ved markering 8 stk. 3 gange=24 Så Skal man tage ud 4×4=16 232-12-24+16 =212. Så hvis man ikke tager ud mere end 2 gange i stedet for 4=204 Herfter Noget passer ikke. Og har 1 maske for meget pr mønster til at passe sammen med når mønster 4 og 5 skal i brug
19.10.2020 - 11:33DROPS Design answered:
Hej Marianne, det er svært at regne ud hvor det er gået galt... kan du have taget ind en gang for lidt, eller taget ud en gang for meget? Du er nødt til at have 204 masker inden du fortsætter, ellers får du svært ved at få mønsteret til at passe... Held og lykke :)
22.10.2020 - 13:52
![]() Marianne wrote:
Marianne wrote:
Hej. Jeg har opdelt mønster som i skriver det. Men det giver ingen mening, da jeg vil have 3 snoninger på den ene side og 1 på den anden side. Er i sikker på at raglan ikke skal starte i de 2 vrang . Vil gerne vide præcis hvordan 1 Pind efter opdelingen ser ud. For den måde i skriver det på, kan jeg ikke forstå noget af. Venter i spænding
11.10.2020 - 18:30
![]() Judith Jeffery wrote:
Judith Jeffery wrote:
I have Just completed the row where the markers have been placed, and then knitted the first increase row adding 23 stitches evenly spaced. I’m having so much difficulty in understanding this pattern that I’m considering not finishing it! Are the raglan sections after the 1st and 4th markers?And does this mean increasing by 23 stitches on every row x 10 etc? I’m in the process of writing the pattern out in full so hopefully I’ll be less confused!
10.06.2020 - 11:52DROPS Design answered:
Dear Mrs Jeffery, you will increase on either side of A.1/A.2 which are making the raglan lines, markers are between A.1/A.2, you then increase before this A.1 and after this A.2 - there are 4 markers in total. In size S you increase first 23 times on every other round then 6 times on every 3rd round - increase 8 sts on every round and work them on body as explained under PATTERN + S/M. Happy knitting!
10.06.2020 - 12:40
![]() Natalia Marino wrote:
Natalia Marino wrote:
It says 3 different length of needles are needed (40, 60 and 80 cm), but it doesn't tell when to use each?
10.04.2020 - 03:52DROPS Design answered:
Dear Natalia, the length of the needles depends on the number of stitches. You use the shorter ones when you have less stitches so that it's more confortable to work.
12.04.2020 - 19:29
![]() Katrin wrote:
Katrin wrote:
Ich habe gerade mit der Raglanzunahme begonnen und Frage mich nach wie vielen Reihen der zweite und dritte Zopf im Vorteil und Rückenteil anfängt.
24.03.2020 - 11:16DROPS Design answered:
Liebe Katrin, die Zunahmen beim Vorder- bzw Rückenteil entstehen je nach der Größe in jeder Runde, dann in jeder 2. Runde (ausser 1. Größe) und in jeder 3. Runde (nur 1. Größe). Die ersten 6 Zunahmen sind in A.2 gestrickt, dann die 8-9-7-8-8 nächsten Zunahmen sind links gestrickt, dann die 6 nächsten Zunahmen sind in A.2 gestrickt. Die Zöpfe werden dann gestrickt, wenn Sie schon genügend Maschen zugenommen haben. Viel Spaß beim stricken!
24.03.2020 - 11:39
|
||||||||||||||||||||||||||||
Alana#alanasweater |
||||||||||||||||||||||||||||
 |
 |
|||||||||||||||||||||||||||
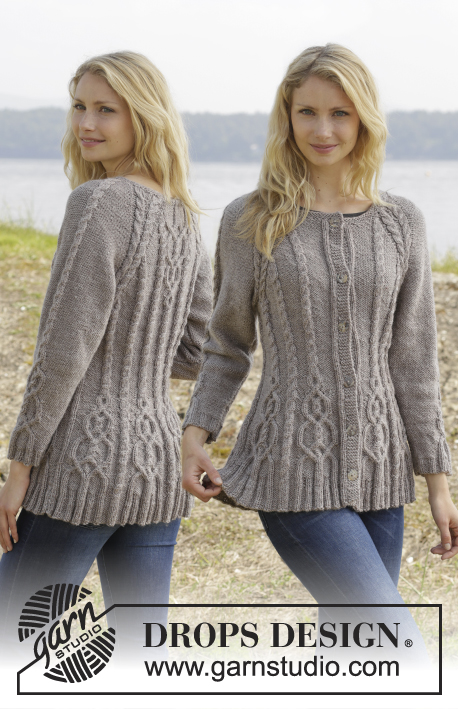
Knitted DROPS jumper with cables and raglan, worked top down in ”Karisma”. Size S-XXL
DROPS 156-19 |
||||||||||||||||||||||||||||
|
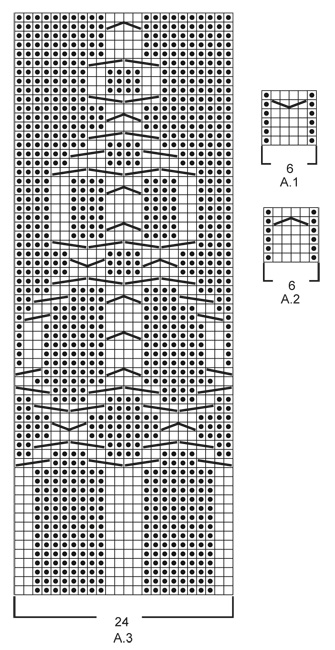
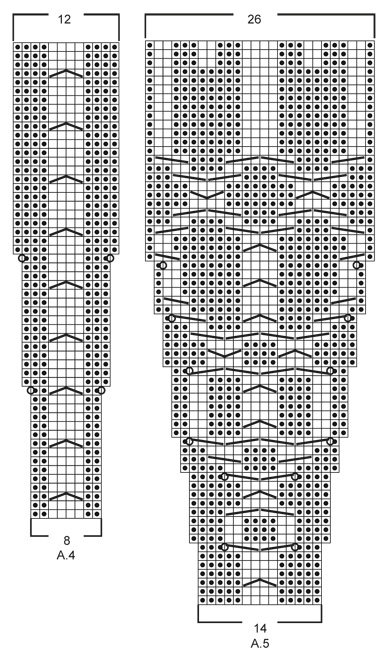
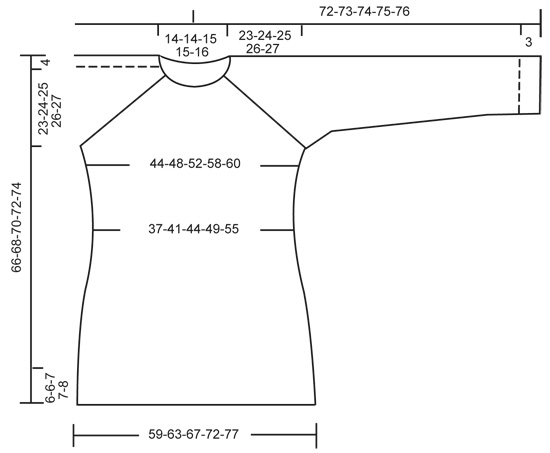
GARTER ST (in the round on circular needle): * K 1 round and P 1 round *, repeat from *-*. 1 ridge = 2 rounds. GARTER ST (back and forth on needle): K all rows. 1 ridge = 2 rows K. PATTERN: See diagrams A.1 - A.5. The diagrams show all rows in pattern seen from RS. RAGLAN: Inc on each side of raglan sts (A.1/A.2, marker, A.2/A.1) by making 1 YO = 8 inc on round. On next round K the YOs twisted to avoid holes. Then P the new sts on sleeves, and on front and back piece work the new sts in pattern as explained below. DECREASE TIP (applies to sleeves): Dec on each side of marker as follows: Work until 3 sts remain before marker, P 2 tog, P 2, P 2 tog = 2 sts dec. INCREASE TIP: Inc 1 st by making a YO. On next round P YOs twisted, i.e. work in the back loop of st instead of front to avoid holes. P the new sts. ---------------------------------------------------------- JUMPER: Worked top down in the round on circular needle. Work sleeve in the round on circular needle/double pointed needles. YOKE: Cast on 92-92-97-97-101 sts on circular needle size 4 mm with Karisma. Work 3 ridges in GARTER ST in the round on circular needle - see explanation above. Continue to work an elevation in GARTER ST back and forth -see explanation above, from mid back as follows (1st row = RS): Now work 5-5-7-7-9 sts, turn, work 10-10-14-14-18 sts, turn, work 15-15-19-19-23 sts, turn, work 20-20-24-24-28 sts, turn, work 25-25-29-29-33 sts, turn, work 30-30-34-34-38 sts, turn, work 35-35-39-39-43 sts, turn, work 40-40-43-43-48 sts, turn, work back to beg of round. Now K 1 round AT THE SAME TIME inc 24-24-23-23-27 sts evenly = 116-116-120-120-128 sts. P 18-18-19-19-21, insert 1st marker here (= this is now beg of round), A.2, P 2, A.2, P 2, A.1, insert 2nd marker here, A.2, P 0-0-1-1-3, A.3, P 0-0-1-1-3, A.1, insert 3rd marker here, A.2, P 2, A.2, P 2, A.1, insert 4th marker here, A.2, P 0-0-1-1-3, A.3, P 0-0-1-1-3, A.1. READ THE NEXT 2 SECTIONS BEFORE CONTINUING! REMEMBER THE KNITTING TENSION! On next round beg inc for RAGLAN – see explanation above, AT THE SAME TIME work pattern as follows: RAGLAN: Repeat inc every round 0-2-10-20-20 times in total. Then inc every other round 23-32-30-26-27 times and every 3rd round 6-0-0-0-0 times = 348-388-440-488-504 sts. PATTERN: Work pattern on body as follows (P the inc sts on sleeves): Work the first 6 sts inc in A.2, then P next 8-9-7-8-8 inc sts, work the next 6 inc sts in A.2, P the next 8-9-7-8-8 inc sts. NOTE: (Size M-L-XL-XXL): When A.3 has been worked 1 time vertically, continue with A.2 over cable and P the remaining sts from A.3 until start of body. S/M: Then inc as before on sleeve and inc inside A.1/A.2 (i.e. between A.1 and A.2, towards marker for raglan) on front and back piece 1-4 more times. P the new sts. L/XL/XXL: Continue with A.2 over the next 6 inc sts, P the next 7-8-8 inc sts, then inc as before on sleeve and inc inside A.1/A.2 (i.e. between A.1 and A.2, towards marker for raglan) on front and back piece 1-4-5 more times. P the last 1-4-5 inc sts. Piece now measures 27-28-29-30-31 cm from shoulder. Now work as follows: Slip the first 80-90-102-114-116 sts on a stitch holder for sleeve, cast on 12 new sts under sleeve, insert a blue marker in the middle of these new sts, work the next 94-104-118-130-136 sts (= front piece), slip the next 80-90-102-114-116 sts on a stitch holder for sleeve, cast on 12 new sts under sleeve, insert a blue marker in the middle of these new sts, work the remaining 94-104-118-130-136 sts on round (= back piece). NOW MEASURE THE PIECE FROM HERE. BODY: There are now 212-232-260-284-296 sts for body. Then continue pattern as follows: S/M: P 6-3, * A.2 0-1 time in width, P 7-7, A.2, P 8-9, insert a marker, A.2, P 8-9, insert a marker, A.2, P 9-9, A.2, P 9-9, A.2, insert a marker, P 8-9, A.2, insert a marker, P 8-9, A.1*, P 7-7, repeat from *-* 1 more time, P 1-4 L/XL/XXL: P 3-3-0, * A.2 1-1-2 times in width, P 4-6-5, A.2, P 7-8-8, insert a marker, A.2, P 7-8-8, insert a marker, A.2, P 7-8-8, insert a marker, A.2, P 10-11-12, A.2, P 10-11-12, A.2, insert a marker, P 7-8-8, A.2, insert a marker, P 7-8-8, A.2, insert a marker, P 7-8-8, A.1 *, P 4-6-5, repeat from *-* 1 more time, P 1-3-5. READ THE NEXT 2 SECTIONS BEFORE CONTINUING! Now dec and inc at the same time as follows: DECREASE: Dec differently as follows - READ DECREASE TIP: Dec 1 st on each side of the middle cable on front and back piece. Repeat dec every 2-2-1½-1½-1½ cm 3-3-4-4-6 more times. AT THE SAME TIME dec 1 st towards cable in every section with P sts with marker in (= 8-8-12-12-12 markers). Repeat dec every 3-2½-5-4-4 cm 2-3-1-2-2 more times. INCREASE (towards the sides): When piece measures 3 cm, inc along the cable towards the sleeve (i.e. cable from raglan) in P section towards the sides – READ INCREASE TIP! Inc 4 sts on round. Repeat inc every 1½-1½-2½-1½-1 cm 3-4-2-4-10 more times. When all dec and inc are done, 188-204-228-248-276 sts remain. When piece measures 11-12-12-13-14 cm, work pattern as follows: P 6-3-6-6-0, A.2 0-1-1-1-2 times in width, P 7-8-6-11-15, A.4 0-0-1-1-1 time in width, * A.5, A.4 *, repeat from *-* 2-2-3-3-3 more times in width, A.5 1-1-0-0-0 times in width, P 7-8-6-11-15, A.2 0-1-1-1-2 times in width, P 7-8-6-11-15, A.4 0-0-1-1-1 time in width, * A.5, A.4 *, repeat from *-* 2-2-3-3-3 more times in width, A.5 1-1-0-0-0 times in width, P 1-5-0-5-15. NOTE: Adjust the first cable in A.4 and A.5 to get a nice transition between diagrams. Continue with pattern and inc according to diagram. When A.4 and A.5 have been worked vertically and piece measures approx. 33-34-34-35-35 cm, there are 308-324-364-384-412 sts on round. Insert a marker here. NOW MEASURE THE PIECE FROM HERE. Now work rib as follows: S/M: * Work K over K and P over P until 7-11 sts remain before the blue marker in the side, P 2, K 2, P 3-4 *, repeat from *-* 1 more time and continue with K over K and P over P the rest of round. L/XL/XXL: * Work K over K and P over P until 8-14-21 sts remain before the blue marker in the side, K 2-2-2, P 3-4-3, K 0-2-2, P 0-3-3, K 0-0-2, P 0-0-3 *, repeat from *-* 1 more time and continue with K over K and P over P the rest of round. When rib has been worked for 2 cm from marker, inc by making 1 YO before first P st in every P section - remember INCREASE TIP. When rib has been worked for 5-5-6-6-6 cm, cast off with K over K and P over P. SLEEVES: Slip the 80-90-102-114-116 sts from stitch holder back on circular needle. K 1 row over all sts and cast on 12 new sts at the end of row = 92-102-114-126-128 sts. Insert a marker in the middle of the new sts (i.e. 6 sts on each side of marker). NOW MEASURE THE PIECE FROM HERE. Then work sleeve in the round on circular needle/double pointed needles. Continue the middle cable on sleeve as before but work P over cables in raglan. On 2nd round beg dec on each side of marker - READ DECREASE TIP. Repeat dec in every other round 6 more times = 78-88-100-112-114 sts. Then dec 1 st on each side of marker every 2-1½-1-1-1 cm 13-17-22-27-27 times = 52-54-56-58-60 sts. AT THE SAME TIME when piece measures 15 cm, work A.5 over cable in the middle of sleeve - adjust the first cable in A.5 to get a nice transition between diagrams. NOTE: Do not inc in A.5 on sleeve, i.e. do not work YOs in diagram. When A.5 is finished and sleeve measures 37 cm, work rib as follows from marker at beg of round: P 0-0-1-2-3, K 1-2-2-2-2, P 3, K 2, P 3, K 2, P 2, continue rib as on last row in A.5 (= 26 sts), P 2, K 2, P 3, K 2, P 3, K 1-2-2-2-2, P 0-0-1-2-3. Continue like this for 3 cm, cast off with K over K and P over P. ASSEMBLY: Sew the holes under the sleeves. |
||||||||||||||||||||||||||||
Diagram explanations |
||||||||||||||||||||||||||||
|
||||||||||||||||||||||||||||
 |
||||||||||||||||||||||||||||
 |
||||||||||||||||||||||||||||
 |
||||||||||||||||||||||||||||
Have you finished this pattern?Tag your pictures with #dropspattern #alanasweater or submit them to the #dropsfan gallery. Do you need help with this pattern?You'll find 24 tutorial videos, a Comments/Questions area and more by visiting the pattern on garnstudio.com. © 1982-2026 DROPS Design A/S. We reserve all rights. This document, including all its sub-sections, has copyrights. Read more about what you can do with our patterns at the bottom of each pattern on our site. |
||||||||||||||||||||||||||||


With over 40 years in knitting and crochet design, DROPS Design offers one of the most extensive collections of free patterns on the internet - translated to 17 languages. As of today we count 324 catalogues and 12284 patterns translated into English (UK/cm).
We work hard to bring you the best knitting and crochet have to offer, inspiration and advice as well as great quality yarns at incredible prices! Would you like to use our patterns for other than personal use? You can read what you are allowed to do in the Copyright text at the bottom of all our patterns. Happy crafting!
Post a comment to pattern DROPS 156-19
We would love to hear what you have to say about this pattern!
If you want to leave a question, please make sure you select the correct category in the form below, to speed up the answering process. Required fields are marked *.