
Popular categories
Looking for a yarn?


Comments / Questions (273)
![]() Liesbeth wrote:
Liesbeth wrote:
Patroon, maat M: er staat 6, 9, 6 en 9 gemeerderde steken, dat maakt 30x meerderen, maar ik moet in totaal 34x meerderen. Had er dan niet moeten staan : 6, 9, 6 en de kaatste 13 gemeerderde steken averecht? En nog een vraag: voor M moet ik daarna nog 4x meerderen. Is dat ook op elke 2e naald?
01.10.2021 - 22:54DROPS Design answered:
Dag Liesbeth,
Je maakt gewoon de meerderingen voor de raglan zoals aangegeven, dus inderdaad 34 keer. Daarnaast brei je op een gegeven moment kabels in de gemeerderde steken zodra dat kan, dus zodra je 6 steken heb, kun je de kabel in A2 breien, als je nog geen 6 steken hebt brei je die steken in tricotsteek. De steken naast A.2 brei je averecht, enzovoort.
07.10.2021 - 14:33
![]() Linda Simmonds wrote:
Linda Simmonds wrote:
See my enquiry 30.9.21. Size M. I now understand that I work a cable (A2) after I have increased 6 sts. This starts the cable line down the front/back sections. But I do not understand P9. Please explain more clearly.
01.10.2021 - 22:08
![]() Linda Simmonds wrote:
Linda Simmonds wrote:
I have started this and doing size M. I have got to the 116 sts and placed all my markers on the next row. I have started the raglan increases and it is looking fine but I do not understand working the PATTERN AT THE SAME TIME. I cannot follow the instructions for PATTERN, nor do I know when to start this and for how many rows. I have only done 6 sets of increasing so far which have been done before and after the A1/A2 sets by markers (ie 4x raglans). Your help will be welcomed .
30.09.2021 - 00:39
![]() Margarita wrote:
Margarita wrote:
Ik heb het idee dat de tekst niet klopt, en ik kom helaas niet verder.. voor maat S moet ik raglan 23x meerderen om de naald, maar dan kom ik niet op 348 steken? En: ik ben nu bij naald 16, maar ik mis een kabel op de panden, die vlak langs telpatroon A3 lopen aan beide zijden.. alvast bedankt voor je reactie.
26.09.2021 - 22:18DROPS Design answered:
Dag Margarita,
Inderdaad denk ik ook dat er een fout in het patroon zit en dat je 29 keer om de naald moet meerderen in plaats van 23 keer. Dan kom je wel op 348 steken. Ik zal dit doorgeven aan de ontwerpafdeling om na te kijken zodat er een correctie op kan komen.
In de beschrijving bij 'PATROON' (vlak daar onder) staat aangegeven hoe je de gemeerderde steken breit op het pand en de mouwen, de kabel die je mist komt er dan bij.
EDIT: Er is inmiddels een correctie gemaakt, voor maat S moet je nog eens 6 keer minderen elke 3e naald.
07.10.2021 - 14:18
![]() Liesbeth wrote:
Liesbeth wrote:
Vraag 6) Bij tips voor het meerderen staat dat je de omslag av moet breien en in de volgende naald de nieuwe steek ook av. Maar verderop begrijp ik dat je deze tip moet negeren op het voor en achterpand?
13.09.2021 - 10:32DROPS Design answered:
Dag Liesbeth,
Je breit de gemeerderde steken averecht op de mouwen en in patroon op de panden. Hoe je de gemeerderde steken op de panden breit staat uitgelegd in de patroontekst.
17.09.2021 - 10:35
![]() Liesbeth wrote:
Liesbeth wrote:
Vraag 5 (ik had er net al 4 gesteld): ik denk dat de eerste markeerder het begin van de rechtermouw is? Dan het voorpand tussen markeerder 2 en 3, de linkermouw tussen 3 en 4 en achterpand tussen 4 en 1? Met uw antwoorden denk ik dat ik er voorlopig wel uitkom, dus alvast bedankt :)
12.09.2021 - 15:41DROPS Design answered:
Dag Liesbeth,
De markeerders geven inderdaad telkens de overgang aan tussen de mouw en het pand.
17.09.2021 - 10:25
![]() Liesbeth wrote:
Liesbeth wrote:
1) Net gemeerderd tot 116 steken. In de nu volgende naald moet ik van A1,/2/3 alleen de eerste naald breien ? Dus dan is de 1e naald van de raglan de 2e naald van A1/A2A3? 2) Moet ik de patronen A1 t/m A5 lezen van rechts naar links en van onder naar boven? 3) Klopt het dat ik A1 en A2 bijna 6x moet herhalen als ik A3 1x brei? 4) Patroon: na één nld raglan komen er 8 steken bij; moet ik de volgende naald 1x A2 extra breien en 2 steken av extra???
12.09.2021 - 15:25DROPS Design answered:
Dag Liesbeth,
1) Klopt, je begint in de tweede naald van het telpatroon met de meerderingen voor de raglan.
2) Je leest de patronen inderdaad van rechts naar links (en van onder naar boven.
3) Ik heb het niet nageteld, maar dat zou kunnen kloppen, je herhaalt steeds te telpatronen in de hoogte zoals aangegeven in de beschrijving en omdat het ene telpatroon minder naalden in de hoogte heeft dan het andere, herhaal je deze dus vaker.
4)In de beschrijving staat precies aangegeven hoe je de gemeerderde steken breit op de panden en op de mouwen.
17.09.2021 - 10:22
![]() Lucie Poudrier wrote:
Lucie Poudrier wrote:
Bonjour, Pour débuter l'empiècement, je ne comprends pas comment arriver à 116 mailles (M). Faut-il compter 18 m env. +A.2 +2 m env. (=8m) +A2+2m env. (=8m)+ A1 (6m)+A2 (6m)+ A3 (24m) +A1 (6m) +A2+2 m env. (8m)+ A2+2 (8m) +A1 (6m) + A2 (6m) + A3 (24m) + A1 (6m). Total 134 mailles. Je ne vois pas quelles mailles sont de trop. Merci de m'aider. Lucie
03.09.2021 - 00:57DROPS Design answered:
Bonjour Mme Poudrier, ce sont les 18 premières mailles que vous avez noté, auparavant, les tours se situaient au milieu dos, vous tricotez ces 18 premières mailles et placez votre marqueur après ces mailles = début des tours désormais, puis vous tricotez comme indiqué (ces 18 mailles seront maintenant tricotées à la fin du tour). Bon tricot!
03.09.2021 - 07:33
![]() DOMINIQUE LENOIR wrote:
DOMINIQUE LENOIR wrote:
Hello, je démarre "empiècement"et bloque déja sur l'indication "Tricoter 3 côtes au POINT MOUSSE ". c'est quoi ces 3 cotes ? Merci
03.05.2021 - 17:28DROPS Design answered:
Bonjour Mme Lenoir, pour tricoter 1 côte au point mousse, on doit tricoter 2 rangs endroit; pour tricoter 3 côtes au point mousse, on va tricoter 6 rangs endroit. Bon tricot!
04.05.2021 - 07:37
![]() DOMINIQUE wrote:
DOMINIQUE wrote:
Hello, je démarre "empiècement"et bloque déja sur l'indication "Tricoter 3 côtes au POINT MOUSSE ". c'est quoi ces 3 cotes ? Merci
03.05.2021 - 17:28
|
||||||||||||||||||||||||||||
Alana#alanasweater |
||||||||||||||||||||||||||||
 |
 |
|||||||||||||||||||||||||||
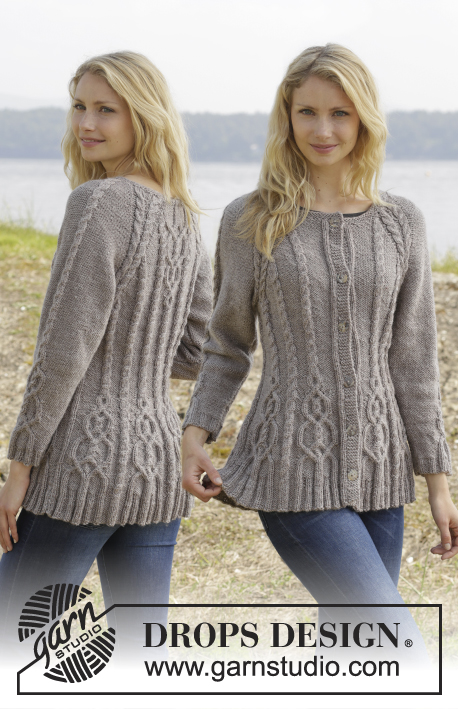
Knitted DROPS jumper with cables and raglan, worked top down in ”Karisma”. Size S-XXL
DROPS 156-19 |
||||||||||||||||||||||||||||
|
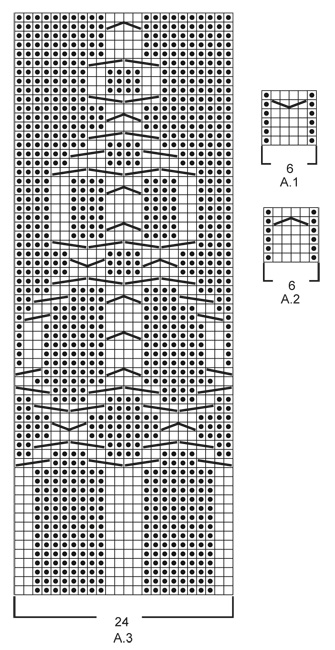
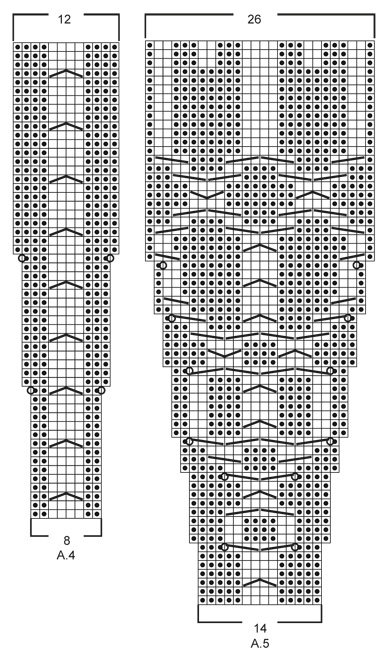
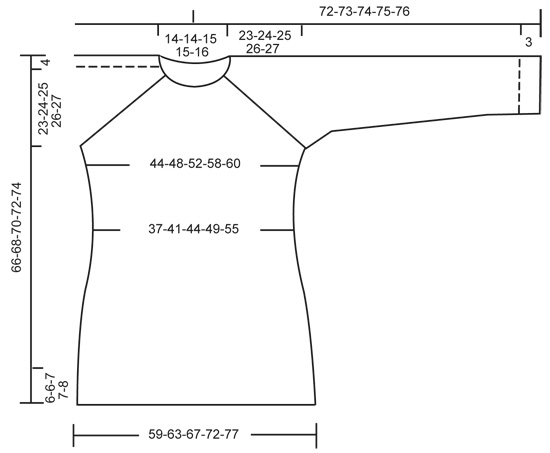
GARTER ST (in the round on circular needle): * K 1 round and P 1 round *, repeat from *-*. 1 ridge = 2 rounds. GARTER ST (back and forth on needle): K all rows. 1 ridge = 2 rows K. PATTERN: See diagrams A.1 - A.5. The diagrams show all rows in pattern seen from RS. RAGLAN: Inc on each side of raglan sts (A.1/A.2, marker, A.2/A.1) by making 1 YO = 8 inc on round. On next round K the YOs twisted to avoid holes. Then P the new sts on sleeves, and on front and back piece work the new sts in pattern as explained below. DECREASE TIP (applies to sleeves): Dec on each side of marker as follows: Work until 3 sts remain before marker, P 2 tog, P 2, P 2 tog = 2 sts dec. INCREASE TIP: Inc 1 st by making a YO. On next round P YOs twisted, i.e. work in the back loop of st instead of front to avoid holes. P the new sts. ---------------------------------------------------------- JUMPER: Worked top down in the round on circular needle. Work sleeve in the round on circular needle/double pointed needles. YOKE: Cast on 92-92-97-97-101 sts on circular needle size 4 mm with Karisma. Work 3 ridges in GARTER ST in the round on circular needle - see explanation above. Continue to work an elevation in GARTER ST back and forth -see explanation above, from mid back as follows (1st row = RS): Now work 5-5-7-7-9 sts, turn, work 10-10-14-14-18 sts, turn, work 15-15-19-19-23 sts, turn, work 20-20-24-24-28 sts, turn, work 25-25-29-29-33 sts, turn, work 30-30-34-34-38 sts, turn, work 35-35-39-39-43 sts, turn, work 40-40-43-43-48 sts, turn, work back to beg of round. Now K 1 round AT THE SAME TIME inc 24-24-23-23-27 sts evenly = 116-116-120-120-128 sts. P 18-18-19-19-21, insert 1st marker here (= this is now beg of round), A.2, P 2, A.2, P 2, A.1, insert 2nd marker here, A.2, P 0-0-1-1-3, A.3, P 0-0-1-1-3, A.1, insert 3rd marker here, A.2, P 2, A.2, P 2, A.1, insert 4th marker here, A.2, P 0-0-1-1-3, A.3, P 0-0-1-1-3, A.1. READ THE NEXT 2 SECTIONS BEFORE CONTINUING! REMEMBER THE KNITTING TENSION! On next round beg inc for RAGLAN – see explanation above, AT THE SAME TIME work pattern as follows: RAGLAN: Repeat inc every round 0-2-10-20-20 times in total. Then inc every other round 23-32-30-26-27 times and every 3rd round 6-0-0-0-0 times = 348-388-440-488-504 sts. PATTERN: Work pattern on body as follows (P the inc sts on sleeves): Work the first 6 sts inc in A.2, then P next 8-9-7-8-8 inc sts, work the next 6 inc sts in A.2, P the next 8-9-7-8-8 inc sts. NOTE: (Size M-L-XL-XXL): When A.3 has been worked 1 time vertically, continue with A.2 over cable and P the remaining sts from A.3 until start of body. S/M: Then inc as before on sleeve and inc inside A.1/A.2 (i.e. between A.1 and A.2, towards marker for raglan) on front and back piece 1-4 more times. P the new sts. L/XL/XXL: Continue with A.2 over the next 6 inc sts, P the next 7-8-8 inc sts, then inc as before on sleeve and inc inside A.1/A.2 (i.e. between A.1 and A.2, towards marker for raglan) on front and back piece 1-4-5 more times. P the last 1-4-5 inc sts. Piece now measures 27-28-29-30-31 cm from shoulder. Now work as follows: Slip the first 80-90-102-114-116 sts on a stitch holder for sleeve, cast on 12 new sts under sleeve, insert a blue marker in the middle of these new sts, work the next 94-104-118-130-136 sts (= front piece), slip the next 80-90-102-114-116 sts on a stitch holder for sleeve, cast on 12 new sts under sleeve, insert a blue marker in the middle of these new sts, work the remaining 94-104-118-130-136 sts on round (= back piece). NOW MEASURE THE PIECE FROM HERE. BODY: There are now 212-232-260-284-296 sts for body. Then continue pattern as follows: S/M: P 6-3, * A.2 0-1 time in width, P 7-7, A.2, P 8-9, insert a marker, A.2, P 8-9, insert a marker, A.2, P 9-9, A.2, P 9-9, A.2, insert a marker, P 8-9, A.2, insert a marker, P 8-9, A.1*, P 7-7, repeat from *-* 1 more time, P 1-4 L/XL/XXL: P 3-3-0, * A.2 1-1-2 times in width, P 4-6-5, A.2, P 7-8-8, insert a marker, A.2, P 7-8-8, insert a marker, A.2, P 7-8-8, insert a marker, A.2, P 10-11-12, A.2, P 10-11-12, A.2, insert a marker, P 7-8-8, A.2, insert a marker, P 7-8-8, A.2, insert a marker, P 7-8-8, A.1 *, P 4-6-5, repeat from *-* 1 more time, P 1-3-5. READ THE NEXT 2 SECTIONS BEFORE CONTINUING! Now dec and inc at the same time as follows: DECREASE: Dec differently as follows - READ DECREASE TIP: Dec 1 st on each side of the middle cable on front and back piece. Repeat dec every 2-2-1½-1½-1½ cm 3-3-4-4-6 more times. AT THE SAME TIME dec 1 st towards cable in every section with P sts with marker in (= 8-8-12-12-12 markers). Repeat dec every 3-2½-5-4-4 cm 2-3-1-2-2 more times. INCREASE (towards the sides): When piece measures 3 cm, inc along the cable towards the sleeve (i.e. cable from raglan) in P section towards the sides – READ INCREASE TIP! Inc 4 sts on round. Repeat inc every 1½-1½-2½-1½-1 cm 3-4-2-4-10 more times. When all dec and inc are done, 188-204-228-248-276 sts remain. When piece measures 11-12-12-13-14 cm, work pattern as follows: P 6-3-6-6-0, A.2 0-1-1-1-2 times in width, P 7-8-6-11-15, A.4 0-0-1-1-1 time in width, * A.5, A.4 *, repeat from *-* 2-2-3-3-3 more times in width, A.5 1-1-0-0-0 times in width, P 7-8-6-11-15, A.2 0-1-1-1-2 times in width, P 7-8-6-11-15, A.4 0-0-1-1-1 time in width, * A.5, A.4 *, repeat from *-* 2-2-3-3-3 more times in width, A.5 1-1-0-0-0 times in width, P 1-5-0-5-15. NOTE: Adjust the first cable in A.4 and A.5 to get a nice transition between diagrams. Continue with pattern and inc according to diagram. When A.4 and A.5 have been worked vertically and piece measures approx. 33-34-34-35-35 cm, there are 308-324-364-384-412 sts on round. Insert a marker here. NOW MEASURE THE PIECE FROM HERE. Now work rib as follows: S/M: * Work K over K and P over P until 7-11 sts remain before the blue marker in the side, P 2, K 2, P 3-4 *, repeat from *-* 1 more time and continue with K over K and P over P the rest of round. L/XL/XXL: * Work K over K and P over P until 8-14-21 sts remain before the blue marker in the side, K 2-2-2, P 3-4-3, K 0-2-2, P 0-3-3, K 0-0-2, P 0-0-3 *, repeat from *-* 1 more time and continue with K over K and P over P the rest of round. When rib has been worked for 2 cm from marker, inc by making 1 YO before first P st in every P section - remember INCREASE TIP. When rib has been worked for 5-5-6-6-6 cm, cast off with K over K and P over P. SLEEVES: Slip the 80-90-102-114-116 sts from stitch holder back on circular needle. K 1 row over all sts and cast on 12 new sts at the end of row = 92-102-114-126-128 sts. Insert a marker in the middle of the new sts (i.e. 6 sts on each side of marker). NOW MEASURE THE PIECE FROM HERE. Then work sleeve in the round on circular needle/double pointed needles. Continue the middle cable on sleeve as before but work P over cables in raglan. On 2nd round beg dec on each side of marker - READ DECREASE TIP. Repeat dec in every other round 6 more times = 78-88-100-112-114 sts. Then dec 1 st on each side of marker every 2-1½-1-1-1 cm 13-17-22-27-27 times = 52-54-56-58-60 sts. AT THE SAME TIME when piece measures 15 cm, work A.5 over cable in the middle of sleeve - adjust the first cable in A.5 to get a nice transition between diagrams. NOTE: Do not inc in A.5 on sleeve, i.e. do not work YOs in diagram. When A.5 is finished and sleeve measures 37 cm, work rib as follows from marker at beg of round: P 0-0-1-2-3, K 1-2-2-2-2, P 3, K 2, P 3, K 2, P 2, continue rib as on last row in A.5 (= 26 sts), P 2, K 2, P 3, K 2, P 3, K 1-2-2-2-2, P 0-0-1-2-3. Continue like this for 3 cm, cast off with K over K and P over P. ASSEMBLY: Sew the holes under the sleeves. |
||||||||||||||||||||||||||||
Diagram explanations |
||||||||||||||||||||||||||||
|
||||||||||||||||||||||||||||
 |
||||||||||||||||||||||||||||
 |
||||||||||||||||||||||||||||
 |
||||||||||||||||||||||||||||
Have you finished this pattern?Tag your pictures with #dropspattern #alanasweater or submit them to the #dropsfan gallery. Do you need help with this pattern?You'll find 24 tutorial videos, a Comments/Questions area and more by visiting the pattern on garnstudio.com. © 1982-2026 DROPS Design A/S. We reserve all rights. This document, including all its sub-sections, has copyrights. Read more about what you can do with our patterns at the bottom of each pattern on our site. |
||||||||||||||||||||||||||||


With over 40 years in knitting and crochet design, DROPS Design offers one of the most extensive collections of free patterns on the internet - translated to 17 languages. As of today we count 324 catalogues and 12284 patterns translated into English (UK/cm).
We work hard to bring you the best knitting and crochet have to offer, inspiration and advice as well as great quality yarns at incredible prices! Would you like to use our patterns for other than personal use? You can read what you are allowed to do in the Copyright text at the bottom of all our patterns. Happy crafting!
Post a comment to pattern DROPS 156-19
We would love to hear what you have to say about this pattern!
If you want to leave a question, please make sure you select the correct category in the form below, to speed up the answering process. Required fields are marked *.