
Popular categories
Looking for a yarn?


Comments / Questions (63)
![]() Iris wrote:
Iris wrote:
Bonjour, pour le dos et le devant, il est indiqué... "continuer en jersey"..."A 4 cm..." On n'a tricoté que les 2 premiers rangs de A2, "jersey" signifie-t-il continuer à partir du 3ème rang de A2 ? Puis faire tout le motif A2 et jersey ensuite ? Le motif A2 n'est plus cité dans la suite des explications ? Que dois-je comprendre ? Merci :)
10.10.2016 - 13:10DROPS Design answered:
Bonjour Iris, on ne tricote plus A.2 pour le dos et le devant après les emmanchures, seulement les premiers rangs tricotés avant, et on continue en jersey. Vous pourrez également noter sur la photo que le "zig-zag" en haut de A.2 ne se retrouve que sur les manches. Bon tricot!
12.10.2016 - 09:41
![]() Gunn wrote:
Gunn wrote:
Jeg strikker denne på oppdrag for ei annen dame. Det var et flott mønster, og oppskriften var lett å følge. Kan også anbefales til de som ikke har noe særlig strikkeerfaring da alt var godt forklart.
21.02.2016 - 15:29
![]() Helle Knudsen wrote:
Helle Knudsen wrote:
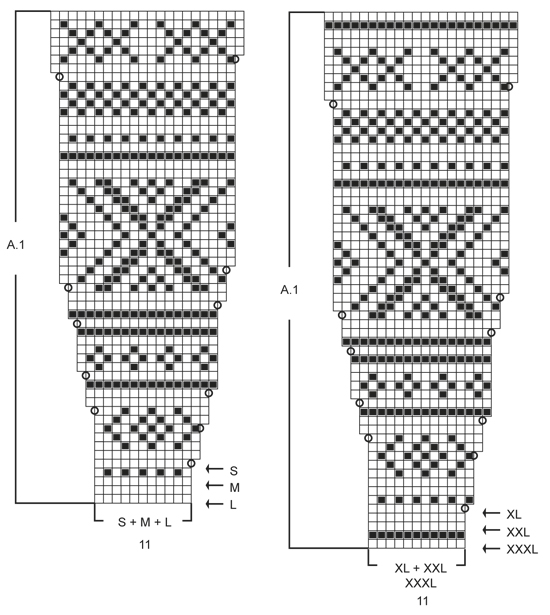
Der refereres til diagram A1, A2 og A3. Jeg kan kun se diagram A1 i opskriften. Hvor er A2 og A3. Mvh Helle
05.10.2015 - 23:46DROPS Design answered:
Hej Helle. De staar lige under A.1
06.10.2015 - 12:18
![]() Anke wrote:
Anke wrote:
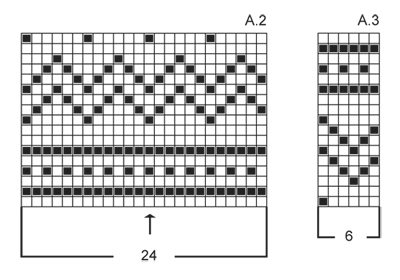
Ich habe noch eine weitere Frage: Das Muster A.2 läuft ja über 24M (wobei eine Wdh nach 6M), d.h. die Maschenzahl müsste ein Vielfaches von 6 sein, was nicht immer der Fall ist. Ist der Bruch im Muster am Ende der Reihe so gewollt?
25.09.2015 - 23:02DROPS Design answered:
A.2 stricken Sie ja nur am Ärmel komplett zu Ende. Dadurch, dass Sie an der unteren Ärmelmitte Abnahmen machen, geht das Muster dort nicht auf. Sie müssen es, wenn Sie oben am Ärmel beginnen, das Muster so anpassen, dass die Mitte des Musters oben in der Mitte auf dem Ärmel liegt. Sie stricken dann einfach so weit es geht, es ist normal, dass das Muster an der unteren Ärmelmitte einen "Bruch" hat.
28.09.2015 - 10:50
![]() Anke wrote:
Anke wrote:
Ich habe ein kleines Verständnisproblem mit der Anleitung: "In der nächsten Rd die 1. Rd von A.2 stricken und GLEICHZEITIG 8M gleichmäßig verteilt zunehmen (=250M)" Ist mit "die 1. Rd von A.2 stricken" gemeint, dass man das Muster A.2 erstmal durchstrickt und anschließend 8M zunimmt? und dann weiter mit der Anleitung verfährt? Besten Dank und viele Grüße Anke
22.09.2015 - 00:10DROPS Design answered:
Nein, Sie müssen bereits in der 1. Rd von A.2 die 8 M zunehmen. Sie stricken also die 1. Rd von A.2, das sind nur rechte Maschen, und nehmen dabei 8 M zu. Denn stricken Sie die 2. Rd von A.2, das sind nur linke Maschen, und legen dabei wie beschrieben M still.
27.09.2015 - 22:39
![]() Constanza wrote:
Constanza wrote:
Hola. Estoy tejiendo la talla M y no entiendo cómo se ajusta el gráfico A2 al comienzo de la manga. Ya la cuarta fila del gráfico no coincide con la cantidad de puntos (63 puntos). Gracias por la ayuda!
04.09.2015 - 02:24DROPS Design answered:
Hola Constanza. El pt con la flecha en el diagrama tiene que coincidir con el pt central de la manga (en la parte superior de la manga). A cada lado del pt central hay 31 pts, es decir que empezamos a trabajar el diagrama en el 5º pt del diagrama (se trabajan 20 pts hasta el final del diagrama + 11 pts de otra repetición del diagrama desde el principio hasta la flecha (el pt con la flecha no está incluído))
08.09.2015 - 11:31Debbie wrote:
Hi - I am having a problem with getting the pattern to line up at the back marker ( still at the top) especially the the large criss cross section - am I doing something wrong with the increasing of the stitches? Or will it work itself out - doesn't look right to me - please help!!!!
04.08.2015 - 09:38DROPS Design answered:
Dear Debbie, insert a marker between each repetition to check your sts following the diagram appropriate to your size to be sure it will match. Happy knitting!
04.08.2015 - 17:51Rainbowis wrote:
Sorry for my many questions. You mean that i continue decreasing until the piece measures 14cm from the new markers under sleeves then start increasing from here as instructed? Regards.
03.08.2015 - 11:09DROPS Design answered:
Dear Mrs Rainbowis, dec should be done when you insert new markers (5th and 6th ones), then start inc when piece measures 16 cm (in size L) from the new sts under sleeve as stated. Happy knitting!
03.08.2015 - 16:12Rainbowis wrote:
Thanks for helping. I need to know shall I continue knitting without decreasing after putting the 5th & 6th sts? Regards.
01.08.2015 - 11:17DROPS Design answered:
Dear Mrs Rainbowis, markers 5 and 6 are inserted when all sts are dec (when you have 158 sts) then you will inc 1 st on each side of these both markers when it says: "When piece measures 14-15-16-17-18-19 cm from the new sts under sleeve, beg inc – remember INCREASE TIP 1! Inc before 1st and 3rd marker and after 2nd and 4th marker. Repeat inc every 3 cm 4 more times, AT THE SAME TIME on 2nd, 3rd and 4th inc, inc 1 st on each side of 5th and 6th marker (= sides) – READ INCREASE TIP 2!" Happy knitting!
03.08.2015 - 09:18Rainbowis wrote:
Does between means in the middle of the 1st and 2nd markers or it means at the 40th St? Regards & thanks
29.07.2015 - 19:51DROPS Design answered:
Dear Mrs Rainbowis, that's correct you put marker in the middle of 40 sts in st st, ie you will have 20 sts before and 20 sts after the new markers. Happy knitting!
30.07.2015 - 10:54
|
||||||||||
Elinor Dashwood#elinordashwoodsweater |
||||||||||
|
|
||||||||||
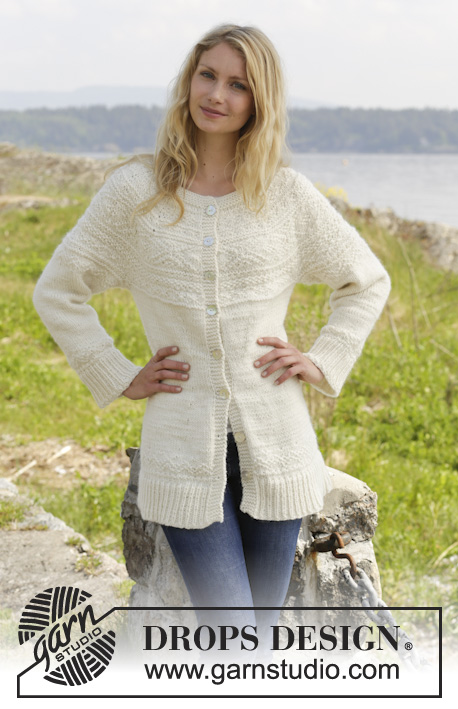
Knitted DROPS jumper with round yoke and textured pattern, worked top down in "Alaska". Size: S - XXXL.
DROPS 157-5 |
||||||||||
|
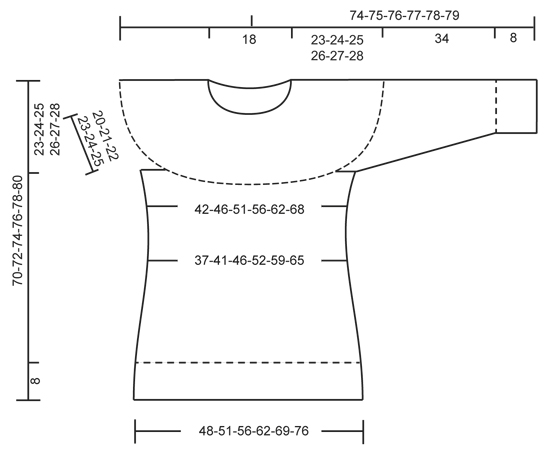
GARTER ST (in the round on circular needle): * K 1 round and P 1 round *, repeat from *-*. 1 ridge = 2 rounds. PATTERN: See diagrams A.1 to A.3. The diagrams show all rows in pattern seen from RS. INCREASE TIP 1 (applies to yoke): Inc 1 st by making 1 YO, on next round work YO twisted (i.e. work in the back loop of st instead front) to avoid holes. INCREASE TIP 2: Work until 1 st remains before marker, 1 YO, K 2 (marker is between these), 1 YO. On next round work YO twisted (i.e. work in the back loop of YO instead of front) to avoid holes. DECREASE TIP (applies to waist + sleeve): Dec as follows after marker: Slip 1 st as if to K, K 1, psso. Dec as follows 2 sts before marker: K 2 tog. ---------------------------------------------------------- JUMPER: Worked in the round, top down. YOKE: Cast on 69-76-80-84-87-91 sts on circular needle size 4 mm with Alaska. Work 4 ridges in GARTER ST - see explanation above. Insert a marker at beg of round = mid back. Now switch to circular needle size 5 mm. Work in stocking st AT THE SAME TIME inc 41-45-52-59-67-85 sts evenly – READ INCREASE TIP 1! There are now 110-121-132-143-154-176 sts on round. Then work an elevation back and forth in the neck from mid back as follows: K 9-10-11-12-13-14, turn piece and P 18-20-22-24-26-28. Turn piece, K 27-29-31-33-35-37, turn piece and P 36-38-40-42-44-46. Turn piece and K 45-47-49-51-53-55, turn piece and P 54-56-58-60-62-64. Turn piece and K over all sts until marker. On next round, work and inc according to pattern A.1 – choose diagram for correct size. REMEMBER THE KNITTING TENSION! When entire diagram A.1 has been worked 1 time vertically, there are 220-242-264-286-308-352 sts on needle. On next round work 1st row in A.2, AT THE SAME TIME inc 8-8-8-10-16-0 sts evenly = 228-250-272-296-324-352 sts. Work next round as follows: 2nd row in A.2 over the first 31-35-39-43-48-53 sts, slip the next 51-55-57-61-65-69 sts on a stitch holder for sleeve, cast on 8 new sts (= under sleeve), continue with A.2 over the next 64-70-80-88-98-108 sts (= front piece), slip the next 51-55-57-61-65-69 sts on a stitch holder for sleeve, cast on 8 new sts under sleeve, A.2 over the next 31-35-39-43-48-53 sts. There are now 142-156-174-190-210-230 sts for body. BODY: Continue in stocking st. When piece measures 4 cm from new sts under sleeve, insert 4 markers in piece as follows: 17-20-23-25-28-31 sts in stocking st, insert a marker, 36-38-40-44-48-52 sts in stocking st, insert a marker, 36-40-48-52-58-64 sts in stocking st, insert a marker, 36-38-40-44-48-52 sts in stocking st, insert a marker, 17-20-23-25-28-31 sts in stocking st. Now beg dec - READ DECREASE TIP. Dec 1 st before 1st and 3rd marker and 1 st after 2nd and 4th marker (NOTE! 1st marker is 1st marker on row from RS!). Repeat dec every 1-1-1½-2-3½-3½ cm 4-4-4-3-2-2 times in total = 126-140-158-178-202-222 sts. Now insert a marker in the middle of the 36-38-40-42-48-52 sts in each side (i.e. between 1st and 2nd marker and between 3rd and 4th marker) = 5th and 6th marker. When piece measures 14-15-16-17-18-19 cm from the new sts under sleeve, beg inc – remember INCREASE TIP 1! Inc before 1st and 3rd marker and after 2nd and 4th marker. Repeat inc every 3 cm 4 more times, AT THE SAME TIME on 2nd, 3rd and 4th inc, inc 1 st on each side of 5th and 6th marker (= sides) – READ INCREASE TIP 2! When all inc are done there are 158-172-190-210-234-254 sts on needle. When piece measures 31-32-33-34-35-36 cm from new sts under sleeve, inc 4-2-2-0-0-4 sts evenly = 162-174-192-210-234-258 sts. Then work A.3 over all sts. When A.3 has been worked vertically, inc 42-45-51-66-78-90 sts evenly = 204-219-243-276-312-348 sts. Work 1 round in stocking st. Then switch to circular needle size 4 mm and work rib as follows: * K 1, P 2 *, repeat from *-*. Continue like this until rib measures 8 cm. Cast off with K over K and P over P. SLEEVE: Worked in the round on double pointed needles. Slip the 51-55-57-61-65-69 sts from stitch holder back on double pointed needles size 5 mm. Work 2nd row in A.2, cast on 8 new sts under sleeve at the end of row = 59-63-65-69-73-77 sts. Insert a marker in the middle of the 8 new sts (i.e. 4 sts on each side of marker). Then work in the round. Continue with pattern according to diagram A.2 – NOTE: Adjust pattern according to the middle, arrow in diagram marks middle st on top of sleeve, AT THE SAME TIME when piece measures 4 cm from marker, beg dec – READ DECREASE TIP! Repeat dec every 2-1½-1½-1½-1½-1 cm 8-10-11-10-12-14 more times = 41-41-41-47-47-47 sts remain. When piece measures 34 cm in all sizes, inc 1 st = 42-42-42-48-48-48 sts. Then work pattern according to diagram A.3. When A.3 has been worked 1 time vertically, inc 3 sts evenly = 45-45-45-51-51-51 sts. Now switch to double pointed needles size 4 mm and work rib (K 1/P 2). Cast off with K over K and P over P when rib measures 8 cm. ASSEMBLY: Sew the holes under the sleeves. |
||||||||||
Diagram explanations |
||||||||||
|
||||||||||
 |
||||||||||
 |
||||||||||
 |
||||||||||
Have you finished this pattern?Tag your pictures with #dropspattern #elinordashwoodsweater or submit them to the #dropsfan gallery. Do you need help with this pattern?You'll find 25 tutorial videos, a Comments/Questions area and more by visiting the pattern on garnstudio.com. © 1982-2026 DROPS Design A/S. We reserve all rights. This document, including all its sub-sections, has copyrights. Read more about what you can do with our patterns at the bottom of each pattern on our site. |
||||||||||


With over 40 years in knitting and crochet design, DROPS Design offers one of the most extensive collections of free patterns on the internet - translated to 17 languages. As of today we count 324 catalogues and 12290 patterns translated into English (UK/cm).
We work hard to bring you the best knitting and crochet have to offer, inspiration and advice as well as great quality yarns at incredible prices! Would you like to use our patterns for other than personal use? You can read what you are allowed to do in the Copyright text at the bottom of all our patterns. Happy crafting!
Post a comment to pattern DROPS 157-5
We would love to hear what you have to say about this pattern!
If you want to leave a question, please make sure you select the correct category in the form below, to speed up the answering process. Required fields are marked *.