
Popular categories
Looking for a yarn?


Comments / Questions (52)
![]() Lisbeth Beyer wrote:
Lisbeth Beyer wrote:
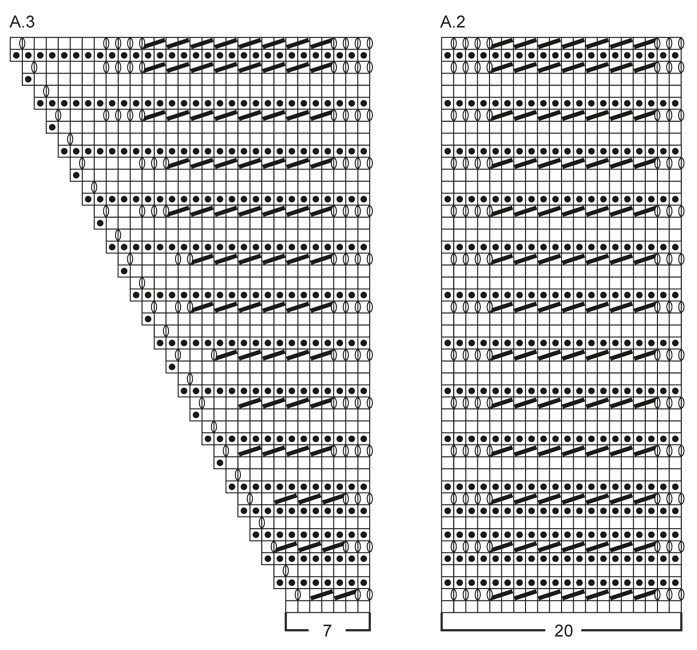
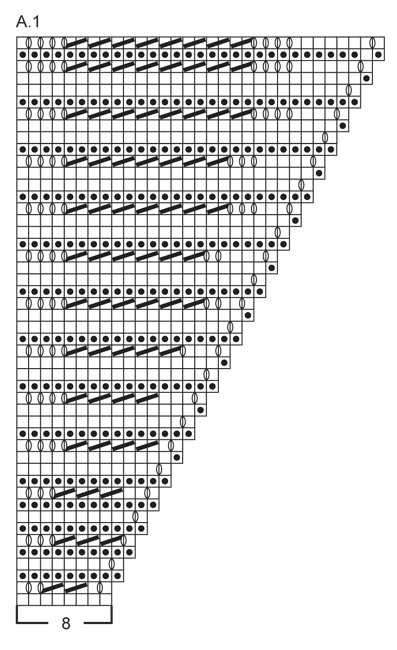
Skal starte med diagrammet finder der et sted man kan checke antallet af masker pr. runde i diagrammet, synes ikke det passe ? Hvis midte sættet (diagram A.) er 40 masker hvordan ender jeg så på 140.
11.02.2019 - 20:14DROPS Design answered:
Hej Lisbeth, du har 155 m på en side, strikker A.1 (8m), så A.2 (20m) 7 gange og sidst A.3 (7m) =155 m. Således strikker du på hver side. Det er kun A.1 og A.3 du tager ud, det vil sige at du tager 2 masker ud i hvert hjørne (ifølge diagrammerne) på hver 2.pind. God fornøjelse!
12.02.2019 - 09:52
![]() Susanne Madsen wrote:
Susanne Madsen wrote:
Hvor meget garn bruges der? Har en veninde der bestilte 8 ngl, strikkefasthed passer. Hun har bestilt mere, men kunne ikke få samme indfarvning. Det er ikke ok. Resultatet bliver ikke tilfredsstillende, samtidig med at tæppet bliver dyrere. ØV, det er ikke godt nok
09.11.2018 - 00:46DROPS Design answered:
Hej Susanne, Vi har brugt 7 nøgler DROPS Baby Merino, vi har ikke fået information om at det er for lidt.... men prøv også at måle strikkefastheden i højden. Strikker man strammere end hvad vi gør ifølge opskriften, så får man flere pinde på 10 cm og da går der også mere garn. God fornøjelse!
09.11.2018 - 10:52
![]() Hege Tandberg wrote:
Hege Tandberg wrote:
Da skjønner jeg at drops oppskrifter ikke er noe for meg. Så løst klarer jeg ikke å strikke.
21.08.2018 - 18:57
![]() Hege Tandberg wrote:
Hege Tandberg wrote:
Strikket med pinne 4. Da jeg var halvveis hvor det skulle være 76 riller og 52 cm hadde jeg bare 42 cm. Begynte på nytt med pinne 4 1/2, halvveis er det nå 46 cm. Dvs. at jeg må opp i pinne 5 1/2 for at oppskriften skal passe til garnet som er anbefalt. Forferdelig kjedelig. Hvor løst skal jeg måtte strikke? Mener jeg strikker normalt. Denne oppskriften kan umulig være riktig.
19.08.2018 - 19:23DROPS Design answered:
Hei Hege, Vi alle strikker forskjellig. Prøv å strikke 10 x 10 cm for å se hvilken pinne størrelse du trenger. God fornøyelse!
21.08.2018 - 07:46
![]() Hege Tandberg wrote:
Hege Tandberg wrote:
Strikket med pinne 4. Da jeg var halvveis hvor det skulle være 76 riller og 52 cm hadde jeg bare 42 cm. Begynte på nytt med pinne 4 1/2, halvveis er det nå 46 cm. Dvs. at jeg må opp i pinne 5 1/2 for at oppskriften skal passe til garnet som er anbefalt. Forferdelig kjedelig. Hvor løst skal jeg strikke? Mener jeg strikker normalt. Denne oppskriften kan umulig være riktig.
02.08.2018 - 15:34
![]() Mandy wrote:
Mandy wrote:
Hallo, ich würde die Decke gerne 2-farbig arbeiten. Wieviel Wolle muss ich für die Decke und wieviel für den Wellenrand rechnen? Vielen Dank im Voraus.
03.03.2018 - 11:30DROPS Design answered:
Liebe Mandy, leider haben wir dafür keine Erfahrung, da diese Decke nur mit einer Farbe gestrickt wurde. Ihr DROPS Laden kann Ihnen aber vielleicht weiterhelfen. Viel Spaß beim stricken!
05.03.2018 - 10:13
![]() Wertemberg McGuinness Marta wrote:
Wertemberg McGuinness Marta wrote:
Bonjour, je commence la bordure avec aiguilles circulaires et dans un commentaire vous dites de tricoter chaque côté séparément. On fait donc une couture ensuite aux quatre coins? Merci beaucoup!
14.08.2017 - 07:21DROPS Design answered:
Bonjour Marta. Il n'y a aucune couture. Etant donné le nombre de mailles vous travaillez sur 4 aiguilles circulaires en rond. BON TRICOT!
14.08.2017 - 10:09
![]() Lene wrote:
Lene wrote:
Mønstret læses fra højre mod venstre i hver af de tre diagrammer, tak Lone
11.07.2017 - 19:11
![]() Lene Bagge wrote:
Lene Bagge wrote:
I hvilken side starter mønsteret i hhv. A1, A2 og A3?
09.07.2017 - 16:02DROPS Design answered:
Du starter altid diagrammet i nederste højre hjørne, strikker første pind i A.1, går over til A.2 også nederst i højre hjørne og sidst A.3, således fortsætter du hele vejen rundt langs med hver side af tæppet. God fornøjelse!
12.07.2017 - 12:27
![]() Kathrine wrote:
Kathrine wrote:
Hei, Jeg strikker dette teppet og på bølgemønsteret har alt stemt hele veien. Når jeg kommer til omgang nummer 14 i diagrammene har jeg to masker for mye når jeg kommer til slutten av A3. Jeg har telt over flere ganger, men klarer ikke å se at jeg har strikket feil. Kan det være noe som ikke stemmer i diagrammet?
19.06.2017 - 09:39DROPS Design answered:
Hei Kathrine. Hvor mange masker har du på hele 14. omgang? 676 masker? Når vi ser over 1. - 14. omgang skal det stemme med hvor mange 2 rett sammen man strikker og hvor mange kast man gjør.
23.06.2017 - 13:46
|
|||||||||||||
Baby Bliss#babyblissblanket |
|||||||||||||
 |
 |
||||||||||||
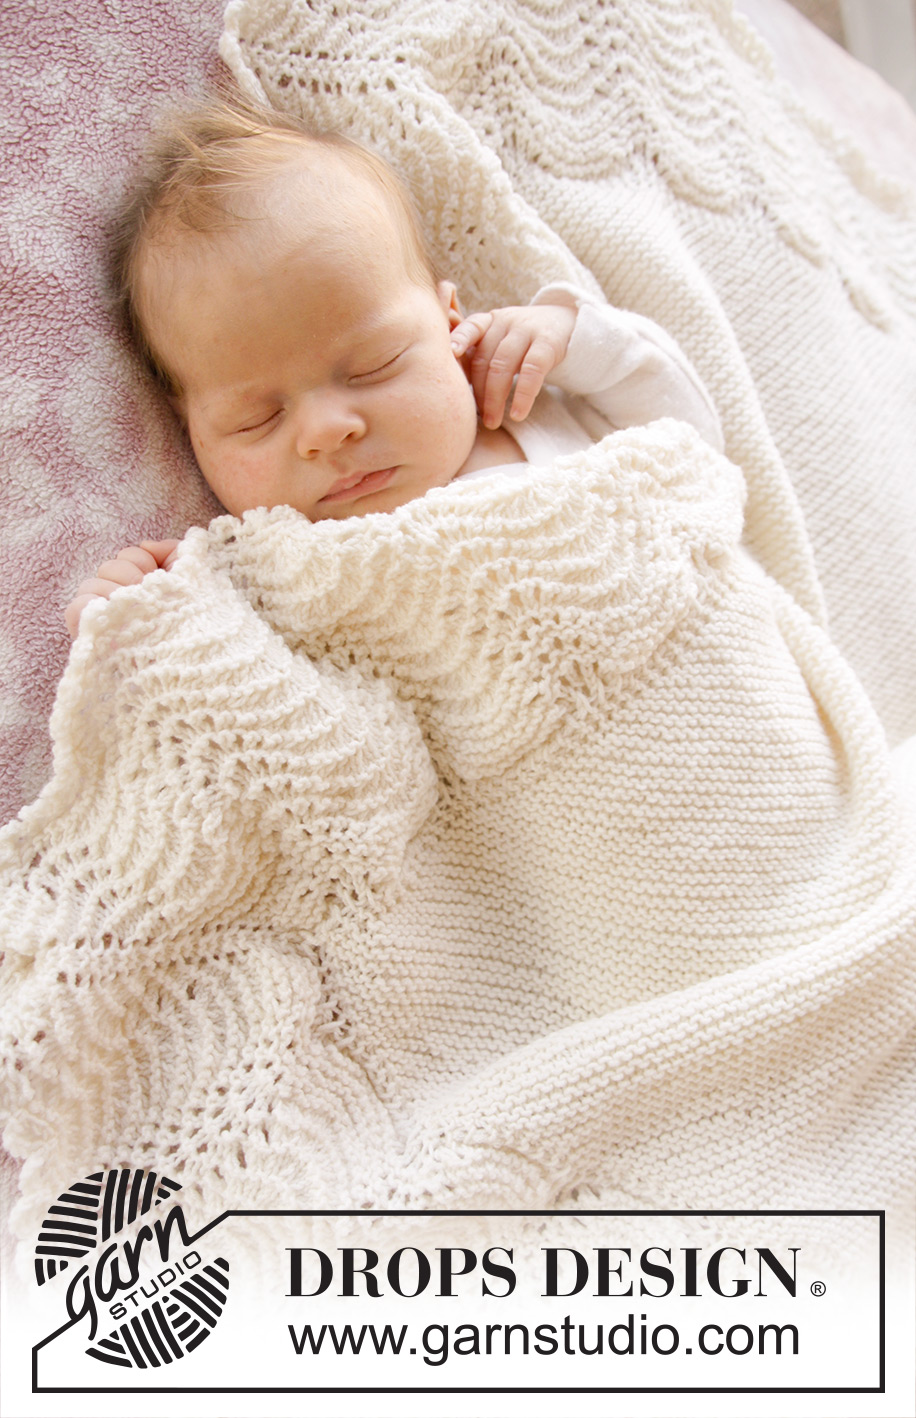
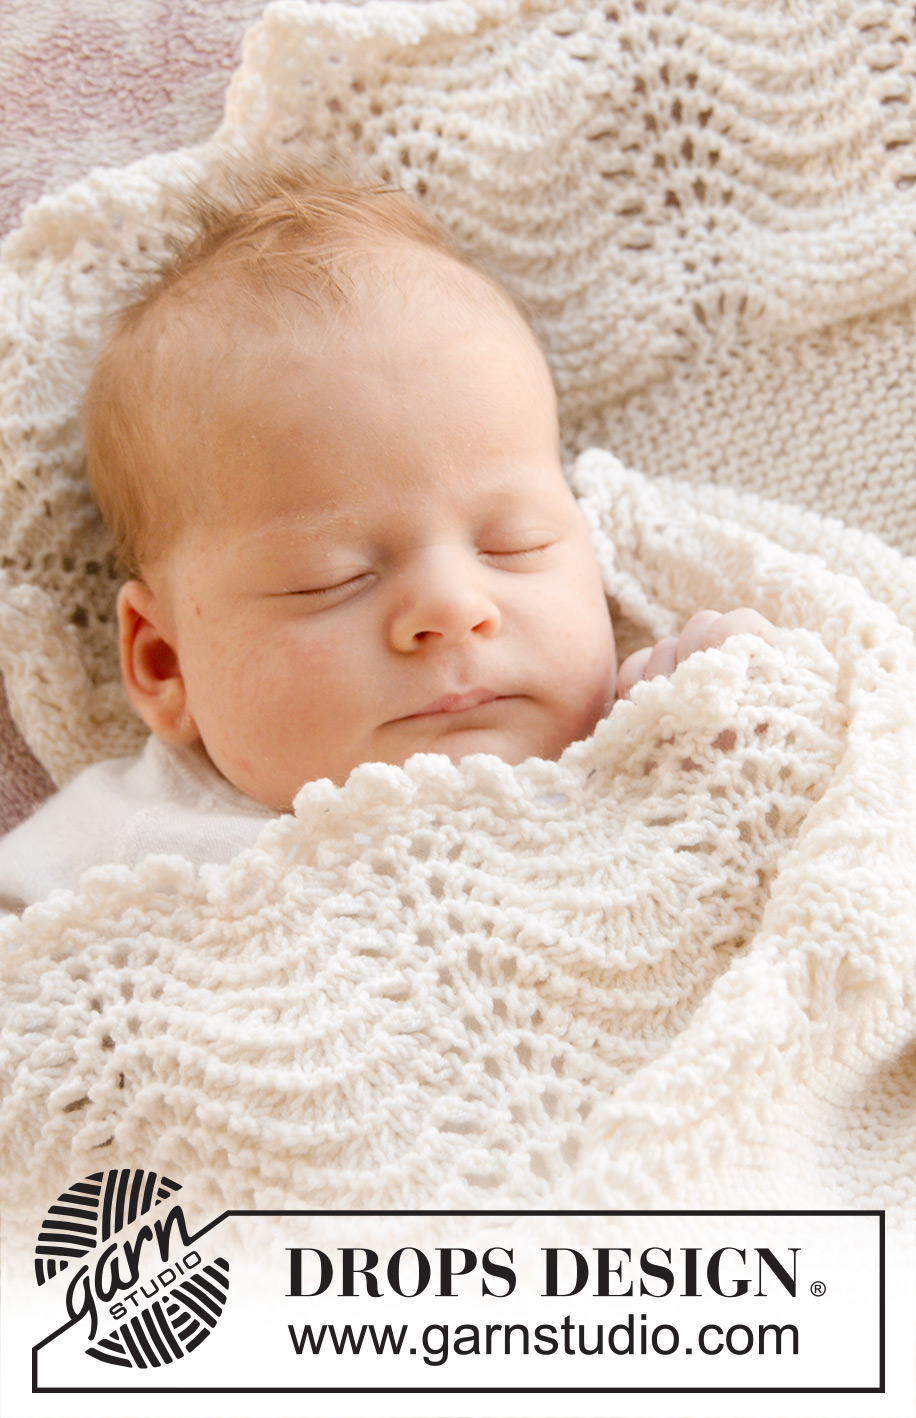
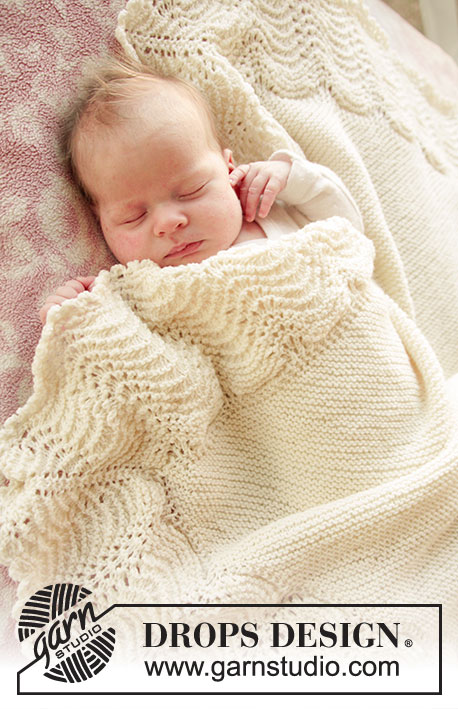
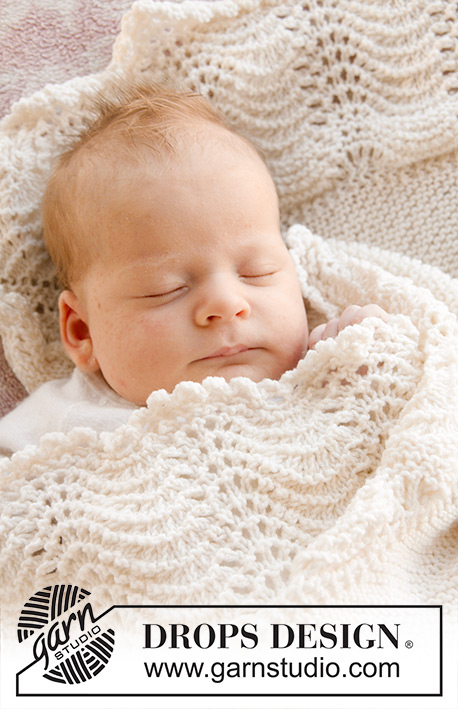
Knitted baby blanket in garter st with wave pattern edge in DROPS BabyMerino
DROPS Baby 25-2 |
|||||||||||||
|
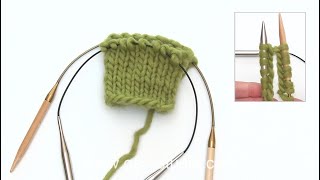
GARTER ST (back and forth on circular needle): K all rows. 1 ridge = 2 rows K. PATTERN: See diagrams A.1 to A.3. ---------------------------------------------------------- BLANKET: Worked back and forth on circular needle. Work diagonally from corner to corner, then work edge in Wave pattern in the round on circular needle - NOTE: Because of no of sts use 1 circular needle on each of the 4 sides on blanket. Cast on 3 sts on circular needle size 4 mm with Baby Merino. K 1 row. Then work in GARTER ST - see explanation above, AT THE SAME TIME inc as follows at beg of every row: K 1, K 2 in next st and K the rest of row, turn piece. Continue back and forth like this. REMEMBER THE KNITTING TENSION! When 76 ridges have been worked (= 155 sts on needle), blanket measures 52 cm along each of the 2 sides. Then dec at beg of each row as follows: K 1, K 2 tog, K the rest of row, turn piece. Continue like this until 3 sts remain on needle, slip 1 st as if to K, K 2 tog, psso. Cut the yarn, pull it through st and fasten. Blanket measures 52 cm along each of the 4 sides. EDGE IN WAVE PATTERN: Beg in the mid of a corner on blanket and pick up from RS on circular needle size 4 mm with off white as follows: * Pick up 1 st in the corner, pick up 1 st at the edge in every ridge and make 1 YO between every st until next corner, pick up 1 st in the corner * = 155 sts along one side of blanket. Beg with next circular needle and repeat from *-* along next side on blanket – NB: When picking up like this there will be 2 sts in each corner. Repeat the same way along the next 2 sides on blanket = 620 sts distributed on 4 circular needles. K 1 round (= 1st round in diagram). Work next round as follows: * Work A.1 (= 8 sts), repeat A.2 over the next 140 sts and work A.3 (= 7 sts) *, repeat from *-* along all 4 sides. Continue pattern like this. When last round in A.1, A.2 and A.3 remains, edge measures approx. 13 cm. Work last round in A.1, A.2 and A.3 AT THE SAME TIME LOOSELY cast off - outer edge will bend according to pattern. CROCHET EDGE: Work a finishing edge around the entire blanket on hook size 4 mm with off white as follows: Work 1 dc in st before the 2 sts in a corner, 4 ch, 1 tr in first ch worked, skip the 2 sts in the corner, 1 dc in next st, * 4 ch, 1 tr in first ch worked, skip approx. 2 sts, 1 dc in next st *, repeat from *-* around the entire blanket but make sure that a "loop" is in every corner, finish round with 1 sl st in first dc from beg of round. Fasten off. |
|||||||||||||
Diagram explanations |
|||||||||||||
|
|||||||||||||
 |
|||||||||||||
 |
|||||||||||||
Have you finished this pattern?Tag your pictures with #dropspattern #babyblissblanket or submit them to the #dropsfan gallery. Do you need help with this pattern?You'll find 17 tutorial videos, a Comments/Questions area and more by visiting the pattern on garnstudio.com. © 1982-2026 DROPS Design A/S. We reserve all rights. This document, including all its sub-sections, has copyrights. Read more about what you can do with our patterns at the bottom of each pattern on our site. |
|||||||||||||


With over 40 years in knitting and crochet design, DROPS Design offers one of the most extensive collections of free patterns on the internet - translated to 17 languages. As of today we count 325 catalogues and 12298 patterns translated into English (UK/cm).
We work hard to bring you the best knitting and crochet have to offer, inspiration and advice as well as great quality yarns at incredible prices! Would you like to use our patterns for other than personal use? You can read what you are allowed to do in the Copyright text at the bottom of all our patterns. Happy crafting!
Post a comment to pattern DROPS Baby 25-2
We would love to hear what you have to say about this pattern!
If you want to leave a question, please make sure you select the correct category in the form below, to speed up the answering process. Required fields are marked *.